UPDATE: Reviews section refreshed, redesigned, searchable: Go take a look
I've just taken on an allotment plot recently. Partly so that I could grow some rad veg to eat, but mainly, if I'm honest, so I could BUILD A SHED! 😀
I thought I'd share my progress with you shed-appreciating folks here.
I work as an instructor/technician in a College, teaching cabinetmaking and so for one, have a great workshop to use but also, a two-week window over the Easter break with no students in (except Mon, Tues, Weds last week), with holiday booked to hastily build my shed. I had to be quick!
My design is inspired by boats, by camping pods, by curvy stuff, by not wanting a flat-roofed shed, and so is based on images I have been looking at online by a bloke called Stimpson, who came up with a quick and elegant way of building shelters for boat building...
[img]  [/img]
The curved ribs are formed from two sections, blocks are screwed in from both sides, thereby locking the components into a curve. Dead simple really but very effective.
So, Monday morning, the first day of half-term, I laid out some moisture-resistant mdf on the floor(which would later become my floor) and started the build.
I had done a plan of sorts on Google Sketchup. The shed had to be no more than 10x8'.
[img] 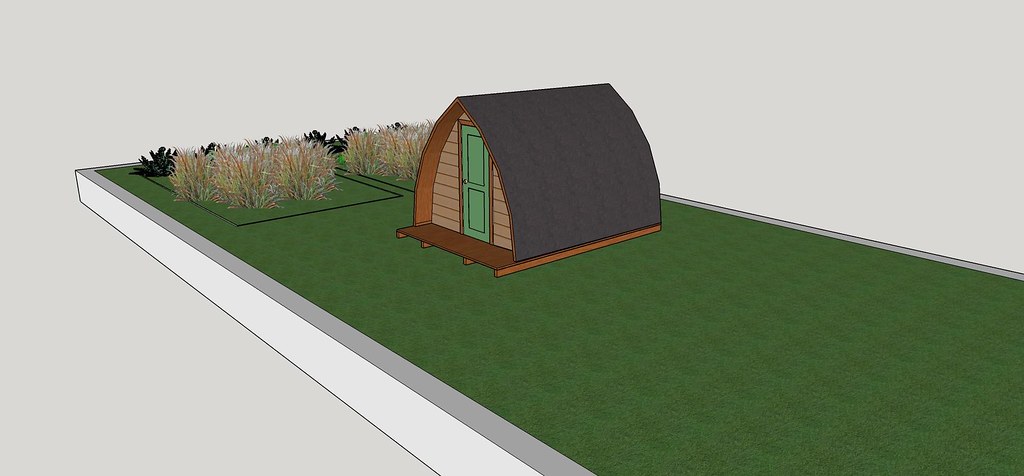 [/img]
Initial layout onto 2 8x4' panels.
[img]  [/img]
Curve is laid out (2440mm radius, starting from 300mm vertical from bottom to increase headspace)
[img] 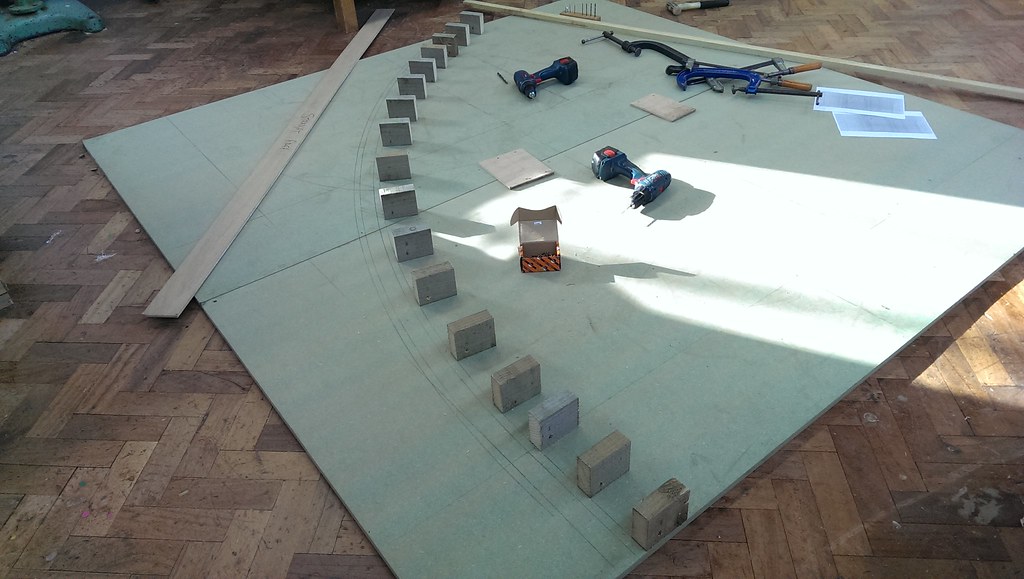 [/img]
Bending rib 1 around the blocks, and making any adjustments.
[img] 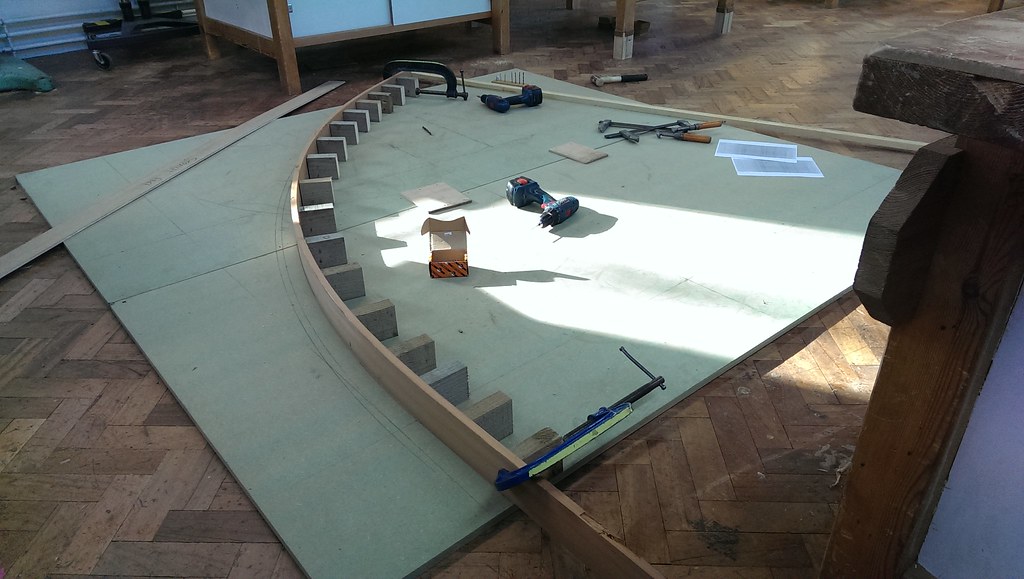 [/img]
A large percentage of the materials I used were effectively free thankfully, else I wouldn't have been able to do this. We had a lot of stuff left lying outside when some contractors did a massive job, finished and cleared off, leaving it all open to the elements. I rescued it 🙂
[img] 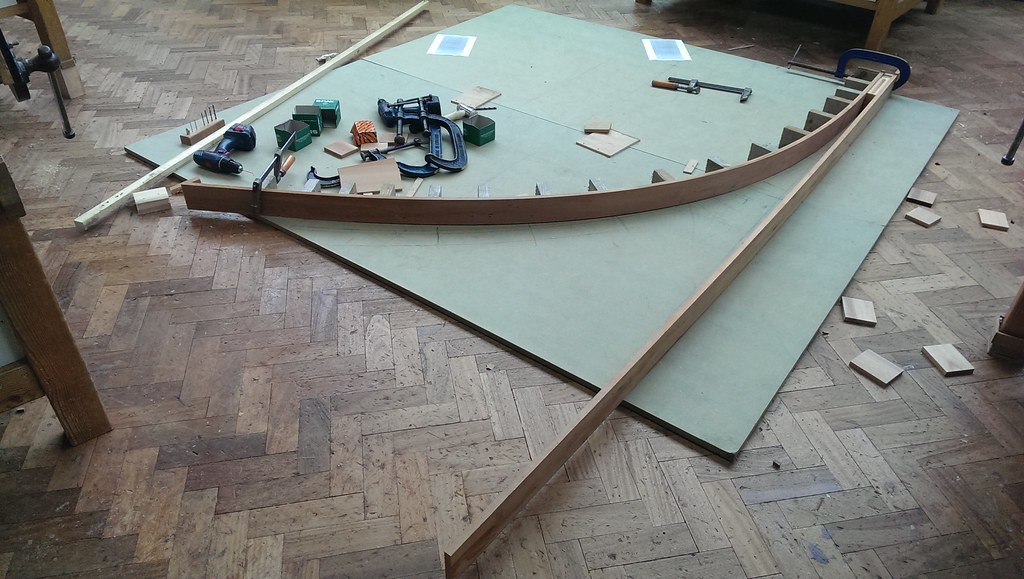 [/img]
The double skin rib with blocks between at regular intervals, and screwed in from both sides.
[img]  [/img]
What I was finding when I did the ribs was that just like when you steam-bend timber, or laminate timber, you get a degree of 'springback'. The degree to which the timber springs back is pretty hard to plan for and so because of that, I found that the ribs were often turning out a bit differently to one another...
Meh...
Cutting the tops to angled length where they would meet the ridgebeam.
[img] 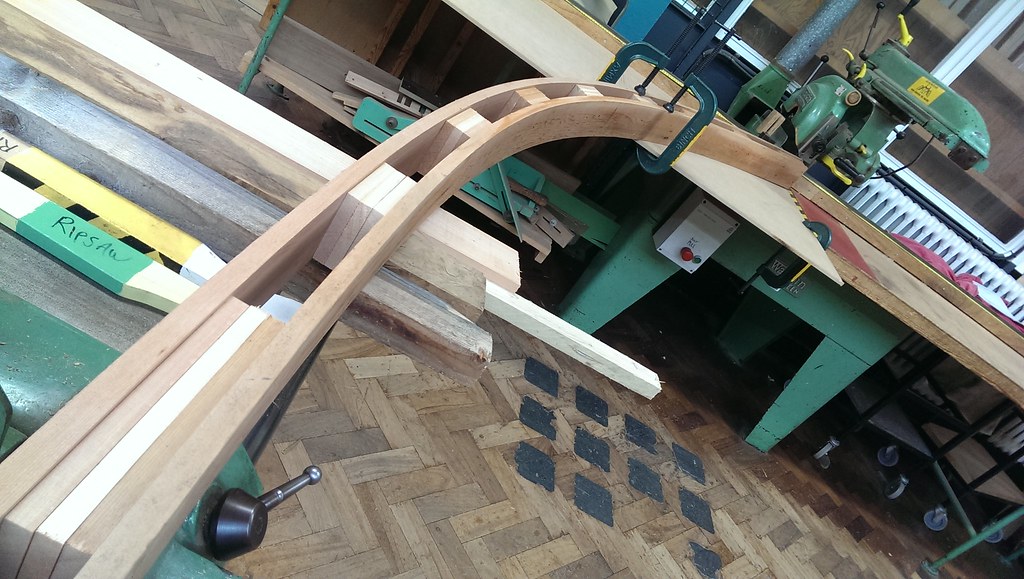 [/img]
Larch bent components
[img]  [/img]
Next up was the base. I was originally intending to use Euro pallets for this but figured I t would be way quicker in the time I had and easier just to suck up the cost and get some treated 4x2" treated timber. Job done.
[img] 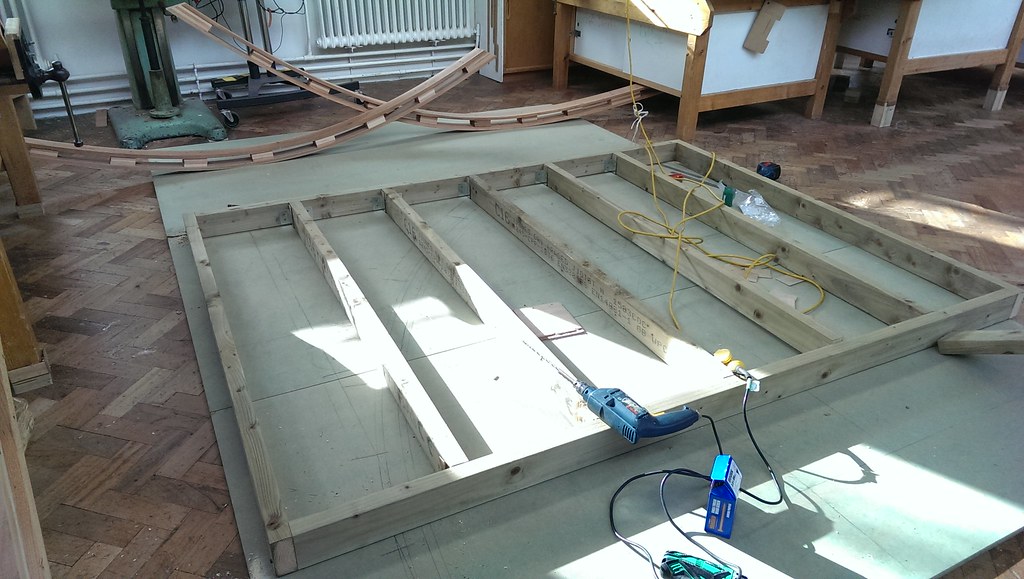 [/img]
The base. 12x8' although the actual shed will be just 10x8' (as per allotment regs)
[img] 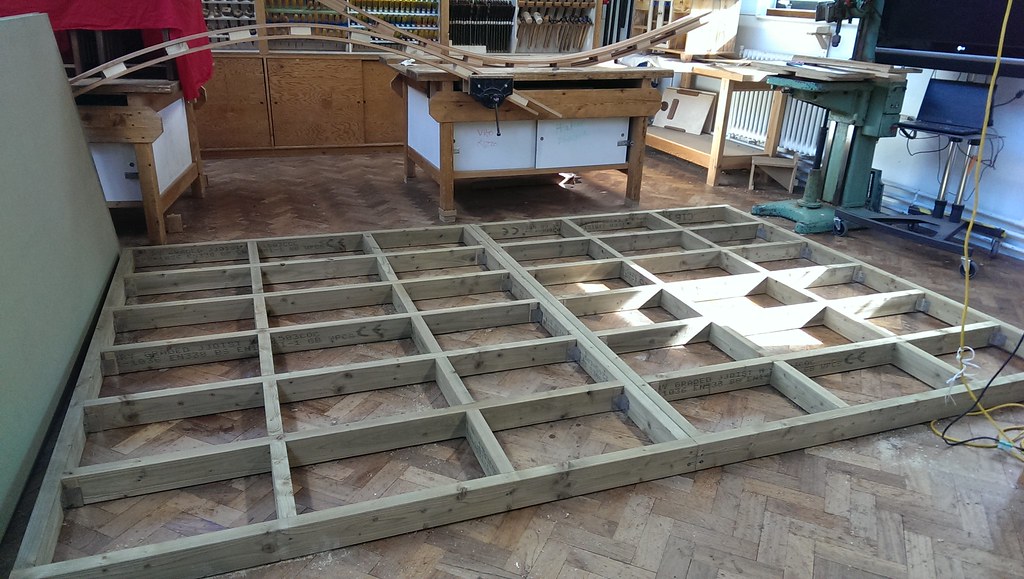 [/img]
Layout on floor and some of the ribs (8 in total)
[img]  [/img]
12x8' base built and up on blocks to allow the curved ribs to fit which extend down past the base level.
[img] 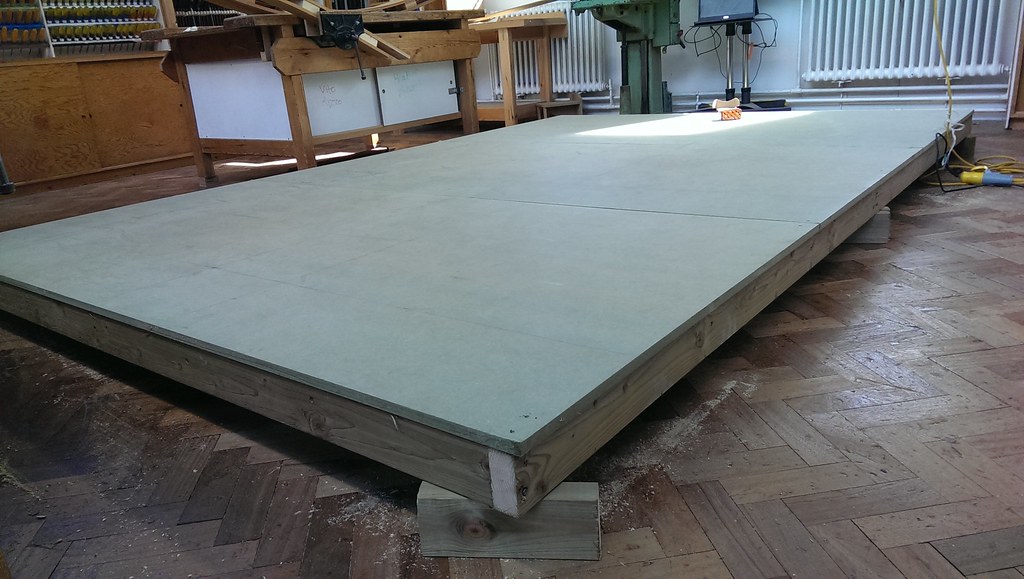 [/img]
Now I could fit the side rib-bearers and fit the ribs each side, spacing them out evenly.
[img] 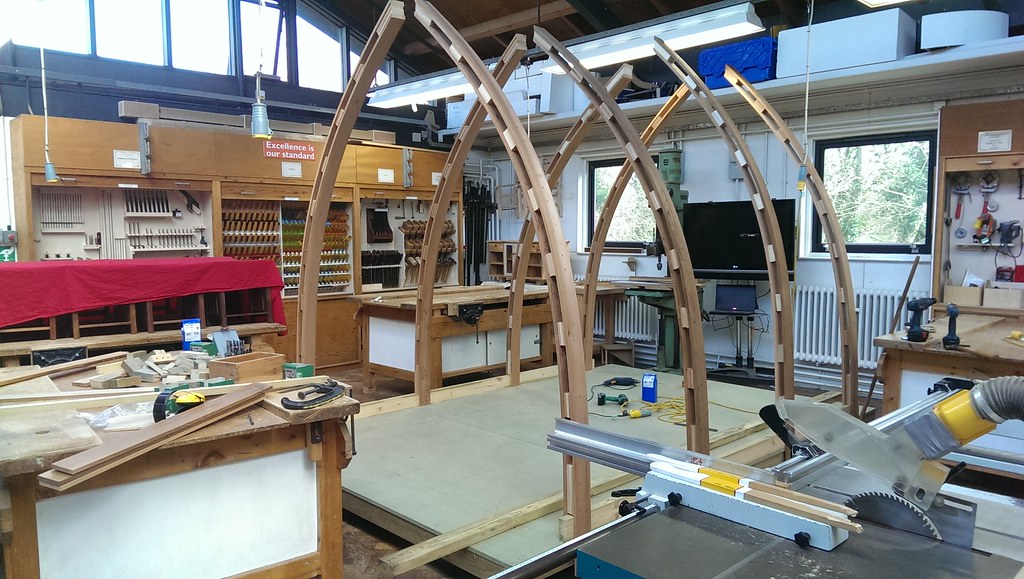 [/img]
Next I fitted the ridgebeam. I was on my own building this and so to fit this massive length I had to come up with a way of supporting the ends while I screwed in another end. I ended up making trusses or brackets or ridge plates or whatever they're called that lock the ribs together from each side but leave a gap big enough for the beam to sit into. Thsi meant I could work at one end while the other end was just supported....sort of. You can just see one on the far right rib section.
I also tried a bit of cross-bracing, which they tend to use on the polythene-skinned versions of these designs, but which of course I wouldn't need what with screwing panels to the ribs.
[img] 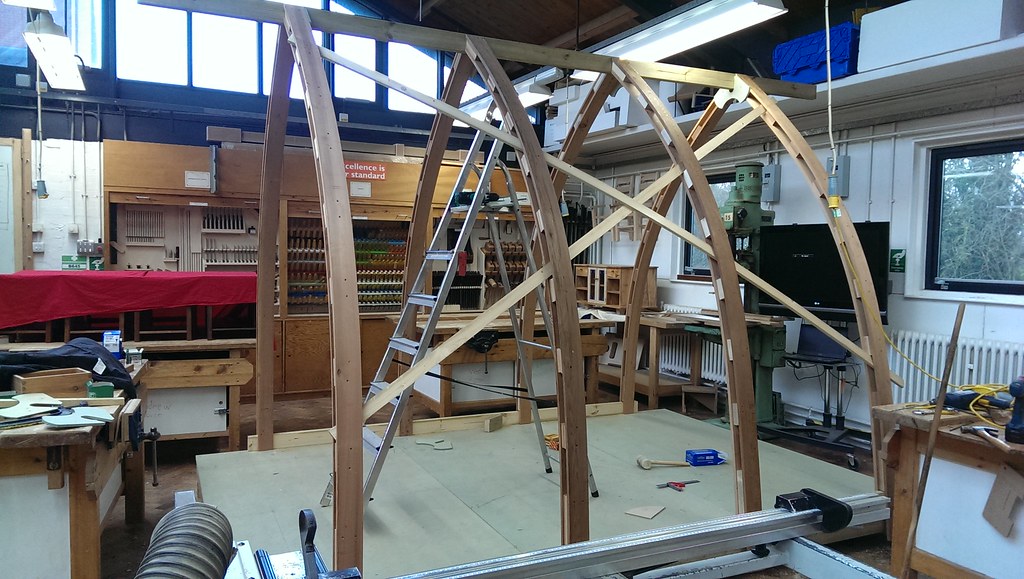 [/img]
With the ribs screwed to the ridgebeam, I then started my attempts at skinning the structure using (because it was free) 9mm moisture resistant mdf.
[img] 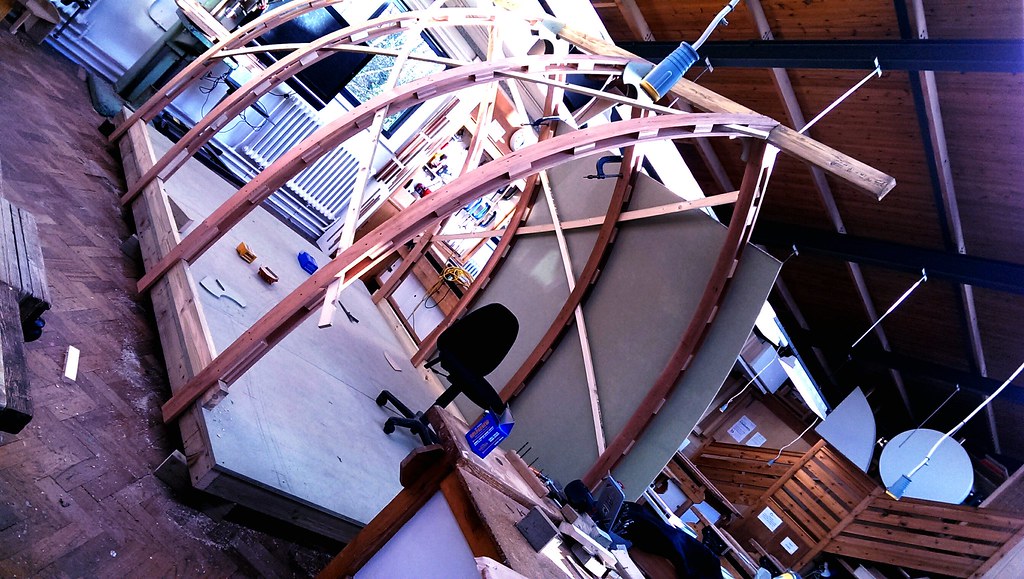 [/img]
The skinning worked fairly well so I moved onto fitting a door which I'd found in a skip. Made a frame out of some old Beech window linings I found too.
[img]  [/img]
With a doorframe in place, I could cut and fit the ends...
[img] 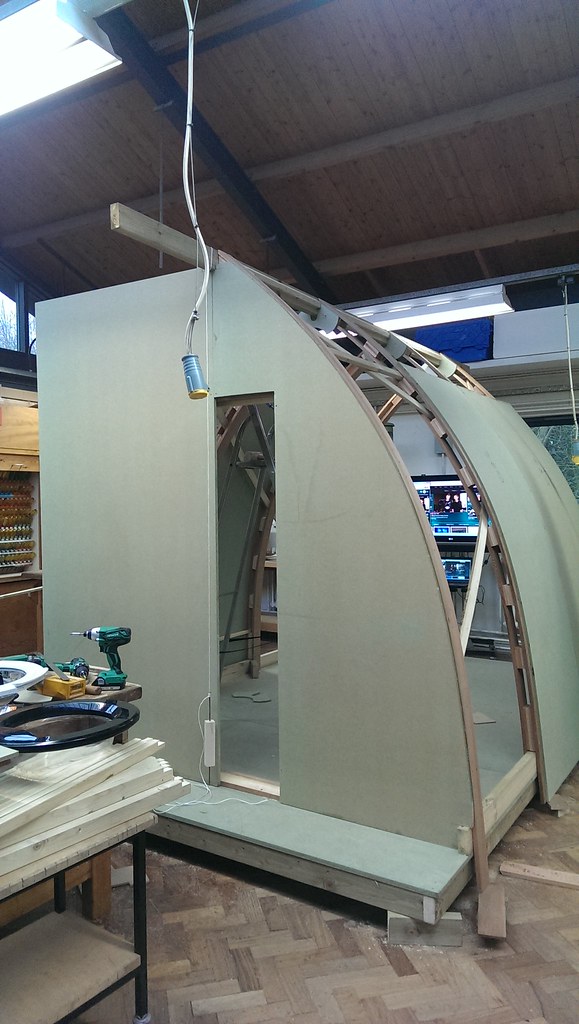 [/img]
A decent shed has to have a bit of light coming in and so I had the idea of using washing machine doors. One trip the the tip later...
[img] 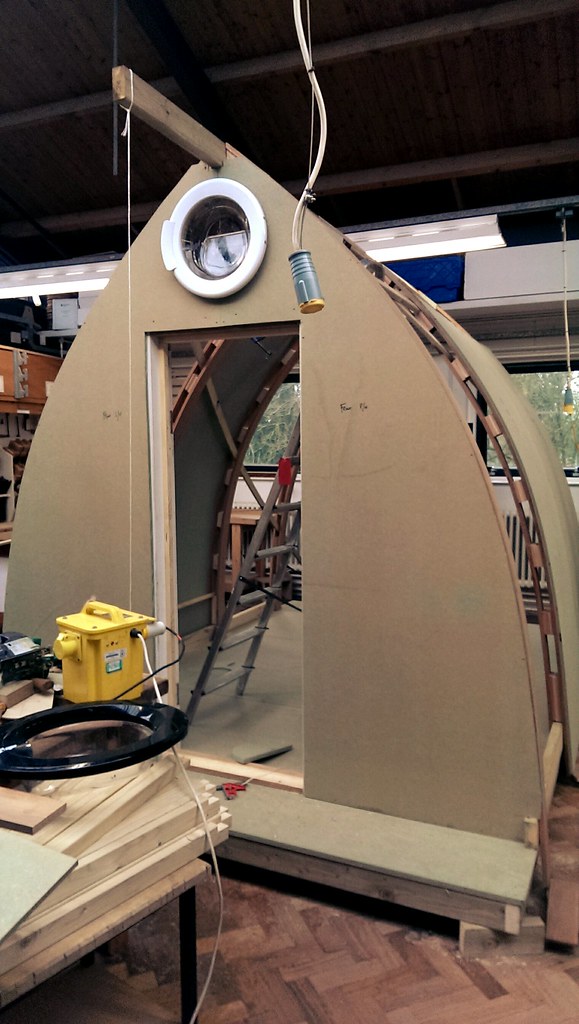 [/img]
[img] 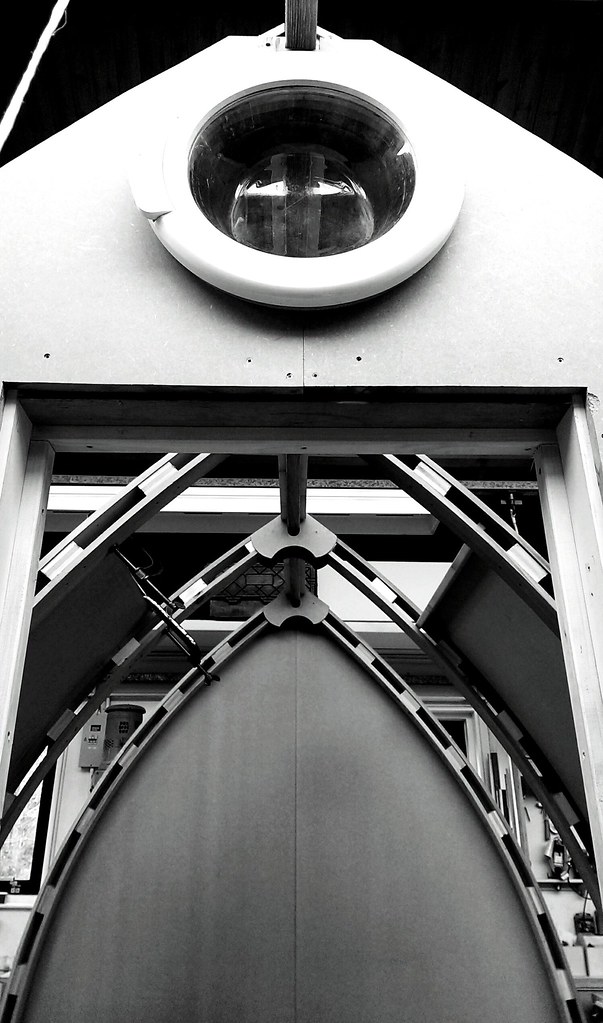 [/img]
The front end could only house one window, but for the back I decided to go a bit Pugin and made a Gothic Trefoil out of my rescued washings machine doors... 😀
[img] 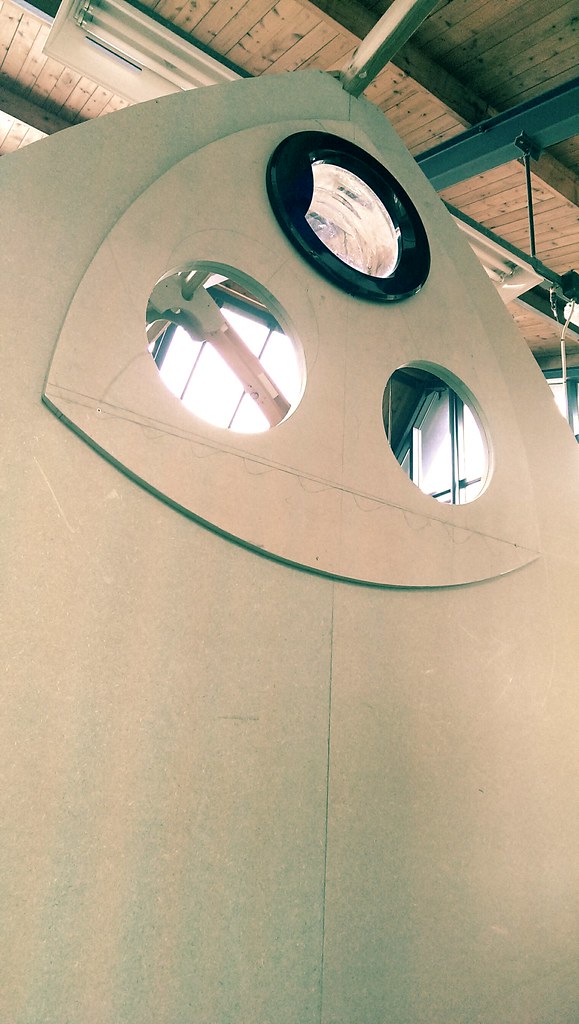 [/img]
While I was there, and getting a bit carried away. I thought I'd make a nice tree for the back inside wall. My idea being that I will drill lots of holes in the top of the trunk and folks can sit there of an evening with a branch and a pen-knife and whittle a nice branch or two that we can then fit to the tree, building up a nice effect over time. The bulk of it is made from local Sycamore, which was rough shaped by bandsaw and then sculpted a bit with an abrasive disc on my angle grinder.
[img]  [/img]
[img] 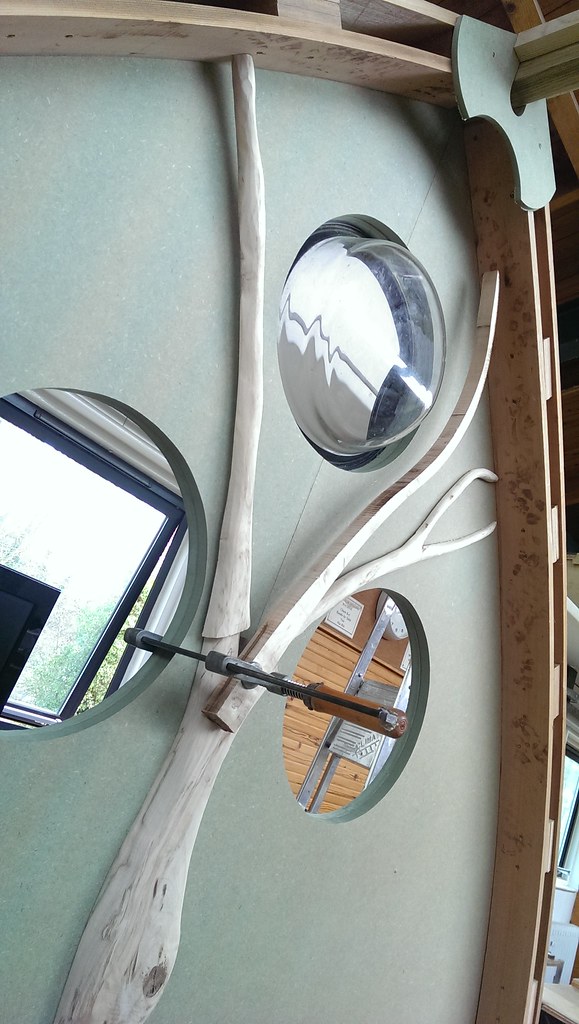 [/img]
Because I wasn't quite busy enough already, I made a little timelapse video of me dismantling the shed (also reversed to imply building it, but I forgot...)
Once I'd mostly made the shed. I had to deconstruct it, remove the base and take the base to site in order to lay it out and sink the trunks I'd got for the pilings into the ground. The college was closed from Good Friday, right until Thursday just gone and so I just had to leave everything but the base there, while I went away and laid the foundations.
First step was having to cut the trunks down, five of them to 3 foot. I had to use a bowsaw as I don't have a chainsaw... 😕
I then sunk some massive deep holes in each corner and one in the middle for each log.
My arms were only just long enough to clear out the bottoms of the holes where there were lots of stones.
[img]  [/img]
[img]  [/img]
I then laid the base, sticking in additional supports onto paving slabs here and there abouts.
I used a bit of postcrete on the main pilings.
[img]  [/img]
With the base in and some good weather, it was all systems go on the build. You can see here some supports I added to screw the sides/roof to. They are just halved so that they pull against the rib when screwed through from the outside.
[img]  [/img]
[img]  [/img]
The shed in its new home!
[img]  [/img]
[img]  [/img]
It's fair to say that the building of this has caused a bit of a stir down the allotments. Young upstarts coming in and building these shed-palaces!...
I have had a stream of people approaching me and paying the shed compliments though so it's been a great way to meet my fellow allotmentists..
When I came to put the roof on, I fortunately had some help from a mate.
We first completely covered each end of the shed with a load of massive screen printed promotional banners that the college had chucked out. Great material and waterproofs it well.
We then followed that with a roofing felt underlay...
[img]  [/img]
And that is where I am at today...
[img]  [/img]
So, I'm off down there today to fit a lock to the door as it's an old internal door and doesn't have a lock, and then I'm going to have an almighty sit down before I'm properly back to my normal work tomorrow for a rest!
I'll be adding some felt in the future and also doing some stuff on the inside so will update this thread.
Hope some of you like the build.
🙂
That is really rather gorgeous, more posts and photos please.
Shed of the year contender - very nice.
Inspirational. That is excellent 😀
Top work.. has given me ideas for my next shed.
Would look good finished with cedar shingles
That is really rather good.
Nice 😀
love the washing m/c window lights, in a shed with power you could also hang them from the ceiling with a lamp above them .
Love that. Some people on here are really very talented indeed.
Makes me sick. 😆
Love that. Some people on here are really very talented indeed.
Makes me sick.
+1
Like the shape too. Very viking 🙂
Really cool. Well done!
Smashing job ! Good work sir.
bravo.
Nice shed.
Much nicer than WCA's effort.
Nice
cloudnine - Member
Top work.. has given me ideas for my next shed.
Would look good finished with cedar shingles
I really wanted to use cedar shingles but basically can't afford it just now. Could always add them at a later date mind.
Thanks for the nice comments folks. I do like a good build-thread...
🙂
Freekin. Awesome.
Sometimes you click on a thread and you're left in awe and fring a little bit inadequate, this is one of this times.
That is flipping brilliant.
Simply fantastic!
I saw it was a kayak23 build thread and new instantly it would be special 🙂
The rib curving / porthole ideas are genius. Any idea how durable the MR MDF will be (not that it really matters when foc)?
Oh yes.
Puts my 'old wooden bed becomes lean to roof along side existing shed' effort of cowshed joinery today to shame...
Brilliant!
Thanks for sharing.
mcmoonter - Member
Simply fantastic!
Praise indeed coming from a man like yourself. Thanks.
Any idea how durable the MR MDF will be (not that it really matters when foc)?
No idea actually. I think it'll last years if not directly wet.
It was outside for several months in the winter although covered with a tarp.
It seems fine except for the odd edge which got wet.
I'm Mostly worried about moisture coming up through the floor, but I built it on the stilts so it would have some air flow under it.
I've been really excited about this actually. I've built lots of things furniture-wise now but this is the first thing I've made that you can get into! 🙂
Nice use of washing machine doors, maybe you could keep the hinge mechanism, that way you can open a window if it gets too hot.
That's ace, that. Cor. 😀
Absolutely brilliant on so many levels from the concept, the build and the finishing touches. I particularly love the tree on the inside. It almost seems a waste to have it sitting away on an allotment!
Nice workshop too.
Fantastically brilliant. I now feel sick.
Brilliant, clever, efficient and inspirational.... but I'd never be given enough 'time off' to do such a thing... 😥
Fantastic thread!! Saw something similar at the Falkirk Wheel last week - gave me food for thought.
OP, you are actually Kevin McCloud and i claim my 5 pounds!
(how many times did you use the word "upcycling" during the build?? 😉
(how many times did you use the word "upcycling" during the build??
Not as many as I used [i]spin[/i] cycling...
😀
jealous, that is all* 🙂
*OK, congrats as well, that's quiet an erection.
Fantastic!
Is there something about Larch which made it a good choice for the ribs? Could treated pine be used, or would pine snap before you got the required bend?
You've got me thinking about the new chicken coup I need to build at some point.
Ishouldbeworking - Member
Fantastic!
Is there something about Larch which made it a good choice for the ribs? Could treated pine be used, or would pine snap before you got the required bend?
The larch was free which was pretty much the main reason I used it. It is however good externally and is often used to clad the outside of buildings.
I had about 3 snap on me. Reason being they had a knot in an unfortunate position. Knots don't want to bend...
Pine would be fine, just so long as it's fairly straight grained and knot free. Knots are usually pretty prevalent in pine.
I guess if you bought the wood from a diy superstore it would already be bent anyway... 😀
Also, thickness is the key. Thinner you go, the tighter it'll bend but then the less meat you have to fix to. Swings and roundabouts. I did consider that a triple layer with thinner section might work well.
That's top notch 🙂
The larch was free which was pretty much the main reason I used it. It is however good externally and is often used to clad the outside of buildings.
Similar reasons why our old office was clad in the stuff... Larch is uber cheap, and there is loads of it available, as most folk think it rubbish.
Beg to differ. 😉
[url= https://farm3.staticflickr.com/2328/1742464860_bbce522e0a_b.jpg [/img][/url][url= https://flic.kr/p/3DYA6A ]100_4311.jpg" target="_blank">https://farm3.staticflickr.com/2328/1742464860_bbce522e0a_b.jpg [/img][/url][url= https://flic.kr/p/3DYA6A ]100_4311.jpg"/> [/url] by [url= https://www.flickr.com/people/88555557@N00/ ]matt_outandabout[/url], on Flickr
[url= https://farm3.staticflickr.com/2040/1741646021_2fea0e8ff8_b.jpg [/img][/url][url= https://flic.kr/p/3DUoFF ]100_4286.jpg" target="_blank">https://farm3.staticflickr.com/2040/1741646021_2fea0e8ff8_b.jpg [/img][/url][url= https://flic.kr/p/3DUoFF ]100_4286.jpg"/> [/url] by [url= https://www.flickr.com/people/88555557@N00/ ]matt_outandabout[/url], on Flickr
Wow, that's beautiful matt_outandabout.
Shed of the year by a mile, looks brilliant.
Btw the floor in your workshop is a bit special too!
Nice place to spend your days... 🙂
Top work kayak,those washing machine windows are a great idea.
Bregante - MemberLove that. Some people on here are really very talented indeed.
Agreed!
I bought a woodworking book just after Christmas and have so far erm, read it a few times.....that's about it!
Along with my plans to become a master wheel-building expert.
Can barely keep on top of cutting the grass and washing the bikes, so god knows where I would find the time to 'do woodworking' but I really want to get started with it.
wow, nice work there.
Shed is all felted now, and compost bins built at the side. At some point I'll be starting to make wooden shakes\shingles from offcuts that I'll use to clad the external wall at each end.
Having some nice evenings already sat down there with an incinerator and a beverage or two...oh, and we made the Allotment association Newsletter!... Sweet. 😀
[img]  [/img]
I've got a question for the woodburnerists!
Just picked up a nice little workshop stove and am starting to think about how best I might get the flue out the roof, or in fact, if it would be best to route it out of the end wall instead?..
You can see that it's steep inside where the chimney will naturally meet the roof.
[img]  [/img]
I know that you can get these silicone roof cowling things...
[img]  [/img]
....but the natural place for the flue to exit the roof near the top is going to be a pretty steep pitch.
Has anyone fitted something similar on such a steep pitch?
Or, would I be better getting it to come out of the front wall low down with a 45 or 90 degree bend and then upwards on the outside?
Like this sort of thing...
[img]  [/img]
I can't believe I missed this thread!
Amazing work. Some fantastic ideas. Love the washing machine doors.
I'm planning a recycled garden office build and I always come back to using the recycled elements in an ordered patterned way like you have done with the grouping of portholes. Really excellent!
The ribs are a thing of beauty. Great that you'll be able to appreciate those on the inside permanently.
It's also great that you got some good photos. Even though I'm an amateur photographer, I never seem to get the time to photograph my own work with anything other than the iPhone.
Looking forward to following the progress.
Personally, I would go out the wall or nearly apex of roof. Such a steep angle would be a challenge to waterproof properly IMO...
