Forum menu
I've been having issues with my gears skipping on brand new kit. Someone in another thread mentioned this tool which I'd never actually heard of.
I thought I'd quite like one but didn't fancy paying so much for something I'd use once in a blue moon.
Did a bit of searching, watched a YouTube vid or two and made me own instead innit.
Took a couple of hours I'd say.
Donor material. Box section steel from an old office table.
[img]

An old qr axle found in the spares. Really useful as it has the M10x1mm fine thread found on most hangers. A normal M10 bolt has a thread which is too coarse.
You also have the little nuts and washers too.
[img]

Finding the right drill bit. I used one that was fractionally too small so that I could fine fit it by filing.
[img]  [/img]
[img]  [/img]
Axle fitting nice and snug
[img]  [/img]
I then set two nuts locked against each other about 15-20mm up the axle. This would become the end that threads into the gear hanger. The two nuts together also gave the bar enough clearance to clear the frame. Your frame design might mean you need more, or less clearance.
[img]  [/img]
I then needed to find a spacer that would take up the unthreaded section of the axle.
[img]  [/img]
I found a section of steel bar with a hole already through it and drilled it out to size, again, slightly undersize and then filed it to fit snug.
[img]  [/img]
I then fitted it to the axle, added some washers before it and after it, then a nut, and then another nut to lock it all.
At this point you want to tweak the tightness of the opposite nuts each side of the bar so that you get a nice firm fit but so that you can still turn the axle relatively easily.
[img] 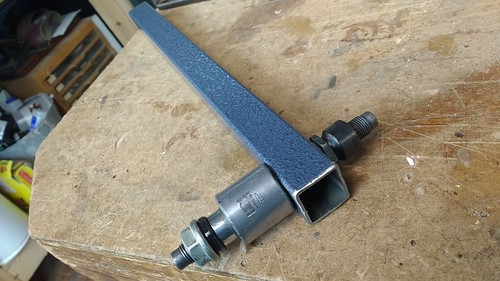 [/img]
Now I cut the bar down so that I could figure out some form of adjustment system to allow for different wheel sizes and for the adjustments you need to make during due to the centre point being off centre to the wheel.
[img] 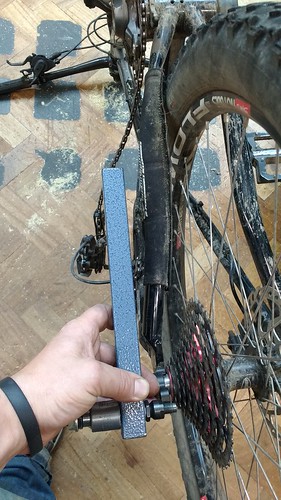 [/img]
The easiest way to get the adjustment I thought was to plane a piece of wood down to fit snugly inside the tube.
I used a hardwood (American Cherry if you're interested) got it square to size...
[img]  [/img]
Then knocked the corners off with a plane.
[img]  [/img]
I then found a length of aluminium tube to use as a length marker, a bit like in a wheel truing stand. Drilled the wood, and filed it to a fine, sliding fit.
I also found some rubber washers to use as stops for the tube. These particular ones are off an old set of bolts used to join a toilet cistern to the pan below.
[img]  [/img]
With that all done and sliding nicely,I screwed the tool into the gear hanger and nipped it up on the inner bolt against the hanger.
[img]  [/img]
So now I could try the tool out.
First I rotated it to the right side of the wheel, slid the aluminium marker in so it was just off touching the rim. Then I pushed the rubber washer up to the bar to form a stop.
[img]  [/img]
[img]  [/img]
I then pulled the marker out of the way, swung the tool to the left hand side, pushed the peg in gently to it's stop and compared. If one side is further out than the other it's a case of grasping the metal section of the tool and tweaking the hanger using leverage to try to 'encourage' it inwards. You then repeat the check on the right and left and repeat the tweak until it's even.
Now, the same is done vertically, on the top and bottom of the wheel to check and adjust for true that way too.
[img]  [/img]
Make sure you rotate the wheel a bit when checking as a buckled rim will throw your readings out.
Not tried the bike in anger yet to see how my adjustments have worked, but hey, it's always good when you manage to save a bit of cash with a diy tool!
🙂
Cheers.
Good one 🙂
I love the marriage of metalwork and carpentry!
This is awesome - huge thanks, now favorited. I posted a [url= http://singletrackworld.com/forum/topic/checking-derailleur-hanger-alignment-without-a-tool ]question about something similar[/url] a few months ago, your instructions are great and will hopefully get me off my butt to make one.
Yes, that's very clever, but whenever I bend my hanger, it's always a long way from the workshop. My DIY hanger alignment set up generally looks something like this:
1) Remove hanger from bike
2) Find big flat rock
3) Put bent hanger on big flat rock
4) Find slightly smaller rock.
5) Hit hanger repeatedly with rock until it looks straight.
6) Put hanger back on bike.
If hanger not straight or gears not working, repeat steps 1 - 6.
^^^ 😀