Forum menu
Just finished this today. Hopefully it will last 40 years like the last one.
[img]

[/img]
No gravel board used as we wanted to be more wildlife friendly. There's a hedgehog highway installed for the wee beasties.
[img]

[/img]
Cut ends all treated before fitting and are on top as I wanted the treated end down but off the deck.
Kayak why does the mdf look kinda funny?
Do you mean as in it's green? It's moisture resistant mdf which comes green. It paints better in my experience. The edges do anyway.
Yep that'll be it. Also useful point re taking paint. Will be making use of that tidbit. Thanks.
Love the fence! Good job there. Think I need to replace some fence soon but have not really looked into it. What timber did you use and what sort of cost is it per meter?
[EDIT - imgur seems to have mangled my images 🙁 )
]Not quite to Kayak et al's standards but pleased with it as my first bit of proper indoor wood work for 10 years.
As wife will be WFH for the foreseeable future she needed a better desk than the kitchen table. Lockdown limited options so got hold of some old 5"x2" pine beams that used to be in the shed of a cement factory. None of them were perfectly straight or true and were all heavily impregnated with grot and cement dust....
Pressure hosed down to get rid of dust, sanded down to get rid of the worst skelfs and edges
Sash clamped together, pocket hole screws
[img]  [/img]
and battens to hold together and in alignment.
[img]  [/img]
Flip over and make router frame and sledge to get a flat surface
[img]  [/img]
Queue tedium of doing 175cm of routing at 10mm intervals
[img]  [/img]
Saw ends off, sand down
[img]  [/img]
bleach orange out of the pine with steradent (treated sample lower)
[img]  [/img]
[img]  [/img]
Fill gaps with grey filler and finish with 2 coats of grey flooring oil
[img]  [/img]
Fold 50mm x5mm mild steel into trapezium shape for legs, screw legs on and done
[img]  [/img]
Not exactly a Chippendale but considering the constraints on making it I'm happy, it works, looks good and was made for <£50
Cool desk. I like the flattening sled!
Looks great with the metal legs. 👍

Olive bread 🙂
That looks really great Simon.
I am now very hungry.
Grrrr 🙂
Love that desk.
Hi Biggles missed your comment yesterday. I used 175mm x 32mm featheredge cladding (the yard were surprised that I was using it for fencing). 3.6m lengths were £5.40 each and I cut these in two. The boards are fixed to cant rails top and bottom, the rails were 2.4m each and cost around £4 a length. The rails are bolted to the original posts with coach bolts. Total material cost including screws was under £240 delivered.
Herself said I was slow working but it was painstaking stuff as I'm not a natural wood worker and I like to start late, just over 2 days to dismantle and replace that run. I used clamps to hold the planks while I got them plumb and level before screwing them to the rail.
I've priced the fence to the right as that's ours too and it comes at just shy of £800 using 1.6m x 22mm featherdedge, similar cant rail and new posts with post fix.
Another fence here.
A number of firsts for me, including using concrete and a table saw. Pretty happy with the result, just the gate to go.

I like the flattening sled!
That's one of Nick Offerman's (Ron Swanson) favourite jigs
https://www.finewoodworking.com/2011/09/29/level-big-slabs-in-no-time-flat
https://www.finewoodworking.com/2011/09/12/router-jig-turns-stumps-into-beautiful-side-tables
Damper.
As used on trans continental bike ride in Oz in 1890s. Flour, molasses, and water. Nought else.
[img]  ?_nc_cat=109&_nc_sid=8024bb&_nc_ohc=MQ6kRXi1DP0AX8vjg1T&_nc_ht=scontent.flhr2-1.fna&oh=acab3dda10efeef87d9dd6c948751d1a&oe=5F1DB22A[/img]
Made a mud kitchen for the kids over lockdown.
And then painted it to match their new play shed.
I made a desk that goes up.
It also goes down.
It also goes up and down and in the middle.
Danposs86 that Wendy house and mud kitchen are awesome by the way. 😊👏
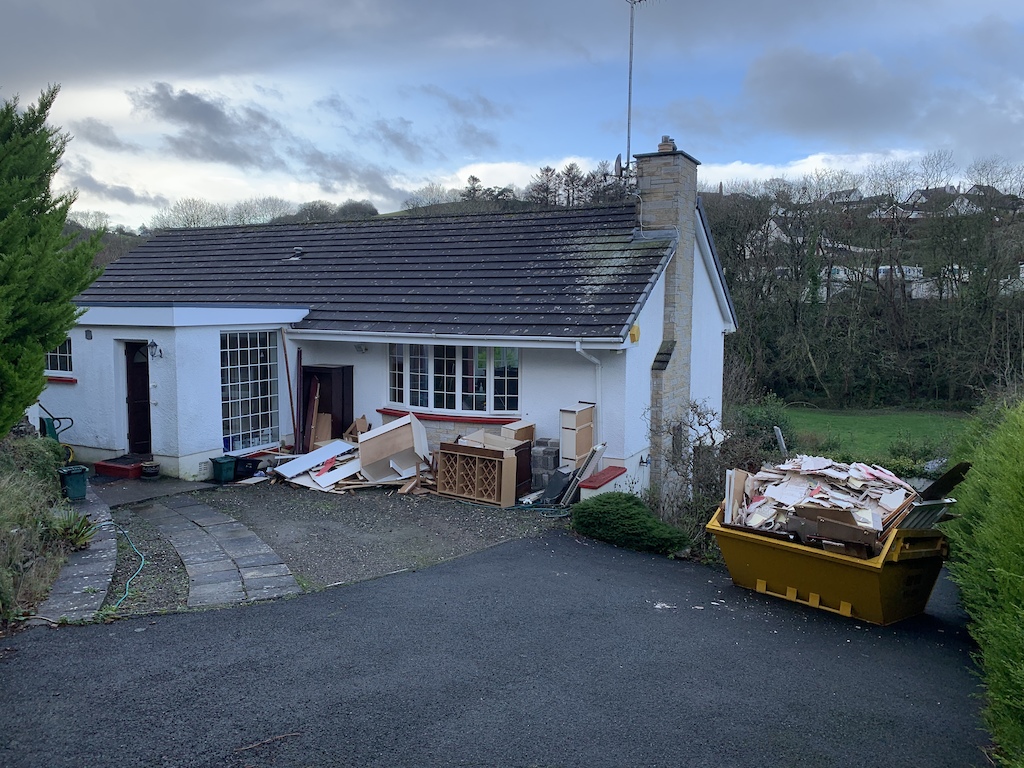
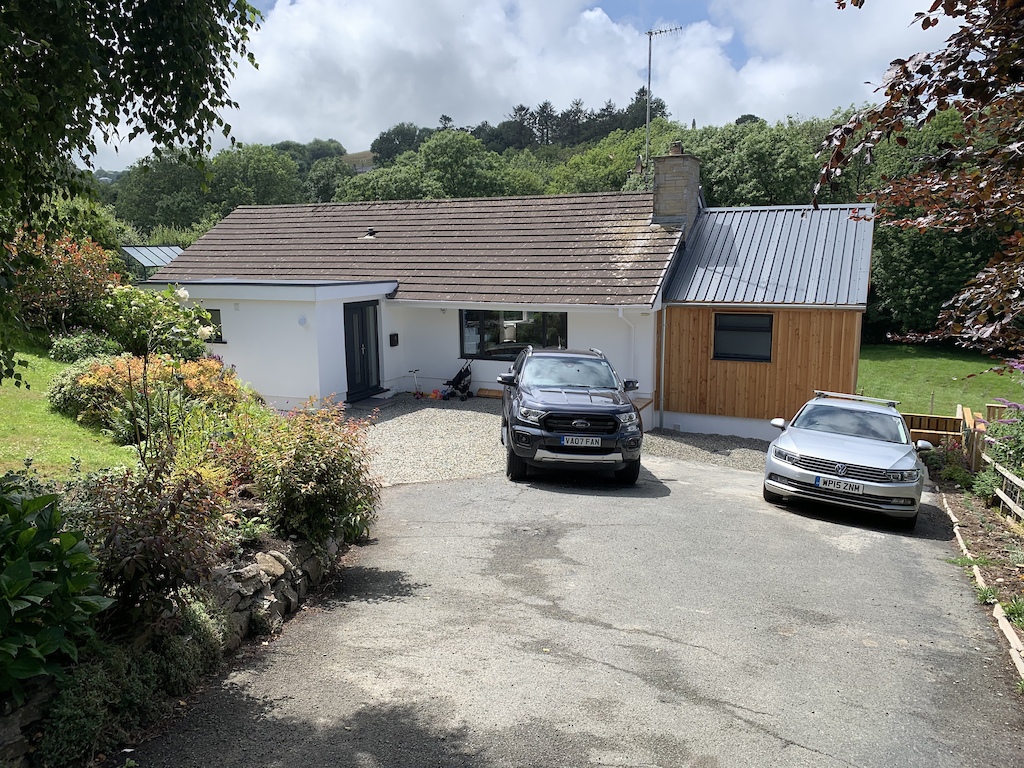
I worked my arse off from January to the end of April this year to get my family into our "new" house. Not my first major renovation project but it was my first extension!
Block build base, timber frame with Welsh larch cladding from a sawmill 10 miles away.
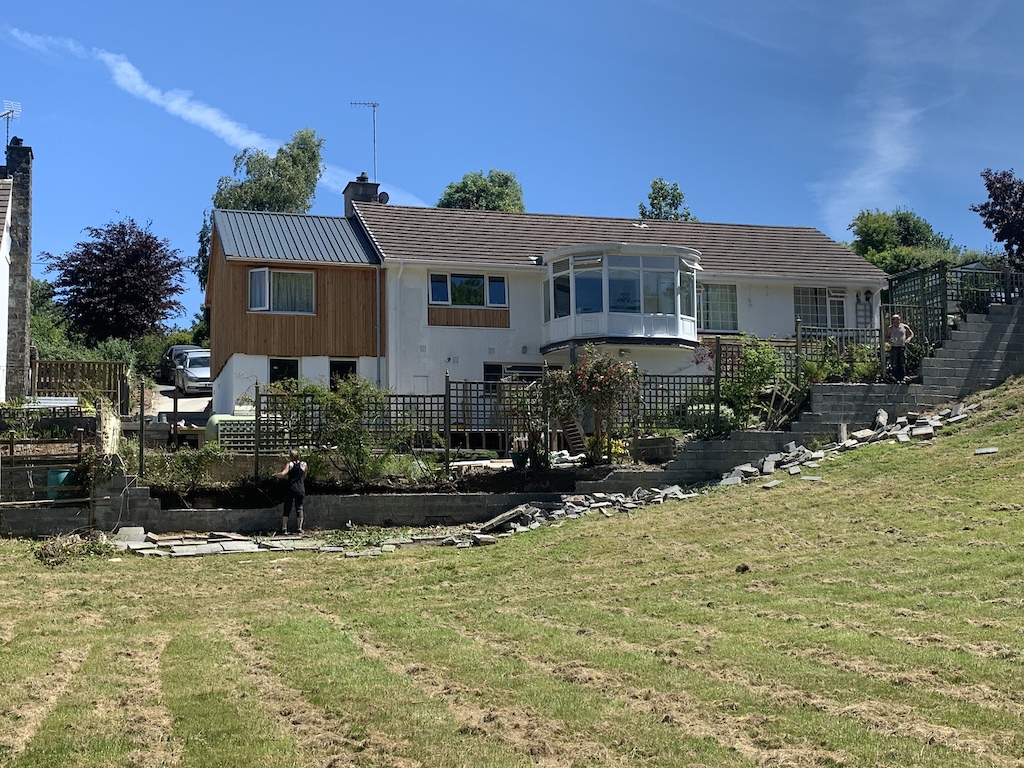
Now working on the back garden.
I did nothing but work on the house and my job for those 4 months so now cycling again is very welcome indeed.
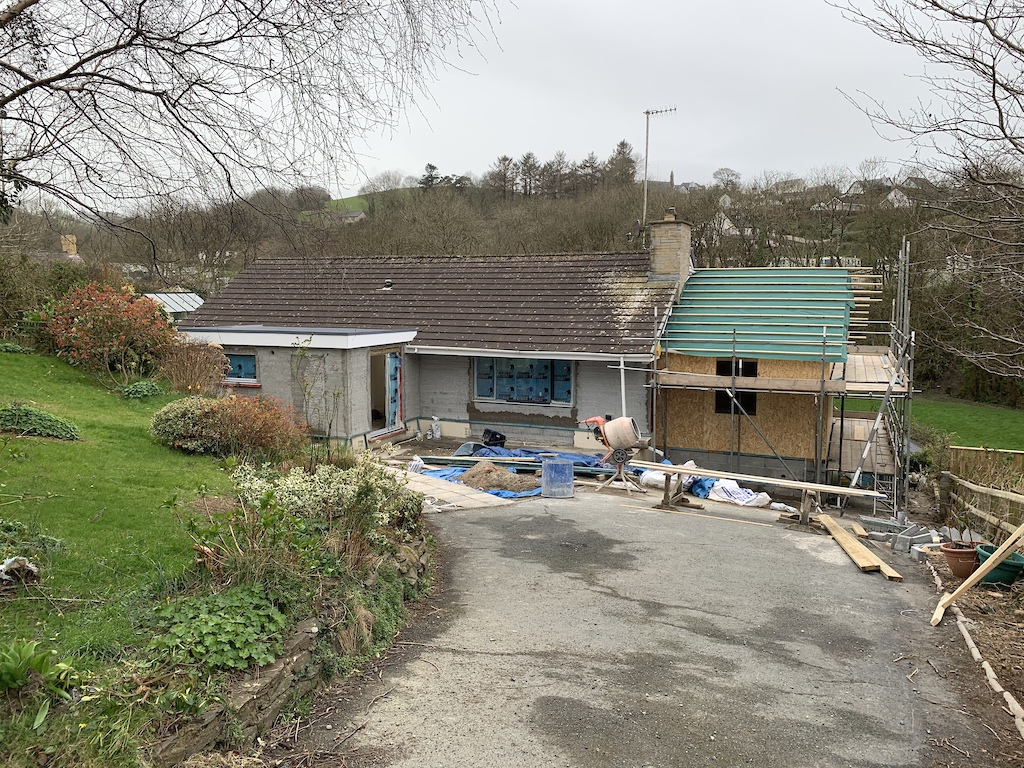

In the extension I have a bedroom, walk in wardrobe and en-suite. Underneath is my office which leads into the old underground garage now my workshop!
Finally, I've just made my kids a new paddling pool!

Posting here rather than starting a new topic, hopefully the woodworkerists can help.
My dear old Nan is moving house, I was clearing out the garage when I found a Stanley Bailey No.3 Plane, its very old and apparently belonged to my great grandfather who was a joiner.
The trouble is that its missing the tote? (handle). I've looked online but can only find handles for no.4 planes, does anyone know if these will fit?
I want to get the plane in working order for my little bro who is a carpenter, I'm not bothered about preserving the patina or anything like that, I want this to be used instead of sold.
Thanks in advance.
@nostrils I think they are all the same size from no.3 all the way up to no.7, they're certainly the same on all my bailey pattern planes and the bigger ones my dad has a couple of, seem the same too. The knobs have changed shape a bit over the years, but the totes hardly vary at all.
@mahowlett, thanks for that, I'll get one ordered. Now, which sharpening stones...
I know it is one hell of a lot of work. But have you considered hand planing ?. Rather than flattening with the powertool.
I have a thicknesser, but occasionally I'll hand plane a board flat, because its actually really satisfying, and you feel more of a connection to the trades beginnings and the challenges the early carpenters faced.
I once made a box for someone and started with a seasoned log, reclaimed from the tree the council cut down(ASh) No powertools, the entire thing first riven out, then planed then finally jointed. If i had machined it all out i'd have lost the gorgeous ripple the timber has.
Wear a sweatband though 😉
Made a little 3-legged table as a thank you for a neighbour.
Ash, walnut and recycled broom handles.
Mintyjim - good work fella.
What an amazing house. It just looks like a bungalow from the front. Big surprise when you see the shot from the back.
Big surprise when you see the shot from the back.
Indeed. That paddling pool is very inventive. 😂 Good work.
Not something i really wanted to be making but looks like it's going to be necessary
Nice mask. Excellent pattern matching 😅👌
I've got a problem with one of the last things I made. A dining table made of oak-veneered MDF and black Valchromat. Well, 2 problems really. First off, the oak is getting quite stained; red wine, curry, oil & vinegar, the usual stuff, and some of the grain is has quite a texture to it. The grain isn't raised, rather the "character" swirls are have little grain lines that are not filled up, when you run your fingernail over them you can hear the texture and if I don't do something about it they'll fill up with gunk.
I finished it with a couple of coats of Osmo Polyx Oil, satin.
The second problem is that the oak is inset into a border of Valchromat. I've experimented with Osmo on Valchromat; it looks fantastic with just one coat and bloody horrid with two.
What I'm planning to do it sand it all down with my random orbital sander to get a clean surface without going through the veneer and starting again. I'm thinking I'll mask off the valchromat and put some really thick coats of Osmo on the oak, then take off the tape and give a final light coat over the lot.
Has anybody got any better advice? Preferably experience-based.
[img]  [/img]
Another Cargo-bike. Lightweight and again with a folding rack. Pictured here at the top of a scottish tenement stairwell.
Got a few wee jobs to do to it and then will upload more photographs to:
https://www.instagram.com/colin_woof/
I really like that cargo bike. To make it even more storage friendly, could you include a folding mechanism for the handlebars?
Big John. I think if you're such messy eaters 😉... and don't use coasters, then maybe look to use a varnish rather than an oil.
Not too sure if that's possible now compatibility-wise given you've already oiled it, but I'd be thinking of a finish that coats and provides a protective surface layer, rather than one that gets sucked into the substrate.
Either that or take it to a sprayer and get it lacquered.
Hmmm. That's a shame. I was hoping in your Black Tea guise you'd just tell me to slather on more coats of PolyX. I've got a few offcuts so I'll play around. What's the best way to apply a heavy coat of Osmo, or is that a no-no?
I'm not sure you can. It sucks in what it sucks in. Usually if you don't wipe off the excess you just get left with a glacky, sticky layer.
Piece of toughened glass over the top?
Looking at what I've got that sounds like it might be right. I'll try emailing Osmo for their take on it before any drastic action. There's only so much leeway with veneer before it delaminates or goes through to the MDF.
More cargo bike love!
It's obviously still a work in progress. Can only weld in the garden which is really slowing things down, rare to get low wind and no rain on the same day in the NE.
Argh! Photos!
I really like that cargo bike. To make it even more storage friendly, could you include a folding mechanism for the handlebars?
I'll have a think. This is a good idea. I know satori do a qr turning stem. unfortunately i'm already using a qr stem raiser so not sure how to get both functions working.
Revamping the bit where the chickens used to live.
Step 1: a bench.
[img] 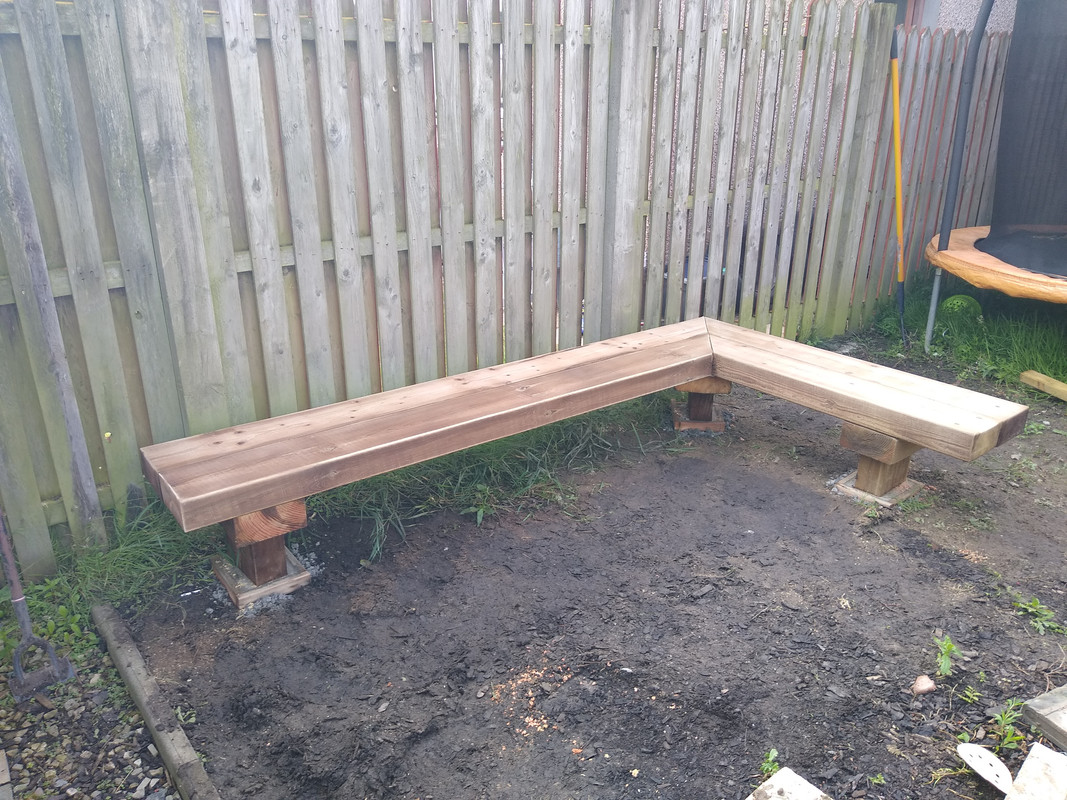 [/img]
It's tight together, flat and level but the 45 degree cut could be better, didn't realise the the circular saw moved a bit as I cut through.
Held together with rebar pins, now what's the best to treat it with or can I just leave it?
Cargo bike Colin - there's a few Ergotec folding handlebars that don't look too tooth-smashy. I've considered some for a ghetto-folding bike build sometime.
May be slightly narrow but would ergotec folding bars help your cargobike storage issues @Retrodirect.
https://www.ergotec.de/en/products/lenker/sub/verstellbare-lenker/produkt/fhs-2-25-4.html
PS I love the diversity of stuff on this thread, all excellent.
I've recently finished a take down bow that fits into an arrow case, So much easier to take to the woods.
Shoots nicely too.
Damm photo sharing...
hopefully it works this time:
[url= https://live.staticflickr.com/65535/50128082998_157ff8fb90_z.jp g" target="_blank">https://live.staticflickr.com/65535/50128082998_157ff8fb90_z.jp g"/> [/img][/url][url= https://flic.kr/p/2jnDwD5 ]IMG_20200711_131810[/url]
[url= https://live.staticflickr.com/65535/50128085553_e63d0c9998_z.jp g" target="_blank">https://live.staticflickr.com/65535/50128085553_e63d0c9998_z.jp g"/> [/img][/url][url= https://flic.kr/p/2jnDxp8 ]IMG_20200711_132023[/url]
That bow is very nice
I had a rickety old picnic table that was on its last legs, so I cut up some usable bits and made a herb garden for the patio. Its a bit rough and ready but I'm quite pleased how it turned out considering it was effectively scrap wood and I had to work with what I had rather than buying the wood I needed.

Edit, image not showing - Here's a link https://ibb.co/M7gYhFX

Dead chuffed with this sourdough.

I made a kitchen knife on a course with the amazingly patient Joel Black. 121 folds of steel with an integral bolster. Hard work and it was much harder than the last knife I made which didn't have a bolster. I'm really happy with it though!
Thanks @squirrelking, I like the term rustic it doesn't sound quite so bodgetastic! I also made a trough planter for some bigger herbs/small veg. Should keep my daughter busy for the summer holidays 🙂

@kayak23 I do love a nice bit of decent plywood.
We just finished the decking underneath the hammock pergola.
[url= https://i.ibb.co/TgZCD35/E95-F3-AA1-0241-4-BCA-B485-3-AA28-A15-CAA9.jp g" target="_blank">https://i.ibb.co/TgZCD35/E95-F3-AA1-0241-4-BCA-B485-3-AA28-A15-CAA9.jp g"/> [/img][/url]
Get on with your work, Kayak23, don't waste time texting Keavney!
Just finished the fork mounted bags and taken them out to test them. Made the rest of the bags over the past 10 days.
Looking forward to some proper bag testing next week.
[img]  [/img]
Get on with your work, Kayak23, don’t waste time texting Keavney!
Ha ha ha!!! 🤣👍
Hopster, these look great!
Side note: Which tyres are these?
Side note: Which tyres are these?
Panaracer Gravelkings in 700x38c. Very much for dry weather and smooth trails.
Can I have a last thing I HAD made?...
We lost our beautiful labradoodle Barney and I commissioned a glass artist whose work I'd appreciated to do a piece for us. Turned out amazing! 😍
Kayak, that's lovely!
Being a full time desk jockey, I don't have the manly skills of a lot of you guys so I very rarely have a go at making stuff, but following the relative success of my vertical planter above, I thought I'd have a crack at making a new back gate.
The old one was falling apart and the bastard cat had used the top as a scratching pad. It was also really narrow due to the small opening and a drainpipe in the way which made getting bikes in and out a pain and any standard gate in the shops was too big.
I decided to make the gate posts smaller and make it open out the other way. I also found a pretty cool magnetic latch which is easier than the old latch which used to jam against the wall intermittently.
Anyhoo, this is the result of quite a few hours of effort:


This is what it replaced:

Very nice. You should be properly proud of that 👍
Cheers Timidwheeler, it is quite satisfying knowing I made it myself. My brother is a carpenter and normally 'helps' me do stuff (I mainly watch him!), so the acid test will be when he passes comment, but its straight and it opens and closes so I'm happy 😊.
I tried to do a proper job with what I think are called lap joints so hopefully it won't fall apart after winter...

The genuine Cusco adjuster dial for these shocks is expensive...
[img]  [/img]
...but I like this alternative I made
[img]  [/img]
I finally got round to finishing this off. I needed to make a disc-mount tab welding jig to position a disc brake. It took me an entire month to get around to it.
It's nice to finally have two brakes.
I'm really happy with this one. It's taken a bunch of iterations of cargo-frames but I have the handling absolutely dialled.
as always, more here if interested:
https://www.instagram.com/colin_woof//a >
[img]  [/img]
@northwind that is brilliant!
Colin, was wondering what you were up to with the machining, good work!
As it's hot this idea may be of use to some of you. An external cover to cut down solar gain from your windows. I used an old sheet.

Getting very close to having some functional additive manufactured (3D printed) titanium cranks. 🙂
I made a frame bag, and was pleasantly surprised at how well it turned out:
Nice bag! 😃👌
I didn't really make this, just changed it a bit. I was bored so I messed about with some paint.
[url= https://i.postimg.cc/W1Kx0FNC/IMG-20200815-203120615.jp g" target="_blank">https://i.postimg.cc/W1Kx0FNC/IMG-20200815-203120615.jp g"/> [/img][/url]
[url= https://i.postimg.cc/vmf290Sx/IMG-20200816-144832358.jp g" target="_blank">https://i.postimg.cc/vmf290Sx/IMG-20200816-144832358.jp g"/> [/img][/url]
so with some bits of worktop left & some tiles leftover from a failed kitchen project........
I decided to make some bedside tables as my wife could never find any she liked
I had to by a plunge router from ebay, which is possible the best powertool I own, even if I was terrible with it, especially on the 1st one
Rustins plastic wood filler saved the day & squared off all the gaps Id left

the islamic arches were cut out badly with a jigsaw


6 years from moving, from tonight I no longer have to charge my phone & put my glass of water on the floor!!
Nice Kimbers! 😊👌
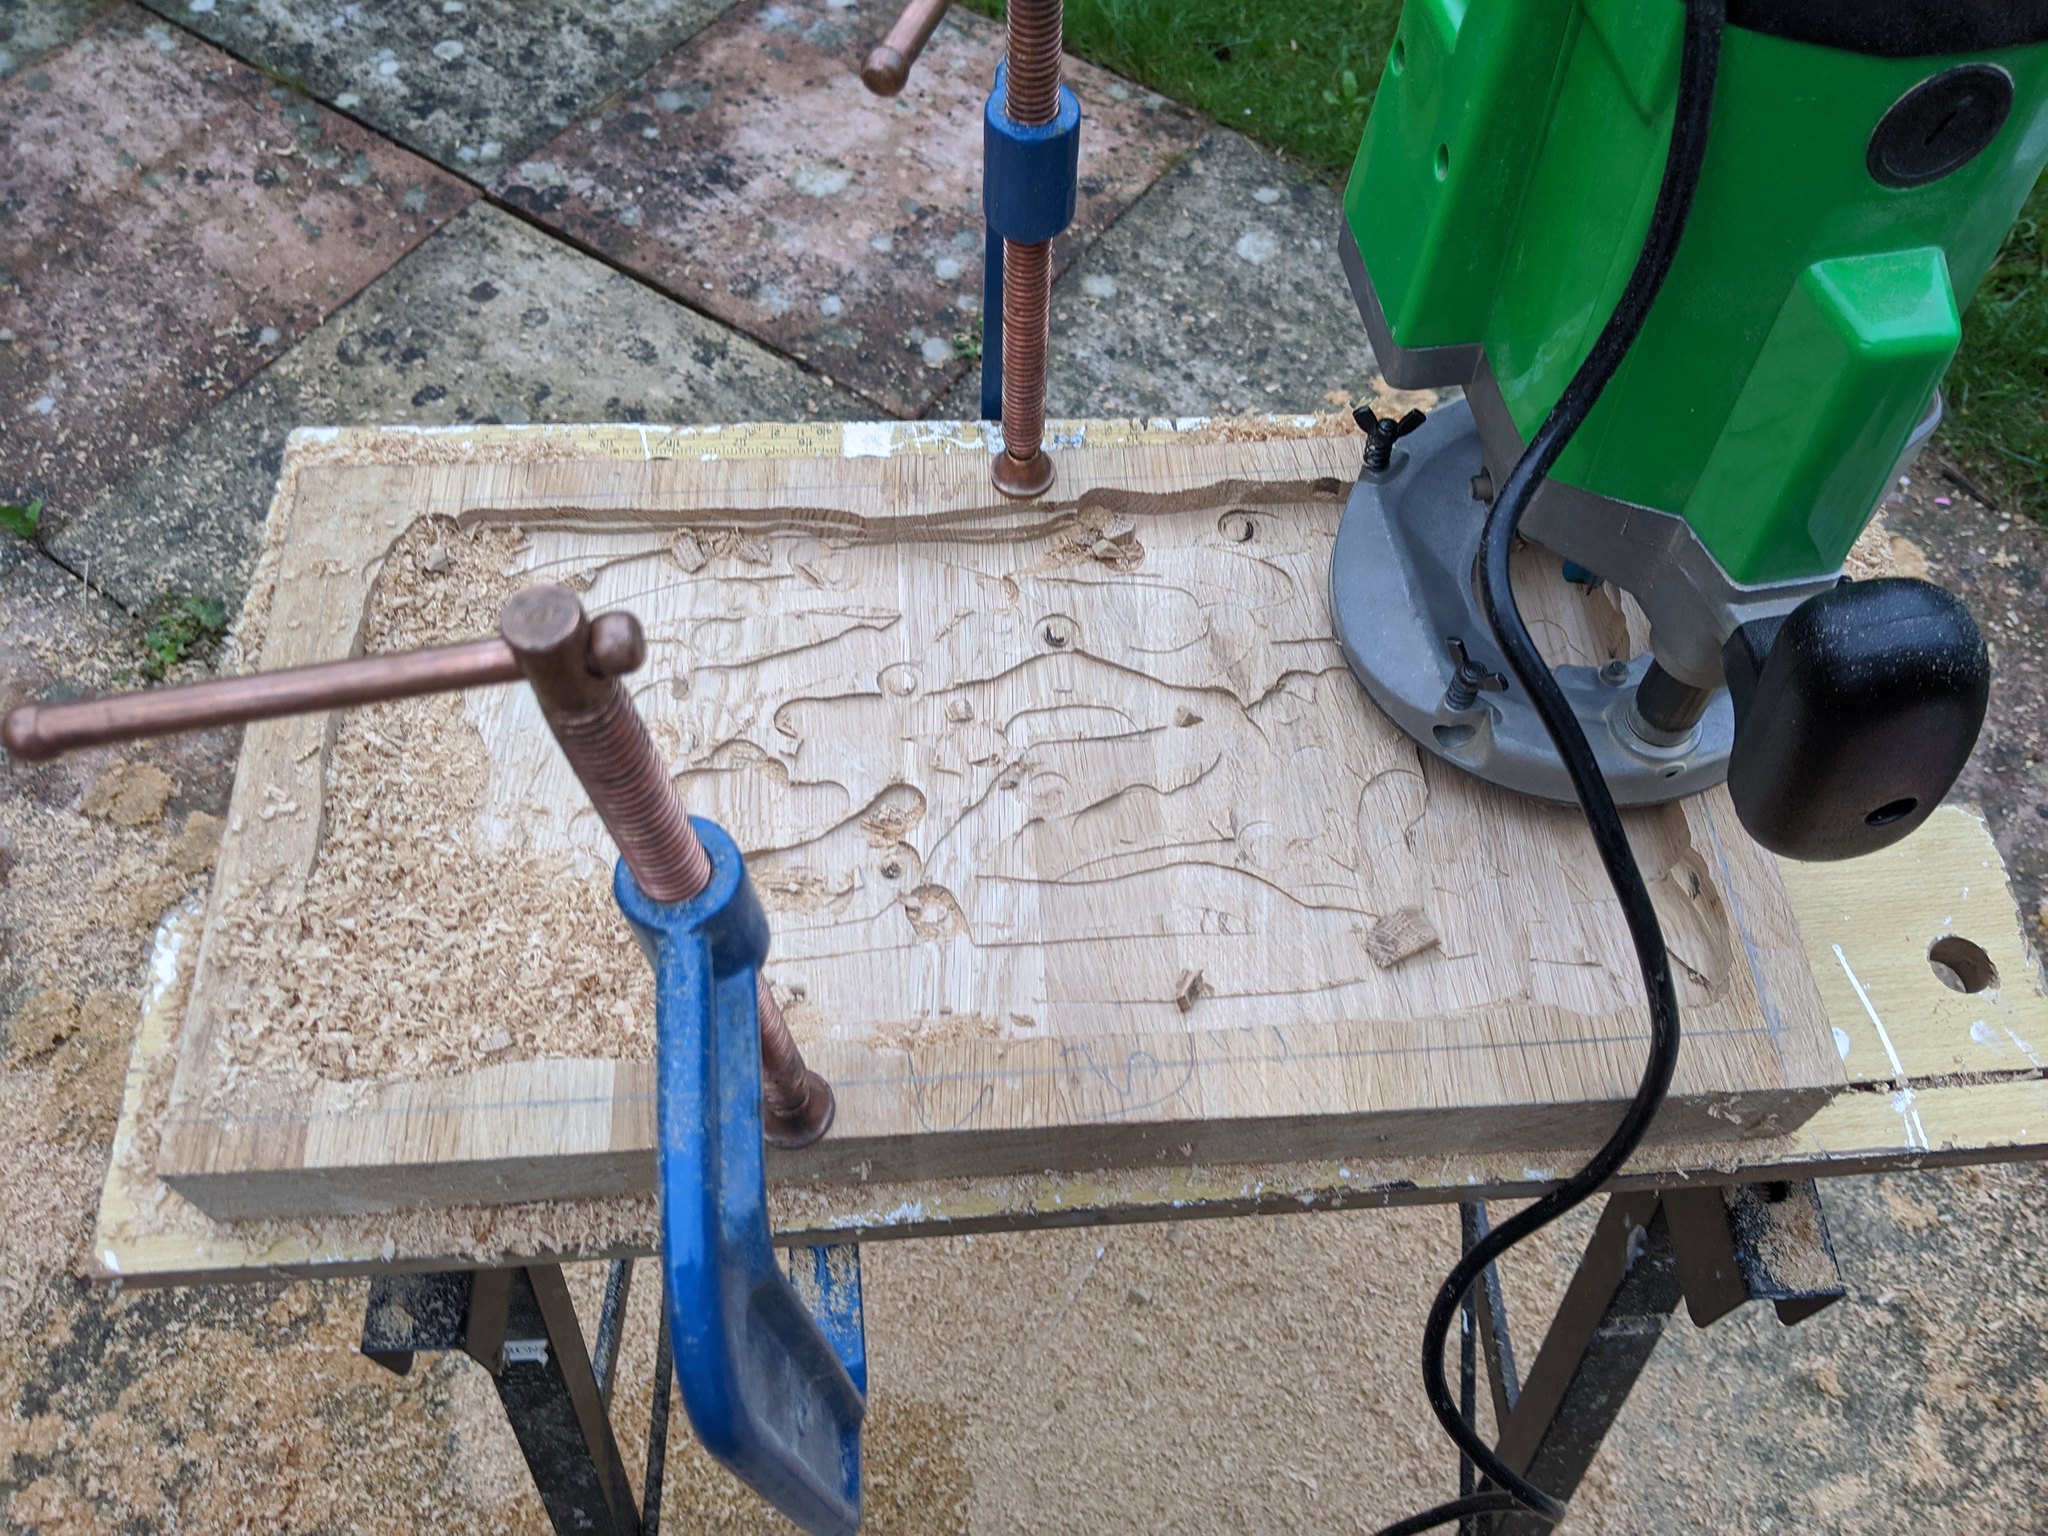
I'm liking the freeform organic texturing you did with the router on the glue surface too 😉 it's so difficult not to dig in.
I'm doing a similar thing at the moment. I find working from the centre in spirals outwards works well, making sure you're cutting against the direction of cutter rotation (machine travelling clockwise), taking small skims at full depth (you can't go back), and being mindful to keep all the pressure on the side of the router that's on the 'shelf' of the work.

Still work to do but last couple of days building and fitting this

Very tidy surfer, looks mint. What board are you using? Melamine ply?
Cheers @kayak23 , I've no idea what I want to do next with the router, I just want to use it !
@kayak23 what will that be in the end? Looks fun. I went to your web page and saw your amazing gallery. Do you have an Instagram that I can follow?
During lockdown I started doing the odd bit of woodwork, then built a deck then got hooked on Leo Sampson's Tally Ho YouTube project. I'm just finishing oiling the deck today, so can post on here even it's done! 👍
@kayak23 what will that be in the end? Looks fun. I went to your web page and saw your amazing gallery. Do you have an Instagram that I can follow?
During lockdown I started doing the odd bit of woodwork, then built a deck then got hooked on Leo Sampson’s Tally Ho YouTube project. I’m just finishing oiling the deck today, so can post on here even it’s done!
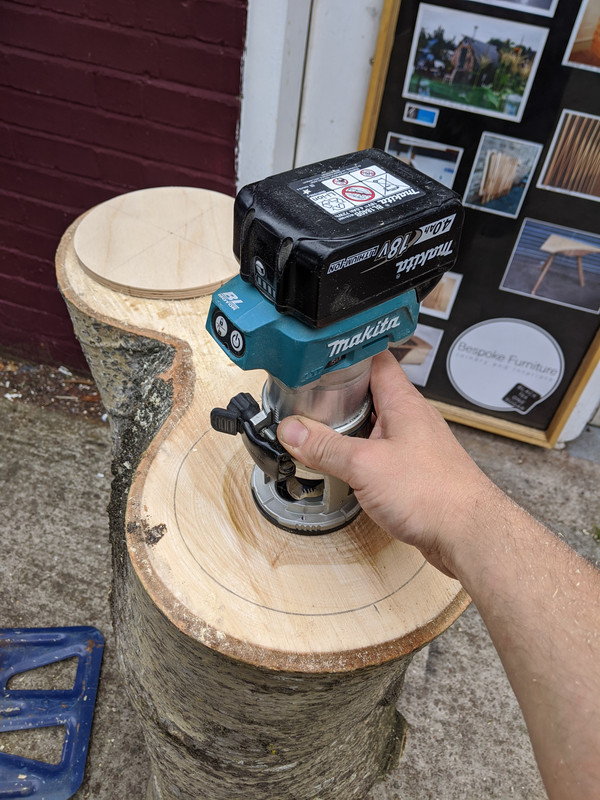
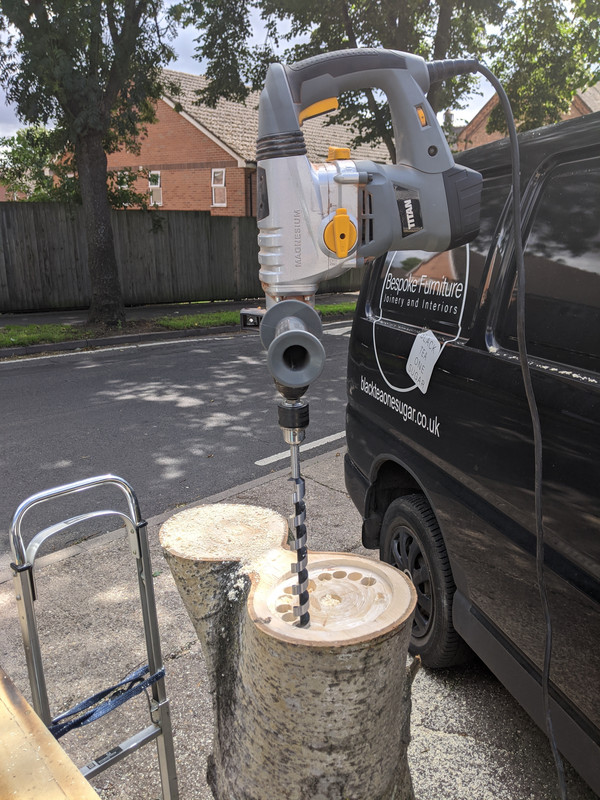
Thanks Adam T. It's for a marketing/exhibition company who are marketing an electric car.
They wanted a tree trunk hollowed out and some electronic bits put in so that on the stand it can look like the car is being charged from a tree.
It's so ...Eco...apart from the tree is dead and all... 😂
Insta is blackteaonesugar
Yeah I love Tally Ho. Unreal the work that goes into it. Properly hard work too. Must be eye wateringly expensive too! 😳
Lockdown capers:
I butchered some tree trunks and fitted them with electronics for electric vehicle charging demo thing...
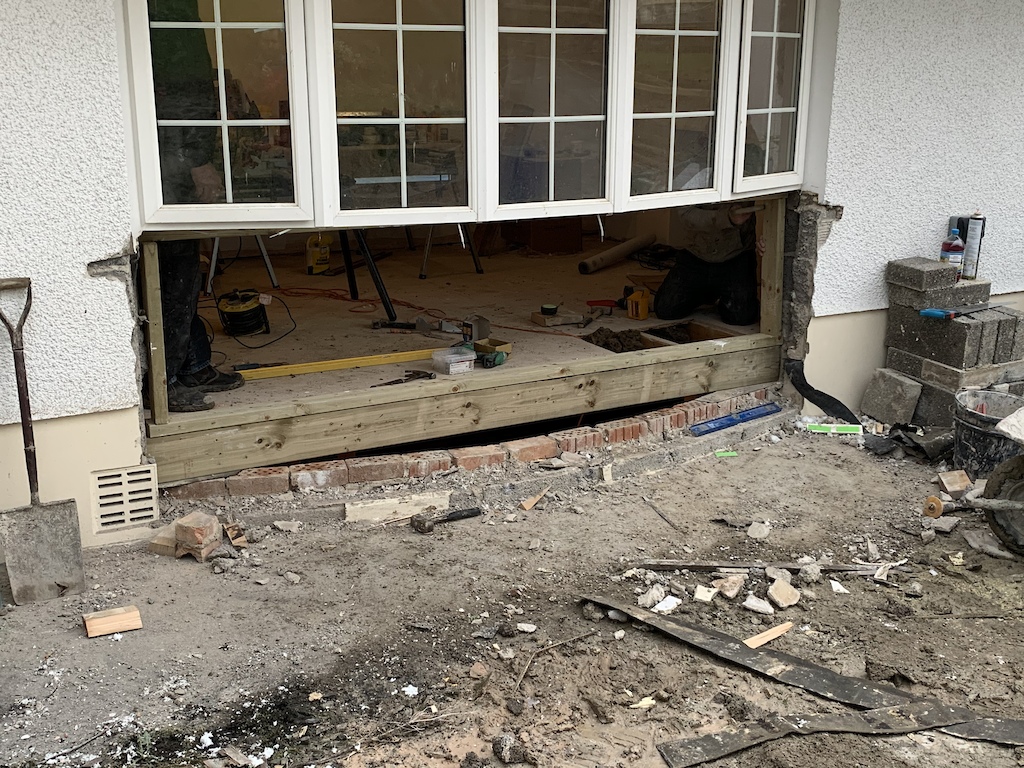
The last 6 weeks..... Labouring , learning and sometimes ignoring ...... Oh and handing over the bank card every other day.
But we got there.
Dining room is an extra 16sqm and the utility is 7sqm. Fitted a new kitchen at the same time.
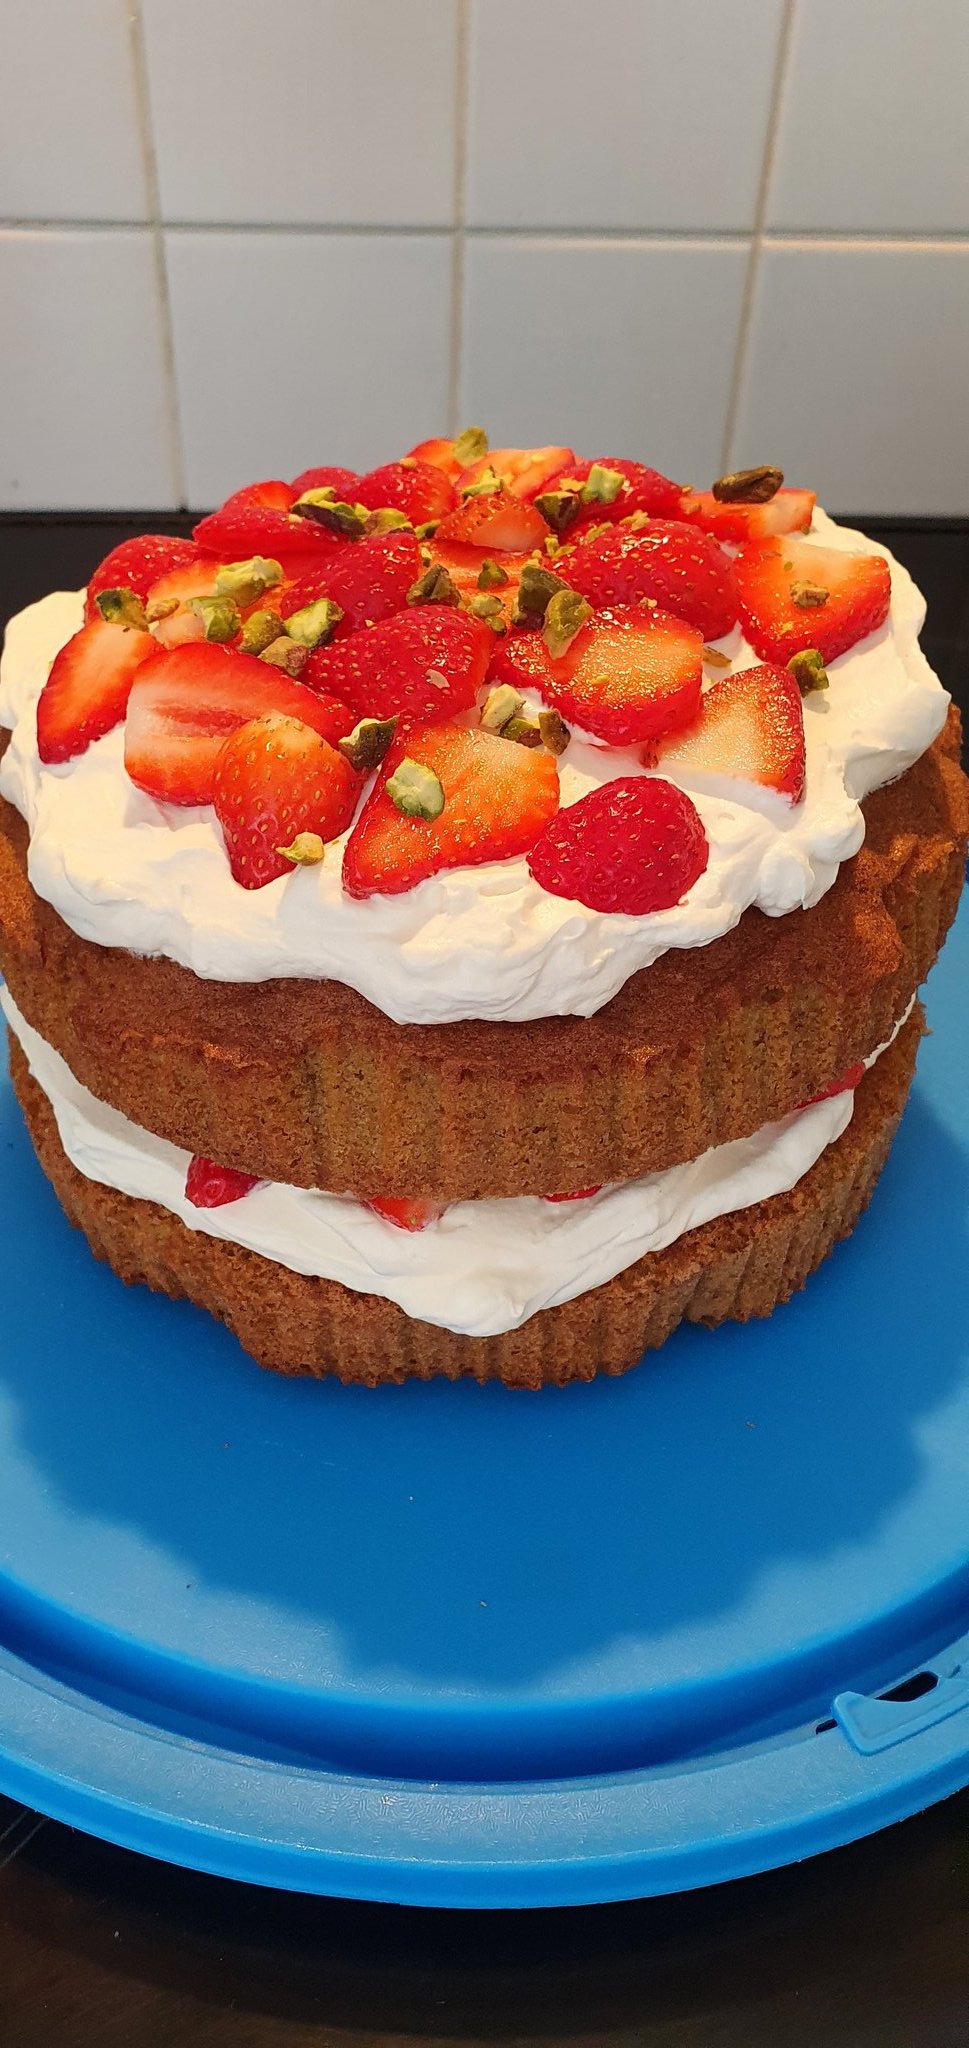
Cake.