Forum menu
kayla well done! Would be really interested to hear more such as how time-consuming and difficult was it, did you use any essential oils, what quantity have you made?
For retrodirect - some photos of seat tube bending buried in here (page 3).
https://singletrackworld.com/forum/topic/the-lets-see-your-29er-hardtails-rigids-thread
Basically done cold around a plywood former, tube stuffed with sand (and blended cat litter.....). Leaves a very very slight ripple in the back of the tube but can't see once painted. 16 and 12.7mm tubes just done on a slightly improved crappy bender from Stakesys (so again not as good as mandrel bent but OK if you don't look close).
I did like your angle grinder seat tube video - though you did it freehand at first 🙂
Re-handled a bread knife that I bought when I was sleeping on a mates floor in Sheffield back when I worked for Midland Bank. Sanded it a bit smoother after the photo but I love the Loveless Bolts
I finished the bike rack for the back of my van.
The back of the Transit Connect is a bit small to easily get in and out of to strap the bikes to the side, or a wheel rack, and you can only easily get from one side as it has a single slider. My solution is to mount a couple of old Thule roof carriers to a sliding bed that comes out of the back, then you can get to the clamps from stood by the back door. Runners are made from Unistrut, with roller bearings the same OD as the profile to run up and down in. Works really well and still loads of room to get other stuff in the sides for a trip. Big wing nuts hold the runners onto the wooden frame for easy dismantling to turn it into a full size van again.


kayla well done! Would be really interested to hear more such as how time-consuming and difficult was it, did you use any essential oils, what quantity have you made?
Ta! It was ok, it took me ages to chivvy myself up to do it (I've had the stuff for about a month now) just because, well, chemicals and that. I reckon in all it took a couple of hours once I'd waited for the lye to cool down enough. I made a bum-basic coconut oil soap (20% superfat) and added tea tree and peppermint oils for the smell. It'll be another few weeks until it's ready to try but it came out of the mould ok and it smells nice. I'd be comfy making more cold process stuff with a few more ingredients in now I know I'm not about to blow the house up or dissolve my head or anything 😆
Whipped this up yesterday. Trusty cnc machine and some scraps from work.
Very impressive.... Ehr... What is it?
Ta! It was ok, it took me ages to chivvy myself up to do it (I’ve had the stuff for about a month now) just because, well, chemicals and that. I reckon in all it took a couple of hours once I’d waited for the lye to cool down enough. I made a bum-basic coconut oil soap (20% superfat) and added tea tree and peppermint oils for the smell. It’ll be another few weeks until it’s ready to try but it came out of the mould ok and it smells nice. I’d be comfy making more cold process stuff with a few more ingredients in now I know I’m not about to blow the house up or dissolve my head or anything 😆
kayla did you buy any special equipment such as a thermometer, heavy-bottomed saucepans, knife for cutting? Bet those oils will be gorgeous. Couple of hours isn't bad but it must have been nerve-wracking all the same! Where did you get the recipe from? Please update when they're ready for use.
Have been making another load of washing powder this morning, 3 bars of soap were used (bought a box of 18, all unwrapped) so it would be pretty useful to make my own soap.
@drnosh
Thanks! It is pretty er, robust, (****ing heavy) for about 30kg tops of mountain bikes though.
kayla did you buy any special equipment such as a thermometer, heavy-bottomed saucepans, knife for cutting? Bet those oils will be gorgeous. Couple of hours isn’t bad but it must have been nerve-wracking all the same! Where did you get the recipe from? Please update when they’re ready for use.Have been making another load of washing powder this morning, 3 bars of soap were used (bought a box of 18, all unwrapped) so it would be pretty useful to make my own soap.
I bought a stainless dish and used a big pan we already had to make a double boiler to warm/melt the oil. Pyrex jug (for the lye) we already had and OH makes home brew so we had some theremometers kicking around too!
It was pretty fraught to start with but the only really sketchy thing is the lye solution (we handled worse stuff in chemistry lessons at school!) which is neutralised pretty much as soon as it goes into the oil and I had a bottle of vinegar on hand in case I spilt it on myself 😆
The recipe came off t'internet and I used this-
http://soapcalc.net/calc/SoapCalcWP.asp
to check it. It's just a really basic, can't-really-go-wrong 100% coconut (20% superfat) soap recipe with whatever essential oils you want to add bunged in when you're supposed to bung them in. It's ready to use after a few days (used it last night in the shower and it's really nice with loads of lather) but it will be at it's best in a few weeks' time (I made it on the 3rd, last Monday).
There are recipes for other 100% coconut oil soaps with more lye added that are harsher and can be used for laundry soap, just google 'coconut laundry soap' and it'll chuck up a load of answers.
I made the 'Sam Pilgrim Mini Kicker' ramp:
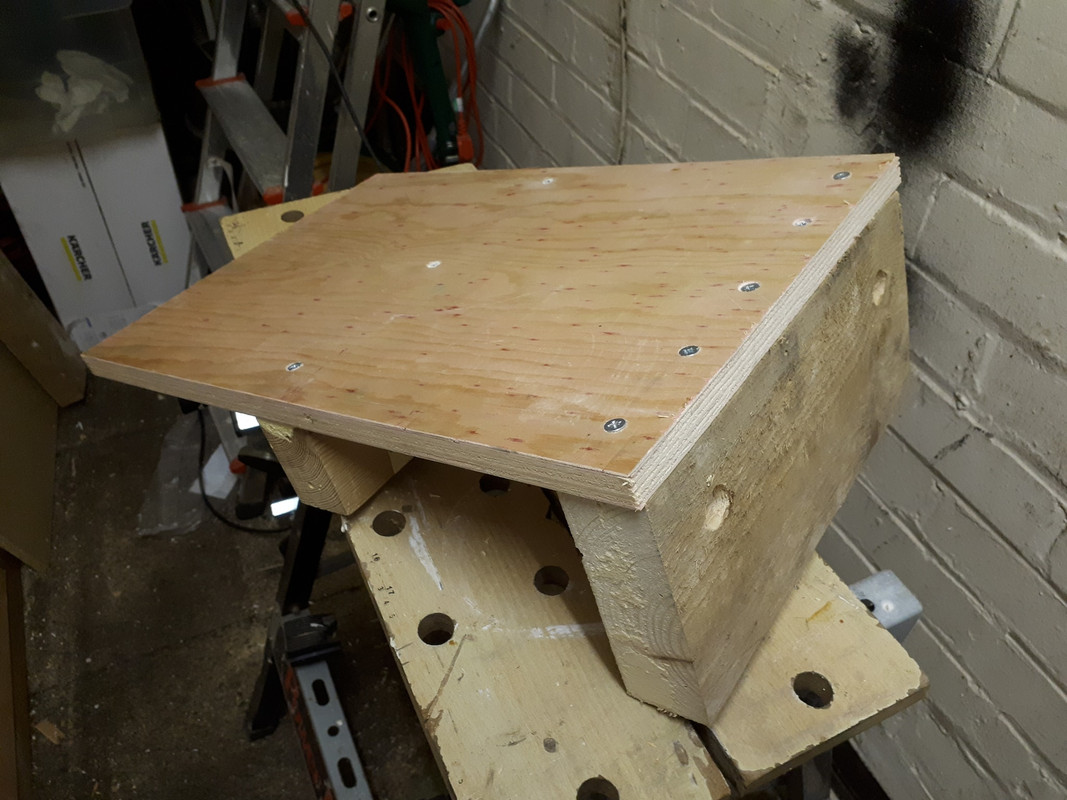
Then, I thought, "Let's go bigger", and used up a load more scrap wood:
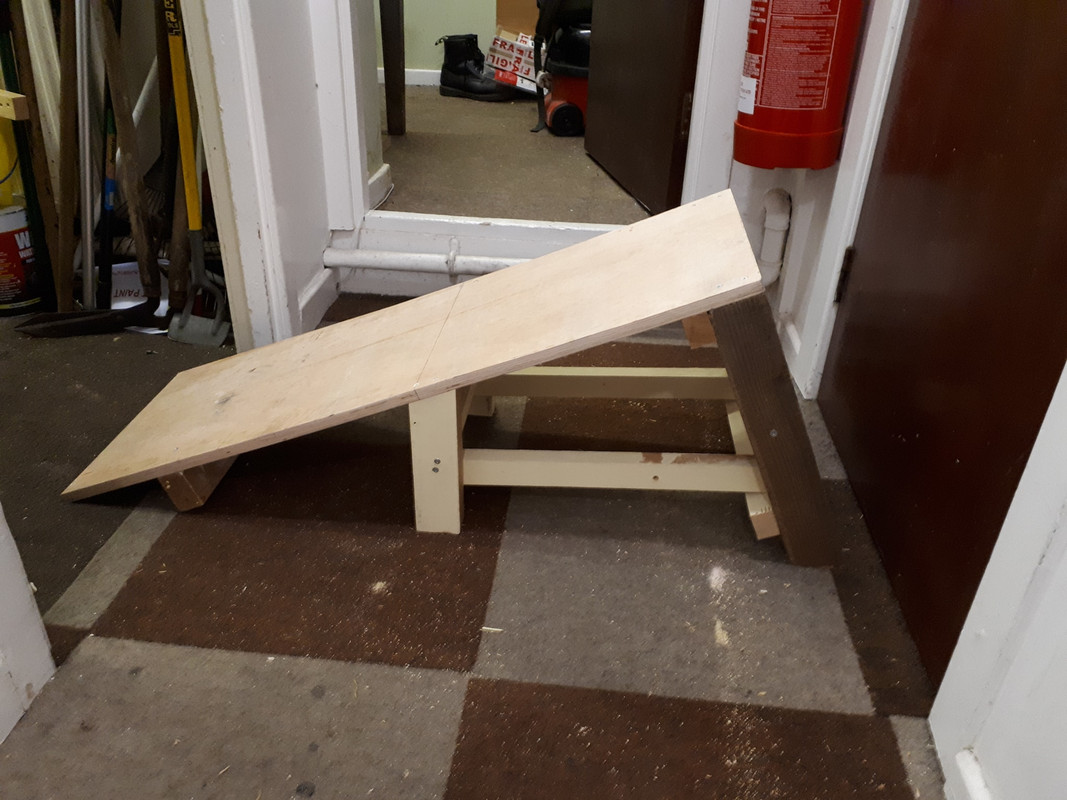
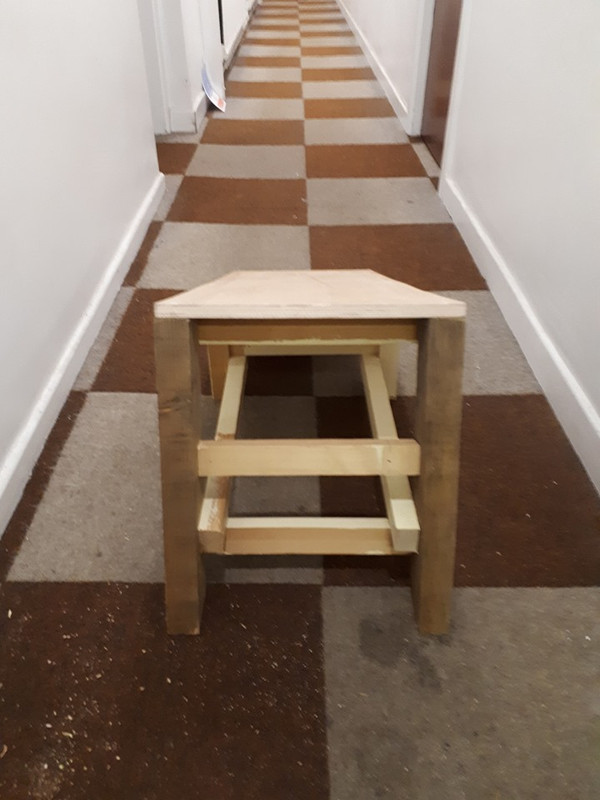
Just got to wait for a dryish day now to hurt myself...
^ awesumz!
Not quite made.... but got this 1920 single sleeve valve engine working again.
[url= https://live.staticflickr.com/7869/47555354141_a83c7e14a7.jp g" target="_blank">https://live.staticflickr.com/7869/47555354141_a83c7e14a7.jp g"/> [/img][/url][url= https://flic.kr/p/2fsiBYZ ]Barr and Stroud Sleeve Valve Engine[/url] by [url= https://www.flickr.com/photos/2strokesteve/ ]Stephen Williams[/url], on Flickr
https://www.youtube.com/watch?v=X1AsImew0l8&t=69s
Even got it generating now, it's meant to run at 4000RPM and produced 200V 250W @ 400Hz for a lifeboat Marconi radio transmitter, but not sure how well it would stand up to it at nearly 100years old.
That's a beaut! What fuel does it use?
@tthew, just petrol, it smokes a bit due to the oil pressure on the sleeve, sounds like a mini semi-diesel.... I have a 2 stroke diesel genset but as it was the last of only 15 made it now lives in a museum for such items in Wales on longterm loan.
I'd like to get my open crank out more often but it's not as rare or interesting (well to me...) though most enthusiasts would prefer it....
A birthday card
[url= https://live.staticflickr.com/65535/48056930457_74265d330c_z.jp g" target="_blank">https://live.staticflickr.com/65535/48056930457_74265d330c_z.jp g"/> [/img][/url]
I bought an Asgard Trojan shed a while back. Billed as fitting 4-5 bikes in. Does it eck! Road bikes maybe.
[url= https://live.staticflickr.com/65535/48097258411_7702f53b95_k.jp g" target="_blank">https://live.staticflickr.com/65535/48097258411_7702f53b95_k.jp g"/> [/img][/url][url= https://flic.kr/p/2ghc2f4 ]Untitled[/url] by [url= https://www.flickr.com/photos/79912681@N06/ ]blackteaonesugar[/url], on Flickr
I have 4 mtbs in there and so needed a way of maximising the space and storing the bikes nicely off one another.
I found the best way was vertically with front wheels off so needed a simple way of doing it.
Those axle tube-brackets you get cost a fortune. I've made them out of wood previously I didn't want to fiddling about threading axles while supporting the bike so came up with an alternative.
I bought 4 toggle clamps (used a lot in woodworking for jigs etc) and made some angled mounting blocks out of plywood, which I'd cut to 95mm width, just under the fork spacing of my non-boost forks, and more under my fatbike forks.
[url= https://live.staticflickr.com/65535/48097250381_9223493bf6_k.jp g" target="_blank">https://live.staticflickr.com/65535/48097250381_9223493bf6_k.jp g"/> [/img][/url][url= https://flic.kr/p/2ghbYRB ]Untitled[/url] by [url= https://www.flickr.com/photos/79912681@N06/ ]blackteaonesugar[/url], on Flickr
I then routed a curved channel towards one end(a hand saw would do cutting a vee)
[url= https://live.staticflickr.com/65535/48097250986_765d81319f_k.jp g" target="_blank">https://live.staticflickr.com/65535/48097250986_765d81319f_k.jp g"/> [/img][/url][url= https://flic.kr/p/2ghbZ33 ]Untitled[/url] by [url= https://www.flickr.com/photos/79912681@N06/ ]blackteaonesugar[/url], on Flickr
Then I mounted the toggle clamps to the ply and adjusted the wotsit rubber bit until it just snapped nicely onto a bit of 15mm dowel(my axle size)
[url= https://live.staticflickr.com/65535/48097350782_eb2320f5a5_k.jp g" target="_blank">https://live.staticflickr.com/65535/48097350782_eb2320f5a5_k.jp g"/> [/img][/url][url= https://flic.kr/p/2ghcuGE ]Untitled[/url] by [url= https://www.flickr.com/photos/79912681@N06/ ]blackteaonesugar[/url], on Flickr
I then had a think ....🤔.... and thought that I'd rather spread the force of the clamp over a wider area of the axle, even though it's only rubber.
So I used some more ply, with some more curved channels routed into it, and mounted that opposite the clamps using a hinge so that it could be swung out the way when getting the bike out.
[url= https://live.staticflickr.com/65535/48097253001_1b35f28e18_k.jp g" target="_blank">https://live.staticflickr.com/65535/48097253001_1b35f28e18_k.jp g"/> [/img][/url][url= https://flic.kr/p/2ghbZCM ]Untitled[/url] by [url= https://www.flickr.com/photos/79912681@N06/ ]blackteaonesugar[/url], on Flickr
I drilled a shallow hole in the clamping ply as the toggle clamp had run out of adjustment. I could have just packed up the clamp a bit but this was closer to hand.
[url= https://live.staticflickr.com/65535/48097298033_240e779017_k.jp g" target="_blank">https://live.staticflickr.com/65535/48097298033_240e779017_k.jp g"/> [/img][/url][url= https://flic.kr/p/2ghce2c ]Untitled[/url] by [url= https://www.flickr.com/photos/79912681@N06/ ]blackteaonesugar[/url], on Flickr
[url= https://live.staticflickr.com/65535/48097255236_be7b8609f8_k.jp g" target="_blank">https://live.staticflickr.com/65535/48097255236_be7b8609f8_k.jp g"/> [/img][/url][url= https://flic.kr/p/2ghc1ij ]Untitled[/url] by [url= https://www.flickr.com/photos/79912681@N06/ ]blackteaonesugar[/url], on Flickr
Then I mounted each block into the shed onto some plywood board that I'd already fixed on the back wall.
I had to offer up each bike due to different wheelbases but yeah, wheel the bike into position, flip the hinged block over and snap the toggle clamp in. It still allows you to pivot the bike at a bigger angle which I need to do as the seat fouls the door and I don't like storing bikes with the dropper down.
[url= https://live.staticflickr.com/65535/48097354292_aa68061a20_k.jp g" target="_blank">https://live.staticflickr.com/65535/48097354292_aa68061a20_k.jp g"/> [/img][/url][url= https://flic.kr/p/2ghcvKb ]Untitled[/url] by [url= https://www.flickr.com/photos/79912681@N06/ ]blackteaonesugar[/url], on Flickr
[url= https://live.staticflickr.com/65535/48097256456_1b5ada0f1f_k.jp g" target="_blank">https://live.staticflickr.com/65535/48097256456_1b5ada0f1f_k.jp g"/> [/img][/url][url= https://flic.kr/p/2ghc1Em ]Untitled[/url] by [url= https://www.flickr.com/photos/79912681@N06/ ]blackteaonesugar[/url], on Flickr
[url= https://live.staticflickr.com/65535/48097355362_eabe87b2b2_k.jp g" target="_blank">https://live.staticflickr.com/65535/48097355362_eabe87b2b2_k.jp g"/> [/img][/url][url= https://flic.kr/p/2ghcw4C ]Untitled[/url] by [url= https://www.flickr.com/photos/79912681@N06/ ]blackteaonesugar[/url], on Flickr
It works really well except, the swing over clamp ply block thing hits the front brake caliper (I forgot about that) and so you've to do a little more careful angle of entry than if it wasn't there. I might modify it slightly in future.
[url= https://live.staticflickr.com/65535/48097515982_9743601677_k.jp g" target="_blank">https://live.staticflickr.com/65535/48097515982_9743601677_k.jp g"/> [/img][/url][url= https://flic.kr/p/2ghdkNW ]Untitled[/url] by [url= https://www.flickr.com/photos/79912681@N06/ ]blackteaonesugar[/url], on Flickr
It would work quite well floor mounted in a car too.
👍
@kayak23, that’s a cracking idea. My shed isn’t quite as high as the asgard, but it may work...
Not been doing much in the workshop due to real life, but got a chance to get in and do a quick paint.
Ouch my eye!
Josh
Wow just trying to pass the mensa test that is uploading images!
https://flic.kr/p/2giJGtJ
If this doesn't work I give up.
It's the stand by the way, not the floor, mess , foot stool or any other detritus I have included in this image.
Here's one I've been working on a little a while. It's not done but I'm ready to share. It's a bluetooth remote control for my phone, specifically for OruxMaps (my favourite mapping program). The idea is that when it's hammering it down with rain and my touchscreen would be unusable I can leave the phone running in a waterproof ziplock bag and still wake up the screen and zoom in/out etc. Also when riding off road on trails it's useful to be able to check the map without taking hands off the bars.
It has a low profile and can be comfortably mounted on the inside of road STI's or flat mtb bars.
I did the case design on Autodesk's www.tinkercad.com and my friend at work has a 3d printer. Design:
[url= https://i.ibb.co/8bhHXPg/image.pn g" target="_blank">https://i.ibb.co/8bhHXPg/image.pn g"/> [/img][/url]
Real life (nice glowing red LED on charge):
[url= https://i.ibb.co/6nYvyKk/image.pn g" target="_blank">https://i.ibb.co/6nYvyKk/image.pn g"/> [/img][/url]
This first version was basically a learning experience for 3d design/print and now I am redesigning it with bigger buttons, better tactile response and better waterproofing. The new top/buttons will be one piece 3d printed in TPU (flexi plastic).
The bluetooth board in this one is simply stripped from some throw-away-cheap Chinese bluetooth headphones.
[url= https://i.ibb.co/ZdRghR7/image.pn g" target="_blank">https://i.ibb.co/ZdRghR7/image.pn g"/> [/img][/url]
It had to be used in combination with a little app I wrote to fake being a media player (so it could receive headphone button presses when the phone is sleeping)- recent'ish version at https://github.com/ptd006/Biketweaks . (This whole project started with just a wired headphone button.) However I have already started the next iteration of the remote control with a general purpose bluetooth chip (Nordic NRF5 series). This will allow me to do cooler stuff like have a little optical map panning thing and potentially a display for heart rate etc.
Impressive 👌
Nice bike stand too ^^
That's really impressive twowheels
Not a new project, but one that I didn't document properly at the time. I just came across this photo!
For the life of me I can't post images on here!! Doh!
@blokeuptheroad - yup it is awful. If you don't have a flickr or similar account you can paste to an ad-driven site like https://imgbb.com/ . After uploading there is an option to "copy bb code". You then paste that in your post here.
After uploading there is an option to “copy bb code”. You then paste that in your post here.
you can do that direct from flickr. Or by copying the url if on a mobile. Thats how I do it
Got a link to your pic BUTR?
For the life of me I can’t post images on here!! Doh!
Find the link on whatever photo hosting site you use that starts with "..[IMG]www.blahblah". (and will end with "blah blah[/IMG]").
'Copy' that, and just paste it straight into your post on here.
Edit: I'm so thick 😀 Here's a screenshot of what I meant to say:
[IMG]  [/IMG]
Not allowed to post actual pics of the parts but they are on this.

Find the link on whatever photo hosting site you use that starts with “..“).
‘Copy’ that, and just paste it straight into your post on here.
Edit: I’m so thick 😀 Here’s a screenshot of what I meant to say:
Thanks. Will it work? Here goes...
[img]  [/img]
[img]  [/img]
Edit: yes it will! Tried every link of the dozen or so on Imgbb except that one, thanks bearnecessities!
New coop, the second I've built, currently unoccupied awaiting a new flock of girls.
kayak23 that is a proper sneaky idea, well done!
This is what's been keeping me fit lately.
Before:

During:

And after:

Although the wife says she was intercepted the other day by representatives of the Lollipop Guild.
Great job on the garden.
We're lucky enough to have a large garden- unfortunately it was retired couple that had the house before us and the garden is a nightmare to keep on top of, especially the many borders.
Tinribs in training for World Hopscotch champs? Looks nice and easy to keep tidy.
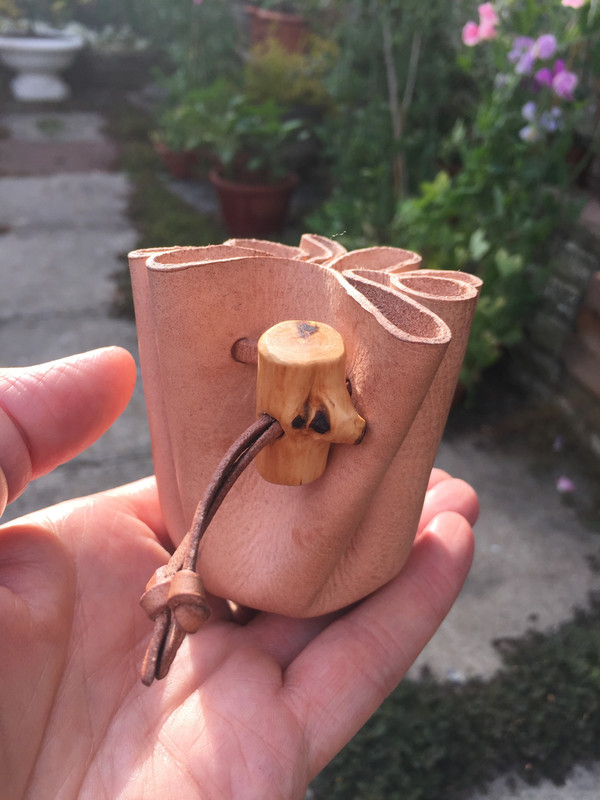
As my wallet isn’t designed to carry more than a few cards, paper cash and other flat bits and pieces, I need a small pouch for loose cash. I’ve had a small drawstring leather pouch for a few years, made from three bits of thin leather stitched together, but I thought it might be fun to make one out of a single piece.
I was at the Knives ‘19 show last weekend, there’s a stand that does all sorts of leather goods for making sheaths, etc, and they gave me a square piece of undyed 2mm leather that had a faint imprint on it.
A bit of working out with a small bowl, paper and scissors, and a small piece of blackthorn I had kicking around for a toggle, and I ended up with this:
Couple of pics of my wee flat I rent out. I have posted pics before but not in its completed state. I am very chuffed with this. 6 months work, £10 000 and a full refurb to high standards meeting all regs for rentals
[url= https://live.staticflickr.com/65535/48220754507_646fb0dde0_b.jp g" target="_blank">https://live.staticflickr.com/65535/48220754507_646fb0dde0_b.jp g"/> [/img][/url][url= https://flic.kr/p/2gt6Yk6 ]DSC_1169[/url] by [url= https://www.flickr.com/photos/25846484@N04/ ]TandemJeremy[/url], on Flickr
[url= https://live.staticflickr.com/65535/48220754647_fdb1b2b2b6_b.jp g" target="_blank">https://live.staticflickr.com/65535/48220754647_fdb1b2b2b6_b.jp g"/> [/img][/url][url= https://flic.kr/p/2gt6Ynv ]DSC_1168[/url] by [url= https://www.flickr.com/photos/25846484@N04/ ]TandemJeremy[/url], on Flickr
[url= https://live.staticflickr.com/65535/48220754737_ea1c11d2d4_b.jp g" target="_blank">https://live.staticflickr.com/65535/48220754737_ea1c11d2d4_b.jp g"/> [/img][/url][url= https://flic.kr/p/2gt6Yp4 ]DSC_1167[/url] by [url= https://www.flickr.com/photos/25846484@N04/ ]TandemJeremy[/url], on Flickr
Looks good tj
Very nice. I hope you get tenants who value it as highly as you.
Not said in a snide fashion: we have 3 lovely tenants in our 3 houses because we did them out nicely and stress to them that "although it's our house it's your home, so if you want to put pictures up etc., go ahead". It's worked well so far.
Thats pretty much what we do Bigjohn - we do live next door which helps
CountZero is Robin of Locksley and I claim my five shillings.
CountZero is Robin of Locksley and I claim my five shillings.
Nah, I gave up on using a bow when I left school!
I just need something to carry loose change in, wallet can’t, various cloth sunglasses bags have worn through, had a little leather bag for a few years made from three pieces stitched together, just fancied seeing if I could make something quickly out of a single piece of leather. Total cost, zero, leather was free, had some blackthorn, took about an hour and a half.
Nice,I like the handles.
Haven't checked in for a while - some great things posted. Absolutely love this thread!
Posted this on bearbones but thought it would fit here too.
basically needed a mount to attach my dynamo light to the front of a truss fork, I wasn't keen to mount it on the bars as it'll get in the way of bar bags and generally make it less tidy. No mounts available that I could find so I made one myself out of an old crank arm.

Firstly did some sawing
 " alt="" />
Then some drilling
 " alt="" />
Then some drilling, tapping, sawing, filing and sanding and it seems to work! much more solid than it needs to be so maybe I'll trim some metal off or drill some weight saving holes in it. Quite happy with the result anyway
Stu nice work.
Would you be able to drill a hole in the plate and weld the loops from the back?, plug weld effectivly. For me welding seems to take ages to get right, have tried tig and went through gas quicker than filler rod (i was doing it wrong😁).
I made a crane
[img]  [/img]
So that I could plant some posts
[img]  [/img]
So that I could make a carport
[img]  [/img]
wasn't actually finished when I took that pic, but hopefully you get the idea.
Nice truckport. But I'm even more envious of the workshop big enough to fit a T244 AND work alongside it! Happy apprentice memories from developing / building those things at Leyland in the very early '90s.
Bigdean, to be honest I wish I'd have punched through the plate and rivetted from the back and not done any weld. I've experimented with plug welding in the past, with not much success but that was much thinner stuff and I agree a plug would have worked a treat.
Hindsight is 20/20 and all that
Hoping to post a pic of a Raspberry Pi case at some point. So far I've done an internet search and seen all the standard offerings, and the non-standard offerings, and everything in between. Need the imagination to kick in. Thinking perhaps using old bike parts and/or reclaimed pallets. Maybe nick some bits from my Dad's shed when I next visit. Found a really nice looking offcut from a former reclaimed pallet in the man-cupboard at the end of the hall, yesterday. Not even got a half baked idea yet. Time helps too.
Cheeky little set of bookshelves to go on the kitchen counter top. Oak 'n' ply
I've made a feeding station for a hedgehog out of scrap bits.

Seems to have been appreciated by the local hog. The neighbours cat is a bit annoyed about it all though.

Kayak - thats really nice.
Just another - pics not showing for me
D"oh. Anyone know how do I link from a drop box photo? I've share it publicly so though getting the source url would work. Seems not.


It's amazing to see what people are capable of. The quality on this thread is high indeed.
My humble offerings are these I made recently, as my boss is off for a few weeks with a knackered finger.


(that took three goes to publish)
Anyway, these are for a late 30s Dawes Efficiency Tourist.
3 piece 6082 T6, 36 hole, 90mm OLD front, 110mm OLD rear with an ISO disc cog fitting, double bearings on drive side
I miss driving DAF 4 tonners.
Those hubs are amazing bruise.
Thank you @kayak23 I would have preferred to use a thread-on cog, but I can't seem to turn a thread that precisely with my lathe. I'd like to make a rear screw-on freewheel eccentric SSMTB hub, similar to the WI ENO.
Why can't I see the hubs, have I been naughty? I love a hub..
I've got no idea. It's probably something to do with the BBcode from Imgur.
Daughter number 2 carved a spoon with her Mora knife from a bit of wood we picked up in Lotts Wood
[url= https://i.ibb.co/C9kWdtW/IMG-20190727-130743.jp g" target="_blank">https://i.ibb.co/C9kWdtW/IMG-20190727-130743.jp g"/> [/img][/url]
^I'm sure I still have the first spoon I carved 30ish years ago - and I was probably about the same age wise!
Those black lugs tho 👍🏼
Slightly cheating as I didn't actually do the making of these templates, but I will be using them to make something over the next few months/year. Can you guess what? Very nice CNC work from Chop Shop in Sheffield:

Canoe?
Life size model whale/t-rex?
Canoe?
Nearly - sea kayak!
Working on a bilaminate headtube today
