ultrafire 3000mAh protected cells on [url= http://cgi.ebay.co.uk/ws/eBayISAPI.dll?ViewItem&item=110576073884&ssPageName=STRK:MEWNX:IT#ht_1315wt_907 ]ebay[/url]. I've no idea about the brand, but i'd presume they aren't really 3000mAh as i think they are cheap foreign stuff. Still I got 4 for 12 quid posted so cant complain 🙂
Personally I only use high quality 2.6Ah Samsung Li-Ion cells, not cheap but you pay for what you get.
As for the 3Ah cells, chances are unless youre buying top quality cells they wont be 3Ah and if they are they will be pretty expensive, besides the cycle life will be pretty reduced as something has to give having that extra Ah inside for the same size can.
In essence, there are two types of driver / power supply. The old-fashioned linear supplies burn any excess voltage as heat. Switch-mode supplies like my driver are able to convert a higher voltage at low current to a low voltage at high current with minimal losses but at the expense of a more complex circuit.
With a linear driver the current out is the same as the current in. With a switch mode driver the power out is pretty much the same as the power in, taking some small losses in to account. To explain, two XPGs at 1A would represent about 6.6W of power (3.3V x 1A x 2) Using a 11.1V battery and a linear driver this would mean 11.1-6.6 = 4.5W of power would be dissipated as heat in the driver and in effect wasted. A switch-mode driver assuming 90% efficiency would use about 7.3W of power so at 11.1V this is about 660mA.
Increasing the battery voltage to 14.8V and the linear driver still draws 1A but now you are wasting 8.2W as heat. The switch-mode driver still draws 7.3W which is just under 500mA. (Current = Power / Voltage)
When you are talking single LEDs from single lithium cells then the issue of drivers gets a bit more complicated. The battery voltage is only just above the LED Vf so the wasted power in a linear driver is small, often making them as or even more efficient than a switch-mode driver, plus they are usually cheaper as they are simpler.
managed to get my new driver fitted last night (cheers blackcattech :D)
and took the triple for a spin.. only down an unlit country road but pretty impressed with the output..!! seems slightly more light than my old 20Watt philips Masterline halogen light.. but with a much colder bluer colour..
slightly 'spotty' beam though and am thinking of using a different optic on the middle LED to give a bit more flood close to the bike.. (and keeping a regina either side to keep the spot)
what optic would anyone reccomend for this purpose?
its addictive this light building business! 😉
http://uk.farnell.com/ledil/ca10931-boom-w/ssc-p7-acriche-ref-tape-base-wide/dp/1817773?in_merch=New Products&MER=i-9b10-00001144
farnells do these - i guess might work to give more flood?
for a quid a pop its got to be worth a go?
might work... but they are designed around the P7 LED's which i think are bigger in size than an XPG so it might not work...?
they have Reginas in stock at farnells in the UK ive just seen if anyone needs any..! [url= http://uk.farnell.com/ledil/c11347-regina-xp/cree-xpe-g-reflector-spot/dp/1817493 ]Farnell link to Regina optics[/url]
gunna sort an order from cutter soon i think and get a few things to tinker with from there but the optic choice is a bit bewildering!
I have used the Ultrafire 18650 3000mAH cells for a while now (in DX torches), and I don't believe they are 3000mAH as my run times are no where near what I would expect. I haven't timed the run time, but I got less than 2 hours last week with a combination of 2 and 4 XPG's on full power. I am out tonight and have just charged the cells, so will see how long they last for.
When I finish building my 2x XPG and 2x 18650 batteries inside light, I will do a proper timed run.
Don't know if they'll fit inside the Hammond case but if you check out the Ledil range at Farnell they have some oval optics - I think the heidi one is 21.6mm diameter for example. I'm intending to test a combination of spot and oval to see if that gives a better beam.
If anyone wants any, let me know ASAP as I need to order from Farnell today but I'm off to Portsmouth at about 3 this afternoon so I need to get the order in before then!
BTW, I'm sure I pointed out that Farnell had Reginas about 20 pages back....
Troutie: you have mail re ordering £28 batteries inside parts kit if you have any left.
Last night I only got 1.5 hours on a combination of 2 and 4 XPGs, using 4x 18650 3000mAh. I will have to try and do a controlled test, I have a P7 torch that takes a single 18650, I normally get an hour out of it. Will run it with each cell to try and determine which ones are bad. Or does anyone know of a better test?
Yeah something wrong there surfbus, guess the best way to tell is to try each cell in your torch whilst you sit at work or something.
surfbus - if you've got a multimeter I'd try [url= http://laserpointerforums.com/f67/how-healthy-your-batteries-how-measure-internal-resistance-57576.html ]this[/url]
Thanks johnfb will try this tonight.
You have some payment Troutie 🙂
For anyone looking for external battery options, bags like this one: http://bit.ly/frJPGl fit batteries like these pretty well: http://bit.ly/ibeRpW
14.4v LiPo batteries will also overvolt your retro halogens very nicely 🙂
ok Dr
Will get them in the post tonight
Thanks
Doctor Rad - Any idea what charger for those LIPO batteries?
@thesurfbus - I got one of these: http://bit.ly/eb35Xe which claims to charge pretty much anything: LiPo, LiIon, LiFe, NiMH, NiCd and good old Lead Acid. Will do balanced charging for LiPo stacks, and claims to do balanced discharging too, but I don't think it does this correctly. Needs an external power supply, a laptop supply with the right plug works fine for me.
LiPo charging is a tricky business; get it wrong and you can cause a fire: http://bit.ly/epCGQL
Apparently it's best to use a charger which will balance the cells, i.e. make sure each cell of the battery is charged to the same voltage. If you don't do this, you can easily overcharge a cell, or over-discharge it when the battery is in use.
You also need to be careful not to over-discharge the whole battery pack. A 4-cell 14.8v pack should not be discharged lower than 12v, or 3v per cell. At this point, your LEDs or halogens would still be burning brightly! You can get battery monitors / alarms on eBay, or build your own if you can solder: http://bit.ly/hVuMYm (circuit diagram in 4th post).
One of the two 4-cell batteries I got ( http://bit.ly/ibeRpW) apparently has two bad cells which won't charge properly. May be able to revive them by discharging the other cells to the same level and then charging, but I'm not sure yet. Have asked if I can return the pack to Hong Kong for a replacement, will keep you posted on customer service quality.
Have a look round their eBay shop, they've some useful stuff and LOADS of different LiPo battery packs: http://stores.ebay.co.uk/GoMarketStore
Hi Troutie, I've sorted payment and emailed you my address.
Did you recieve it?
Hi troutie i sent you payment last friday,just wondering if the kits on its way,got BCT kit on tuesday and hammond box,cant wait to get started.
Greasyrider
not sure depennds on what your real name is .
Piker your stuffs in the postal system somewhere .
Thanks troutie,just itching to get started.
Hi Troutie, just emailed you.
Thanks, Andy
Right then: drilling stuff.
I'm much better at the electrical side of things than the mechanical. Looking at the standard of CK's drilling and tapping, I'm guessing he must be using a pillar drill?
I already have a tap and die set, but my concern is about drilling holes 'straight' into the metal, as presumably if the pilot hole is 'off' then the tapped hole will result in a wonky bolt? So, how to drill straight without a pillar drill?
Response from go_market about the wonky battery: they're sending me a new one! Have asked if I need to send the duff one back (will actually work as a spare if not) but can't say fairer than that... assuming it turns up!
i used mini nuts and bolts and gave myself enough 'float' with each hole to line things up.
otherwise you just have to centrepunch the bolt hole and be really careful. the ali is so soft do you really need to tap the holes? a self tapping screw will offer more leniency than a wonky tapped bolthole.
all my equipment is a bit shonky (bought for fixing classic VW`s not weeny accurate electrical work) and i dont have a vice either so i have to accept it wont be perfect (although my light doesnt look bodged!)
Just a quickie for BCT: how well would your drivers cope with a sudden change in load? I'm thinking about having a second switch on the output to swap from two LEDs to one, either for power saving or so you could switch in and out a more floody optic on the switchable LED.
I guess a break-before-make switch would work best so there's a break in connection when switching?
Dr Rad
No the leds or driver will not like the sudden switching of loads and while it may work once or twice
Bad things will happen.
IE. Both leds are on so driver sending 6.6 volts to the leds. You suddenly switch one off
The other suddenly get all the six vots and becomes unhappy
Newb here, just read this thread front to back, after a post i read on MTBR guided me here...
Really interested in building this but have a few Q's
Can you both (trout and BCT) confirm you have kits available? (not neccessarily in stock) but dont wanna buy one half if the other half isnt available. haha.
secondly, where do i send payment?
Thirdly... Thankyou. 🙂
Troutie, is this something you've actually tried? I'm not sure myself but I'd have thought it should be OK. The voltage is pretty much irrelevant, the driver stores charge in an inductor and discharges it through the LEDs. If you reduce the load suddenly then briefly the inductor will hold too much charge which would result in a slight current spike through the LED but as there is also a capacitor across the output this will absorb some of that spike until the driver has the chance to adjust itself. As XPGs can take 1.5A you may be fine.
Really, I'd want to set up a system to measure current in the loop and see what happens but you'd need a 'scope to do this properly.
A few points I'd make though, you would be better reducing current rather than the number of LEDs to save power - LEDs are more efficient at lower currents so two LEDs at 350mA would give more light than one at 700mA.
If you did want to disable one LED or switch one LED for another what I'd do is to use a suitably rated switch to short across the LED in question. That would mean there is always a complete path rather than possibly having momentary open circuits which could cause problems. I'd still want to check this with a 'scope though.
(BTW, Troutie, did you get my email from a few days back about drivers / XPGs? Or are VM playing their usual tricks again....)
Yup, kits available still. Payment details are in the thread several times but it's go a bit messy now! Paypal address is in my profile, kits are £8 each plus £1 P&P for as many as you like. (Although I'm down to my last few switches now)
BCT - Can you stick me down for two Kits, Payment Sent
Troutie - If you could get in touch and let me know i would appreciate it 😉
cheers
@trout - I thought this might be the case, but then if two LEDs were disconnected and one LED connected afterwards, presumably the driver would have time to sort itself out while there was no output load connected. What I need to know is how long the driver takes to sort itself out and if a break-before-make switch would give enough time.
@BCT - good point about efficiency, but at low speeds I might want e.g. to be able to switch out my more floody beam to save power.
I'll get the double regina version rocking first and then look at refinements. I like the idea of a dynamo version too mind you, I think there's scope for a single unit with two power sockets for either battery or dynamo drive.
DrRad - not that easy I'm afraid. Once the inductor has stored some charge the only way to discharge it is through the LEDs so you will always get that initial spike. What I don't know without doing some measurements is how high that spike could be - as I say, hopefully the capacitor on the output will even it out. If you did do this then maybe connecting another capacitor on the output would help as well - the one fitted is only 1uF so maybe something in the range of 22-47uF may help but again I'd prefer to do the measurements first rather than guessing.
For those wanting spare end pieces for their Hammond boxes, Digikey can order them in for you: http://bit.ly/geKxOz (photos here: http://bit.ly/fKmxvJ )
Hi Joec1
Yes I have plenty of the kits available
mail is in my profile
Steven
not tried myself but going of what George from Taskled said when asked the same question as Dr Rad asked .
will have a trawl through the spam and see if your mail is there .
It seems like a few of you have not yet received your kits from the last batch I posted the PO sounds like they are struggling with a huge backlog of deliveries so I cant raise any missing mail queries just yet they say I need to wait till things settle down after the xmas rush.
Hey Doc .... as BCT says far better to switch the power down on both LEDs using the driver control switch.
If you drill the holes in the case first and dry fit the L bracket, Leds, reginas and lexan to the case, you can then mark through the holes onto the L plate with a scribe or fine sharpie/pencil making sure everything is pushed up to the lexan. Disassemble everything, centre punch the 3 scribe/sharpie/pencil circles and drill the L plate. This ensures that even if you are slightly out of line with your case holes, the L plate holes should match!
As for alternative optics .... I'm contemplating experimenting with an optic swap for my dip beam.
Doc ... you know you want to do it don't you ...... 😈
[IMG] 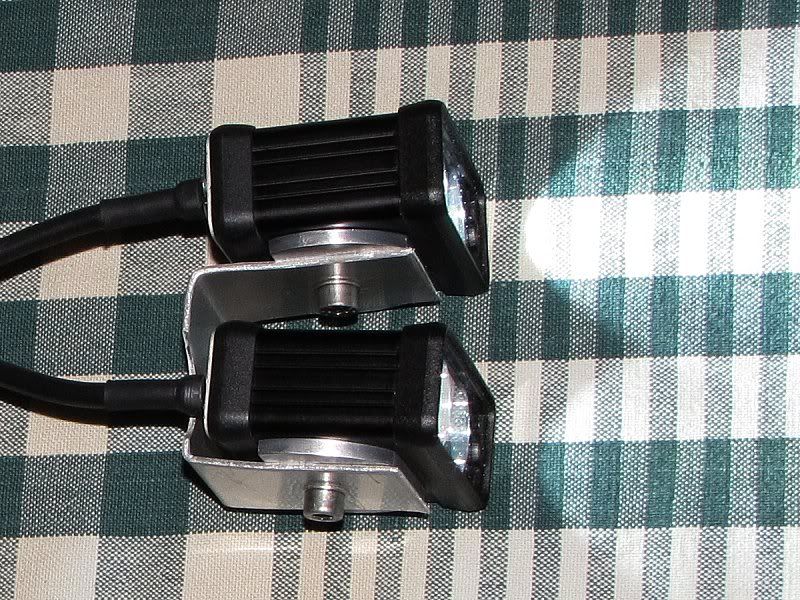 [/IMG]
..... my test rig .........
..... twin lights ..... dip and main ... or ... wide and narrow ..... 😀
Brill troutie.
Can you confirm the cost per set? I will get payment across to you tonight (when I know what it is haha)
Cheers.
Will see if I get the chance to do some tinkering next week - bosses are using up their holiday allowance before the year end so I should be able to play a bit... Any peak will be for well under a millisecond so shouldn't overly tax the LED and I'm fairly sure the capacitor will filter things out anyway, still best check before I start advising!
Not sure if any of the driver kits are held up but I'd be surprised if they aren't. I have just received a weekly paper that comes on a Wednesday - dated 8th December. I'm waiting for some LEDs that I ordered from Germany over two weeks ago and in general I seem to be getting much less post than usual so I have a feeling things are going to be FUBARed until well in to the New Year...
I have just posted out a batch of the latest folks stuff ordered
but dont hold your breath for christmas the post lady said .
Steven you need now to be thinking about a max 3 amp driver .
with dimming and thermal protection .and you could be on to a winner in the new year .
for the XM-L they are shipping soon
Still thinking about drivers to be honest. I've had feedback from elsewhere that sticking with the 25mm circular format would be preferable. I think I may end up with three drivers, 25mm circular ones rated at 1.5A in buck and boost formats and the 3A buck driver in a larger, rectangular format.
Snowed in ..... Very unusual for Merseyside ..... no Christmas shopping, no grocery shopping .... no bikey riding ....Bah! 😥
Hmmmm! Found a spare piece of hammond extrusion .... how about making a hood for the dip beam .... could give it a try ......
[IMG] 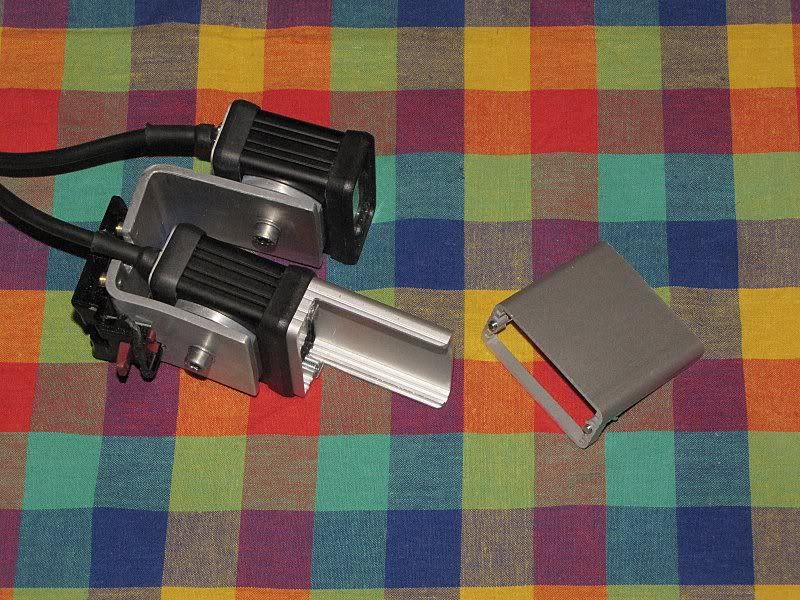 [/IMG]
.... how about 2 from one piece!
[IMG] 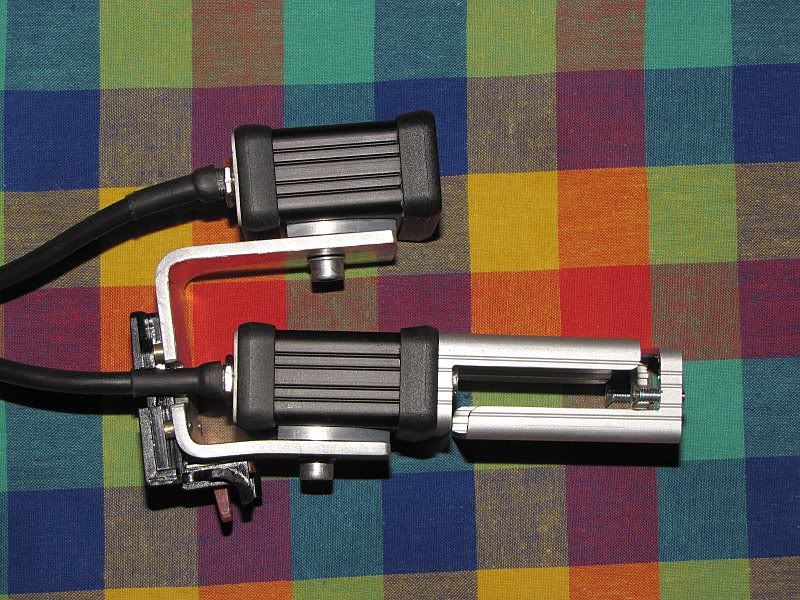 [/IMG]
One of them will match the dynamo light nicely ..... I could anodise the one for the twin lights .... all they need are longer screws and they fit the front perfectly.
But will they work .......... too much snow to find out! ........... Patience! 👿
I think I just fried mine.
Wires came off and in a moment of foolishness I didnt' double check what went where. A brief flash then nothing...bugger
Picked up a couple of Hammond boxes from Maplin yesterday... OMG, so tiny! Everything looks bigger in the photos.
Batteries arrived from DX finally. Found a good little case in Mountain Warehouse that fits my DIY 4x18650 holder perfectly, so job done for now, though I do have an itch to make a v2 with a more spready optic on one LED if I can find info on them somewhere. I whittled part of troutie's mount down to fit into a broken Exposure mount I have lying around, just off to test it in the snow, seems solid. Total cost of light must be about £50-£60 I guess, nae bad!
[url= http://farm6.static.flickr.com/5001/5273718089_926e30ca8b.jp g" target="_blank">
[url= http://www.flickr.com/photos/squaresjim/5273718089/ ]IMG_7869_1024x768[/url]
[url= http://farm6.static.flickr.com/5247/5273717971_efd5f718bb.jp g" target="_blank">
[url= http://www.flickr.com/photos/squaresjim/5273717971/ ]IMG_7867_1024x768[/url]
[url= http://farm6.static.flickr.com/5124/5273710417_13a54f1c7c.jp g" target="_blank">
[url= http://www.flickr.com/photos/squaresjim/5273710417/ ]IMG_7882_1024x768[/url]
[url= http://farm6.static.flickr.com/5122/5274317362_7c9a255e56.jp g" target="_blank">
[url= http://www.flickr.com/photos/squaresjim/5274317362/ ]IMG_7881_576x768[/url]
[url= http://farm6.static.flickr.com/5049/5274317246_8ec9d394cc.jp g" target="_blank">
[url= http://www.flickr.com/photos/squaresjim/5274317246/ ]IMG_7884_1024x768[/url]
[url= http://farm6.static.flickr.com/5086/5273709933_bcff8b1b06.jp g" target="_blank">
[url= http://www.flickr.com/photos/squaresjim/5273709933/ ]IMG_7883_1024x768[/url]
Troutie did you get my email re. missing package?
I've bought a few of the extension cables from DX ( http://www.dealextreme.com/details.dx/sku.32751) so if anyone would like one fire me an email. I'm guessing they will take a while to arrive though...
J
Yes I did Jammy also replied see my post further up
theres millions of parcels languishing in warehouses due to the weather and xmas rush just have to be patient
Nice job BJ
Couldn't have done it without you and BCt troutie - thanks!
Jammy - my last order from DX took 6 weeks or so, might be longer now the royal snail are up the creek.
@bigjim - would frosting the glass over the front of one reflector make the beam a bit more floody? Could be an easy win...
@bigjim - would frosting the glass over the front of one reflector make the beam a bit more floody? Could be an easy win...
I really dont know, a more spready lens or reflector would perhaps be more efficient.
trout - Are the kits (from you) still £20 each? i need two kits and one box (i already have the other box) so i make it £48? can you confirm and i will have payment across to you today.
Hi Joec1
Yep that is correct.
Not likly to get for before xmas though with the mail
cheers trout, will send across now
yea i had guessed that. doesnt matter too much, as long as its here soon(ish) haha. will add my username to the payment details.
just striped down a 'dead' laptop battery i was given at work and all cells were between 3.92 and 3.94 volts. i haven't ordered a charger yet, so can't test any further
So after connecting up the battery the wrong way and everything looking dead. What is post likely to have died on me?
My leds, or driver?
I think the driver doesn't have polarity protection if I remember correctly. Not sure if the badness would have made it as far as the leds and if they would be damaged too.
The driver will have gone - they are not tolerant of reverse connection of power I'm afraid. Next batch I'm going to have to add this as I've found a way to do it with minimal losses. Only problem is I've got a few hundred of these to get through first...
It is unlikely to have reached the LEDs but not impossible. The LED+ is near enough the power + (only a low value resistor between them). The LED- should only go live when the driver IC starts switching which it won't have done with power the wrong way but it depends what internal damage it has done to the IC. Or if you happen to have a LED short to the case.
As I've suggested before, and easy and safe way to test power LEDs is a PP3, preferably a really cheap one, direct across the LED. They can't source enough current to do any damage but I wouldn't do it for long, just enough to test it still works.
Package has turned up, thanks Troutie 🙂
Thanks trout,package arrived today.
Time to re-read the thread and get cracking.
ah well.
I will figure out how I'm going to dig open the case and get to the driver I smothered in silicon.
Last question before i get started,what is the best glue to use to stick the driver to the ali heatsink/heatsink to hammond box.
Piker - Arctic Alumina Adhesive
Thanks bobblehat, on the bottom of the new driver i have there are 5 small holes that show metal,will they short out on the ali heatsink or is it not a problem.
piker I used some car touch up paint on the exposed connections on the back before I glued the driver on to the aluminium. HTH
Happy Xmas & happy new year to all you fellow builders! 
I used the AAA directly on the board ... it's non-conductive and non-capacitive. The AAA layer, even if very thin, will insulate the board from the small piece of aluminium. I think the exposed metal is actually minutely recessed as the solder mask covers all but those exposed bits.
Did you get a case with solid plastic ends or metal ends with plastic bezel? I think you'll be OK with using AAA to stick the little ali plate to either.
If you got the new-type power connector as well (I think you did) then there is less of a problem with electrical shorts through a metal backplate as the body is now plastic. The original power connectors I supplied had a metal body so of course the backplate (and in theory the whole case) was live. There may still be a problem if there are any shorts on the LED connections to the case but as bobble says AAA is insulative so you shouldn't need to worry.
Best check on the size of the mounting plate, as the connections are now on both sides of the board make sure you don't short between them.
Thanks for the advice,i have trimmed the plate a bit so the end connections dont short.Was just bothered about the holes underneath.
Can normal 2 part epoxy adhesive be used for the driver,AAA is expensive considering i only need a tiny bit and i have epoxy to hand.
Bigjim: is [url= http://www.mountainwarehouse.com/travel/backpacks/mini-5l-10l/combi-pocket-p2866.aspx ]THIS[/url] the case your using for your batteries, did the velcro strap come with it?
Epoxy not ideal as it starts to soften when you get over about 50-60C. Also heat transfer to the block will be minimal. That said, the new driver runs cooler anyway so not such an issue but it is always good to reduce the temperature as far as possible.
If you are using AAA to mount your LEDs then do the driver at the same time. If you've already done the LEDs or are using thermal paste and screws then you would probably get away with epoxy or a contact adhesive.
Bite the bullet piker ...... get the AAA .... you'll probably need some for your next build as well! ..........
........... Oh! Yes! There will be a next build 😈
I have used silicon for the driver with no adverse effects in a few lights and still working fine .
all recieved cheers folks.
Wah! Hoo! The posts are back again! 🙂
Thank god its back ... I thought my build instructions had vanished!
managed to finally finish off my MK2 triple hammond yesterday.. 😆
2 cool white XPG using regina reflectors, and a single warm white (i think its warm anyway..) XPG through an oval optic to give a bit of spread and less of a cold beam in the foreground..
first ride with it tomorrow.. cant wait! 8)
thanks to trout and Blackcattech for the parts / inspiration!
MK3 and 4 are already being planned with some triple XPG boards... 😯
What optic did you use spacehopper? Very keen to get one of my 2 leds through a more floody optic than the regina reflector - get a bit more light around the foreground.
[url= http://www.cutter.com.au/proddetail.php?prod=cut941 ]Oval Optic[/url]
the Oval version of one of these.. i got it from Farnell though but cant find it on there now.....!
i think there is a newer/better version out though which is on the farnell site..
[url= http://uk.farnell.com/ledil/ca11365-laura-o-xp-tape/cree-xpe-g-optic-holder-oval/dp/1848285 ]Newer Laura Oval Optic on Farnell[/url] 🙂
Cool thanks. I take it you used a larger box to get the three and that bigger optic in? I'd be interested in seeing some pics of that, and beamshots!
Is there a minimum order at Farnells?
pics of the light... this is Mark 2..!
[url= http://farm6.static.flickr.com/5283/5343198547_2f0321bb35.jp g" target="_blank">
[url= http://farm6.static.flickr.com/5162/5343198863_4436df1aa9.jp g" target="_blank">
[url= http://farm6.static.flickr.com/5281/5343808132_d3500c9dd1.jp g" target="_blank">
not the prettiest of things.. reminds me of Number 5 from Short circuit..
It was going to have a piece of plastic or something in front of the clear perspex front to make the front look neater but found they interfered with the beam when next to the reflectors..
shifted the heatsink upwards in the case too to the top as when the LEDS where at the bottom the bottom of the case it cut off part of the beam and stopped the light shining downwards to where the front wheel is..
oh.. and if you do use one of the oval / laura type optics they are about 2mm shorter than a regina reflector... so i cut a square of aluminium to put behind the LED and space it to the same level at the front. So as not to block the periphery of the oval beam being blocked by the Regina's either side..
will take some beamshots tomorrow night and post them on here if i remember! 8)
and yes there is a minimum order of £20 at Farnell..
its pretty near to where My other half lives in Leeds though so i might pop in over the weekend as ive seen big billboards advertising a trade counter and see if i can pick up some of the new Laura Optics and see if they are any better..
troutie, did you receive my email?
test ride last night.. 🙂
[url= http://farm6.static.flickr.com/5005/5346613921_6c75d7b1dd.jp g" target="_blank">
Beamshots.. all @ 970Ma
Camera Fuji F31FD 3 second exposure 2.8 aperture Iso 100
2 Reginas + Oval Optic...
[url= http://farm6.static.flickr.com/5008/5346610467_b3dc7410b1.jp g" target="_blank">
2 Reginas
[url= http://farm6.static.flickr.com/5085/5346610265_cdd31b7c5c.jp g" target="_blank">
Just the Oval Optic..
[url= http://farm6.static.flickr.com/5045/5346609969_185e9160ce.jp g" target="_blank">
20 Watt Philips Masterline Halogen @ 14 Volts for comparison
[url= http://farm6.static.flickr.com/5121/5346609801_2489e76a11.jp g" target="_blank">
looks a bit more floody in the pictures than in real life..
Hopefully Mark 3 with a 20mm triple XPG and floody optic in the centre in place of the Oval will improve this a bit.. 🙂