I don't think I've totally stuffed up the crank, it's gone back on and I'm going to try and crank it up better.
Torqued to spec? Don't keep tightening it, check the spacers etc first
It probably wasn't. Is now. I suspect this means that I'll be buying new cranks sooner rather than later.
I have managed to setup the shocks ok. Neither of them have any rebound or anything like that, just lock outs. Which honestly I'm happy with, it's nice and simple.
Next up, figuring out how to setup the gears properly. I've had to put the B-screw all the way in to get it tensioned up, but it seems ok. Now just for lots of faffing with the limit screws to try and get it working correctly.
Got to the bottom of the weird shifting, one of the quick links isn't on right due to the damage to the chain, so it's overly rigid and it causes the chain to skip at certain points.
Third test ride went well. Nothing fell off unlike the other two. Apart from the issue with the chain is seems ok. New chain is on order.
Hopefully once that's turned up that'll be it.
I have managed to setup the shocks ok. Neither of them have any rebound or anything like that, just lock outs
Fork and shock will deffo have rebound, might not have high/low speed compression but they will have rebound. Look for the rabbit and hare symbols.
Bike looks good though.
Fork rebound is under the right leg. Shock rebound under the lockout lever (probably). Very rare not to be able to adjust rebound.
Hare and tortoise is Rockshox, these are Fox which is just +/-
saddle looks like it could be more forward and more nose down (start flat to ground and adjust dependent upon if you find yourself moving forward - tilt back, or moving back - tilt forward, when riding).
what cranks? shimano benefit from after market aluminium pre-tension bolts sometimes. ebay.
a good source of info is the park tool website. obviously they're trying to sell tools of which there are many equivalents at lower prices.
It's not a hare either. It's a Jackalope!
Interesting, new fact for the day. 😀
Ok, so looking again at the rear shock there's a red ring around the lock out, so I guess that's for rebound? Ditto on the fork, there's a weird red tube at the bottom which I guess could be for rebound?
Anyway, fourth short test ride in the bag. New chain has been fitted. Fiddled with the shifting a bit more and it's vaguely better I think. It's normally absolutely fine when on the stand in the house, but the moment I'm out riding it's suddenly not as great. However I think it's getting to the point where I can go on a proper ride with it, which is exciting. I mean nothing else has fallen off whilst riding round the park, so up a mountain should be fine right?
The saddle position in the previous photo wasn't at all right, it wasn't even properly tight. I've sorted that out, but the only thing I don't like about the Ascend dropper is that the saddle adjustment is a bit finicky. It's still a bit more nose up than I'd like. The saddle is otherwise quite nice and it's definitely grown on me.
Photos to come soon.
Yeah rebound on the rear shocks is the dial behind the lock out lever. On the fork, pull the red thing off at the bottom of the fork leg, it's just a protective cover, the rebound dial is under that.
Not exactly ads678, done forks it's a cover, others it's the actual adjuster. On a fox 34 it'll be the adjuster. Normally it's the bigger forks where it's a cap.
Not exactly ads678, on some forks it's a cover, others it's the actual adjuster. On a fox 34 it'll be the adjuster. Normally it's the bigger forks where it's a cap.
Ignore me, I'm talking shit! The red plastic cover I'm thinking of is on the QR lever if it has one, nothing to do with the rebound knob.....
🙄
So this is the dial on the bottom of the fork:
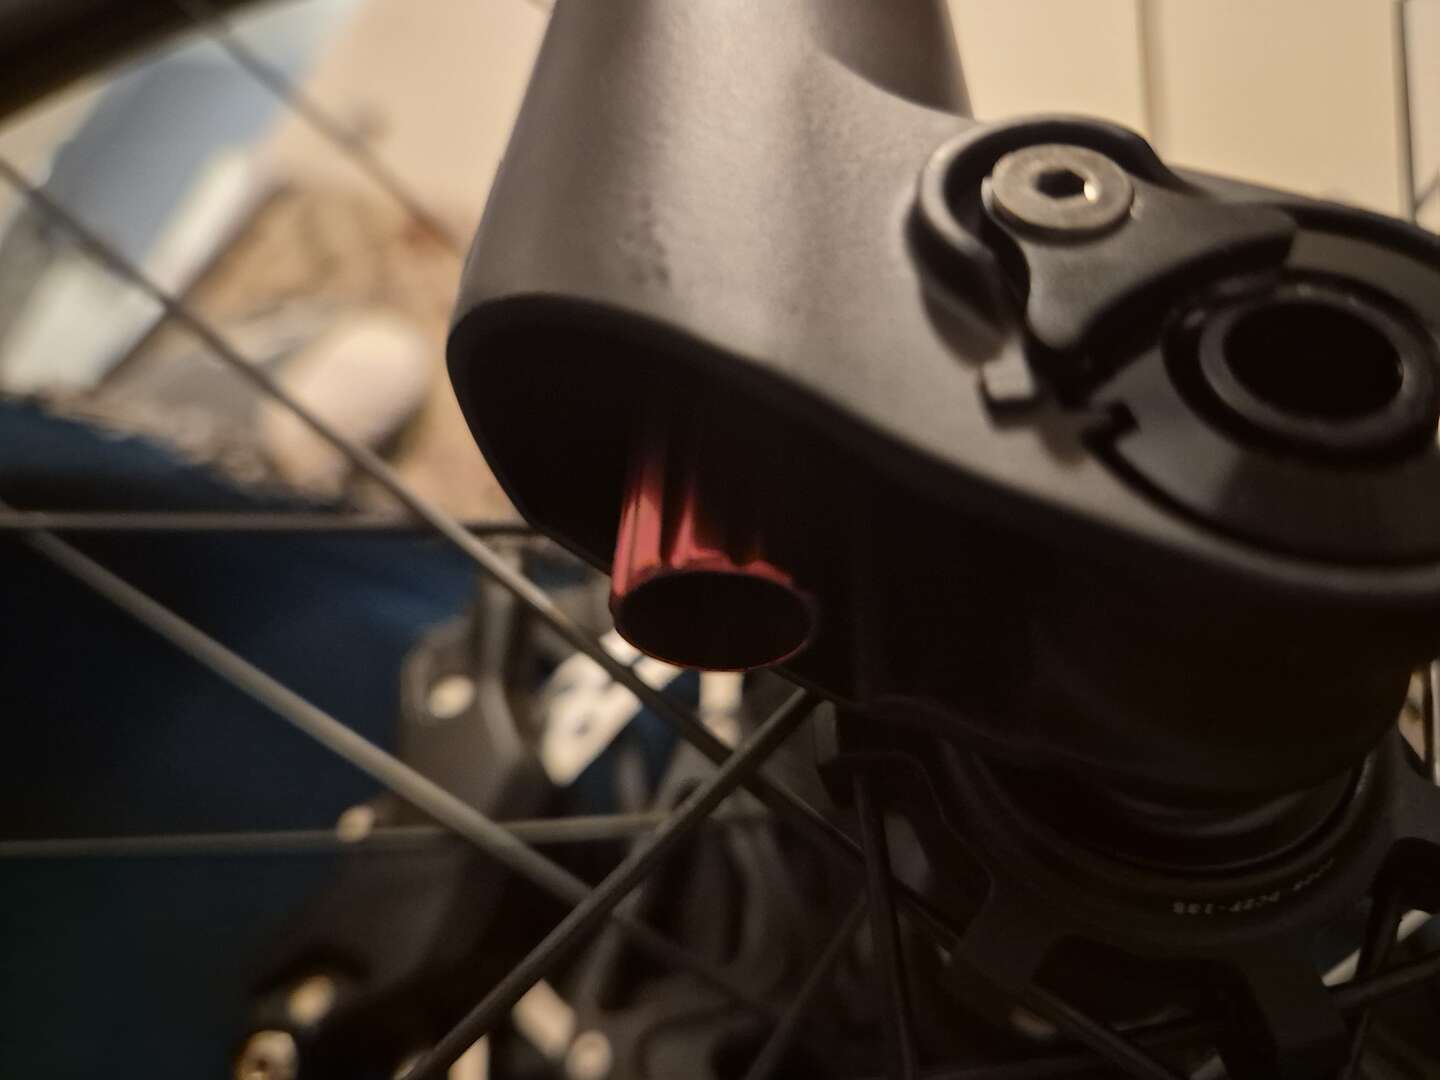
If that's rebound, then it's a bit odd. But there we go. I'm fairly happy with how the shocks are. This is more of a XC/gravel/occasional blues kinda bike, so it feels ok to me atm.
Anyway, last major annoyances are:
Shifting, for the life of me, I cannot get this right. I've watched a load of videos. I've tweaked it endlessly, but still not getting anywhere. My most recent thought was that cause the B screw was all the way in I should shorten the chain. I've done that and the tension is better, but still no idea. Apparently some SLX mechs have a guide on the back for setting up the B screw, but not this one. I don't have the little tool to tell you how to adjust the B screw. I'm sure that the hi and lo screws are fine. But the moment I'm out of the 3rd smallest cog, it just starts clicking like it wants to shift. It's fine in the biggest cog as well. So the one proper ride I've done oscillated between the biggest and smallest cog and that was it. I guess I'll have to admit defeat and take it to the LBS.
The angle of the seat. The Ascend dropper post does not have the best adjustment there. Best I've figured is to slacken the screws off, tighten up the front one, hope that you've got something like the right angle and then tighten the back one. Other seatposts I've had in the past have been much nicer to adjust. This is just a pain.
Set the chain length using the park tools method. That is chain around largest cassette cog and and the front chainring without being routed through the mech. Add 4 links to the length.
It's a second hand frame so I'd be checking the hanger is straight.
Park also have a guide for setting the B screw.
I'll try that. I used the shimano method and I still think the chain isn't tight enough. I'm hoping that's the reason tbh.
All the B- screw vids seem to use a guide, I guess I need to get another tool...
Ditto the hanger, that's a tool isn't it?
I'm definitely fed up of buying new tools.
Check the back of the derailleur again for the mark. You might need to shine a torch on it too - it can be hard to see.
A couple of thoughts and forgive me if already covered...
You mentioned a new chain, was that going onto a used/part worn cassette?
Any possibility of a stiff link? Not sure how your chain is connected (snap off pin, Shimano style, quick link etc).
Are there any bent teeth on the cassette from the earlier chain issue? I bent the cassette teeth on a SRAM ten speed setup with a ham fisted shift under massive load a couple of years back.
Mech hanger tools aren't especially expensive and not a bad thing to have in the arsenal. Depending on where you are maybe someone could lend/help? If not LBS will have.
Check the back of the derailleur again for the mark. You might need to shine a torch on it too - it can be hard to see.
I've looked and looked and I really can't see anything. Oh well.
LBS time?
I enjoy every aspect of building a bike and have done many times, but indexing gears is a hard pass for me. I can spend hours trying to do it myself and it still be shite, or get a pro to do it perfectly in 5 minutes.
A couple of thoughts and forgive me if already covered...
You mentioned a new chain, was that going onto a used/part worn cassette?
Any possibility of a stiff link? Not sure how your chain is connected (snap off pin, Shimano style, quick link etc).
Are there any bent teeth on the cassette from the earlier chain issue? I bent the cassette teeth on a SRAM ten speed setup with a ham fisted shift under massive load a couple of years back.
Mech hanger tools aren't especially expensive and not a bad thing to have in the arsenal. Depending on where you are maybe someone could lend/help? If not LBS will have.
All excellent points.
The chain is new.
The old chain had some stiff links, but the new one is 100% fine.
Don't think there's any bend teeth but I'll double check.
In the end I went back to basics with it, watched a few more videos and started again from the top. It's not 100% yet, but it's nearly there. The only major issue is that it sometimes jumps of the top, so I think a small tweak to the hi setting and it'll be done.
The Ascend dropper post does not have the best adjustment there
have another look at that saddle. there's plenty of adjustment on those posts (i've got about three of 'em and so's everyone else). the upper part of the clamp should be roughly centered over the bottom. i don't remember if the bolts are different lengths but IIRC the top is marked indicating direction? you may as well take it apart and have a look as you'll be in danger of bending your saddle rails and the position is likely pretty poor i imagine?
The bit that's bugging me, is the tilt. It's just a little bit too far up. Not by much, just by a degree or two. But I want it pointing down by a degree or so. Other seat posts have had nice little nubbins and marks so you can get it just so. This doesn't.
Like I said before, that photo is very out of date, it's much further forward and more level now. Still not as level as I'd like it tho.
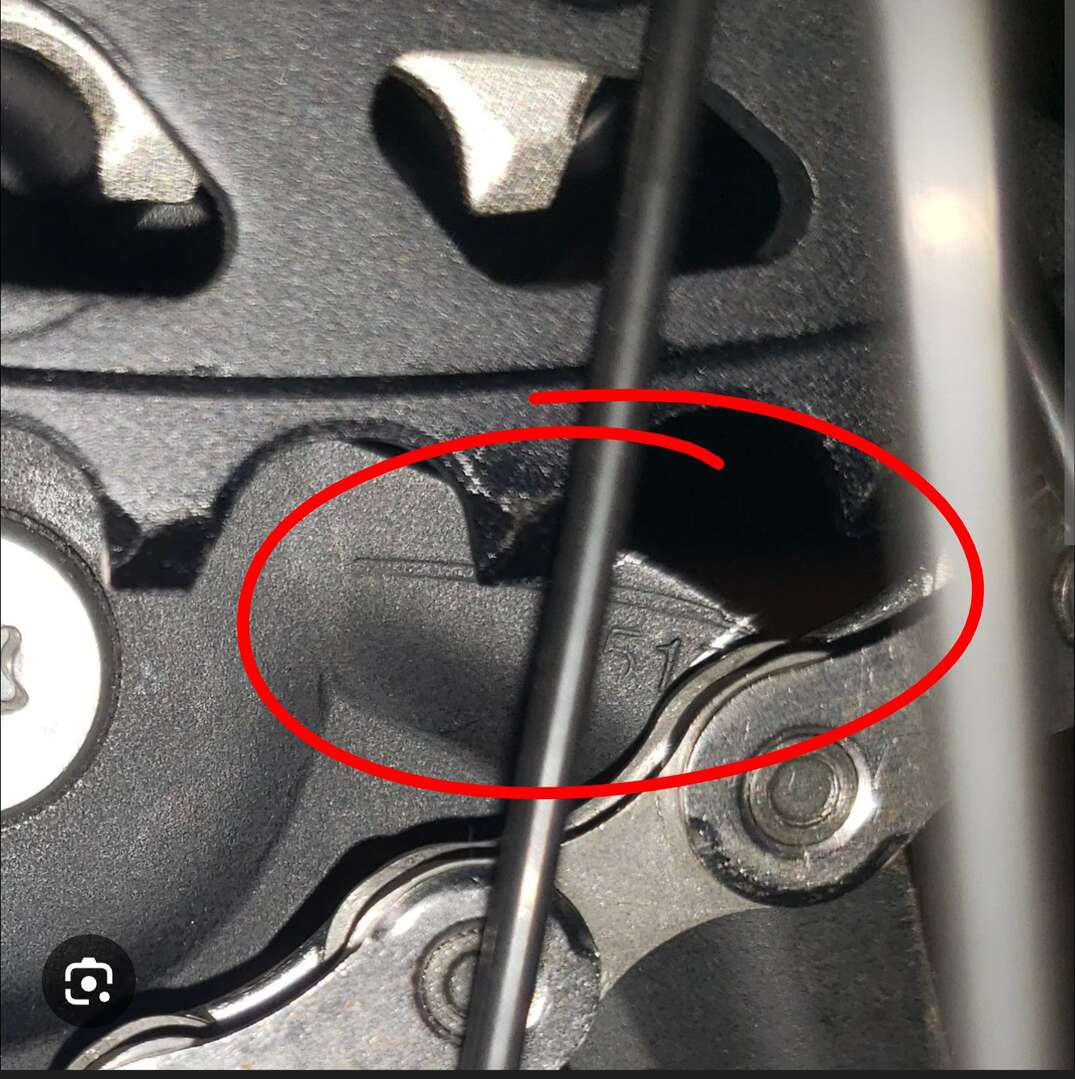
Check the back of the derailleur again for the mark. You might need to shine a torch on it too - it can be hard to see.
I've looked and looked and I really can't see anything. Oh well.
This is the mark you're looking for
Ok, that is subtle. Thanks for that, I'll check it out tomorrow morning.
I have never seen.one of those marks before. Will be checking the bikes tomorrow!
I have never seen.one of those marks before. Will be checking the bikes tomorrow!
It's very subtle. I did find it when I had a really good look in the right place. It was basically about right, so I was happy about that.
The Ascend dropper post does not have the best adjustment there
have another look at that saddle. there's plenty of adjustment on those posts (i've got about three of 'em and so's everyone else). the upper part of the clamp should be roughly centered over the bottom. i don't remember if the bolts are different lengths but IIRC the top is marked indicating direction? you may as well take it apart and have a look as you'll be in danger of bending your saddle rails and the position is likely pretty poor i imagine?
The bit that's bugging me, is the tilt. It's just a little bit too far up. Not by much, just by a degree or two. But I want it pointing down by a degree or so. Other seat posts have had nice little nubbins and marks so you can get it just so. This doesn't.
Like I said before, that photo is very out of date, it's much further forward and more level now. Still not as level as I'd like it tho.
I've never struggled getting the saddle angle I want regardless of the seatpost (inc a TransX which is currently in use). I run my saddles fairly flat and can get them set up by eye easily, but if I want to be sure a spirit level is your friend. I never use the markings on the post on first fitting, I do use them (if they are there) to re-set up after having the saddle off for maintenance.
