Given the well documented dramas of trying to remove SRAM cranks (which I've experienced myself to some degree) I followed the advice in this article and ordered a replacement steel bolt "downgrade" to prevent the alloy bolt / alloy axle binding drama.
Not only do the original bolts themselves become almost impossible to undo it would appear the self extracting cover also becomes immovable.
I'm aware that it's a left hand thread (i.e lefty tighty) but can I get the flippin' thing undone?!
Nope.
Any suggestions? (Which avoid crank destruction / replacement with Shimano cranks.)
Stick with the original bolt and just use assembly compound ?
The crank must be on and off every 6 months when you have to replace the bearings ?
Which bolt is reverse threaded? I don’t remember anything odd when putting the dub cranks on and off my bikes. I don’t think I touched the self extracting but that’s attached to the cranks - just backed off the preload collar and then just undid the middle bolt with a pissing massive lever (connected various bits of my socket set extension bars together).
The crank must be on and off every 6 months when you have to replace the bearings ?
I've just installed a Nukeproof one so hopefully its going to last longer than 6 months. Original SRAM one lasted for about 18 months.
Which bolt is reverse threaded?
The reverse threaded bit is the self extractor cap, i'e. the bit that crank bolt backs onto when you undo it. I need to undo that to get the alloy bolt out in order to replace it with the steel one.
Steel set up on the left, original alloy one on the right in this picture:

So they've ditched the pin spanner holes for an allen key socket? I wonder why?
I can't remember from mine if there is blue loctite on the threads, heat might help if so.
Are you sure it's reverse threaded? My GXP set up which is very similar isn't. Also on the picture you've posted the torque setting seems to suggest normal thread?
That torque setting is for the bolt holding the chainset to the the axle, not the cap into the crank arm.
And yes, 100% certain its a reverse thread on the cap.
If this is just about getting a sticky SRAM crank off, then the following works for me:
Take off both wheels
Find something solid (the end of a bed works for me) which you can put the NDS pedal under. The NDS crank will need to be forward.
Use the longest allen key you have and then pull up, bracing the NDS pedal against whatever you've wedged it under.
It's definitely won't be counter threaded.
ETA - if it's just the cap, stick the crank in a vice. Makes life a lot easier.
Thanks MM.
It's not about getting the crank off, it's about removing the self extractor cap.
Yeah, apologies, brain clearly not engaged this morning...
All mine (4 bikes) use a similar setup but slightly different (normal thread), but they’ve all come undone quite easily so you shouldn’t have to bray it like the crank bolt. One of them states 12-15nm for the cap, far lower than the 54nm the crank bolt requires. Sometimes it actually helps to tighten them a tiny amount to break the seal, so I’d try that. You shouldn’t damage anything if you only move it a fraction of a turn...
I’ve had issues also with the extractor cap removal but again my memory is standard thread direction. Ability to get a hex key in deep enough to give leverage without round was the challenge. Bike flat on ground and press down/in on Allen key was easier than trying with bike vertical.
Cheers timbog.
Mine has a left hand thread according to the manual and the replacement cap.
Manual also mentions threadlocker so I'll try warming it (gently) as mentioned above to see if that will shift it.
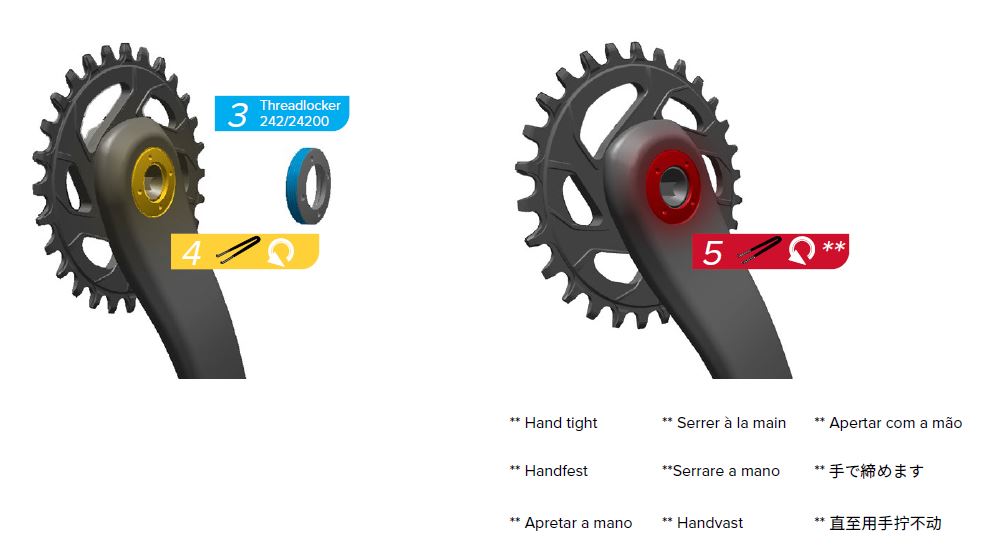
Interesting that the manual says hand tight for something that can only be tightened with a pin spanner 🤔. Either way confirms that it can only be the threadlock holding it.
Right I’m off to ebay to buy a pin spanner 😀
I have set myself up to do this job too, so watching with interest.
Unfortunately I cannot offer advice as yet...
Actually having thought about it, if you have the new bolt and cover you should be able to 'sacrifice' the old cover. In which case I would clamp the arm in a vice and take a sharp chisel to the cover
I'll try heat first.
The chisel option has potential for destroying the cranks.
If it has thread lock on it they can be difficult to remove with a pin spanner, heat will soften the loctite, heat gun, hair dryer or boiling water all work.
I fit the caps with a single drop of blue loctite to prevent them rattling out. (they have been know to fall out)
As an aside I bought a cheap heat gun a few months back. Hotter than a hair dryer, cooler than a blow torch. It’s been incredibly useful for all kinds of things. About a tenner..
Let us know how you get on !
I'll report back with my findings once I've had the hairdryer on it. Fingers crossed.
I've admitted defeat.
I tried the hairdryer- no joy.
I tried standing the bolt end of the crank (spider removed) in boiling water for 10mins - no joy.
Crank in a vice using a pin spanner to try and move it after both of the above measures.
I then escalated matters and used a punch / hammer combo against the pin spanner holes - no joy.
All I've managed to achieve is the slight rounding off of the pin spanner holes.
The crank has only done 38 miles since it was removed to install the new BB and already it needed a long 8mm hex key / old seat post extension to get it undone and that was with Red 'n' Tacky marine grease on the threads.
I’ve just done this exact same ‘downgrade’ on a set of brand new XX1 cranks and 8 month old / 4K miles Sram Red cranks.
You are right that it’s an opposite thread so righty loosey.
What pin spanner are you using? I bought these and they did the job. Struggled before using them.
They need a 2.2/2.3mm pin to fit the hole.
Neither of mine had threadlock on.
Keep at it - they do come off.
Frustrating for what should be a 2 minute job! Have you tried alternately tightening and loosening. This can sometimes break it free. You’re not really trying to turn the bolt, just putting pressure on it in alternate directions. Keep at it for as long as your patience allows - it does work sometimes, especially if you combine it with the heat treatment again...
I’ve just installed a Nukeproof one so hopefully its going to last longer than 6 months. Original SRAM one lasted for about 18 months.
Don't hold your breath! Mine lasted less than a month until the drive side bearing was shot, the sealing is useless if you wash your bike regularly/it's wet out. (That was a 30mm version)
What pin spanner are you using? I bought these and they did the job. Struggled before using them.
I'll get one of those types of pin spanner. I'd been trying to do it with one of these without success:

Don’t hold your breath! Mine lasted less than a month until the drive side bearing was shot, the sealing is useless if you wash your bike regularly/it’s wet out. (That was a 30mm version)
Did you get it replaced under warranty?
I managed to move mine by lying down straddling the bike - left foot pushing on nearside pedal, right hand pulling offside pedal and left hand pulling on 1 meter bar. I had to put all the force I had into it several times - before it went bang and undid!! I have now bought a Shimano SLX crankset.
Just for reference, and speaking as somebody who will likely soon to need to remove his crank of the same flavour. the cap with the pin spanner holes, that is turn clockwise to undo?
And the main crank bolt (the 54nm one) that is standard anti-clockwise to undo?
My BB is creaking like mad so will soon need to be removed. Cheers
Painey - correct.
To remove cap (and what this thread is about folks) - left hand thread, i.e. clockwise to loosen.
Main crank bolt (and what this thread is not about folks) - Right hand thread, i.e, anti-clockwise to loosen with medieval amounts of force.
Awesome. Thanks for that. Does seem a bloody stupid way of doing it although I have a pin spanner in the toolkit somewhere. Last used for removing an ancient lefty hub cap bolt.
New bolt and cap has been ordered. That link up the top the OP posted is very insightful.
I’ll get one of those types of pin spanner. I’d been trying to do it with one of these without success:
I think that might be your downfall - I really struggled until I bought the Birzman type pin spanner!
And yes - this thread about the extractor cap removal and not the removal of the crank bolt to remove the cranks.
I'm struggling to find an alternative brand (Birzman out of stock until July) that has small enough pins.
This job might have to wait.
Did you get it replaced under warranty?
I didn't even think about it, somebody else on here pointed out their 2 yr warranty recently too. TBH working in an engineering based co. I tend to just sort stuff like this myself using our regular bearing suppliers rather than going through the aggro of returning stuff. Yes I am a fool to myself sometimes!
You could try one of these spanners, although not sure what diameter the pins are.
https://www.amazon.co.uk/Rybtd-Universal-Adjustable-Wrenches-Polisher/dp/B08KZQ9HN3
My X01 came off without much fuss using the Park tool tool as above, although the main nut took a 250lb impact driver to come undone. Ridiculous design imo but great cranks.
Angle grinder spanner will deffo be too big unfortunately.
https://www.amazon.co.uk/gp/aw/d/B07YJPKVKJ/ref=psdcmw_1939047031_t2_B009P40YBC?th=1&psc=1
This one has 2mm pins - not sure if it would be any better than the Park one though?
I’m struggling to find an alternative brand (Birzman out of stock until July) that has small enough pins.
This job might have to wait.
Happy to post out mine for you to use if you’re desperate to sort it? Drop me an email neilatfoxalldotbiz 👌🏼
Normally they just fall off on the trail.... I lost one (the only bolt I didn't check when I built my bike and it fell off on the first ride....), I missed various others being found and other people grabbed them, but then a buddy found one and gave it to me.
It reminds me of everyone stealing each others Parker pens at school. We all had them, just not our own as it'd get stolen so you just stole someone else's.
11 month old thread but people will keep finding it I guess. So I’ve just been through this process 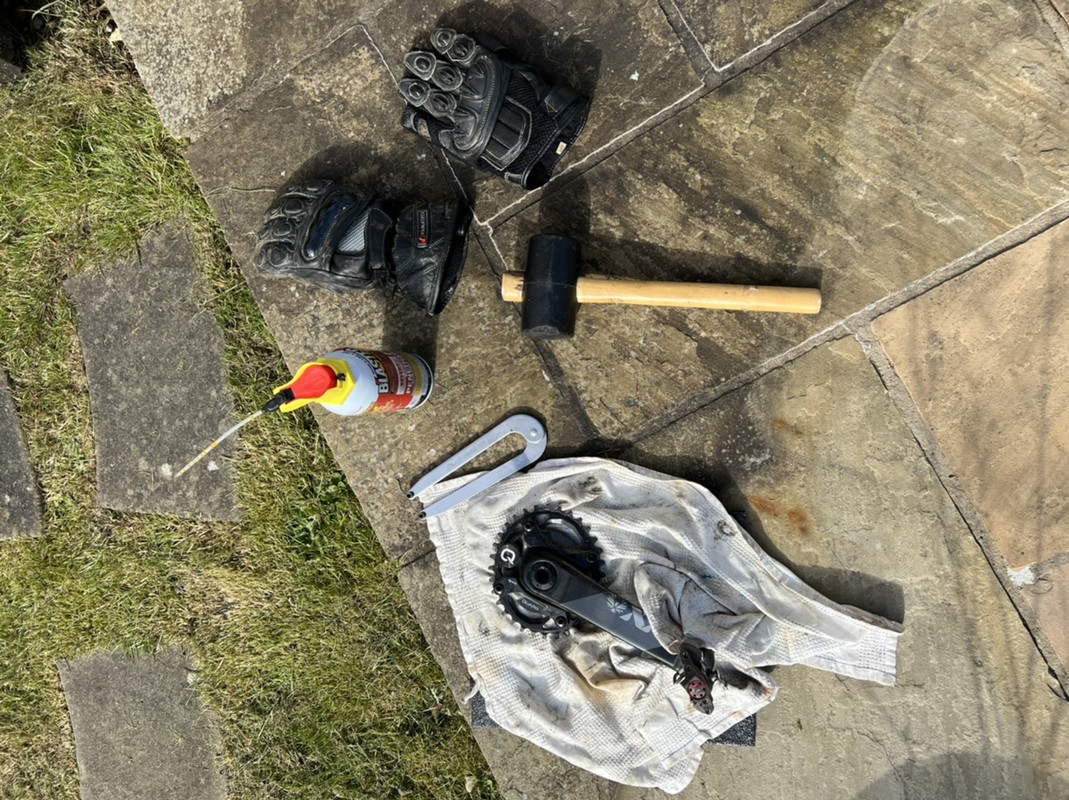 as I bought a couple of the steel bols (two bikes to do) befire winter ready for spring maintenance. Cranks are off anyway so thought I’d get on it. Ironically, for the first time ever I didn’t actually have any significant difficulty removing the cranks using the existing Alu 8mm self extractor today. But I have the teel bolts so they’re going on.
- like many, I couldn’t get the reverse threaded cap off either. Nearly gave up at that point. This is using a good Park Tool pin spanner too. Crank wedged between knee ls and protected underneath. No joy.
- got the PBBlaster out and tried that after 5-10 minutes. Tried quite a few times. Still no joy.
- pin spanner and holes are now looking a wee bit worn just from this one job. So I decided to give it one last go. Picture shows what I used to do it.
- PB Blaster to try and loosen threads if relevant. Massive knuckles gloves for the time it might slip and put a hole in my hand from chainring or from pin spanner. Cloth and foam under the crank and chainring.
Rubber mallet.
Crank between knees while kneeling.
Left hand keeping pin spanner flush in the two pin holes tight. Right hand with rubber mallet and two taps and that was it. Done.
Picture attached 🙂
Now off to clean hands from PB blaster
And then it’s clean everything up and refit with the usual grease/anti seize as appropriate.
Ps. Taking it apart - plenty of blue thread lock from factory installation - which the PB BLASTER has softened by the looks of it. Maybe just that gap with a rubber mallet might be enough without the PB Blaster but hey ho