- This topic has 39 replies, 15 voices, and was last updated 10 months ago by appltn.
-
New (quite old) bike day project. What fork?
-
 1appltnFull MemberPosted 10 months ago
Like many I always regretted selling the bike I rode through my teens, luckily for me I sold it to my brother and he just gave it back to me. Behold the Azonic DS1!


I’m picking it up tomorrow and plan to make it into a single speed dirt jumper. I’m not too bothered about keeping it retro period, it’s going to be an updated version of what I wanted it to be at the time as if I’d just kept upgrading it all these years.
Current specs:
– 2004 Marzocci Z1 Bomber Drop off I (130mm)
– Azonic bar
– Tioga cube stem
– Tioga Factory DH tyres
– Mavic D521 on XT (9mm QR) hubs
– LX drivetrain, Truvativ cranks of some kind.
– Hayes front brake of some kind, XT rear v brake
– Titec seatpost and a DMR saddleI’ve brought:
– Single speed rear hub conversion
– A more modern shaped bar and stem
– Some dirt jump tyres (tanwall, obvs)I’m not sure what to do about the fork, it is at 130mm but ideally I want 100mm. It has an ETA cartridge which is a weird “lock down” thing that causes it to compress into the travel and not rebound, I believe that this makes it completely non travel adjustable.
I think my only option to get to 100mm is to replace the fork, but what with? It needs a straight 1 1/8 steerer, 26” wheel, 100mm travel (or be adjustable). It either needs 9mm QR dropouts or I need to find a 20mm bolt through hub or wheel for very cheap. Ideally I want non-silver stanchions because they just look better. I’d love a Manitou of some sort because that’s what I ran back in the day but open to whatever ideas.
What would you be looking for? Does anyone have something like this in the shed they’d be willing to part with?
 eatmorepizzaFree MemberPosted 10 months ago
I’d keep the drop offs personally, I had some on my old DJ bike in the 2000s, a specialized p1 which I still regret selling and always get a nostalgia hard on when I see bikes with them.
Any reason you feel you need the 30mm less travel?
If going for proper old school single speed DJ I’d either run brakeless or just a single magura hs33 on the rear
appltnFull MemberPosted 10 months agoAny reason you feel you need the 30mm less travel?
It’s a good question, perhaps you’re both right. I’ll give them a once over when I have them here and see how the bike rides before changing.
If going for proper old school single speed DJ I’d either run brakeless or just a single magura hs33 on the rear
The plan is to move the Hayes brake to the rear (I think the lever is reversible) and ditch the front brake. I always wanted an HS33, but never owned one.
eatmorepizzaFree MemberPosted 10 months agoJust had a quick look on ebay there for some 2nd hand HS33s and there’s a few out there, obviously paying more for the signature yellowy green.
I think if you do replace the fork though to get something that fits and doesn’t cause much issue it’s also going to be a used market and refurbish option, again plenty of options on ebay.
1squirrelkingFree MemberPosted 10 months agoUnless you plan on keeping it the stem might fetch some good money on the Vintage DH group on Facebook.
That vintage of fork should reduce down, you’ll just need the right size of spacer. You should have a pair inside the fork, you’ll need them 30mm longer. Annoyingly I just got rid of some Sports that would have been fine for swapping out the Eta cart, I have some Tora U Turns but they’re heavy AF, probably not much more than a DJ tbh but would be good for dialling in ride height. I put shorter forks on my Trailstar and it felt like crap, I’d imagine yours would suffer the same. Alternatively Revelation 426s dual air U Turns will do 100-130mm and weigh bugger all, I’m not heavy and they are my favourite fork by far, look for some on ebay cos I’m not selling mine (sorry)!
appltnFull MemberPosted 10 months agoThat vintage of fork should reduce down, you’ll just need the right size of spacer. You should have a pair inside the fork, you’ll need them 30mm longer. Annoyingly I just got rid of some Sports that would have been fine for swapping out the Eta cart
So just to check my understanding, you can generally reduce a fork like this with spacers, but the ETA cartridge is a fixed length which prevents this in my case, right?
So in theory if I could find another similar fork then I could swap the eta out and then a travel reduction is doable?
1goldfish24Full MemberPosted 10 months agoCor, always wanted a ds1 back in the day!
Get a yellow hs33 on there for maximum nostalgia points.
appltnFull MemberPosted 10 months agoI’ve just taken a look at eBay prices for a fluro hs33 😳
Might save that one for another day.
1MugbooFull MemberPosted 10 months agoThere was a HS33 listed on here the other week. Not flouro though and I’ve no idea if it’s what you need.
squirrelkingFree MemberPosted 10 months agoI don’t thing the ECC cart is fixed, no, No more than any other cartridge. I only mentioned swapping out as I doubt you need it.
I’d suggest some Google digging as I know for a fact it’s been documented how to drop DJs beyond factory and they’re exactly the same internals bar the ECC. Pinkbike would be my first port of call. But as I say I’m pretty sure it’s just a matter of longer spacers to drop them further.
appltnFull MemberPosted 10 months agoAhh okay, in that case I’ll pull it apart and see what I can figure out! I guess a larger spacer would be easy enough to bodge or maybe have 3d printed if needed.
Just collected the bike and gave it a quick clean up, no pics but it looks good!
timberFull MemberPosted 10 months agoHS33 will be easier to match the back wheel with SS and horizontal dropouts.
Personally I’d go with red Tomac brake to go with decals.
1timburFree MemberPosted 10 months ago@appltn – I’ve got an hs33 in black you can have for postage and a charitable donation if you want it? Will try and dm you.
2timburFree MemberPosted 10 months agoIt came out of @woffle spares box of joy. Just sharing the STW love :0)
1appltnFull MemberPosted 10 months agoGot home this evening and took a better look at what I’m dealing with. Removed the crud catcher, swapped the saddle and pumped up the tyres.


The back tyre is rubbing on the frame a bit so I think I’ll need to true the wheel up but then I spotted this…

That doesn’t look good.


I’m currently trying to decide whether to zip tie a few teaspoons across it or just cover it up with a neoprene chainstay protector.
In the meantime I took a few rough geometry measurements because I couldn’t seem to find them anywhere online, these are with a 130mm fork.
Chainstays: 425mm to about 450mm depending on how you position the wheel in the dropouts.
BB height from the ground: 340mm
Reach: 380mm (if I’m being generous)
Head angle: 67 degrees
Seat angle: 69 degreesThe reach is obviously tiny and explains why it feels like a child’s bike to ride but the rest of the numbers are surprisingly close to what you’d want from a dirt jumper today.
soobaliasFree MemberPosted 10 months agoi guess you aint dirt jumping that.
shame. as its got sentimental value consider finding an alu welder to patch it up?
squirrelkingFree MemberPosted 10 months agoThat’s **** that is. Not sure what your options are, I’d get onto the Aluminium Frame Builders Group on Facebook and see what they say. Some grades can be age hardened rather than heat treated but I wouldn’t be riding that without some sort of remedial work.
Not surprised it’s Tiogas, the tyres that refuse to die so you can replace them. Some idiot would probably pay silly money for them and I’m not kidding.
appltnFull MemberPosted 10 months agoHaha yeah the tyre knobs still look basically new.
Another twist, I just messaged someone on Facebook to let them know I won’t need the cranks I was buying from them:
Morning mate not a problem I reckon I could probably repair it for you as I’m a welder/fabricator
Maybe there’s still hope!
appltnFull MemberPosted 10 months agoIt’s been a fun week. Since realising that a repair was probably economical I also realised that a parent from my kid’s school runs a local engineering company so I’ve stripped the bike and he currently has the frame for repairs. It turned out that both chainstays and both seatstays have some degree of wear from that big tyre.
Knowing that the frame would be okay, I’ve carried on with a few bits and bobs to get everything else ready. First up, a single speed conversion and fresh tyres. I also have a bolt on axle ready to put into the hub but haven’t got to that yet.

I’ve also pulled the fork apart, partly just to service it and partly to try and drop the travel. The bike is so small that I need to increase the reach however I can and dropping 30mm height out of the fork will give me a decent bit of extra room.

Here’s the contents of each leg. I can see how removing 30mm from the spacer at the top of the right (left in the photo) leg would reduce the travel but I don’t think the ETA cartridge from the right leg has the same possibility.

There is a 10mm plastic spacer at the top that I could potentially remove but that seems to be about it. The only other options I can think of would be to fully remove the coil spring and then rely on the coil & air spring in the right leg only, or to actually cut 30mm of length off the coil. I could see removing the spring working but I’m not seriously considering cutting the coil down.
I would love to hear if anyone else has an idea for how I might achieve a 30mm reduction here though?
1squirrelkingFree MemberPosted 10 months agoOh, IIRC the spacer needs to come off the top and the other leg will stop it extending if you swap the spacer to the bottom.
I really have never been able to get my head around the swapping of spacers from top to bottom but it works.
As I said before trawl the pinkbike forums it’s all there or ask on the Vintage DH Bike Group as plenty of folk on there know old Zocchis.
appltnFull MemberPosted 10 months agoOhh that does make sense, moving the spacer below the rod that attaches the uppers to the foot nut would limit how far they can extend.
I’m waiting for a long 12mm socket to arrive before I can pull the lowers off but that sounds promising, thanks.
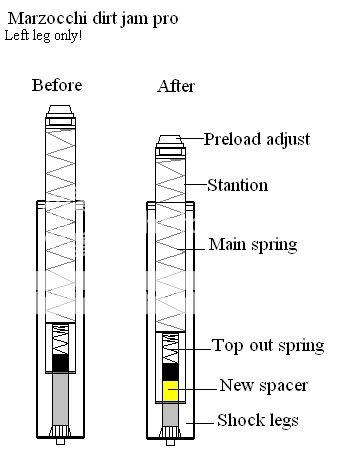
appltnFull MemberPosted 10 months agoAfter a bit of searching I’ve found this Pinkbike thread which describes the same process you’re talking about and also includes this handy image. I’m posting it here for the next person who stumbles on this thread.
 1ballsofcottonwoolFree MemberPosted 10 months ago
I’m still running a set of 2002 Marzocchi Z1s
Swapping the spacer from above to below he cartridge should work to shorten the travel. I accidentally put the top out spring the wrong side of the cartridge once and this actually extended the travel!! top out was rather alarming though.
great resource here
Marzocchi Manuals » Dr-Zocchi (projectweb.de)
Technical manual, with oil volumes and heights
NEGATIVE TRAVEL: (public-repository.org)
User manual
appltnFull MemberPosted 10 months agoThat’s hugely helpful, thank you! I’d managed to find the user manual (which honestly wasn’t too helpful) but that technical manual is really useful.
appltnFull MemberPosted 10 months agoI pinched an hour from work this morning and finished up the fork lowering project. It took a bit longer than I hoped because the right foot nut is quite inaccessible so I needed to buy and file down a long socket to fit. Anyway, here’s the contents of the right leg with the top out spring.

And here it is with my 30mm spacer installed (trimmed from the old and cracked Azonic handlebar that I had on the bike).

I mixed up a special brew of fork oil from what I had laying around (5wt + a little 20wt + Ohlins oil which is roughly 5wt), it’s supposed to be 7.5wt so I reckon that’ll be nearish. You’re supposed to compress the fork fully, then fill the oil to a certain depth below the top cap opening. I measured out a set amount, then filled the spring side to 55mm depth, then subtracted what I had left over. The right leg took 135ml oil and I followed this volume guide and added 15ml more (150ml total) to the left leg because you can’t see inside the left leg with the ETA cartridge installed and you can’t put the oil in with the cartridge out.

I had to compress the spring in the ETA leg and screw the top cap in to hold it down which was tricky but I trimmed the black spacer from the spring leg down by 30mm so that went in easily. Here’s the fork running at 100mm, freshly serviced and ready to go.


I’m still waiting on the frame back from the welders but the next two jobs are to get the rear hub converted to bolt on and figure out if the Hayes disc brake is salvageable.
squirrelkingFree MemberPosted 10 months agoYeah, I used to go with 100mm from the top cap.
Don’t worry about oil weights, it’s all a load of bollocks anyway as this chart will explain better than I can.
https://www.peterverdone.com/wiki/index.php?title=Suspension_Fluid#Marzocchi
Forgot about Dr Marzocchi!
appltnFull MemberPosted 10 months agoYeah, I used to go with 100mm from the top cap.
Don’t worry about oil weights, it’s all a load of bollocks anyway as this chart will explain better than I can.
https://www.peterverdone.com/wiki/index.php?title=Suspension_Fluid#Marzocchi
Yeah, after reading up on oil weights I came to the same conclusion and just lobbed a load of what I had in there 😆. I liked the ombré effect of the blue + red oils.
2appltnFull MemberPosted 10 months agoI’ve got all the bits together after finding some CRC bargains. £20 Level T brake was cheaper than a new hose for the Hayes brake, £25 SX crankset was cheaper and shorter than a new chainring for the old crank.

Almost done when it started raining.

But then the rain stopped.


The only problem is that the frame can’t accommodate the 200mm rotor I have so I need to wait for a 160mm rotor and IS adaptor to turn up before I can ride it.

The frame repair is really well done, you can hardly see the weld (apart from the big raw aluminium bit of course).
 squirrelkingFree MemberPosted 10 months ago
Nice! Did it get heat treated or is it possible to age harden on your frame?
appltnFull MemberPosted 10 months agoNice! Did it get heat treated or is it possible to age harden on your frame?
I actually have no idea, which probably tells you what you need to know.
£50 repair, I’ll ride it and hope not to break it 🤞
zerocoolFull MemberPosted 10 months agoLooks sweet. My Blender is great fun (a sleeker saddle would help but my post is I-Beam) I just need to straighten the (very wonky) wheels as the wobble visually annoys the crap out of me, can’t feel it though.
1appltnFull MemberPosted 10 months agoThanks! Yeah I think the saddle looks a bit goofy on mine too, I’m currently between not wanting to spend anything else on it and wanting it to look as good as possible. I think a Burgtec dirt jump seat and a non layback post would finish it off nicely.
1squirrelkingFree MemberPosted 10 months agoFinally found the answer in an old Dirt, it’s 6061 so would need done properly anyway. Enjoy and take it easy 👍
Really need to get my Trailstar finished!
cookeaaFull MemberPosted 10 months agoReally need to get my Trailstar finished!
I miss my old trailstar, part of me knows it would be bobbins now though, 20/20 rose tinted hindsight and all…
shedbrewedFree MemberPosted 10 months agoLooking great, that. A friend had a DS1 and raced 4x and duel on it way back. I’ve still got the halo combat 24” wheels and matching Contra and Ception tyres in the shed from it 😄👍
appltnFull MemberPosted 10 months agoFinally found the answer in an old Dirt, it’s 6061 so would need done properly anyway. Enjoy and take it easy 👍
Awesome, thanks!
Really need to get my Trailstar finished!
Let’s have some photos?
You must be logged in to reply to this topic.