Fitting a thermostat.... What's to know?
as in CH thermostat?
If so, does it connect to the Boiler direct (modern Combi style system) or in between the timer and the boiler (older style system)?
Mechanical ones are just two wire (basically a switch which is closed when cold and open when warm). A more fancy wifi remote controlled thing will need power, so will be 3 wire, L, N and switched).
OK. I have a thermostat now. It connects to a basic condenser boiler.
What do I do with the red, yellow and blue based on this guidance?
[img] 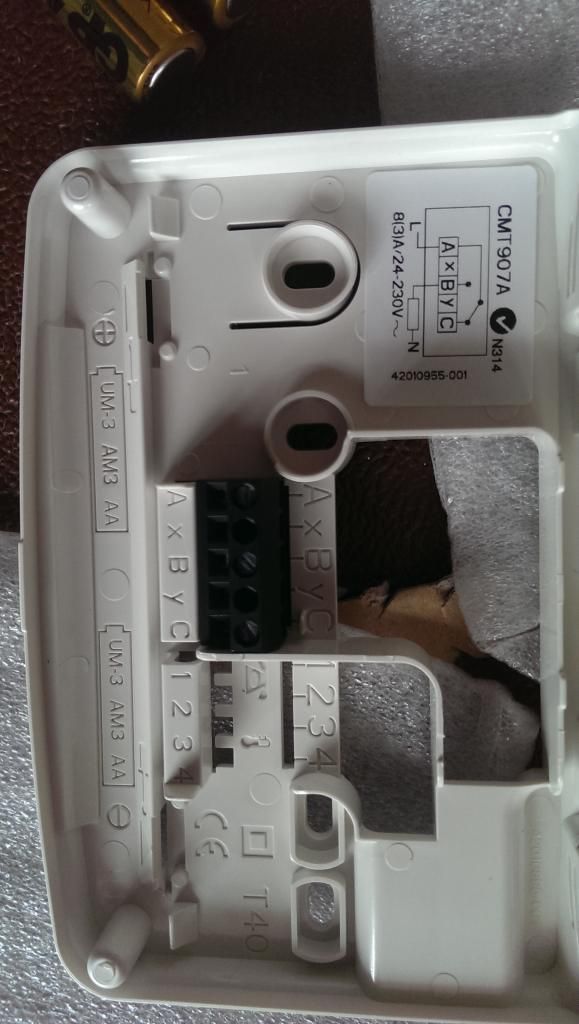 [/img]
[img] 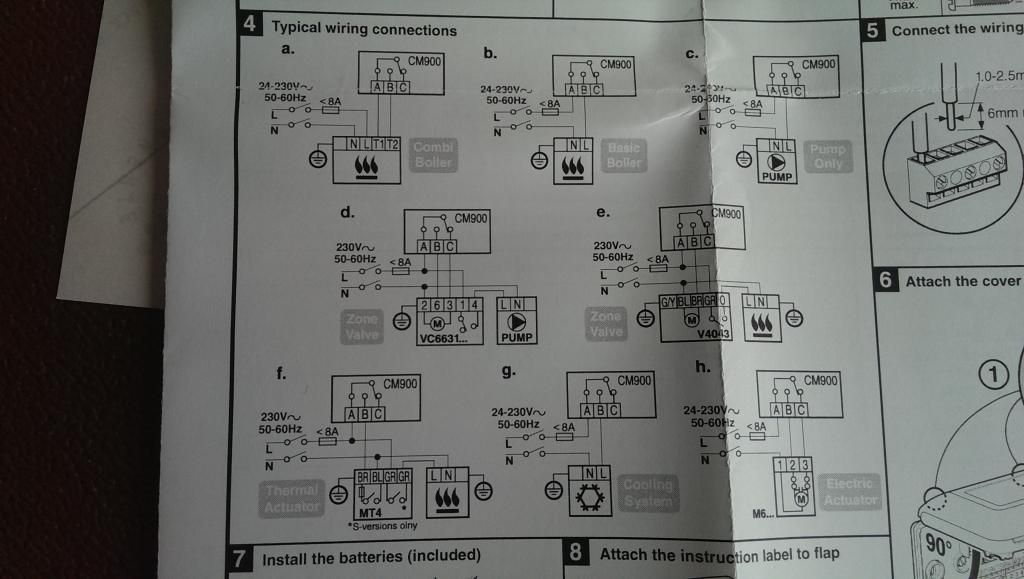 [/img]
[img] 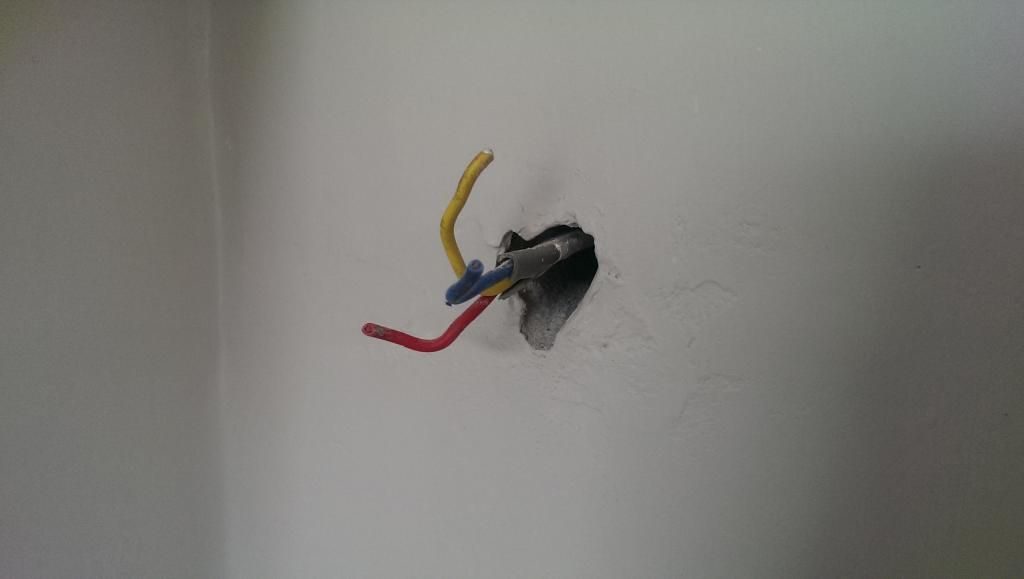 [/img]
There's a timer in with the boiler. Big clunky thing with a b c d dials on it and various water on/off, heat on/off settings
RIPook.
If you die can I have your bike?
In seriousness,
You need to identify what those wires are, and basing that solely on the colour of the insulation is a Really Bad Idea. For all you know that was wired in by someone with no real idea asking for advice on an unrelated Internet forum, they could be anything.
The bike's as shambolic as my wiring
😯
That's all.
With some basic instruction, common sense and no risk taking, it cannot be that hard to put the right wires in the right slots.
That's my logic
Red to A
Blue to B
Yellow either mask off or fit to one of the spare connectors x/y.
* Assuming that whoever wired your place up has red = live, blue = neutral, yellow = earth.
Was there a previous thermostat in situ which you're replacing or is this all new ?
Yeah but the plasterer smashed it. It was ancient anyway
Aye its only electricity and gas what could go wrong 😉
I would do ti myself but no way am I giving advice over the internet on this one
PS is it the honeywell remote thermostat thingy?
If so that is your receiver thingy and not the thermostat thingy [ i have kept this as technical as i reckon you can manage
Red to A (live)
Blue to B (Neutral)
Yellow to C (Switched live)
I'm pretty confident about the above based on the diagram, but IANAE.
Yeah it is. Have I got the wrong bloody part then?
Call me old fashioned, but I always consider money paid to a professional to ensure I don't die, or my house doesn't burn down, is generally money well spent
Have I got the wrong bloody part then?
Probably not, the receiver replaces the old-skool thermostat, the wireless transmitter can then go anywhere you like.
I replaced my old thermostat with a Heatmiser wireless thing last year, very similar to what you've got but with one more connection to make and a much more confusing diagram.
[quote=johnners said]Red to A (live)
Blue to B (Neutral)
Yellow to C (Switched live)
I'm pretty confident about the above based on the diagram, but IANAE.
😯
You sure about that ? Which of the "typical wiring connections" shown in the instructions matches that config ?
All that does is replace the on off switch of the boiler [ probably]- well it does on mine so what he said above also not an electrician
Worst case scenario you die ,middle case scenario it does not work best case it works but you do not know why 😉
[img]  [/img]
is this what you are trying to install?
if so it is powered by batteries and does not need wiring
the receiver needs wiring into the boiler
WHAT ARE YOU TRYING TO INSTAL
A Honeywell 907 programmable thermostat
WHAT ARE YOU TRYING TO INSTAL
One of these?
[img]  [/img]
YES!
Well, that's just some random pic off the net. So who knows if it's wired right.
...but it does demonstrate they are wired in directly.
Like the Dutch do 😀
This might be more helpful: http://www.diynot.com/forums/viewtopic.php?t=79002
Are you still alive? 😯
mine has a separate receiver and the thermostat is battery powered
I am oot
I'm alive. Having my tea.
Come on adey, you're a spark. What's the deal?
Bit early, innit?
Not for my 18 month old. I'm joining him.
Can't say without seeing where the other end is connected! Stick your tongue on it and see if it's live 😀
Are you anywhere near Pembrokeshire? I'll come and look at it for you.
Rich.
Sheffield 😀
Rich, that's a very kind offer, but is [i]anyone[/i] anywhere near Pembrokeshire? 🙂
As Popacapeti says ,look in your boiler wiring for that three core cable. I'll wager only the red & blue are terminated.check boiler installation booklet.I've wired a few in my time :wink:,all it is, is an on off switch ...
Disconnect in your boiler, wire up the thermostat A&B, reconnect boiler.
Did the plasterer cut the cables when he smashed the old one, presumably he still has the old thermostat for reference?
I'll dig around. I think it's in the garage
😆Rich, that's a very kind offer, but is anyone anywhere near Pembrokeshire?
Old thermostat binned. Can't make head nor tail off the boiler end of things!
OK. Boiler is a combi with built in timer etc.
Stat. is battery powered so doesn't need a permanent live.
Connection C isn't required. Only A and B.
A is the connection from the boiler which goes live when the central heating timer switches on.
B is the return from the stat. which goes live when the stat. calls for heat.
The 3 core is a legacy from a previous boiler that had a mains powered stat.
You need to look at the boiler installation diagram and identify which is the output from the timer and where the switched live goes to inside the boiler (which will fire the boiler and run the pump).
The wires may already be connected, or you (I) may need to work it out.
What is the boiler make and model and I'll look up the manual online.
I may need you to take the boiler cover off and take pictures. 😯
Rich.
I'll have a look when I've not had a beer...
I'll keep an eye on the post tomorrow. We'll crack it.I've got no-one else down here to talk to. 🙂
Rich.
You'll need to switch the old stat in the boiler onto "permenant heating" one you have it hooked up. If you can find the manual for your boiler you should be able to identify what each core is connected too at the other end, and then it should make sense.
Red to yellow
Yellow to red
Blew to bits.
[quote=Pook said]I'll have a look when I've not had a beer...
Dont chicken out now man 🙄
I agree with JY.
If anything, have some more beer then take a crack at it.
This is what's going on at the boiler end of things, then the manuals for the timer and a 'v4043H motorised zone valve', of which there are two. [img] 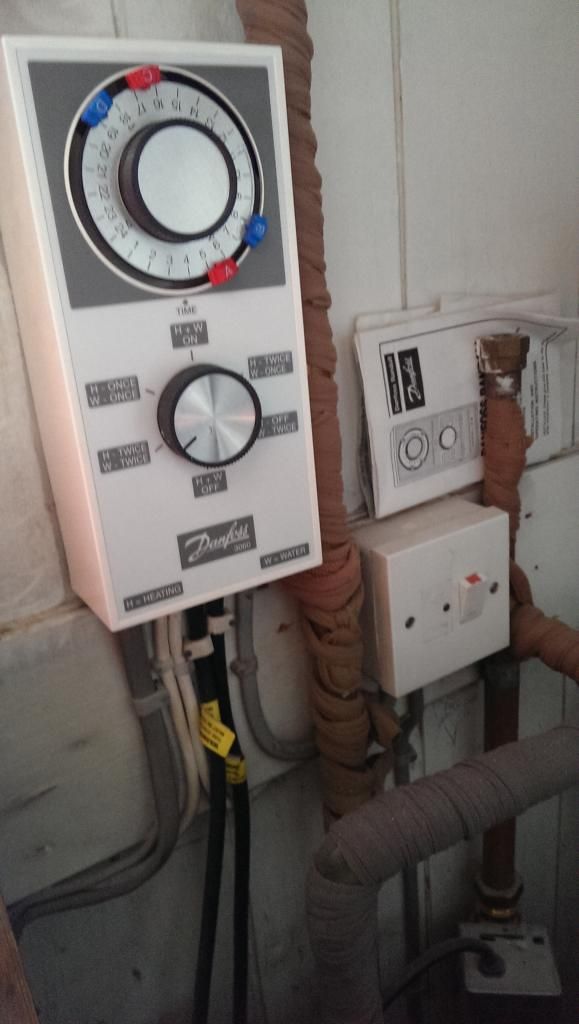 [/img]
[img] 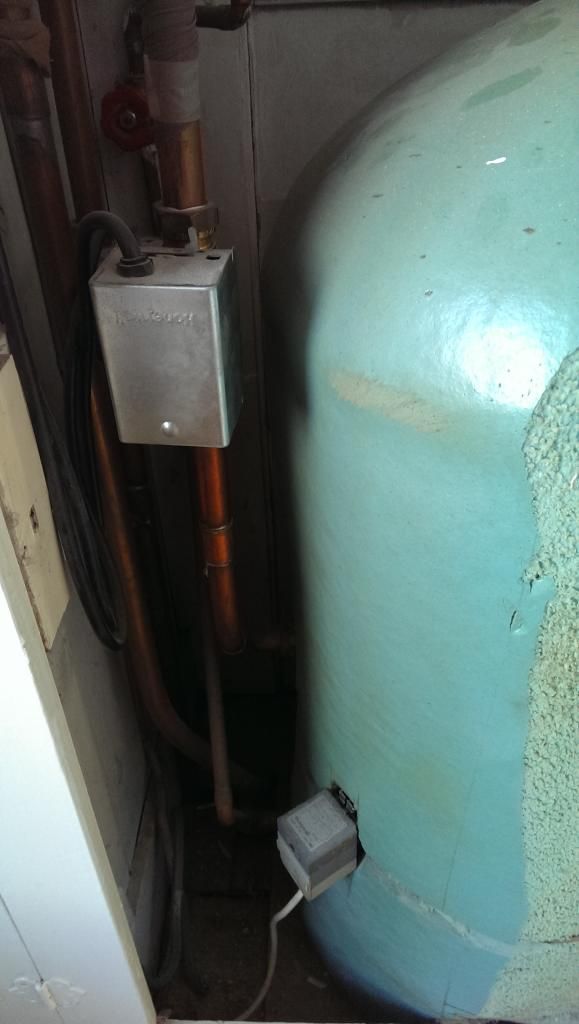 [/img]
[img] 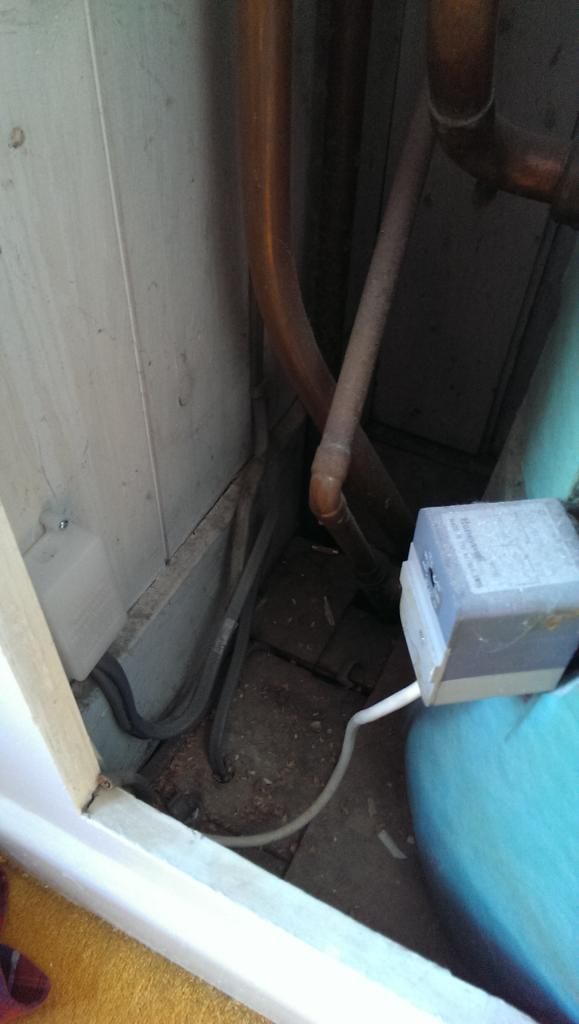 [/img]
Boiler guide:
[img] 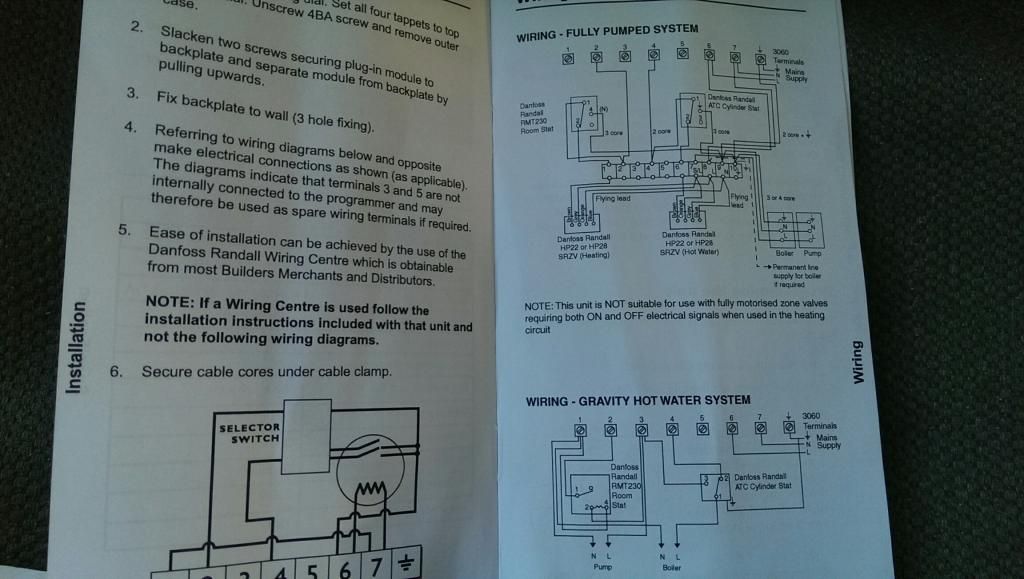 [/img]
Valve guide:
[img]  [/img]
I'm going to die, aren't I?
I'm going to die, aren't I?
Yes, no doubt about that.
Just a question of when. I trust you're wearing thick Marigolds and wellies today?
is the cable on the left the three core from the stat? Turn off the fcu (switch) on the right and take the cover off. post me another photo of the guts.
Rich
misread early post. boiler isn't a combi. System is an 's' plan.
that is also not the boiler guide. it is the guide for the programmer (Danfoss 3060).
I am assuming someone has heard from pook recently? Anyone in his vicinity notice unusual flickering lights?
I can see flames in Sheffield from here, and I'm in Pembrokeshire at the moment.
I fitted the same thermostat last week. As said, only two wires need connecting, it's a simple switch, you leave the timer permanently on and set the programme on the stat. Make c safe and tuck it out the way.
I'm alive!
But which two wires go where???
I've been busy all day doing dad things and biking
Connect 2 in the danfoss controller to "A" in the stat. Connect "B" to the boiler. Which wires are which will depend on how it has been done in the controller which is why I need a picture of the inside.
Rich
Going to get that later for you rich - stuck at work all day now unfortunately. Later I'll be tinkering with a little lad asleep in the room - that's where it all is....
Right... The timer
[img] 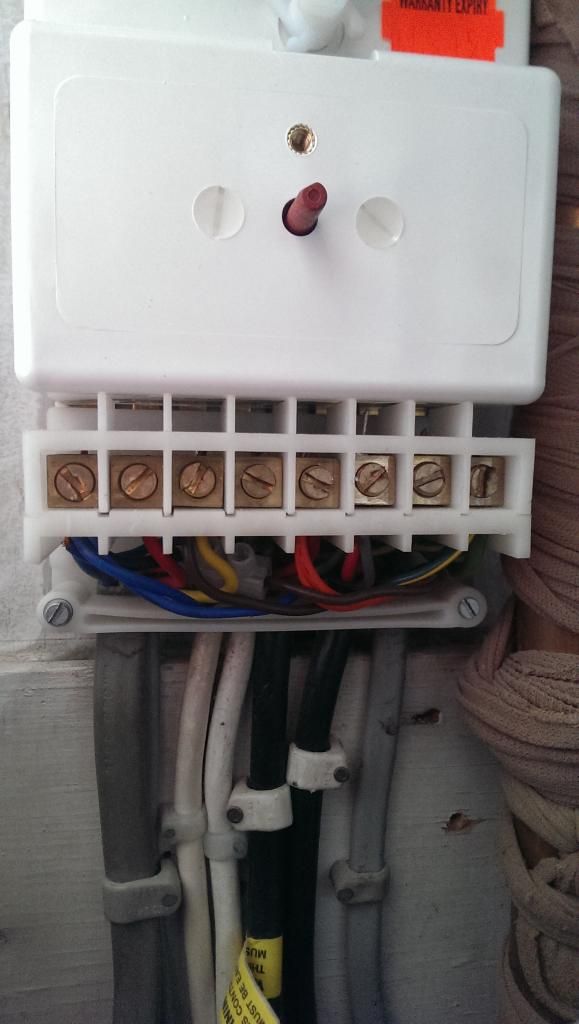 [/img]
[img]  [/img]
[img]  [/img]
Don't start connecting anything without tracing the original 3 wires. There should be an earth there too.
They were, most probably, Live, Switched Live, Neutral and earth.
Now, you will only want Live and Switched live to connect to the new stat.
It doesnt really matter which way they go round, but to do it properly, permanent Live should be to Terminal A, and switched live to B.
Disconnect Neutral at the programmer end.
You do realise to turn the programmer heating to 'On' at all times?
I'm not mucking about until I'm 100%.
You do realise that with chuffing 3 days away on here you could have had someone in to do it for you?
Is this type of wiring not subject to all sorts of building regs / legal restrictions?
Sorry not one for excessive pedantry about these things but boiler + electrics.. Eeeek
I have time in hand to learn. Why would I deny myself the knowledge, or at the very least the opportunity to learn something?
Ok Pook, this is easy.
Firstly, ensure the power is off. This requires you to either turn off at the switch or set the dial knob to H+W Off. Either of these options will ensure the stat. cable is dead at the stat. end. There are live terminals inside the Danfoss box so do not touch anything in there. (There is no need).
Looking inside the Danfoss box, you'll see the three core from your stat: this is the wire on the left. You'll see that the blue/red/yellow wires go to terminals 1, 2 and 3 respectively with the terminals being numbered from the left.
The cabling is correct at this end. You can reassemble the Danfoss box.
At the stat end, put the red wire into terminal A and the yellow wire into terminal B. The blue is NOT REQUIRED. Trim any exposed copper off and tape it up. It's a neutral and is not dangerous but I wouldn't cut it off in case it's required in the future.
Ensure the connections are tight, insert the batteries and switch the power back on. Ensure the Danfoss is set for the boiler to come on (ie H is on) and everything will be fine.
My email is in my profile. If you want to drop me a mail I'll let you have my phone number and I'll talk it through with you.
Rich.
Brilliant - cheers rich. I'll have a look tonight.
Just to address the "earth" issue. You'll find that almost every stat. is double insulated and thus doesn't require an earth. What a lot of people do is cut the earth off in the cable. If you look closely at the stat. end of the cable, you'll probably see a fourth conductor which is has no insulation around it and which has been cut back to the outer (grey) insulation.
You don't need to do anything with the earth.
Rich.
-
We have central heating!!!! Rich, you are star. Thank you.
You owe Rich a pint or 12.
Already one step ahead of you gifboy! Rich, ygm.
I love stw for this kind of thing.