He! He! You got 900!
Thanks for the info Stephen. Sounds good ... old chip, but a bit cooler, wider spacing on the terminal pads and still under (just on?) 20mm. 8)
p.s. you got my message about the new switches?
I've just mic'd up the board and it comes out at 24 x 19.7. The residue of the 'nibs' (what holds the PCB panel together) can increase this slightly but they can be filed down if size is critical.
I'll try to find my camera and do some pictures.
Not got your message - which address did you send it to and when?
19.7 .... that'll do it 🙂
ntlworld one
I can resend if you can't find it. Thanks
I've got three ntlworld addresses... If it was today not received it on the blackcattech one, if it was earlier then I've either not received it or somehow it hasn't registered, sorry!
No prob ...I'll resend it on this forum one now.
Got it, now it's telling me I'm not allowed to send you email....
I'll keep trying but to summaries, yes I have a few spare. The M6 thread is about 5.8mm OD, the 'standard' thread is about 6.1mm. M6 is also coarser if that helps you work out if they may fit.
Most bizarre! Ah! Just got one off you now. I'll respond off forum.
Just wanted to say a big thanks to BCT, Trout and everyone else on this thread. Got all my stuff and built up the light, certainly not the cleanest build I've seen on here, but somehow it works 🙂 really impressed with it.
Thinking now I need a new light for my bars as the DX P7 torch I currently use doesn't seem to cut it now. I'm thinking two 3up XPG's, but not sure if that would work ok. I've got some computer heatsinks which I think if I used inplace of the l-shaped aluminium could be enough to keep it from melting, but not sure what reflectors/lens would be best to give a good flood style light. Any thoughts would be appreciated.
Cheers
Kev
Kev79
you will be going from 2 leds to needing either a more expensive Boost driver or useing 2 of BCTs and a larger battery .
their will be no usfull reason to use a finned or needle computor heat sink inside the housing as you need to get the heat to the outside as fast as poss .
and 2 triples will get hot fast .
if using the hammond case then try and find some U channel that is a nice tight fit and you would then need to add extra sinks to the outside of the hammond
The standard Carclo 20 mm triple tight narrow is still a good flood used with the triple XPG .
a good bar light in the Hammond would be one triple and one single with the same reflector IMHO
but would be a bit more complex to build
Hey GS, I'm impressed with your work...insulation washers a nice touch, I'm gonna copy that.
Your unit reminds me of the film [url= http://www.michaelmirasol.com/flipcritic/2010/01/walle-the-best-film-of-the-las.html ]'wall-e'[/url]
I own an extensive dvd library 🙄
In preparation for the new drivers (parts should be arriving tomorrow from Digikey including another batch of 18650 holders) I'm clearing out my old stock. I have:
6x dim-mode drivers (970mA)
2x standard drivers (970mA)
1x DIY kit (driver, switch, power plug/socket)
Drivers £5.20, kit £8. A quid P&P flat rate. Any that don't go by tomorrow evening will go on eBay.
Kev - as Troutie says, no use having the heatsink inside the box as you just heat up the air inside. Attaching one to the outside would be very useful though - fins and pins increase the surface area drastically and are especially useful when moving. Use a good thick piece of alu inside to get the heat away from the LEDs and to the case.
For three XPGs you'd need a 12V battery with my drivers. A triple lithium might just manage it but you'd be running close to dropout. I found that three P4s needed about 13.5V but they were running at about 4V / LED compared to about 3.3V for the XPG.
Oh, by the way, I've just bought a bag of 100 M3 x 12 polycarbonate screws and nuts from Rapid which should be very useful for avoiding shorts. I can include these in future kits if there is interest - not sure about the practicalities of selling them in 4s as they are so low value the hassle factor would be high for the money.
OK, I'm late to the party...
Mr Trout, did you get my mail?
Mr BCT I need drivers + bits and pieces to build 2 lights.I intend to build one helmet mount and one bar mount light.
So if I've got this right I need:
4X reflectors - Mr T.
4X LED - Mr T.
2X Cases - Mr Maplin.
1X Bar mount - Mr Lumicycle.
1X Helmet mount - Mr?
2X Switch - Mr Rapid.
2X Jack plug (male) - Mr Rapid.
2X Jack plug (female) - Mr Rapid.
1X Battery mount for internal fit - Mr BCT.
1X Battery mount for external fit - Mr BCT.
1X Battery bag for top tube - in stock.
?X AA batteries - Mr?? or Mr Smudge?
2X Heat sink - in stock.
2X Polycarb sheet - in stock.
1X Heat conducting adhesive - Mr??
Various bis of wire,screws and flex - all in stock.
Anybody care to fill in the blanks?
Regards
Marko
Marko - I'll check what I've got when I get home tonight. I think I have spare switches and boots, just short of the power cables. I'm ordering from Rapid over the weekend anyway so can get what bits you need.
Troutie will probably confirm but I have a feeling he found the case was too small to fit 2x 18650 inside. You may get something like 3x CR123 which would be about half the capacity of 2x 18650 and if you are using two you could probably get away with running it on low power most of the time.
Marko cant find any mails from you in any mailboxes
have got the parts in though .
Batteries will fit in but the holders wont .
one triple and one single is tempting. I'll finish this one and see how it is first!
Troutie and BCT.
Mr Trout, YGM.
Mr BCT, I'll just go for the easy external battery option then. Please mail me when you have checked your stock (markostoreyATgmailDOTcom).
Thanks for the replies
Marko
im liking that triple led badboy! youll burn retinas from miles away.
considering building another as a bar mount but would defo want it floodier. anyone got any links to reflectors? i found some early on in this thread but i didnt bookmark em 🙄
Just received another 10 each of the twin, triple and quad 18650 holders. Prices as before (i.e. I can't be bothered to dig back through the thread so you'll have to check for yourself!)
Is there likely to be any more demand for kits? They have been fairly slow moving so I'm wondering whether to get more stock of the power leads etc.
Hi Stephen .... sent email message on 18th on same address as other messages I sent .... did you get it?
Ive been testing the triple, I ran it on full power while out on a ride thursday, it lasted about an hour. The batteries were not fully charged though.
Seriously impressed with the output while it lasted!
Last night I did a test on the low setting and got 4 hours out of it before i switched it off. At no time did the case get more than slightly warm to the touch.
Now the bad bit, I switched it back on a little later and there was a loud pop, it appears that one of the ultrafire 18650 batteries has died already (only been cycled twice). Hopefully there is no other damage to the light itself.
Are there better batteries out there or should I just get a proper battery pack? mmmmmm, decisions.
Hello,
Re-discovered this thread after stumbling upon it a while back. Feeling inspired but also somewhat daunted, I've decided to bite the bullet and try and give it a go, if able.
BCT and Trout, do you have any kits left over or have you been totally cleared out?
If still available, I'm interested in getting hold of kits for 2 sets, LED's, reflectors, drivers (2 power setting ones?), switches, leads, etc.
Cheers
Phil
Bobble - got one from you at about 11:30 that day. You should have something in the post today unless the local post office are doing their usual trick of either collecting early or holding on to 1st class post for a few days.
Phil - Drivers and switches I have, I'm going to order a few more power leads tomorrow so will have the lot by Tuesday / Wednesday.
Gary - Not a good sign, especially as 'genuine' ultrafires are supposed to be practically bomb-proof. Hope the rest is OK...
Questions
How to bond the driver to the bit of alumunium.
What silicon seal to use?
On the cable with the jack, which is negative? The white striped cable or the black cable.
Any easy ways to cut holes in the black plastic bevel for the reflectors or just to use the perspex
Quirrel - you need to read the thread, all those questions and more in the first few pages. The leaflet from BCT explains the cable.
Thanks Stephen ... probably arrive after the crack of noon Monday 😀 ... if you let me have your postal address by email, I'll send you a switch to evaluate. Thanks, Bobbl@
Quirrel - you need to read the thread, all those questions and more in the first few pages. The leaflet from BCT explains the cable.
What leaflet?
I've not kept track, have you bought a driver kit or are you just looking at the moment? I supply a leaflet with the kits that explains the wiring etc. When I get home I'll see if I can put it up online somewhere.
I done myself a wiring diagram for when the time comes to get the soldering iron out, and i thought i would post it up.
[URL= http://i237.photobucket.com/albums/ff96/The_Wheelie_King_album/th_WiringDiagram.jp g" target="_blank"> http://i237.photobucket.com/albums/ff96/The_Wheelie_King_album/th_WiringDiagram.jp g"/> [/IMG][/URL]
(Click for a bigger image)
Hope it helps.
Hi Stephen .... boots received .... perfect fit .... many thanks! 😀
Got your addy now so I'll send you a switch to play with. I think you'll like it! 8)
Nice diagram Jay ....puts mine to shame in the link on page 11.
I'll send details shortly (after a beer and some grub) about a mod that allows off-low-high or low-med-high for those that would like that configuration .... nothing complicated, honest! I know one or two of you would prefer it to off-high-low etc. 😉
Ok ... this may interest builders who don't like the off/high/low positions of the up/centre/down toggle switch that has been used in these builds.
I've found what looks like a DPDT (Double Pole - Double Throw) 3 position toggle switch that operates like the one above but allows you to do off/low/high (or off/med/full ... or whatever you want to call it!)
It is physically the same size as the DPDT switches that BCT supplied to some builders and the rubber boot that BCT gets from Rapid Electronics fit perfectly (it's 6mm - not the same as Maplin switches or boots)
It's a very clever (odd!) switch that requires a solder link between two of the pins for it to work as a true SPDT on-on-on switch (Yep, not a typo! A DPDT that acts like a SPDT with true on-on-on function).
Here is how you wire it for a simple off/low/full set-up ............
[IMG] 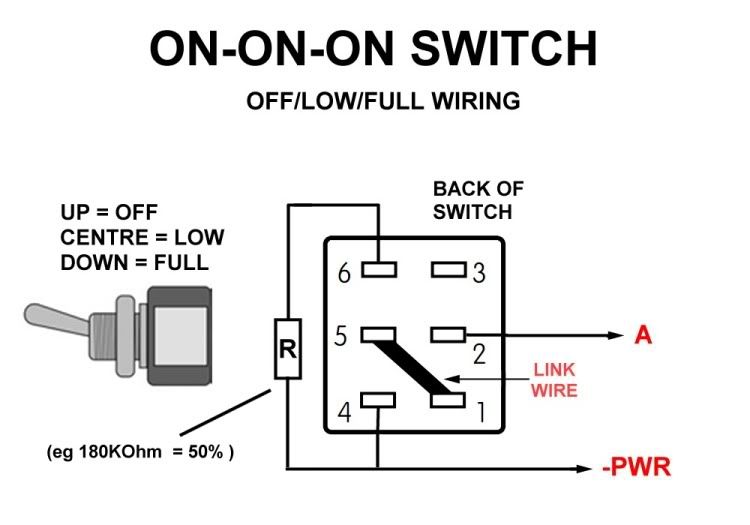 [/IMG]
Here is how you wire it for a low/med/full set-up (provide your own separate on/off switch for no light!)
[IMG]  [/IMG]
I've fully tested the diagrams with the switches and they work perfectly .... you just need to pick the resistors to set what levels you want.
Please note that trying these wiring diagrams with the switches BCT supplied or Maplin/Farnell/Rapid/RS etc etc switches WILL NOT work .... you have to use one of these on-on-on switch types that I'll show the source of below!
Remember, the switches are the same size as a DPDT switch, i.e a little wider than the SPDT switch that Troutie shows on Page 2, or CK shows on Page 13 .... they look like this ... except the ones I got are black! They have a 3A 250VAC / 6A 125VAC rating.
[IMG] 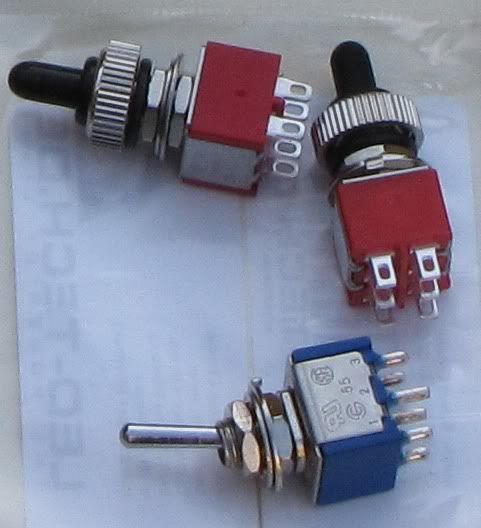 [/IMG]
I got mine [url= http://cgi.ebay.co.uk/ws/eBayISAPI.dll?ViewItem&item=330489062968&ssPageName=STRK:MEWAX:IT ]here[/url], 6 off. They are also available [url= http://cgi.ebay.co.uk/ws/eBayISAPI.dll?ViewItem&item=350404888076&ssPageName=STRK:MEWAX:IT ]here[/url] singly, and I think Farnell and other big suppliers have them too. One thing to note ....... buying them from other suppliers might mean that the important solder link position might be on different pins. My suggested suppliers send diagrams with their switches ...no doubt the big suppliers have info on them too.
Hope this helps someone .... apart from me!
I have managed to buy the wrong Hammond box somehow, not sure how, but I have the solid plastic end pieced one, not the one in two parts with plate at the end.
Quirrel - you don't need the box with the two part plates, it works just fine without them, and as there are less parts, less waterproofing is required.
You will have to drill two large holes (approx 20mm) in one of the end plates and fit the lexan behind, but I think this is a neater solution.
If you search through the posts there are plenty of pictures.
I picked up a fancy drill bit at Aldi tonight, so should do the job.
No piece of scrap will be safe in Quirrel's house tonight ......
Newwww Drilllllllll Biiiiiitttttt ........ Yeeeeaaaahhhh! 😀
It's one of thise different depth bits that you can use on metal. Shaped like a christmas tree. On sale for 4.99 three separate bits, seemed too good a bargain to leave
Quirrel .... If it doesn't give a nice smooth finish to the holes in the plastic front, wrap a bit of wet'n'dry around a suitable diameter round pole and finish it off by hand. It'll look neat then. Good luck, and keep posting progress.
Here's my test set up with a temp bracket to determine the angle between the high beam and the dip. It's thin ali, so easy to bend. When it's had a few test rides and I've tweaked the angle, I'll make a thicker version and anodize it to match the black Kraken.
[IMG] 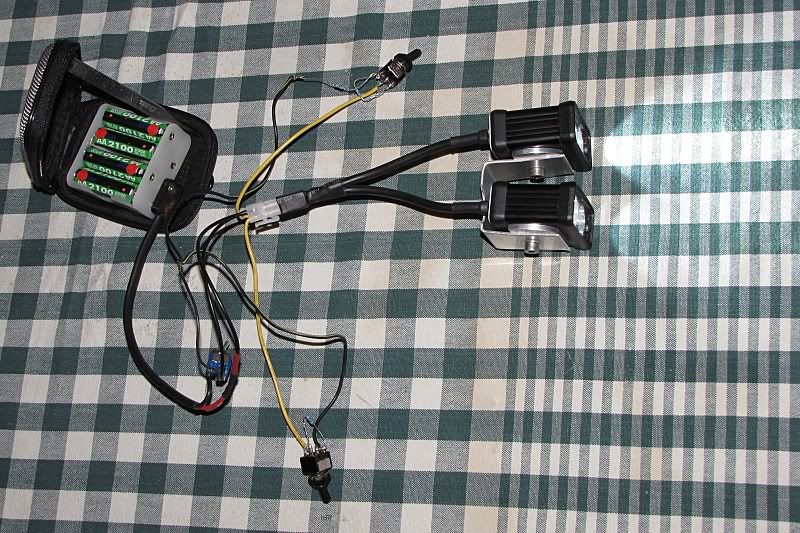 [/IMG]
The new switches are working great. One is set up for 25%/50%/100% and the other for OFF/33%/100%, for testing purposes.
Quirrel - I paid £20 for one of those drill bits from Machine Mart, and also £70 for a pillar drill and £30 for a new soldering iron, so my lights haven't been cheap.
Nice wiring diagrams Jay and Bobblehat 😀
I've finally powered up my lights today, all working nicely with the lo/hi/med switch and seperate power switch. I was originally going to build my battery pack into a water bottle, but saw this the other day which might be more convenient.
[url= http://www.topeak.com/products/Bags/TriBag_raincover?WYSESSID=hc5peenc6p3ra152b10j74g717 ]Topeak bag[/url]
might get one on order this week and have a play.
flicker
looks pretty good that bag. will it fit at the other end near the seat post
to keep the front end nice and light.
Does the BCT Driver go into flash mode once the voltage of the battery drops off? Mine certainly did last night, my 14.8V battery pack was reading just over 6V when I got home.
Has anyone looked at these new XM-L led's? I was toying with build a triple version for my bars, possibly using this new led. Just need to find a suitable lens/reflector for a nice floor beam.
I guess I would also need a different driver which is able to supply a higher current?
Cheers
One of my light heads did do some sort of flashy thing on one test when I accidently let my 8 cell NiMH pack run down to about 6V ...... not recommended 😳
I think letting a 14.8V pack go down to 6V is a definite no-no too! 😥
I went for a cheap option ..... a cheapy camera bag from one of those Poundylandy/worldy/savey stores ..... (Guess how much it was 😈 ..... but don't ask the shop assistant if you don't want a short rude answer 😆
It seems to have some hard shell inside that should be pretty weather resistant. A loop of doublesided velcro strap through the belt strap and it goes on the stem.
[IMG] 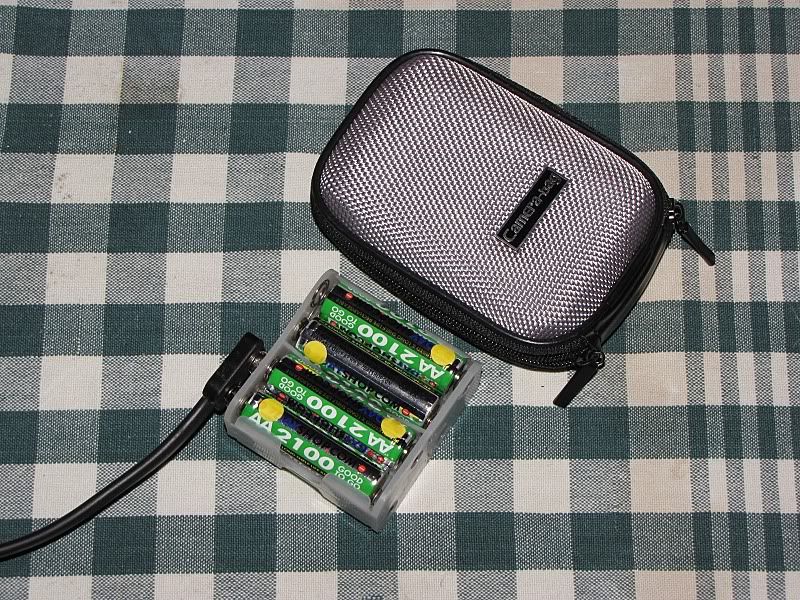 [/IMG]
[IMG] 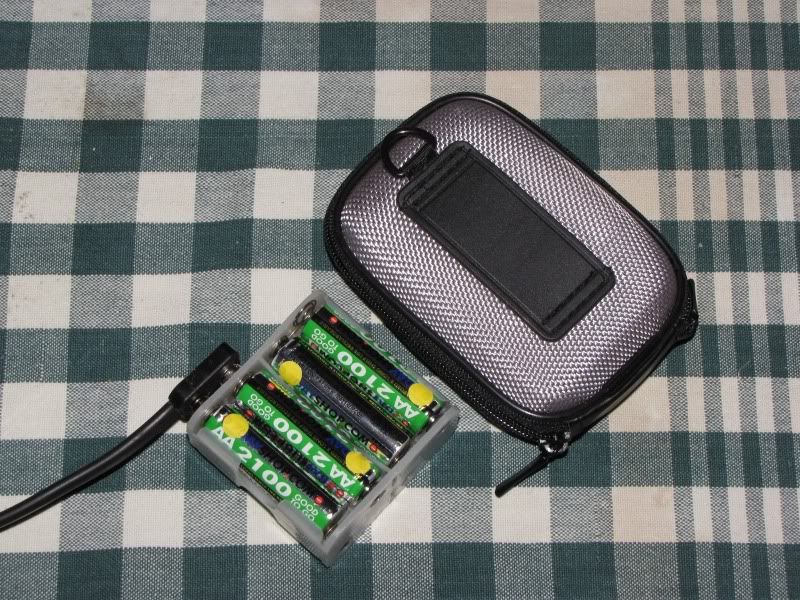 [/IMG]
Quirrel - I paid £20 for one of those drill bits from Machine Mart, and also £70 for a pillar drill and £30 for a new soldering iron, so my lights haven't been cheap.
Bargain then getting my drill bits for a fiver. Soldering iron was in the loft and my drill, well lets just say that a few beers numbs the pain when stabbing oneself in the knee with a drill. My body is the pillar.
I borrowed a 9v battery power supply from work.
I just spotted some 10 quid 18v drills at Netto tonight, so I might buy one for the house anyway and if it works then get another for the battery pack.
Mr T.... I can't see why the bag couldn't be used at the other end of the top tube, against the seat post. Found them for £11.99 at CRC too. Order going in tonight, will report back when it arrives.
