I'll laugh, I'll cry and I'll probably need lots of help. Anyway, thanks to this thread, I now have an increasingly large pile of bike bits scattered around the house. The Chisel frame looks lovely in pink and the large seems like a great size. Here's the current haul:

Massive thanks to everyone who's made suggestions so far. The shimano bits are mostly SLX. Sram DB8 brakes from the 'nana industries folk, which was a price so cheap I felt like I had to (side note, first upgrade will be to hope brakes in a few months time). I'm generally going for black/silver to set off the pink frame. Apart from the red DMRs, which are what I had already. Headset, stem and handlebars are from BMC and they came with the frame. I'll use them for now, they seem ok. The wheels feel stupidly light and I have read that a few folk have issues with breaking them. Fingers crossed I don't do that. But for the money, they seem great. The fork seems great, I'm deffo very happy with that.
Stuff still to arrive (probably not everything):
- rotors (praying that they have locking nuts with them)
- tyres (nobby nic/racing ralph)
- MT801 BB
- Ascent dropper (200mm, which I hope will fit ok, but this one is adjustable so fingers crossed)
- TL-FC25 and TL-FC41
- small torque wrench (already have a big one)
- bleed kit and new brake pads
- star nut install tool
Got a BB install tool off a mate, which is handy. I'm hoping that I don't need any spacers for the cranks, but the internet says I don't. Hopefully the LBS will have some if needed.
Only thing I don't have on order at all is a saddle. I'm going to temporarily nick one from another bike. But maybe a WTB Volt? Or I've never had a brooks and a C17 might be nice? Guess I'm going to have to measure my sit bones tomorrow...
So far all in it's 2.3k, which I'm happy with. Another £100 on tools as well. Weight should be around 12kgs.
I think that getting the cables sorted before I put the BB on seems like a sensible plan. So with that in mind, it's sorting out the fork first and then I'll do the cables. Happy to take suggestions on what order to do things.
Nice haul so far! Looking forward to seeing the final build 😊
If you haven't bought a bleed kit yet the Clarks universal one is really not bad, especially if you're watching the pennies. I bought one when I had an airy brake on holiday last year.
Instructions are not great, but you can match the kit to the relevant brake maker's YouTube or whatever.
Look forward to build pics. 👍
On the saddle suggestions I have a carved C15 (the one with a hole) on the gravel/road bike. Very comfy. They sag a bit in the middle so you might need to tweak your seat height up a bit (just a few mm) if you have a favourite measurement.
I'd probably want a C17 on the MTB due to being a bit more upright and I'd go carved/hole version with that too.
I treated myself to a carved C13 on a bling road bike build, and once you adjust to the slight hammock/sinking sensation, it's been fantastic. Picked up a second hand one in excellent condtion off ebay at less than half price for the other road bike, still got a search live for another on the gravel bike.
Nice, enjoy the build process. I much prefer building my bikes to buying off the shelf.
Please lose the red pedals though, they will look horrendous 🤣
Decent lightweight saddle (I actually have one on my Chisel):
https://sportandleisure.com/products/prologo-scratch-m5-140-nack-carbon-saddle-black-rrp-177-99
Looks fun, I love building up bikes! If they're Shimano rotors they should come with lockrings, but if they don't you could always buy some blingy ones 🙂
Have you got a decent pair of cable/hose cutters? I took far too long to buy a good set (Park Tool CN-10 in my case) but they're one of the best tools I've bought after struggling with normal side cutters/wire cutters for years.
Also a cheap saw guide for cutting down bars and fork steerer is satisfying to use/have but that's a lot easier to live without if you're only doing this once.
Also a cheap saw guide for cutting down bars and fork steerer is satisfying to use/have but that's a lot easier to live without if you're only doing this once.
I spent years sawing mine (by eye) - then recently bought a pipe cutter. Loads better
Also a cheap saw guide for cutting down bars and fork steerer is satisfying to use/have but that's a lot easier to live without if you're only doing this once.
I spent years sawing mine (by eye) - then recently bought a pipe cutter. Loads better
I've got pipe cutters. The bars are already at 760, so won't need to touch them. Just need to do the steerer.
My bleed kit is coming with a tool to cut the hoses. Sadly that won't turn up till Monday at the earliest. Which will definitely slow things down over the weekend.
Nice, enjoy the build process. I much prefer building my bikes to buying off the shelf.
Please lose the red pedals though, they will look horrendous 🤣
I agree they're not great in the colour scheme, but for now, I've got them and I'm going to use them as a stop gap.
I do have red vaults on my Athy, they look great on that.
Decent lightweight saddle (I actually have one on my Chisel):
https://sportandleisure.com/products/prologo-scratch-m5-140-nack-carbon-saddle-black-rrp-177-99
I was going to say I hate the visuals of that, then I saw the cost and weight. That's awfully tempting.
Headset bearing question. I've already got the cups installed on the frame. They seem in good condition. The guy chucked a headset in with it. The bearings don't look the greatest. I should be able to go to the LBS and ask for a 1-1/8" 41.8mm OD x 30.5mm x 6.5mm (45x45) and a 1.5" 52mm OD x 40mm OD x 7mm 954x45) with a reasonable chance of them having the right bearings knocking around?
This is what the bearings look like. The top one seems ok, but the bottom one seems a lot more battered.

The chisel FS frame comes with the headset and the cups already pressed into the frame. They should be brand new bearings, had the shop swapped them out for used ? I built up the same frame from scratch, same colour too. I put a 120 SID, 180mm dropper and Silt wheels in mine. The tricky part was the internal cabling around the BB area.
The chisel FS frame comes with the headset and the cups already pressed into the frame. They should be brand new bearings, had the shop swapped them out for used ? I built up the same frame from scratch, same colour too. I put a 120 SID, 180mm dropper and Silt wheels in mine. The tricky part was the internal cabling around the BB area.
It's a second hand frame, hence the old bearings. I've been able to get a new lower bearing from the LBS. I'll get a new upper bearing on order from somewhere.
Your bike looks great, similar vibe with what I'm going for.
Sorry, missed the second hand bit. My starting point would be to heli tape the critical frame sections before doing anything, I did the top tube, down tube are stays. Thread all cabling and fish through the frame with cable ties and string. It’s a great frame, mine comes in around 13.4kgs for an XL, I did not go for super light components.
The chisel FS frame comes with the headset and the cups already pressed into the frame. They should be brand new bearings, had the shop swapped them out for used ? I built up the same frame from scratch, same colour too. I put a 120 SID, 180mm dropper and Silt wheels in mine. The tricky part was the internal cabling around the BB area.
It's a second hand frame, hence the old bearings. I've been able to get a new lower bearing from the LBS. I'll get a new upper bearing on order from somewhere.
Your bike looks great, similar vibe with what I'm going for.
Unless it feels notchy/not smooth, just use the existing one.
My bleed kit is coming with a tool to cut the hoses.
Have you got one of those tools to press in the barbs? I'm not a massive brake faffer, but when I built up my MTB from a frame set a few months back that saved a massive amount of heartache. Jagwire is the one I got.
So the pile has gotten bigger. As has the amount of tools that I've got. Here's a quick photo from a few days back:

Stuff that has changed, I've swapped the black grips for DMR black and sparkly grips! Red pedals are gone, replaced with black ones.
And the various tools:

Apparently I now need a barb tool as well. So guess I'll get one of them sorted out. However I do now have a decent bike stand, which is nice. Folds down to a decent size as well. I had been feeling a bit guilty about not buying much stuff from the LBS, but most of the tools have come from there at full RRP!
I had hoped that I'd get started with the fork, but been unable to get the upper bearing into the cup:

So decided that a new upper bearing is the best idea. The brand new bottom one just pops in there fine. So I'm assuming that I can't put the old one straight in the top, that's probably not quite right.
Mostly waiting on lock rings for the discs. Now on the upper bearing so I can do the fork. Then need the cable routing tool to arrive. Tried to do that by hand but failed. I'm kinda hopeful that this extra time spent watching videos and making check lists will mean a smooth build when the last few bits arrive this week. Broadly fun still, but want to get it built and ridden now.
You'll often get slight tolerance issues with headsets, putting the bearing in the freezer overnight can help to try and shrink it ever so slightly before fitting
You'll often get slight tolerance issues with headsets, putting the bearing in the freezer overnight can help to try and shrink it ever so slightly before fitting
The difference between the old and new bearing is quite stark, so I'm glad I've bought a new one. Tried a couple of hours in the freezer and it still seems miles off being able to fit. So lets hope it'll fit tomorrow morning. If not, I guess I'm going to have to trouble the LBS with it.
Is there a chance they've picked up the wrong top bearing when they packed the frame up for you?
Is there a chance they've picked up the wrong top bearing when they packed the frame up for you?
Both the old and the new bearing seem the same. I've bought a new bearing and I'm sure that's the right one, least the website, packaging and manual all say it's the right one.
Sure you are not trying to put the lower bearing in the top cup? Normally the bearing with the orange seal goes in the lower and the blue seal in the upper, they are different external radius, this would cause the issue you describe. The headset bearings on all my bike drop in no force required.
If that's the stock headset I found it hard to get a replacement top bearing. The one I did buy didn't seem to fit correctly despite being listed as compatible (loose in the cup). In the end I regreased and ran the old one then bought a new (bird) headset.
If that's the stock headset I found it hard to get a replacement top bearing. The one I did buy didn't seem to fit correctly despite being listed as compatible (loose in the cup). In the end I regreased and ran the old one then bought a new (bird) headset.
Yes, it's the stock headset. It's just a tidge too big. The bottom one fits absolutely fine. There's quite a size difference between the two, so I'm sure I've got the right one. The bottom one does fit absolutely fine. It's just the top one
Sounds like it's time to buy a new headset. Bit frustrating as I'm now going to be sitting around for quite a while till I get to actually finish the build.
In the space of a day things have gotten significantly worse! Turns out the reason why the bearing won't fit is that the cup is slightly damaged. I took it to a local mechanic and they reckon the frame has been dropped at some point. We both think there's a small flat spot at the top of the headtube. So I'm sorta relived that there was a sensible reason that I couldn't fit the bearings. But now I'm worried that the frame is stuffed. Then I'm out of pocket for the frame and have a massive pile of bits that I honestly don't know what to do with. The mechanic is going to pop out the top cup and take a good look at it later on in the week and let me know what they think. Fingers firmly crossed.
Ah that's a bit of a curveball! For what it's worth with it being aluminium I'd be inclined to 'persuade' it round again if required and/or press a new top cup in and not worry about it.
I'd imagine if it's put a flat spot on the headset cup that was almost certainly done without the bearing and fork in it, so as you say it's probably just that the frame was dropped and by sods law landed right on that spot? You'd never do that riding along, and it wouldn't deform with a steel bearing and a fork steerer tube in the middle of it.
Annoying as when you buy something new (even second hand) things like that do take the shine off, but it'll all be forgotten by the second pedalstroke!
We both think there's a small flat spot at the top of the headtube
Is there any external damage to the HT? Find it a bit odd/unlikely that a flat spot has formed on the HT without any external damage
I think, though I'm not 100% sure, I still have the stock cup I took out. You are welcome to it if useful.
Been thinking more about your frame. Would need a decent wack to bend both the frame and (steel) headset cup. I'd have thought that would result in obvious damage and paint loss/spidering on the frame at point of impact. It's not unusual for the cups to be tight at points in the frame but not others. Similarly if the bearing is a snug fit then surface rust on the bearing would make it difficult to fit into the cup. Even if the frame is slightly out of shape it should be possible to ream the head tube to size (though if you had to go this way make sure you get someone who knows what they are doing to doing it!). Summing it up I think it's unlikely to be a drop without obvious damage and I'd suspect the bearing still won't fit easily into the cup when the cup is removed (which would rule out a frame issue).
Could be the top cup is not pressed in correctly. I would buy some new headset cups and press/tap in with a wooden mallet, might solve it. Agree with above, if dropped you would see some external damage.
Good news, the mechanic has popped the upper bearing into the cup.
We both agree with the comments about frame damage, there should be more of a mark. However the top cup is definitely not quite round. It's very subtle, but it's not quite right. He did get it in with a headset press and a little bit of pressure. But neither of us could fit it by hand. Either way, I'm happy as I can be that it'll be ok.
Just got the frame back and done a test fitting of the fork and stem. Got to put my big boy pants on and cut it tomorrow. Now I've got the cables sorted, hopefully progress will be steady tomorrow, as once the BB is in, then hopefully there won't be anything too complex.
have just read the thread, am glad you got the headset in and hopefully nothing else will go wrong. the chisel fs is a great bike and i think you will love it.
i have the cheapest spec one but i am currently waiting to have a full xt groupset fitted and then some new roval carbon wheels (have got a rockshox sid ultimate fork fitted).
i cannot wait till i can actually ride the bike as the weather has been absolutely pants as anyone in the uk will attest to. hopefully though it looks like the weather might start to get dry next week fingers crossed.

Well it's finally beginning to look like a bike. After a lot of faffing with cables and buying what seems like meters and meters of shifter outers from the LBS I'm finally getting there. Hopefully I've managed to muffle the cables well enough. Photo is a bit out of date as I've got the BB, cranks and rear mech on. Annoyingly the cranks need another special bracket, which is on order now. The one I did buy for the cassette doesn't fit either. So I'll try the LBS again for that, hopefully they'll have the right one. Dread to think exactly how much I've spent on tools so far. Keep telling myself, it'll be worth it when I can service my own bike...
I'm having fun honest. Be even better when it's all together and I'm riding, hopefully at the weekend.
Oh and I forgot to buy the mounting rings for the brakes, so I'm now waiting for them to arrive as well.
Looking good
They are awesome; here’s my daughter’s one

So just went out for the first test ride. Initial impressions are that the bike is incredibly light. I mean my current comparisons are a bunch of old steel hardtails and an Atherton S170. But yeah, floaty light.
The dropper post isn't working right either. It's basically held open I think. So need to sort that.
However the main issue was the chain breaking after a few minutes. Now I thought it would be ok, but I had taken the chain apart with a chain tool, to re-thread it when I'd incorrectly threaded it through the mech. Apparently not. Back to waiting for a new chain (or spend full RRP at the LBS)...


Yeah you can't rejoin 12 speed. Needs a quick link put there instead (no problem having 2 in a chain).
Thanks @nixie, got another quick link and the chain seems good now. Also fixed the dropper post.
So next list of issues on test ride #2 areeee:
- Crank fell off (I tightened this up I swear, obviously not enough tho)
- Gears are not shifting correctly at all.
I don't think I've totally stuffed up the crank, it's gone back on and I'm going to try and crank it up better.
As for the gears, I've no idea there. I guess it's back to youtube and faffing with them.
Getting there slowly. Least the brakes, which were my main worry seem to be working fine.
I don't think I've totally stuffed up the crank, it's gone back on and I'm going to try and crank it up better.
Torqued to spec? Don't keep tightening it, check the spacers etc first
I don't think I've totally stuffed up the crank, it's gone back on and I'm going to try and crank it up better.
Torqued to spec? Don't keep tightening it, check the spacers etc first
It probably wasn't. Is now. I suspect this means that I'll be buying new cranks sooner rather than later.
I have managed to setup the shocks ok. Neither of them have any rebound or anything like that, just lock outs. Which honestly I'm happy with, it's nice and simple.
Next up, figuring out how to setup the gears properly. I've had to put the B-screw all the way in to get it tensioned up, but it seems ok. Now just for lots of faffing with the limit screws to try and get it working correctly.
Got to the bottom of the weird shifting, one of the quick links isn't on right due to the damage to the chain, so it's overly rigid and it causes the chain to skip at certain points.
Third test ride went well. Nothing fell off unlike the other two. Apart from the issue with the chain is seems ok. New chain is on order.
Hopefully once that's turned up that'll be it.
I have managed to setup the shocks ok. Neither of them have any rebound or anything like that, just lock outs
Fork and shock will deffo have rebound, might not have high/low speed compression but they will have rebound. Look for the rabbit and hare symbols.
Bike looks good though.
Fork rebound is under the right leg. Shock rebound under the lockout lever (probably). Very rare not to be able to adjust rebound.
Hare and tortoise is Rockshox, these are Fox which is just +/-
saddle looks like it could be more forward and more nose down (start flat to ground and adjust dependent upon if you find yourself moving forward - tilt back, or moving back - tilt forward, when riding).
what cranks? shimano benefit from after market aluminium pre-tension bolts sometimes. ebay.
a good source of info is the park tool website. obviously they're trying to sell tools of which there are many equivalents at lower prices.
It's not a hare either. It's a Jackalope!
Interesting, new fact for the day. 😀
Ok, so looking again at the rear shock there's a red ring around the lock out, so I guess that's for rebound? Ditto on the fork, there's a weird red tube at the bottom which I guess could be for rebound?
Anyway, fourth short test ride in the bag. New chain has been fitted. Fiddled with the shifting a bit more and it's vaguely better I think. It's normally absolutely fine when on the stand in the house, but the moment I'm out riding it's suddenly not as great. However I think it's getting to the point where I can go on a proper ride with it, which is exciting. I mean nothing else has fallen off whilst riding round the park, so up a mountain should be fine right?
The saddle position in the previous photo wasn't at all right, it wasn't even properly tight. I've sorted that out, but the only thing I don't like about the Ascend dropper is that the saddle adjustment is a bit finicky. It's still a bit more nose up than I'd like. The saddle is otherwise quite nice and it's definitely grown on me.
Photos to come soon.
Yeah rebound on the rear shocks is the dial behind the lock out lever. On the fork, pull the red thing off at the bottom of the fork leg, it's just a protective cover, the rebound dial is under that.
Not exactly ads678, done forks it's a cover, others it's the actual adjuster. On a fox 34 it'll be the adjuster. Normally it's the bigger forks where it's a cap.
Not exactly ads678, on some forks it's a cover, others it's the actual adjuster. On a fox 34 it'll be the adjuster. Normally it's the bigger forks where it's a cap.
Ignore me, I'm talking shit! The red plastic cover I'm thinking of is on the QR lever if it has one, nothing to do with the rebound knob.....
🙄
So this is the dial on the bottom of the fork:
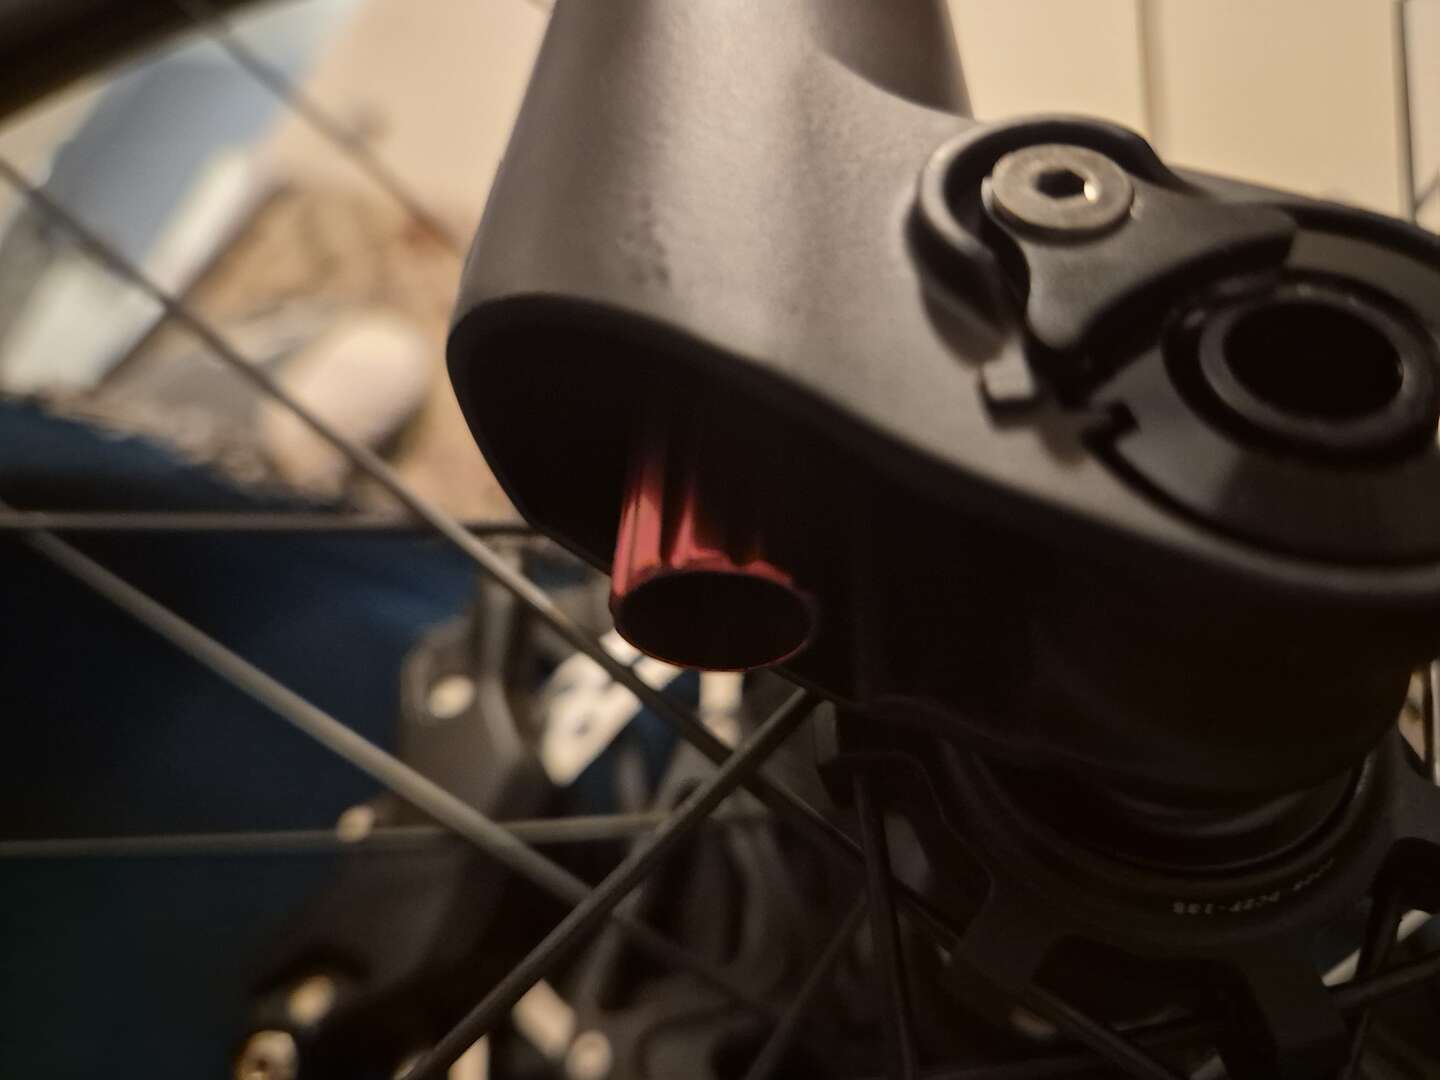
If that's rebound, then it's a bit odd. But there we go. I'm fairly happy with how the shocks are. This is more of a XC/gravel/occasional blues kinda bike, so it feels ok to me atm.
Anyway, last major annoyances are:
Shifting, for the life of me, I cannot get this right. I've watched a load of videos. I've tweaked it endlessly, but still not getting anywhere. My most recent thought was that cause the B screw was all the way in I should shorten the chain. I've done that and the tension is better, but still no idea. Apparently some SLX mechs have a guide on the back for setting up the B screw, but not this one. I don't have the little tool to tell you how to adjust the B screw. I'm sure that the hi and lo screws are fine. But the moment I'm out of the 3rd smallest cog, it just starts clicking like it wants to shift. It's fine in the biggest cog as well. So the one proper ride I've done oscillated between the biggest and smallest cog and that was it. I guess I'll have to admit defeat and take it to the LBS.
The angle of the seat. The Ascend dropper post does not have the best adjustment there. Best I've figured is to slacken the screws off, tighten up the front one, hope that you've got something like the right angle and then tighten the back one. Other seatposts I've had in the past have been much nicer to adjust. This is just a pain.
Set the chain length using the park tools method. That is chain around largest cassette cog and and the front chainring without being routed through the mech. Add 4 links to the length.
It's a second hand frame so I'd be checking the hanger is straight.
Park also have a guide for setting the B screw.
I'll try that. I used the shimano method and I still think the chain isn't tight enough. I'm hoping that's the reason tbh.
All the B- screw vids seem to use a guide, I guess I need to get another tool...
Ditto the hanger, that's a tool isn't it?
I'm definitely fed up of buying new tools.
Check the back of the derailleur again for the mark. You might need to shine a torch on it too - it can be hard to see.
A couple of thoughts and forgive me if already covered...
You mentioned a new chain, was that going onto a used/part worn cassette?
Any possibility of a stiff link? Not sure how your chain is connected (snap off pin, Shimano style, quick link etc).
Are there any bent teeth on the cassette from the earlier chain issue? I bent the cassette teeth on a SRAM ten speed setup with a ham fisted shift under massive load a couple of years back.
Mech hanger tools aren't especially expensive and not a bad thing to have in the arsenal. Depending on where you are maybe someone could lend/help? If not LBS will have.
Check the back of the derailleur again for the mark. You might need to shine a torch on it too - it can be hard to see.
I've looked and looked and I really can't see anything. Oh well.
LBS time?
I enjoy every aspect of building a bike and have done many times, but indexing gears is a hard pass for me. I can spend hours trying to do it myself and it still be shite, or get a pro to do it perfectly in 5 minutes.
A couple of thoughts and forgive me if already covered...
You mentioned a new chain, was that going onto a used/part worn cassette?
Any possibility of a stiff link? Not sure how your chain is connected (snap off pin, Shimano style, quick link etc).
Are there any bent teeth on the cassette from the earlier chain issue? I bent the cassette teeth on a SRAM ten speed setup with a ham fisted shift under massive load a couple of years back.
Mech hanger tools aren't especially expensive and not a bad thing to have in the arsenal. Depending on where you are maybe someone could lend/help? If not LBS will have.
All excellent points.
The chain is new.
The old chain had some stiff links, but the new one is 100% fine.
Don't think there's any bend teeth but I'll double check.
In the end I went back to basics with it, watched a few more videos and started again from the top. It's not 100% yet, but it's nearly there. The only major issue is that it sometimes jumps of the top, so I think a small tweak to the hi setting and it'll be done.
The Ascend dropper post does not have the best adjustment there
have another look at that saddle. there's plenty of adjustment on those posts (i've got about three of 'em and so's everyone else). the upper part of the clamp should be roughly centered over the bottom. i don't remember if the bolts are different lengths but IIRC the top is marked indicating direction? you may as well take it apart and have a look as you'll be in danger of bending your saddle rails and the position is likely pretty poor i imagine?
The bit that's bugging me, is the tilt. It's just a little bit too far up. Not by much, just by a degree or two. But I want it pointing down by a degree or so. Other seat posts have had nice little nubbins and marks so you can get it just so. This doesn't.
Like I said before, that photo is very out of date, it's much further forward and more level now. Still not as level as I'd like it tho.
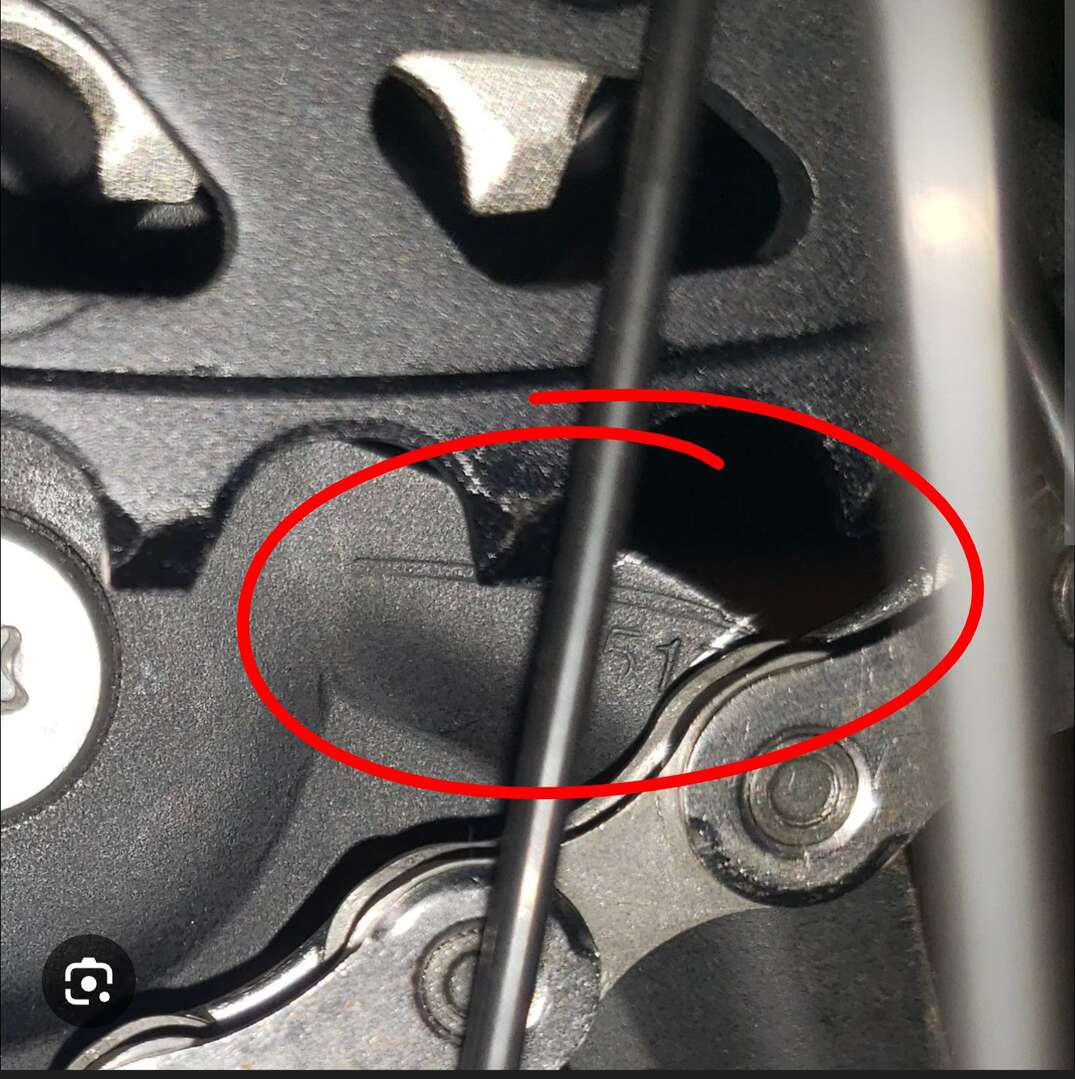
Check the back of the derailleur again for the mark. You might need to shine a torch on it too - it can be hard to see.
I've looked and looked and I really can't see anything. Oh well.
This is the mark you're looking for
Ok, that is subtle. Thanks for that, I'll check it out tomorrow morning.
I have never seen.one of those marks before. Will be checking the bikes tomorrow!
I have never seen.one of those marks before. Will be checking the bikes tomorrow!
It's very subtle. I did find it when I had a really good look in the right place. It was basically about right, so I was happy about that.
The Ascend dropper post does not have the best adjustment there
have another look at that saddle. there's plenty of adjustment on those posts (i've got about three of 'em and so's everyone else). the upper part of the clamp should be roughly centered over the bottom. i don't remember if the bolts are different lengths but IIRC the top is marked indicating direction? you may as well take it apart and have a look as you'll be in danger of bending your saddle rails and the position is likely pretty poor i imagine?
The bit that's bugging me, is the tilt. It's just a little bit too far up. Not by much, just by a degree or two. But I want it pointing down by a degree or so. Other seat posts have had nice little nubbins and marks so you can get it just so. This doesn't.
Like I said before, that photo is very out of date, it's much further forward and more level now. Still not as level as I'd like it tho.
I've never struggled getting the saddle angle I want regardless of the seatpost (inc a TransX which is currently in use). I run my saddles fairly flat and can get them set up by eye easily, but if I want to be sure a spirit level is your friend. I never use the markings on the post on first fitting, I do use them (if they are there) to re-set up after having the saddle off for maintenance.