Measure the “pedalling height” on your existing bike. This is the height from the centreline of the BB/Crank to the centreline of the saddle rail when the dropper post is fully extended and you are in your pedalling position. This assumes that you will be using the same length cranks as your existing bike and the same depth of saddle, if these are going to be different then the “pedalling height” needs to be adjusted accordingly i.e. if you’re using 170mm cranks on your old bike and going to 175mm on the new you would need to reduce your “pedalling height” by 5mm to allow for that.
Deduct the Seat Tube Length from the “pedalling height”, this gives you the “maximum theoretical dropper post height available” for your fully extended dropper post, measured from the bottom of the dropper post collar to the centreline of the saddle rail. This assumes that the dropper post can be fully inserted into the seat tube. This assumption needs to be tested against the selected dropper post, see below. It’s best if you measure the Seat Tube Length with the seat clamp in place, rather than rely on Geometry Charts, as the seat clamp sits proud of the tube by a few mm, if you can’t do this and are only have the Geometry Chart, add a few mm to the quoted length to allow for a seat clamp.
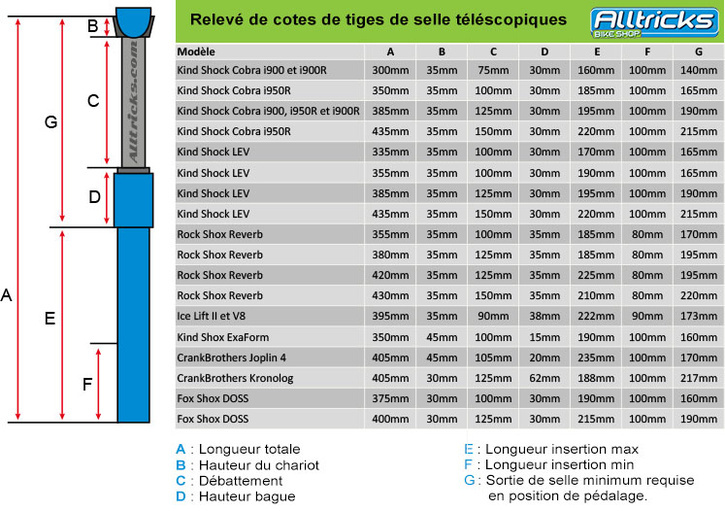
Using the “maximum theoretical dropper post height available” you can then use dropper post dimensions diagrams/info to work out which dropper posts will potentially fit your bike and how much “drop” you can accommodate.
You then need to calculate the actual depth that the selected dropper post needs to be inserted into the frame to give the “pedalling height”. You then need to check that that insertion depth is available by inserting a normal seat post into the frame as far as it will go, mark and measure the depth, and cross check against the dropper post to see if it will fit.