UPDATE: Reviews section refreshed, redesigned, searchable: Go take a look
[i]It’s a Porsche, big bills go with the marque.[/i]
Plus labour charges. Pretty much every job instruction sheet in the workshop manual PDF I got starts with "Drop the engine and Transmission for access."
Change the water pump? "Drop the engine and Transmission for access."
Change the coolant sensor? "Drop the engine and Transmission for access."
Empty the ashtray? "Drop the engine and Transmission for access."
Okay I may have made that last one up but to 'Clear debris from the two front radiators" - a job that should be done at every service - is something liker Remove front wheels. Remove wheel arch liners, Remove headlights, Remove side repeaters, Remove front bumper, Remove air conditioning radiators, brush debris and leaves from the radiator, refit air conditioning radiators, refit front bumper, refit side repeaters, refit headlights, refit wheel arch lines, refit wheels"
Was it Baz Hart? Of Hartec? I picked up the shell of my 951 from there.
Bore score isn’t new. The Alusil engines suffer too.
Overly rich running can wash away the oil film also, the issues already mentioned. Baz was going to machine me some pistons years ago but all the money was in rear engined stuff.
He talked about reversing coolant flow to help. It was 2009 so a bit fuzzy.
Love the project!
I was dealing with Grant. He was refreshingly honest and said £10K + VAT is for the engine rebuild but expect the price to creep as bolts seize, bits are too far gone to reuse and stuff might as well get fixed while the engine is out.
I wondered what sort of stuff so he sent me a list of some of the more usual little bits they might replace
All approximate prices + VAT and assuming nothing related snaps:
New oil cooler. £200
New bank 1 scavenge pump. £130
New tandem pump & pipe. £410
New water pump. £420
New crank position sensor. £200
New evap valve. £300
New air filter. £25
New exhaust clamps. £110
2 New small exhaust brackets. £38
New exhaust sections (prices vary).
New gear box plug socket with seal. £100
New oil/air separator. £210
3 New vent lines. £265
2 New oil catch tanks. £110
6 New ignition coils. £240
2 New ignition coil covers. £60
Belt. £25
3 New belt rollers. £170
New oil pressure switch. £65
New starter motor wiring harness section. £120
New coolant tank. £110
2 New main coolant feed & return pipes at either side of engine along with associated hoses. £570
2 New engine mounts. £420
New gearbox mount. £170
New cardan shaft rubber. £100
4 New sections of brake pipe at the rear of the car. £560
Obviously not all the above would apply
It gets a bit closer to the next episode. I have just hit buiy on these and now need to get them sent down from Derby.
[url= https://i.postimg.cc/6qB1dkfS/Scrap-Front-Wings.pn g" target="_blank">https://i.postimg.cc/6qB1dkfS/Scrap-Front-Wings.pn g"/> [/img][/url]
Well they have arrived.
[url= https://i.postimg.cc/mgFZQ6PV/First-Sight.jp g" target="_blank">https://i.postimg.cc/mgFZQ6PV/First-Sight.jp g"/> [/img][/url]
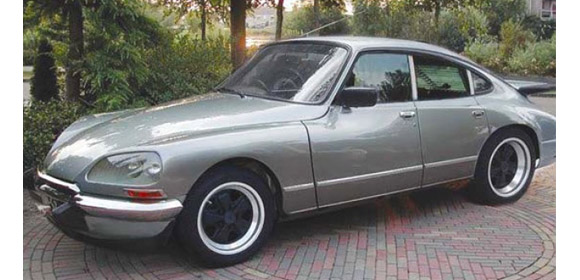
Now I just need to cut some off, add some foam and shape it to look like this.
[url= https://i.postimg.cc/28rXdq3t/Citroen-Left.jp g" target="_blank">https://i.postimg.cc/28rXdq3t/Citroen-Left.jp g"/> [/img][/url]
And try to work out how to make the headlight pod of course. Next video should come as soon as I get a chance to make some progress but I am a bit busy with art commissions, work and Christmas preparations so like and subscribe to get an notification when it arrives.
This is the original idea : https://youtu.be/PlGSR6w2_hI
Came across this on YT while searching for your channel. Guessing you have seen it before?
Yeah, they took the wrong end of each car and then actually built it! Makes my idea almost seem sensible!
Brace yourself for about 7 minutes of ecstasy as the next episode is loading ready for your viewing pleasure :
Oh, just spotted it will take approx 36 minutes to load.
Relax, have a cup of tea and rush back in about half an hour.
Fantastic, well done.
Jump to 3 minutes if you want to see the angle grinder 'incident'
?
4 doors and the front of the bonnet is too bulbous for my liking.
The headlights turned up today so the sculpting of the bonnets and wings has been paused while I create the headlight pods. I feel that the headlights are defining features and also need to actually point in the right direction so I am going to do those and then continue the wings to match. You will see it all in the next exciting episode I am sure.
.
Latest drop :
If you were one of the 3 who watched it before I announced it on there then I have re-uploaded witht he audio fixed. Clipchamp seems to struggle with sound and subtitles.
It still seems to have sound issues but only for the clip where subtitle are present. Weird, it doesn't do that when played in Clipchamp.
I found it most entertaining.
I'm along for the series. I've know you've struggled with it, but I couldn't help thinking the light pod moulds weren't identical when you held them up to camera.
I will go with 'near identical' for now. They are close enough the let me shape the front wings and bonnet lines. More importantly they have an accurate length front to back to allow me to work out how far back they can be and still allow room for the underlying car. I managed to cut 18cm out of the plug from in front of the wheel arch this evening which makes a big improvement in the overall look, even if I do virtually start from scratch again with the wings and bonnet.
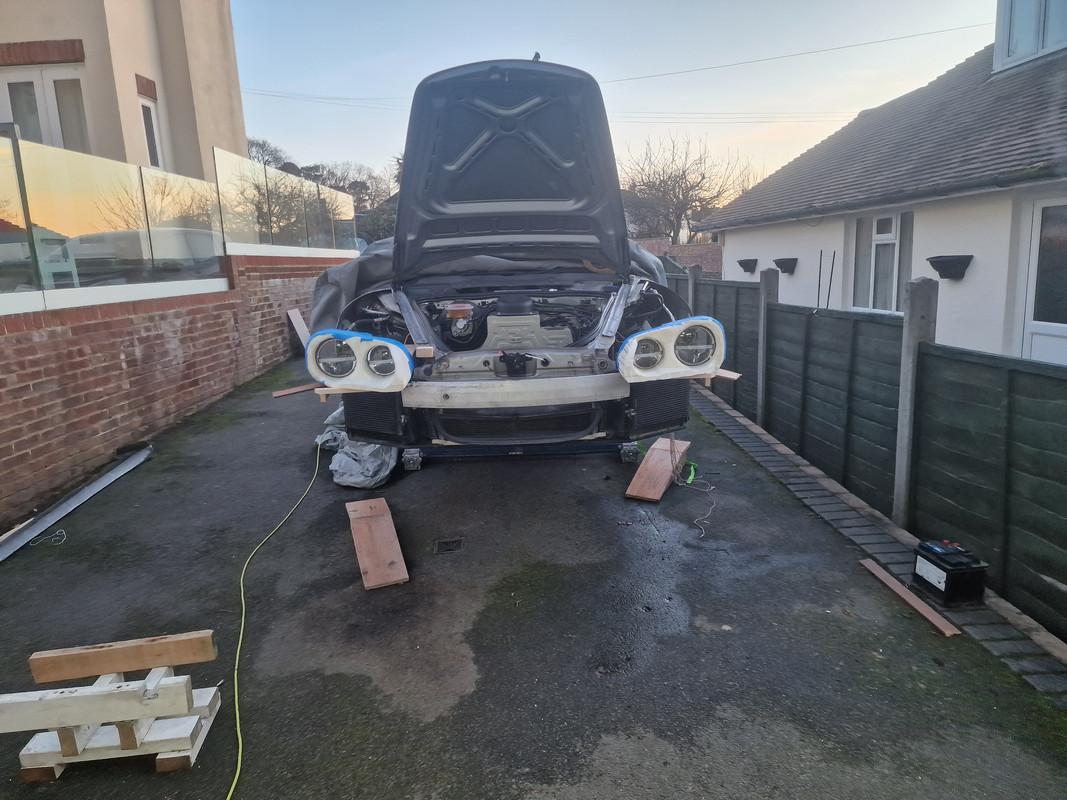
Plenty more before I get that lot onto this.
[url= https://i.postimg.cc/mDsBPg3j/Porsche-naked-front.jp g" target="_blank">https://i.postimg.cc/mDsBPg3j/Porsche-naked-front.jp g"/> [/img][/url]
I really should start with the foam plug attached to the car but I want to keep using the car while I am working on the project. This makes it slightly slower with a bit of rework but lets me enjoy the car for the moment while it is too cold to make too much progress outside or lay up much composite.
You would be really amazed at how much work has gone into this project between the end of Part 4 video.
and then current situation which is this.
Basically I realised that the MDF and doam buck I made in Part 3 needed to have the headlights made in Part 4 integrated and to do that I needed to know where on the car EXACTLY the headlights would go. This meant stripping the car down, which I originally wanted to avoid, and scrapping the whole idea of a moulding plug on the frame in the garage.
So I stripped the car and started to fit the scrap wings from the garage buck but needed various brackets to do this. I could have easily knocked these up in CF or glass fibre apart from the fact the temperature was hovering around zero. I used a few sheets of MDF instead as a temporary solution. This worked fine until we got hit by the storm which ripped the car cover open and soaked the MDF which simply collapsed, ruining everything I had done up to that point.
I am not sure what out of the hours of video I will actually use for the next episode as most of it is now irrelevant. Anyway, we have headlights mounted in the approximate moulds resting in approximately correct position.
I need to make a secure mounting platform to be able to bolts them in place.
I need to sort out some resistors to let the LEDs work without triggering CAN Bus errors,
I need to cut a new wiring from the original Porsche (proprietary?) connector to split to two new H4 LED connectors with indicators and DLR (possibly not fitted to my car) as required.
I need to build another pair of frames to hold the foam to shape the wings.
I need to replace all the wooden brackets with CF once it warms
I need to make a CF copy of the original bonnet so I can make a new bonnet without ruining my good one.
....
Well having finally finished editing the latest release of this thrilling series you will be excited to know that none of the stuff above has been done but you will have to waste 7 minutes watching this to understand the enormity of my progress.
Sneak preview of the start of the next episode. I know I left the episode above quite abruptly but I wasn't expecting to get any time on the project so showed the progress I had made. I then got a couple more hours and finished the rough cut of the wing tops.
[url= https://i.postimg.cc/mZ65gdHv/Headlight-Design.pn g" target="_blank">https://i.postimg.cc/mZ65gdHv/Headlight-Design.pn g"/> [/img][/url]
Have you ever wondered about making stuff out of Carbon Fibre?
This video shows how badly it can go wrong if you are an idiot but also how perseverance pays off in the end. It is a true emotional roller coaster of an episode that puts the heartache and destruction of the storm damage well and truly in the past.
Well done, small round of applause 🙂
[i]Well done, small round of applause 🙂[/i]
Very small I should imagine 😉
Not suggesting that what you're endeavouring to do isn't daft enough but it seems to me the engine, axel and wheel counts are all rather modest. What about a second engine, in fact make both engines V8s. Then three more axles, and an extra wheel somewhere in the middle for good luck.
https://cxf-prod.azureedge.net/news-platform-production/attachments/cl7pzq8bi0sg201lg5pdpqeoe-michelin-photo-du-mille-pattes-01.full.jp g" alt="" />
https://cxf-prod.azureedge.net/news-platform-production/attachments/cl7pzq89b0sg101lg0jbfw406-michelin-photo-du-mille-pattes-04-piste.full.jp g" alt="" />
https://www.youtube.com/watch?v=xfpp4gOERQU
Mental...the longest 2-seater in the world...possibly!
What is wonderful is that is only one of the wonderful DS 'evolutions' among many such bizarre creations. I agree, mine is pretty tame in such company.
In this exciting episode we actually make visible progress as I style the first front wing :
I am a little excited about progress today so here is a sneak preview from the next episode.
[url= https://i.postimg.cc/vBtgcV8d/Sneak-Preview.pn g" target="_blank">https://i.postimg.cc/vBtgcV8d/Sneak-Preview.pn g"/> [/img][/url]
Blimey, what a difference a week makes!!
Only 4 minutes but packed with action - fire (almost) floods, and plagued by bad editing but the bonus feature at the end is actually okay.
If you do bother watching it, please let me know what you like/dislike. DO I keep them the same, do I show more detail for specific stages, are the videos too long / short when I try to keep them at 6 - 8 minutes.
Can proper video people please refrain from telling me how to shoot video, edit video, do voice overs. Or at least keep their comments helpful. I am currently building a car, 2 bike parks, a portfolio of art for the Spring sales, holding down a full time job and keeping my wife and family happy. There is a limit to my time and the skills I can learn. 🙂
I have been watching them all and enjoy your content and style. Keep em coming
Thanks. My wife thinks it is a bit sweary some times
You took an angle grinder to a thousand quid bonnet AND you’ve got a sauna? WCA, you go up in my estimation every episode 👍
The bonnet was much less than £1000 after being restyled by a DHL lorry.
The sauna and hot tub is something I knocked up myself to help me medically. I knackered my ankle so struggle with walking and end up with tight and twisted muscles. Sitting in the tub and then the sauna most evenings relieves the tension allowing me to continue to arse about the next day.
[url= https://i.postimg.cc/tJNHnqvL/Sauna-Design.pn g" target="_blank">https://i.postimg.cc/tJNHnqvL/Sauna-Design.pn g"/> [/img][/url]
[url= https://i.postimg.cc/kG6fLfKw/Sauna-Build.pn g" target="_blank">https://i.postimg.cc/kG6fLfKw/Sauna-Build.pn g"/> [/img][/url]
[url= https://i.postimg.cc/pXSsYbN7/sauna.jp g" target="_blank">https://i.postimg.cc/pXSsYbN7/sauna.jp g"/> [/img][/url]
There is no way I could afford to get one built and installed by someone else.
If you watched the last episode then I think I mentioned that I am doing the bumper/airdam next.
It needs to be quite deep to cover the 911 radiators and other bits so I got my friendly free AI image generator to produce some options. What do you reckon?
[url= https://i.postimg.cc/L6g7rL3D/Front-damm.pn g" target="_blank">https://i.postimg.cc/L6g7rL3D/Front-damm.pn g"/> [/img][/url]
I am currently thinking that I will mostly do the left hand one but with the bumper and spots fromt he right hand picture.
Thoughts? Alternative images?
Datsun 240z front end was the first thing that popped into my head
Could you not reverse the sweep so the lower air dam sits more vertical?
Some black grills under the headlights could look purposeful
Good call. A quick google shows various options and the more vertical dam is a LOT easier to mold that the V in the pictures above which will probably cause mechanical grab when trying to free the part from the mold.
I am now thinking the bumper from the right but the side lights and more angled corner on the air vent from the left. The dam then drops straight down with a little forward sweep and a small front splitter. Vents cut into the dam for the radiator feeds.
Following advice from this thread and the one about aero undertrays, the front air dam is almost complete and you can watch the thrilling build video here first :
Any feedback on these videos?
Things have slowed a little as the weather is either too cold for glass/resin work I need to do, too rainy for the bonnet styling I want to do, or both. I was hoping to get the next episode out next weekend but it is looking unlikely.
I am trying to decide whether it is best to finish the airdam plug, make a mold and pop out a panel that I can then use to align the rest against
or
finish the airdam plug and then crack on with the bonnet and wings before making any moulds and panels.
To much time thinking and watching the rain I guess.
Woo Hoo! It has been a while but brace yourself for the most exciting video episode that I will release this morning!!!
Nice work WCA! I'm enjoying this series far more than most things on TV.
It’s certainly coming along 👍. I can’t help worry though that even a mild ‘bump’ to the front is going to undo all your hard work. WCA, is your red car (BMW?) a similar build?
