Put an original 'Land Rover 110' sticker on.
You can get them as a part no.
Everything else is coming along in a nice classic way, so you need a nice classic badge.
Really want a landrover coffee table 🙂
How I bought mine:
[url= http://farm9.staticflickr.com/8112/8609676493_a13094aeb8.jp g" target="_blank">
[url= http://www.flickr.com/photos/fantasticmrmatt/8609676493/ ]photo[/url] by [url= http://www.flickr.com/people/fantasticmrmatt/ ]fantasticmrmatt[/url], on Flickr
Badge upgrade: 8)
[url= http://farm9.staticflickr.com/8519/8609680751_0b7301578f.jp g" target="_blank">
[url= http://www.flickr.com/photos/fantasticmrmatt/8609680751/ ]photo[/url] by [url= http://www.flickr.com/people/fantasticmrmatt/ ]fantasticmrmatt[/url], on Flickr
seen this on ebay:
[img] ![]() [/img]
[/img]
I like the idea of a custom touch though...
nice TD5 tiger. How's it holding up?
Too many Defenders going down the 'Kahn' ' BLR ' bling route.
Get an Original 1983 "Land Rover 110" badge 🙂
TD5 has it's personality traits but it's okay. Loveable annoying brother type feelings.
cant find a "land rover 110" yet, will keep looking...
Loving the land rover coffee table.
the boys are miffed at losing the "lego room" to my "landrover component storage facility".
But the good news is my bulkhead should be finished next week. I really think I can get this on the road within 4weeks of getting the bulkhead home. We'll see.
Type "muc2003" into eBay. And spend £12
top work tiger, thanks.
Bought it.
Land Rovers
Bikes
Bivvying, I'm alright at.
Just don't ask me any questions on Football
Glad to see you out the heated screen in 😀
as you say, in the end it cost no more than an un-heated one.
Time to put the shopping away, then I get the morning off to finish wiring in the rear looms over a cup of coffee. v satisfying tinkering on it.
This is a pretty handy website http://www.landroverworkshop.com
It's fairly new and not quite finished but the guy building it has deconstructed the dealer parts catalogue so you can browse via the diagrams.
It the pulls in prices from the usual suspects giving an option on Genuine, Aftermarket, OEM which is dead handy as with LR for certain parts anything other than Genuine is a false economy.
It's a bit flaky but still very usefull
Also, while your at this crucial stage have you considered sound proofing?
Especially the bulkhead, you'll have a really good opportunity to add some dampening mass (Flashband) to it before you put it back together.
Makes a big difference if added to
Bulkhead
Inside door skins
Roof underside
Seat box & floors
Rear tub & floors (although it looks too nice now)
Also, before you start bolting all the Ali and Steel back together get a good jointing compound
http://www.intek-uk.com/duralac.htm
For what it costs (although it's horrible stuff to use) it will pay for itself a 1000 times over when you avoid classic LR bimetallic corrosion. (When the Ali goes a bit white powdery around steel contact points)
cheers for the link.
Yes I had considered sound proofing, and will probably use some adhesive foil lined padding on the engine bay side of the bulkhead. The seat box and foot wells are going to be lined internally with rubber stable matting - it's very dense and heavy so will damp sound well as well as insulate to some degree, but is also designed with channels to allow draining. I dont want to use any adhesive inside the cab though.
Im toying with refurbing the headlining or making my own from some 1" closed cell foam sheets. But I can do that right at the end.
Don't forget the "One Life, Live it" sticker
dead my body over
You've got a Land Rover now,
That sticker is a must!
To conform you'll also have to:
Wear ex mod combat trousers all the time, in fact you may never remove these
Ensure your mobile phone is attached to your belt
Be overweight
Have a proper man beard
Smoke
Own a Frontier stove 😉
Tiger - do you just dress the bolts with a dab of duralac, e.g. cab floor panels and bolting them to the seatbox/galv bulkhead. Or do you have to slather the nut/bolt/floor plate etc?
Reasonable covering on the bolts, wipe off with White spirit, like I say horrible stuff though have rags
If (as I just have) you look at page 1 of this thread then jump to the last page, you think 'what the hell happened'.
I've not got the time at the moment to read the rest.
What the hell happened ? At the end of page 1 all you're going to do is change the tyres !
What the hell happened
I couldnt undo a hinge bolt.
The rest, as they say, is history. 😀
Or as trail rat says, I appear to have caught a terminal case of the Landrover Bug.
Great day in the workshop: Frontier stove a'burnin', some R6Music choons, and I got the rear looms all done and started on the battery box and building a relay and fuse bank. Will put some pics up when it's done.
Just ordered another load of relays etc for the heated windscreen.
Weekend updates?
🙂
Have refurbished the front seats - new vinyl and foam from Exmoortrim. bit of a tidy up to the metak work, some kurust and a bit of paint.
By happy coincidence, they were on special offer last week. White stitching detail will go well with my chosen colourway 😉
Ashtree have finally confirmed my sills are done and the bulkhead is off to the hot dip today, and I should be able to pick it up at the end of this week or early next.
You might notice a new sticker on the slam panel tiger 😀
[img]  [/img]
8)
Seats look good, you know that classic 110 badge is the right choice, just looks proper 🙂
Persian carpeting too, I likes your style.
And now the second row seats done.
My most excellent mother reupholstered the backs which need some seamstress work, while I did the bases since that just required brute force and staple gun.
[img]  [/img]
A mate from the pub has just dropped off my tub cappings - he's shot blasted them for me and theyve come out a treat! All for the price of half a dozen pints. Theyve taken on a bit of texture from the shot blasting but there's absolutely no rust or crap on them now so I think I shall hammerite them with a few coats.
That persian carpet will look well buff in the footwells...
You've had all Saturday
Wot ya dun?
Don't use Hammershite on your tub cappings - its crap. Either galv them or google Rustoleum Combicolour paint.
good work this.
im staying out of here as much as possible as im currently banned from mine until such time as the halls finished decorating - unfortunantly that meant I had to replumb , rewire and subsequently replaster most of the house....... its been 18 months so far...
Weekend updates???
I replaced door posts/frame and doors + repaired the damage in my roof where the neighbours chimney caps decided they would come in for some heat.
One step closer to getting to work on it again 🙂
right, sorry guys. Id hoped to wait till Id got some better photos done, but to keep Tiger happy here's some from the middle of last week. It's been nice clean work, with the wood stove going, bottle of beer and 6music on the shelf.
I went to pick up the bulkhead finally on Saturday. 6hr round trip....and in the end one of the cill/b pillar members had to be left behind for reworking as it had come a cropper somewhere along the line and got itself crushed at one end. Fortunately there's plenty I can get on with without it for now, and Ive been promised the last part by christmas and they will meet me half way at Swindon to hand it over.
I'll say it now though, it was not a cheap thing to have done, but Im glad I did. The cills and b pillar were actually more expensive than the bulkhead. A new bulkhead is pretty hard to get hold of if at all, so given the extent of the refurb that was needed and the dipping as well, I guess Im happy with the expense.
It's come out well. All new foot wells, a-pillar tops and bottoms. Shot blasted, jigged, dipped and then tapped or new rivnuts installed. The cills have whole new cill sections welded on the existing b pillars. Again jigged and dipped and the O/S one went on pretty easily so they're fairly straight then.
Ive refitted the tub uppers over the cappings, the tub lowers to the cills, and have finished fitting the second row seating floor, the new rear seat box that Ive fabricated, the driver's side floor and the transmission tunnel. The windscreen went on fine too.
It's all going to need the roof to hold everything together though as it will take some persuading to get everything lined up properly. I shall finish off doing coachwork this week - refitting rear seats, passenger side floor, etc and then get going in the engine bay on the hydraulic systems before the fiddly stuff with the electrics.
Im thinking end of January hopefully, but maybe feb.
[img] https://lh3.googleusercontent.com/-O1HeXR-X6yk/UqCBq-9D3aI/AAAAAAAAHIs/T-wt0NIcsHg/s640/IMG_20131205_121946.jp g" target="_blank"> https://lh3.googleusercontent.com/-O1HeXR-X6yk/UqCBq-9D3aI/AAAAAAAAHIs/T-wt0NIcsHg/s640/IMG_20131205_121946.jp g"/> [/img]
[img] 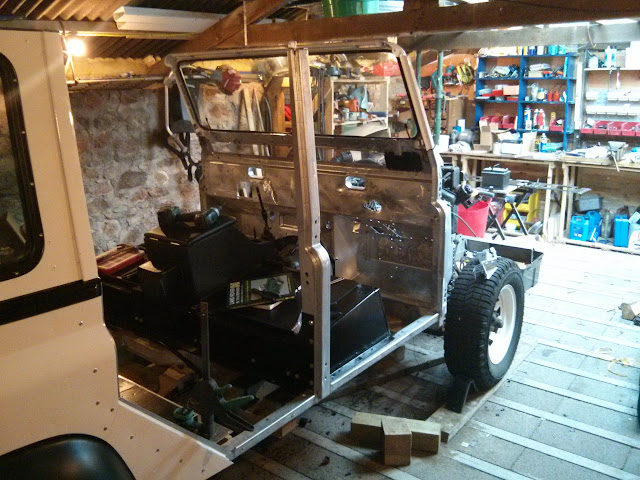 [/img]
Stoner, that is looking really good. Though it is expensive to refurbish and galvanize the bulkhead, it is the way to go. After the chassis, it's the most vulnerable steel part a Land Rover is built around. It should outlast you now. I'd still inject some Waxoyl in there for all the additional cost.
Ive got a can of waxoyl here. I brought it into the house because when I tried shaking it in the garage this week I could hear the solid lump of chilled wax banging around in there 🙂
Im really hoping the galv work will pay dividends. I dont mind a car with temperamental engineering, that leaks or floods or has 1" gaps in the panels. I do though hate rust. And bad electrics. I can deal with the electrics myself, and hopefully the galving will deal with the rest. Although the axles are looking a bit shabby and letting the team down now.....
Looks great Stoner. I'm v jealous and keep thinking that I need a LR in my life for towing boats, biking, shooting or whatever - I've even got room in the barn to keep it warm and dry. I'm just missing the money to do it 😳
Oh well.
Great update, I am now happy 😀
Good work, looking really nice.
If axles are letting it down, the front is easy to strip to casing to get blasted and coated / plated. Rear, assuming it's a salisbury, is more of a pain to get the diff out. Could always pop a TD5 rear axle on though, save some weight to offset all that zinc 🙂
Probably would've been cheaper to buy a car that maybe wasn't such a rust bucket in the first place....
always sunshine and light you are, nick!
Axles will be another project another time. I can get a replacement off ebay and work on it off the vehicle before a swap over.
Just discovered this thread and now missing my landy!
http://www.4x4offroads.com/team-mud-in-mac4x4.html
Scarpers off to autotrader ebay etc!
