Right Gents.
I have managed to complete the LED conversion into a lumicycle halogen can, we all had been dicsussing on here lately.
It is an easy conversion and uses a triple LED from Cutter, driver off Ebay and a heatsink off Ebay.
It uses the existing connector and switch of the lumi can.
As a lot of you requested i have tried to create a step by step guide, so here goes:-
Job 1 is to remove the bulb connector off the lumi leads and remove the wiring loom thus
before removing the loom trial fit the driver to familiarise yourself with how it fits.
[img] 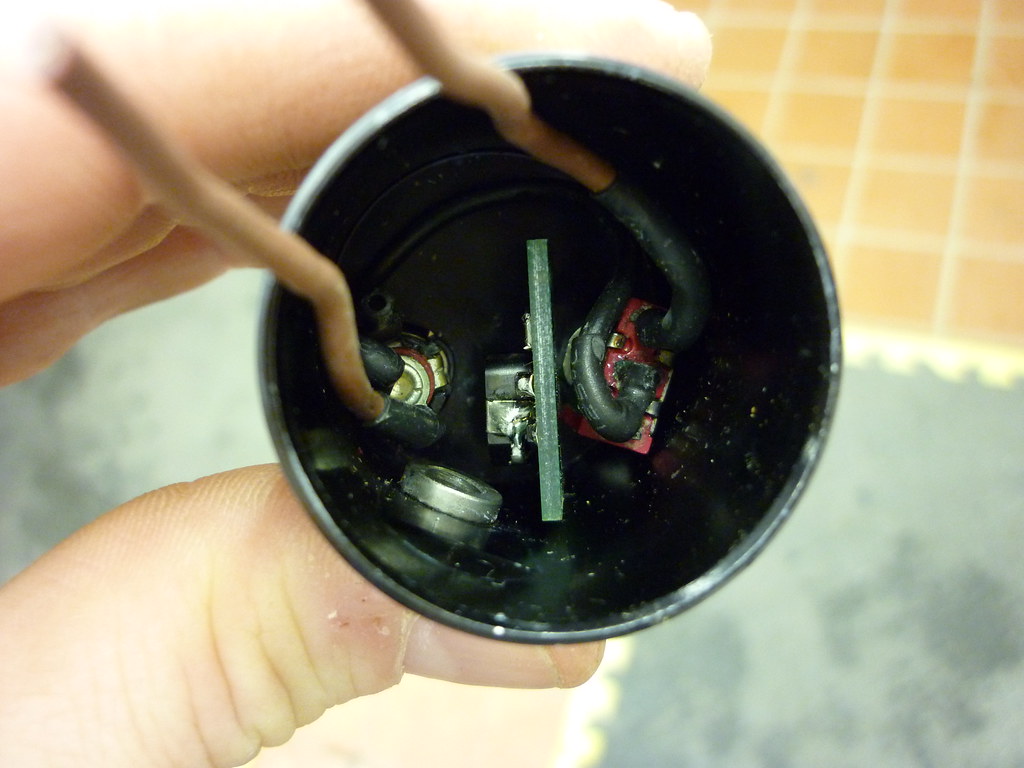 [/img]
[img]  [/img]
the driver is one of these
[url] http://cgi.ebay.co.uk/ws/eBayISAPI.dll?ViewItem&item=250503990255&ssPageName=STRK:MEWAX:IT [/url]
The guy has sold out at the moment but should have a stock in week or two.
Job 2 is to file the boss of th heatsink. The heat sink is this one
this piccy shows before and after
[img] 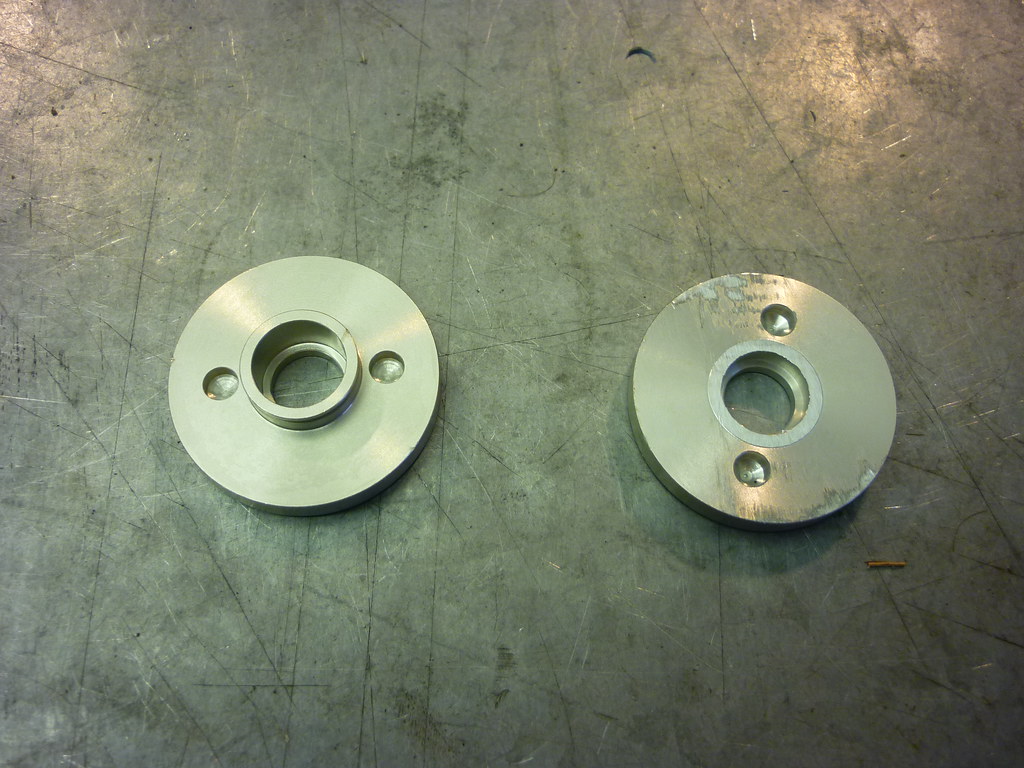 [/img]
the other bit of filing is to file a flat onto the heatsink to clear the flat on the can. about 13mm-15mm should do fine.
[img]  [/img]
Job 3 is to file a very small flat onto the LED board carefully and solder the LED's
[img]  [/img]
[img] 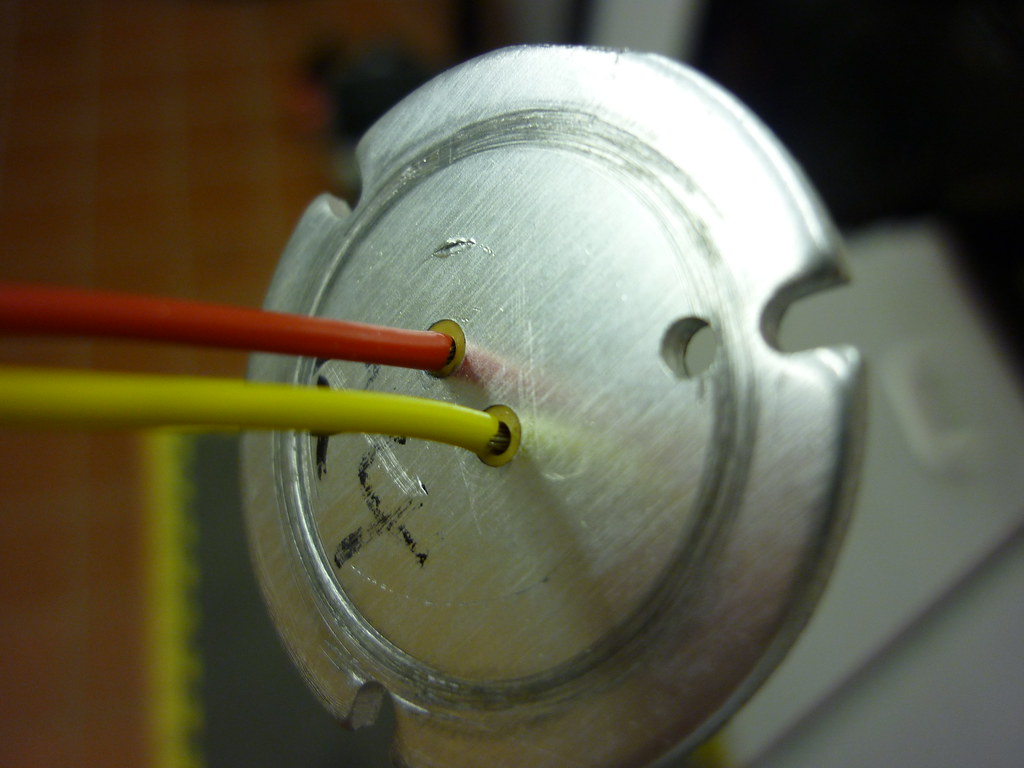 [/img]
[img] 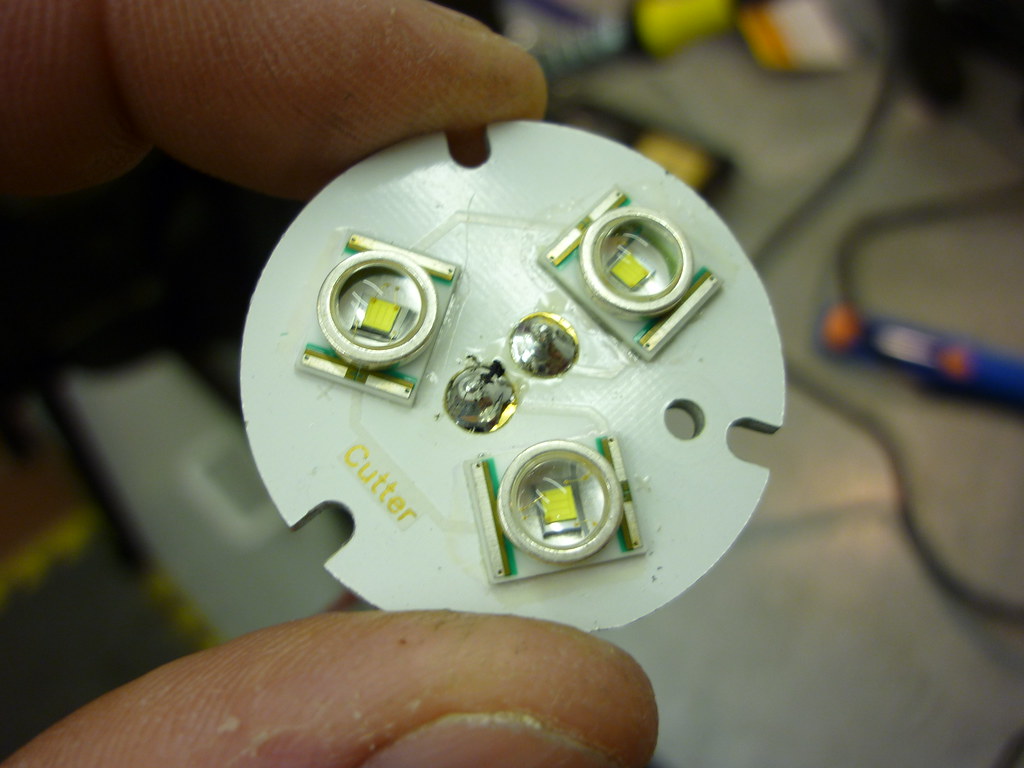 [/img]
Job 4 is to solder the driver.
Solder the LED wires first
[img]  [/img]
then after remove about 4-5 cores from the Lumicycle wires
this allows the wire to fit into the holes on the driver board. then solder those.
[img] 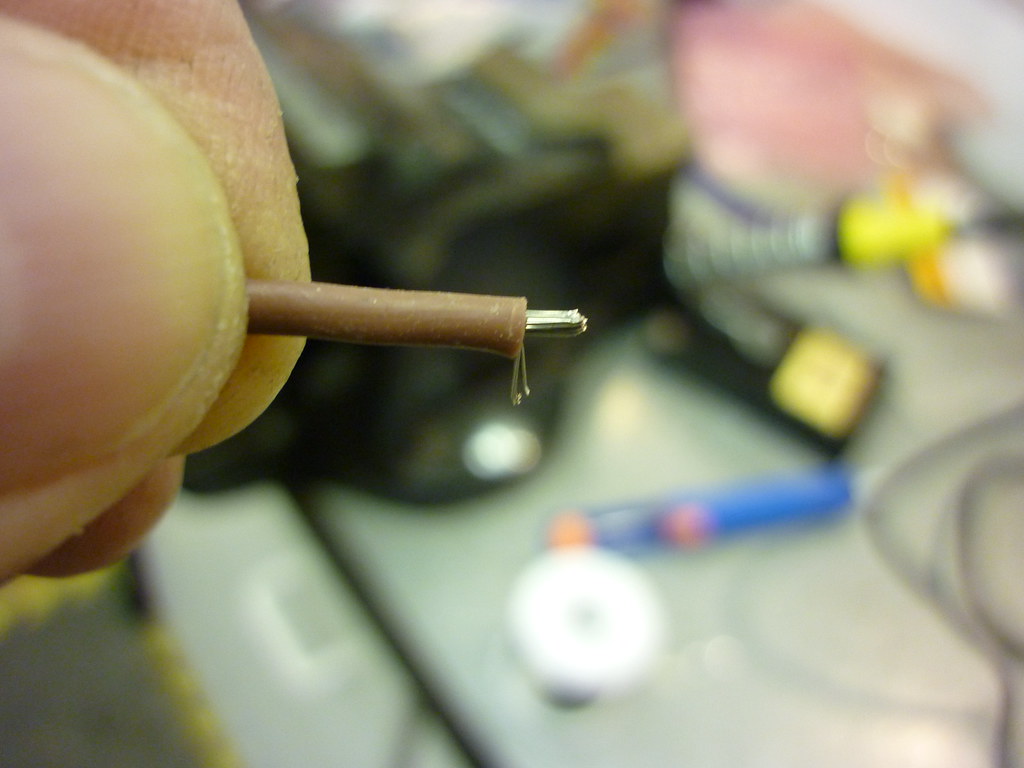 [/img]
I cut the length of the existing loom wires to about 20mm longish.
Job 5 is to wrap the driver FULLY with insulation tape. This is to stop shorting on either the case or switch/power connector.
[img] 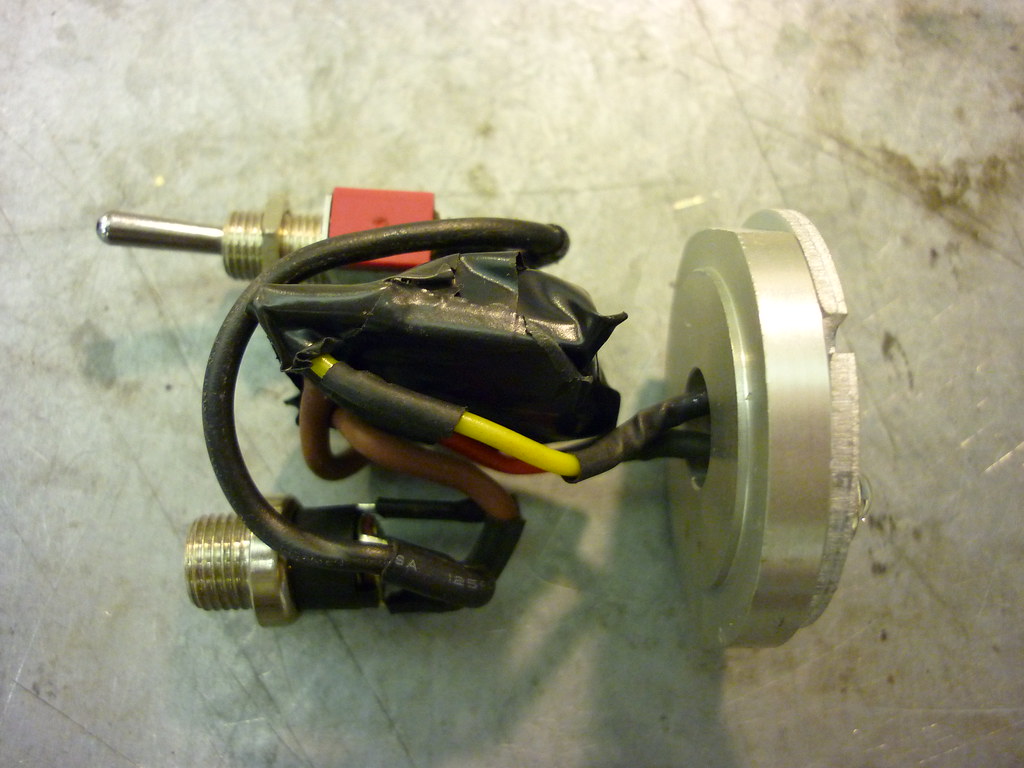 [/img]
Job 6 is to position the switch outside the can, driver, power connector and Heatsink/LED as they would roughly fit into the can. This is why I said at the beginning trial fit the driver so you could see this in situ.
Then with the whole thing assembled install carefully into the can dry. Ie no heat transfer paste/adhesive.
This will allow you to tweak the position of things to get it to fit as it is quite tight.
here are a few shots of the assembled items outside the can for a bit of help
[img] 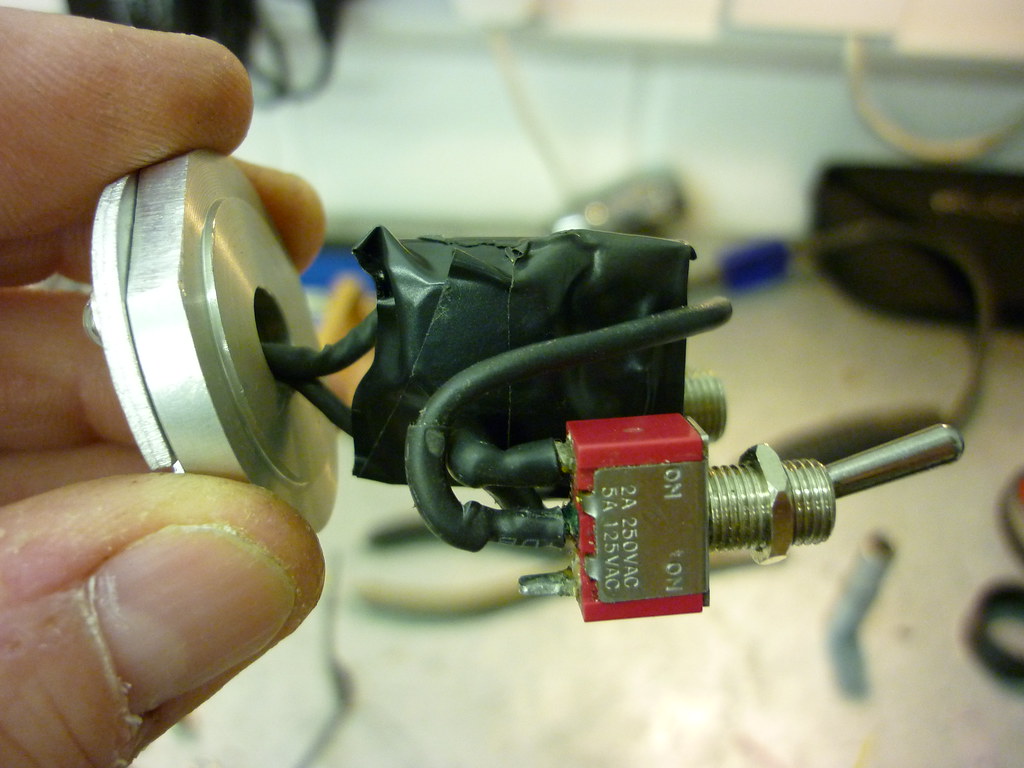 [/img]
[img] 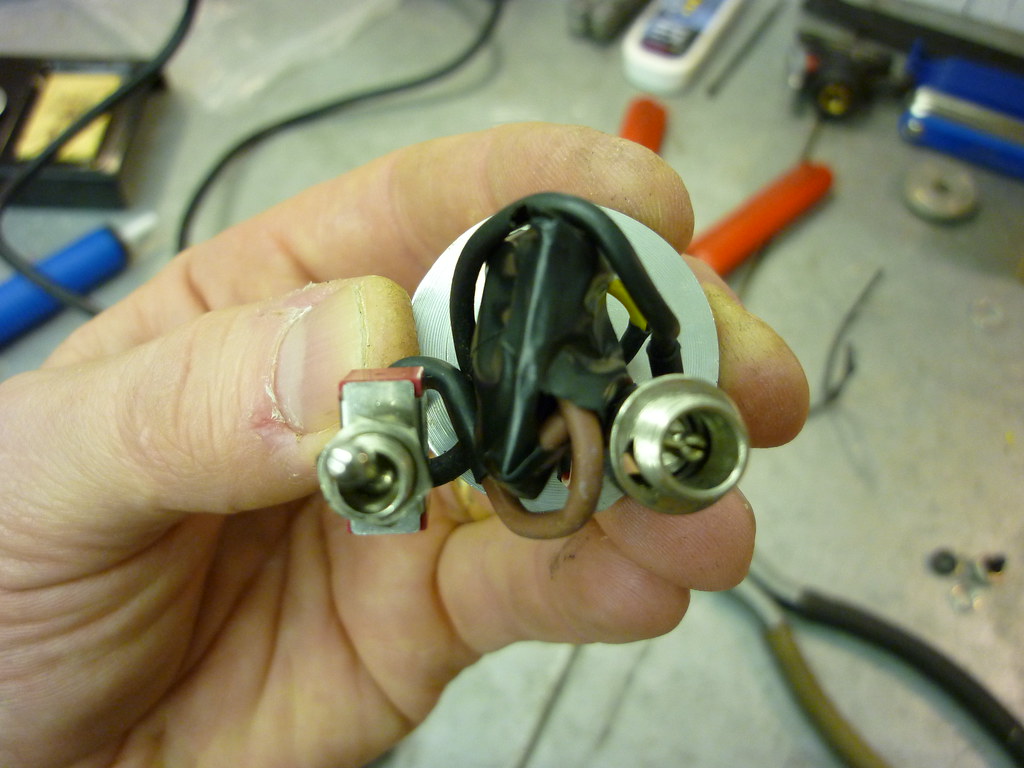 [/img]
[img]  [/img]
When you have managed to get it to fit dry (including adding the optic and bezel just to make sure). Dissamble and use heat transfer paste between the LED and Heatsink and then put some on the outside of the heatsink and re-install into the can
[img]  [/img]
[img] 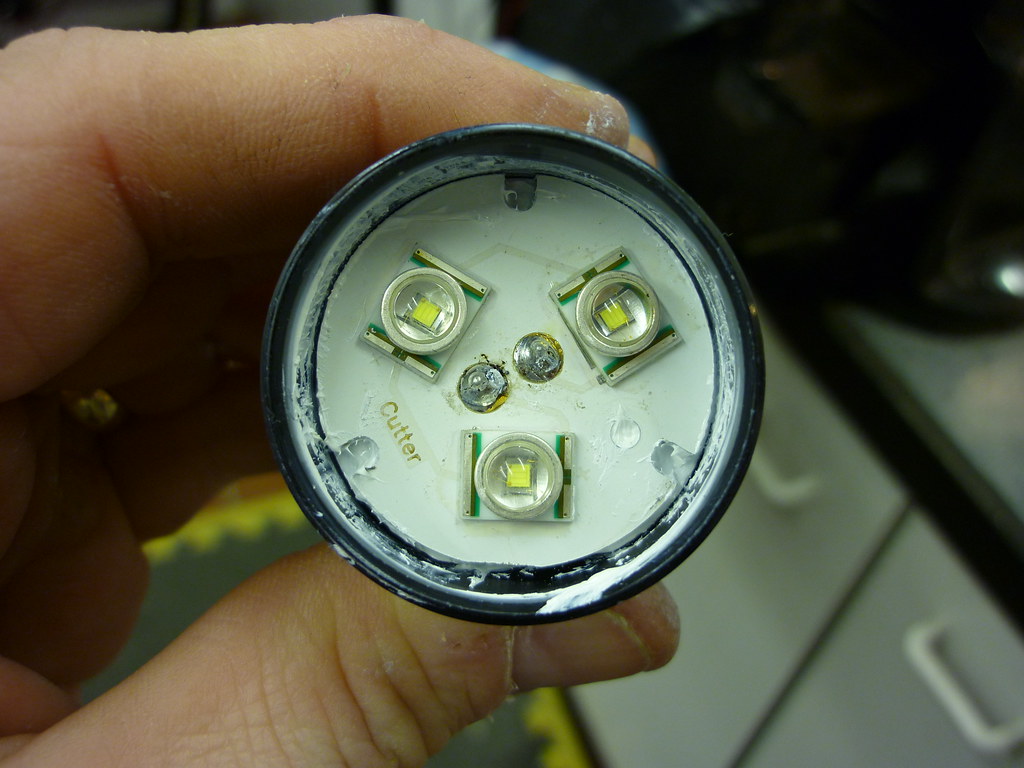 [/img]
fasten the switch and power connector in place, put the optic in and add the bezel.
Job 7 connect the battery, switch on and open a beer.
[img] 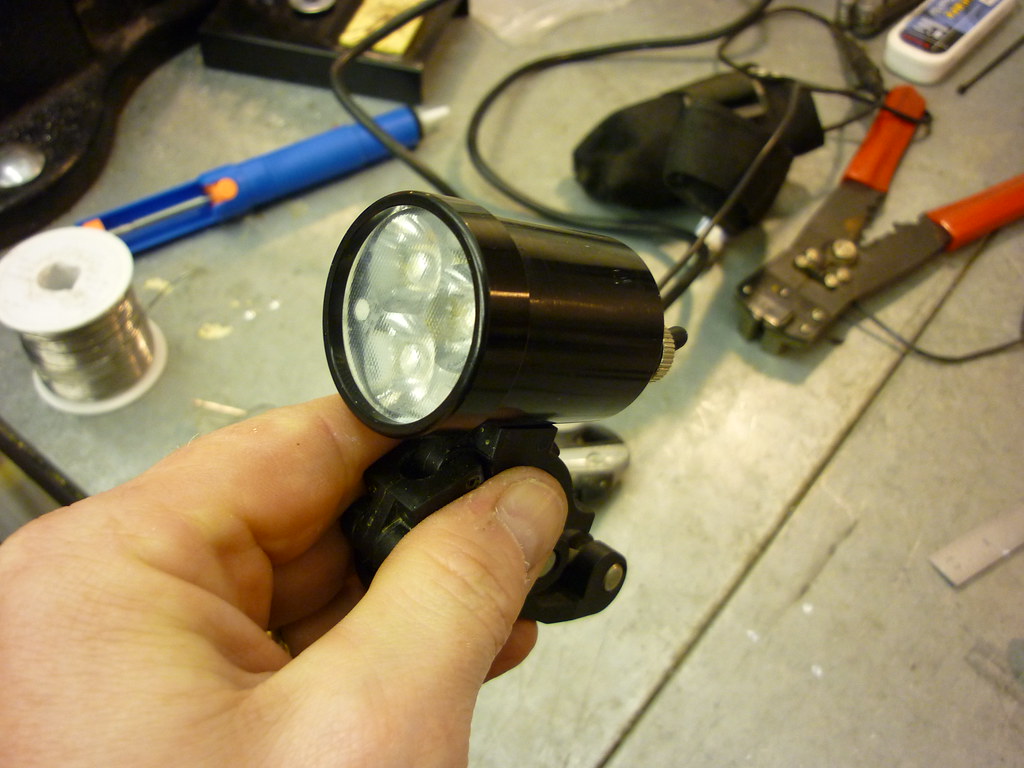 [/img]
[img] 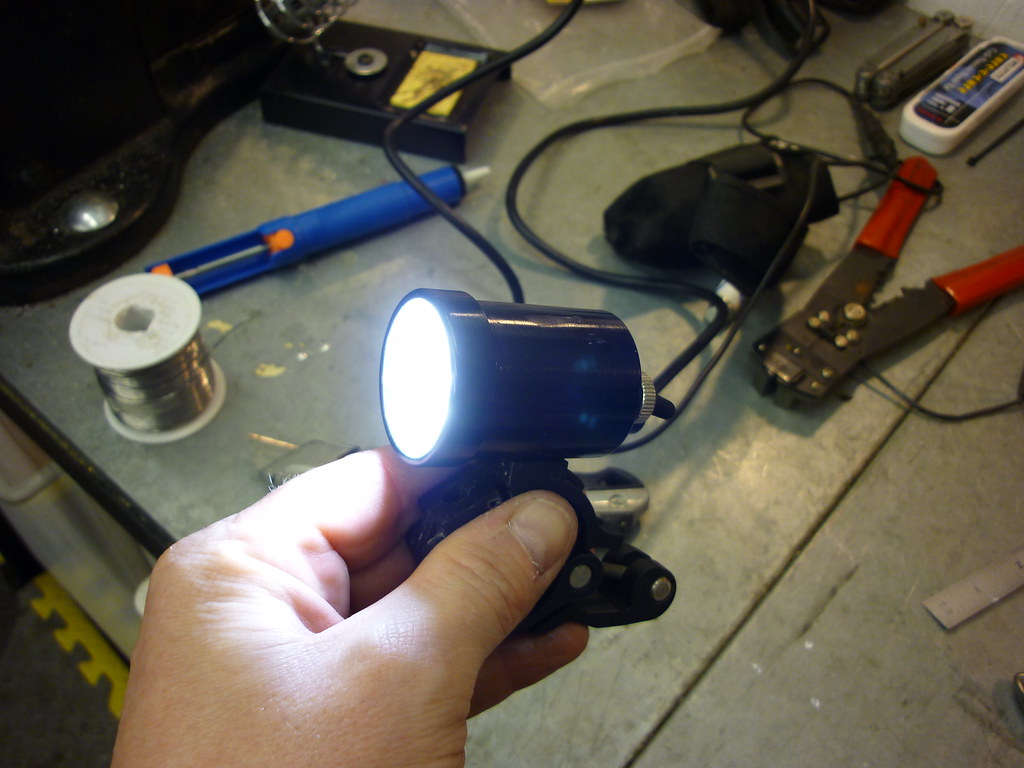 [/img]
Running at 680ma gives good light. I used a triple XRE LED which should give about 500-600 lumens whilst being driven at 680ma. Heat can be felt tranferring into the can so the heatsink/transfer block appears to be working well.
I use heat transer paste from Maplins and 3amp wire to connect from the driver to the LED's from Maplins as well.
Hope this gives a good story on the build.
happy LEDing
Chucky
Got two cans for you with bar mounts ...you about tomorrow?
Nice work
Should be
Txt me and we will sort somat out.
Nice
good guide. Used the ebay drivers on my quad XRE kit. Very useful and simple. Hadn't see the sink idea before saves making one from aluminium.
Simple and they work really well and fully upgradable. Not quite so good for lumicycle though.
Will be in touch re a group order soon.
Mike
Cheers guys.
Just needed to get that built and then i'll get the orders in for the cutter shipment. I'll be in touch in the next day or so or early next week at the latest.
The use of the Heatsink form Ebay saves anybody turning anything. just needs a file/hacksaw and your sorted.
Nice post. Have three lights here that need converting when you have a price please! 😉
What case temperatures are you getting?
Does it matter which wires from the lumicycle looms get soldered on to the circuit board?
Also the same question for the LED?
and can you give a link to a suitable LED
I am going to buy a soldering iron and give this a go
thanks
no idea snaps.
Some guys have been running them on here with hardly any heattransfer/sink for a couple of years so i thought it should be OK.
I'll leave it on tomorrow and see how hot it gets.
Thats about the biggest hetasink you can get in with a switch and connector.( ie about 6mm) Remove those and you should be able to get anothet 5mm or so. Which would be more than ample IMHO.
What's the advantage of thi over the halogen bulbs? Is it a case of longer burn time. I get 3.3hrs on a 20w flood with my enduro battery. Any idea what the equivalent would be with the conversion?
What sort of battery life are you expecting/getting from that setup? My Lumi battery is on its 4th winter and I only get a couple of hours out of a 12W spot and 10W flood running together.
Would be seriously interested in sending mine to you Chucky if you're starting up a mod service, but only if I'm going to get at least 2.5-3hrs with two lights...
Kona TC - yes & yes
Chucky - I'm using an 11mm heatsink on cans with twice the thickness alloy & they're triggering the thermal trip on a bflex after 6 minutes @ 14C ambient
squeekybrakes - LED is much more efficient, longer burntime & more light
The LED's are equivilent to about 40W ish halogen (prepares to be shot down), but only draw 680ma. Not sure how this compares to say a 20w halogen for current draw and subsequent run times.
Will put a link up tomorrow for the LED's Kona and I'll answer your wires to what queation tomorrow as well.
Mrs C is shouting at me as we are late for going out, so i'll post a bit more tomorrow.
See ya
Interested in this.
Is this the item I need to buy from cutter if I want to go for a 4LED MR11 replacement?
http://www.cutter.com.au/proddetail.php?prod=cut759
Truly excellent effort. Informative with good results - top stuff!!
I recently posted my conversion of a normal 6v 4200mAh standard twin-head Smart light to a 7.2v 10,000mAh halogen unit (brighter than a Hope Vision 4 when I finished) onto another forum, but this is one step above that. 
Yeah, good post. I don't know how close a fit the heatsink is, but I found that a cut down beer can as a shim helps for a snug fit in my setup. I might convert my second lamp unit, so would be interested in getting all the bits from one place (yep, v lazy) adam@titley.org
guys...on a related topic - has anyone ever upgraded a Hope Vision 2 mk1 with the latest LED technology?
old git, be interested to see your efforts with the smart light, I'm running one of those as a temporary light until I'm sure night riding doesn't scare me too much! my email's in my profile if you've got any info, or a link would be ace! cheers
Converted one, a bit like yours.
For the second (to be used on commuter), I've been lazy and ordered one of these:
[url= http://www.cutter.com.au/proddetail.php?prod=cut947 ]single LED, drop in job[/url]
Right gents,
some quastions answered
Kona , as snaps pointed out it does matter. If you are using a lumicycle battery this is negative centre (the pin on the battery) this wire from the power connector goes to the - on the driver. The other goes to the + on the driver. The LED's are marked + and - these go to the corresponding LED = and - on the driver as well (4 soldered connections on the driver, 2 x from the lumi wires and 2 from the LED's).
The LED's you require are here
[url] http://www.cutter.com.au/categories.php?cat=Cree+LEDS [/url]
choose XRE then on this 'XR-E (3x)Mounted on Triple PCB for MR11' pull down menu choose the R2 option. TBH either the R2 or the Q5 will do. It's just the R2 is a tiny bit brighter.
The optic is here
[url] http://www.cutter.com.au/proddetail.php?prod=cut781 [/url]
choose the triple narrow from the pull down menu.
At a cost of only £4 you may want to try the medium as well, I just found it a bit 'floody'. They are easy to swap, just unscrew the bezel and swap the optic.
That link Rangerbill is to the mounting board only, you need the link above to get the mounting board with the LED's attached.
It really is a simple, 6 solder task and gives a great light. I'll try a bit of testing with respect to heat transfer etc tonight and get back on here later.
AdamT a cutter order is going in early next week, if you want to buy some stuff as part of that it will help split postage between a few of us. I can order the stuff no problem.
Curly68, I was not really looking to convert any for other people, I'll think about it. I put the instructions up so you could have a go yourself.
speak to you later after some testing.
Chucky
very interested to hear how this gets on with heat re Snaps' comment but am going to consider some riveted and heat pasted fin surface to aid cooling i think as its such a neat conversion.
Chucky have you tried it next to a normal halogen lump 20w for comparison?
good post. just out of interest, what's the cost, roughly?
Not tried it against a 20w halogen, sorry. I'll see if I can get hold of one to compare.
cost = about £40.
Just had it running for 20 minutes in the house with no problems. The can gets warm but LED's are working perfectly.
House is about 23degC
Riding in lower temperatures together with air flow whilst moving should ensure a much lower temp.
wouldn't like to have my 20W halogen in the house for 20 minutes!
hows the colour? are they very blue?
hows the colour? are they very blue?
not really, more of very white. Much whiter than the yellow tinge of halogens.
Hi Chucky, I would like to perform this conversion on my elderly Lumis. I'd be very willing to join forces on a Cutter order to reduce postage costs etc. Is a larger order more likely to attract import tax / VAT though?
Is there any reason not to use an XPG triple rather than XPE? I realise that XPG-specific optics aren't available yet, but it seems that others are using XPE optics with XPG LEDs without much issue.
Cheers.
Your right Gray, however cutter seem to have sold out of XPG's for the moment.
and it's a good point about getting stung for import tax.
I have a HID I want to convert and i'm torn between a Quad XRE (because they have them in stock) or wait for the XPG triple.
Afew others on here want in on the order so we will see what others think WRT import tax etc.
Before committing on the cutter website I have added the optic kit at £7.50 and a XR-E (3x)Mounted on Triple PCB for MR11 for £30, do I need to order 3 Cree XR-E Power Leds at £5.45 each?
Those price Kona are in Australian $. the first two are the only ones you need. The XR-E (3x)Mounted on Triple PCB for MR11 is the board with the LED's already mounted on it.
The prices in £ are £19.56 for the LED and Board and £4.14 for the optic
The Lumi website quotes 650 lumens for the 20W halogen, which is slightly more than you've quoted for the triple LED conversion. If this is the case I'm a bit confused as to how the LEDs are equicalent to a 40w halogen?
The import tax thing is a lottery . . . you should budget on paying it, and it's a bonus if you don't . . .
Nice work on the small case conversion for all 😉
I suspect a higher power XP-G conversion will be much more marginal heat wise, but what you are doing should produce a lot less heat . . . External surface area is much more important than heatsink mass so, increasing the heatsink size inside the can will only delay the inevitable as the heat loss from the outside surface will not really be effected, in fact surface area to volume ratio reduces as you increase the can size which doesn't help 😉 . . . anyways, if it's enough it's enough . . . for reference my XP-G triple running at 1A stabilises at about 20-25C in a 5C ambient while riding with the lumi HID can . . . when stationary it rapidly heats up to 60C+, I have thermal cutout set at 90C . . . that can must have twice the surface area of the small lumi can plus fins . . .
I'm thinking of over currenting an XP-G conversion to 1200mA or 1300mA . . . there seems to be a large increase in light with current per some data I saw on CPF . . . but I suspect heat output would go through the roof too . . . ok in a larger case 😉
When cutter get XP-G's back in I'll try a small case version but I remain sceptical 😉
Fd
Ref brightness comparisons . . . some data I posted on another thread . . .
This is a lumicycle 20W halogen on a 13.2V NiMh battery (about 24W power consumption because the battery is 13.2V instead of 12)
[img]  [/img]
This is a lumicycle HID on the same battery (about 11W power consumption)
[img]  [/img]
This is an XP-G triple, medium (about 10W power consumption)
[img]  [/img]
The LED consumes way less than 1/2 the power of the Halogen and produces way more light . . . and this LED is using a very floody optic, with a narrower optic you'd see it completely destroys it . . .
The HID is also pretty outclassed . . .
I would tend to agree, a 30+W Halogen may be close to the LED . . .
Note this is XP-G's at 1A not the LED's used above . . . but you get the general idea . . .
Fd
Chucky,
Awesome, informative and thank you very much. Posts like this aer brilliant and it is what makes this place great.
As and when you do the HID can conversion, do you think you could do a 'how to' like above for it? i have the hid and not the halogen and would be keen to give the HID conversion a go. Or if you don't have the HID can and fancy a go I am more than willing to let you use mine as a guinea pig 😉
Good work
The HID conversion is practically identical apart from the heatsink being different, I'm not sure if you can buy one that will work quite as well off the shelf, I posted a load of data on converting a HID case on this thread . . .
http://www.singletrackworld.com/forum/topic/resurrecting-old-lumis
Heatsink dimensions I used :-
http://www.flickr.com/photos/ziplockk/4089128329/
Conversion pics :-
http://www.flickr.com/photos/ziplockk/sets/72157622494291417/
I used a bFlex driver and encased it in heatshrink, it just pops in the back of the case with loads of room to spare . . . drilled a 3mm hole in the back of the case axially for the battery warning LED. changed the existing switch for a momentary swicth to make the bFlex work properly (you could use a simpler and cheaper regulator, the guy Chucky suggests for his 650mA reg also sells a 950mA one which would be ideal for XP-G's for about a fiver, which is about 15 quid cheaper than a bFlex and would only give you full power but so what . . . ).
Again a simpler heatsink design may suffice but the interior of the case has a more complex profile and I wanted to take advantage of that . . .
Fd
Squeekybrakes, I have always assumed a HID was equivalent to approx 40watt Halogen.
600ish lumens [b]is about[/b] the same as a HID (the original ones, not the new ones) hence my comparison.
My battery is charge at the moment and Junkyard has just dropped off a 20watt halogen so i'll see how they compare later.
Regardless of actual Lumens it is nearly on par with my R2 XRE Lumi HID conversion and that runs at 1 amp.
Didn't mean to mislead you Squeeky.
I have already done a Lumi HID conversion marionheck (plus another 8 or so for my mates).
The piccy links to how I did it is here
[url] http://www.flickr.com/photos/17059060@N00/sets/72157605077985739/ [/url]
Fergusd has also done the same conversion with a slightly different heatsink but it's near as dammit the same.
Bloody hell Fergusd 1300mA with some XPG's. That will be bright and hot!
and I do like that LED touch on yours at the back of the case. Very nice.
I mangaed to find some ally bar on Ebay that fitted perfectly on my Lumi conversions. It literally was exactly the same in dia as the inside of the lumi HID case
The HID conversions I have done have run faultlessly for over 12 months
The LED in the pics does look like it outclasses the 20W halogen and the HID. Looks like I might try the conversion myself once the LEDs are in stock...
The kit is brighter than the halogen 20 watt one about 10 -20 % ish. It also draws less current and therefore i will run longer. It is not a super bright Trout light but it is perfectly adequate for off/road use without achieving the scorched earth of current systems. Pretty affordable upgrade to avoid Dx or torches IMHO.
I guess the XR-E board can be replaced with an XP-G one when they're available with no need to change the driver?
Nice one. That looks perfectly do-able.
Think I will be buying the bits once the drivers are back in stock with mr eBay.
Might do both cans and have a spot on one & a flood on the other.
So the driver runs at 680ma? Does that mean that is the current draw for all 3 LEDs on the board or each LED?
Is this next calc right.....? ~14v from the battery and the driver supplies 680ma, means that the power is 14x0.68 = 9.5W.
I assume from this, that the 680mA must be the complete board, not the individual LEDS (or else it would be running at ~30W)?
The above being correct - that means that the LED conversion is brighter than the 20W halogen, but actually uses less power than the 12W halogen?
Holy cow!!
spot on there Squeekybrakes.
Looking on the cutter website it seems he is running a 'back order' for the XPG's when he gets them in, so I have no idea how long it will be before he can dispatch them to us if we are to order them.
As I mentioned before a triple XRE R2 is a bright light. It's just the XPG's give about another 30% whilst using the same current.
stumpy01 - No, you need to know the input current drawn by the driver not 680mA (the constant current supplied to the LEDs) & battery voltage will gradually drop as the batteries discharge & will be less when under load.
The driver efficiency will also make a difference.
Now I have it working I am going to try and opu a resistor in the system with a two position switch. The instructions that came with the driver claim a 200k resistor will drop the current by half. The board will allow this driver to be switched in or out. This together with a new 2 position switch from maplins will give the ability to eek out far more battery life and hopefully alleviate concerns about heat by having 2 power settings. A low and a high.
Before I added the resistor to the one above I just wanted to make sure it all fitted first.
I'll see if i can get hold of a small resistor this week and then try to fit it in.
what diameter is the lumi can? just hatching similar conversion for old cateyes...
33mm Inside Diameter
