The bulkhead in invariably removable (cue someone to give the exceptions to this rule 🙂 ). The number of bolts you have to remove to do so may vary.
Yes, they're removable. Mactheknife had one in his, you can see it in his first pics. Didn't have one in mine so no experience but just bolts I would imagine.
Good luck in your van hunt. You thought about a high roof model? Harder to find but standing room is king (and bikes will hang vertically off back doors for the win 🙂 )
Looking great! Had my first van night of the year at the weekend, Love it, didn't even need my heater on! 😀
With discussion about ventilation, might be worth mentioning heating ?
I know that they are expensive , £700+ new or chance a used one at maybe £350 on eBay, but, 12v diesel night heaters are a godsend.
I'm on my second converted van now. Having used my older one for four years with no heating, I realised that despite being off the ground, under cover and not having to worry about brushing against canvas in the night, that condensation, that although things would dry quite well in summer, or with the engine heater on on the way home, bike kit and bedding still remains a bit damp.
The difference to the whole experience and ability to dry riding kit , including soaked through Teva shoes or towels completely for the following day, is startling.
Even on at a very low setting all night , windows cracked open a touch, in sub zero conditions, it's comfy.
You will be struggling for one to burn more than about a litre of diesel a night too.
When I started on my second van, before I'd even ply lined it, the first things to go in were a second battery and a heater.
Probably the biggest game changer, beyond buying the van itself, can't recommend enough.
Don't forget, it will add value to the van , come sale time, or can be removed and put in the next one, or sold on.
Check out Eberspacher or Webasto.
codybrennan - the bulkhead in my Trafic was bolted in but had 2 (IIRC) rivet points too. I just drilled these out.
Nice work. I'm picking up my van tonight so getting it insulated and lined is top priority. If I'm understanding it correctly the basic premise is:
Foil type insulation glued directly to the bare metal
Plywood sheets on top with self tappers into suitable locations
Carpet glued to plywood
Yes/No/Maybe?
What thickness of ply are people using? I'm guessing thinner stuff on roofs and walls with thicker on the floor?
I think I have 12mm or so for the floor, with 9mm for the walls and the factory head lining. I could be wrong though as the panels were already there when I got the van, all I did was take them out, insulate behind, carpet them and stick them back on.
My insulation:
Walls
Flashing tape on the panels (to reduce "booming")
Laminate Floor underlay glued to panels
Large voids filled with Kingspan/Celotex (35mm IIRC)
Foil "bubble-wrap" over all that and taped to create a VBL
9mm ply with Megavanmat carpeting
Floor
Two layers of laminate Floor underlay and more to fill in the gaps.
12mm ply
Flooring vinyl
Roof
Two layers of cheap "karrimat" stuck to roof
Foil bubblewrap
2nd hand (off ebay) roof lining from a minibus version of the van
Doors are stuffed with "recycled plastic bottle" insulation.
Oh - and those reflective silvered windshields. Mine fit internally so less chance of losing them but I believe the external ones are better from a condensation point of view. I also have a couple of those wind deflectors fitted to the front doors and leave the windows open a little at night.
Boardingbob, thats pretty much it, i used spray adhesive for nearly everything. Both the carpet and the tin foil bubble wrap. That stuff is a godsend.
I removed the plywood and fitted the carpet leaving a fair bit left around the edges. Then refitted the plywood and sorted the edges out.
What type of van is it as transporters have holes in the interior bodywork ready for lining with plastic rivet type connectors. If not then see above for self tappers. I had a few types and i just couldnt get them through all the time. I had a bout 50% success rate but twang and spooky used a different type with better results.
Stand by for it taking over your life 🙂
Off out to do the floor vinyl today. once thats sorted the big jobs are all done. Just the millions of wee ones now.
I'm going the stealth camper route like Sazter with a Fiat Doblo. It's ply lined already so I'll use that for my template.
Any recommendations for insulation suppliers online?
Thanks for all this. Cakefacesmallblock: I'm definitely fitting a night heater.
For screwing into metal look up Tek screws. They are used for sheet metal cladding. One version has a drill tip for joining sheet metal to sheet metal and the other has a pointy tip for joining metal to wooden beams. They have a rubber sealing washer built in and you can get coloured caps to fit over them.
Bob, I will message you the links to all my stuff I got for Vangelina. 😉
HA, sazter is the reason i have this van in the first place. Envy is a powerful emotion 🙂
I'd also go as far as to suggest, that insulating a van , which you aren't going to heat, apart from maybe deadening some sound and keeping yourself out of contact with cold steel, which carpeted ply lining does quite well, can be a bit counterproductive.
My reasoning being, that once the sun comes up , even on winter mornings, the van will warm quite well.
Not only that, but any condensation or moisture which had formed on the inside of the outer skin, will evaporate away, via plywood and carpet, quite easily .
Equally, once you start to drive again, the engine heating can warm the rear of the van and help dry things out nicely..
Tin boxes don't 'breathe' like bricks and mortar can. Bricks n mortar can't rust either !
Insulation such as Thermoliner, which is like self adhesive, foil backed camping mat, can be stuck firmly to the outer skin of your van, without creating voids to trap moisture and again, acts quite well as a sound deadener. It's a doddle to use too.
Other opinions available, but that's my take on it !
My reasoning being, that once the sun comes up , even on winter mornings, the van will warm quite well.
Very true but my understanding was insulating the van will also keep it cool in summer whereas an uninsulated van will be like a sauna inside if left in direct sunlight
Yep, that's the stuff I used, thermoliner, sound deadening and insulation in one!
BoardinBob.
To be fair that's a reasoned argument. Although when in the van it's easy to open the windows, when driving , or sliding door when parked up.
Same when returning to the parked van in summer, open the slider and it will soon cool.
Even insulated, with Thermoliner mine gets reasonably warm if parked in the sun,
A thermal, reflective cover for the windscreen really helps keep them cooler much better.
By the way I have no relationship with Thermoliner, or its sellers, it just worked well for me ! 😳 !
So thats the vinyl flooring fitted. It was a pretty easy job. Just trimmed the plywood to fit the back of the van then a bit of careful cutting and the vinyl was in 🙂
Made a bit of a mess of the carpet in a few areas i was covering at the back of the cab. Ill need to get it trimmed down. But so far i am very happy 🙂
[img] 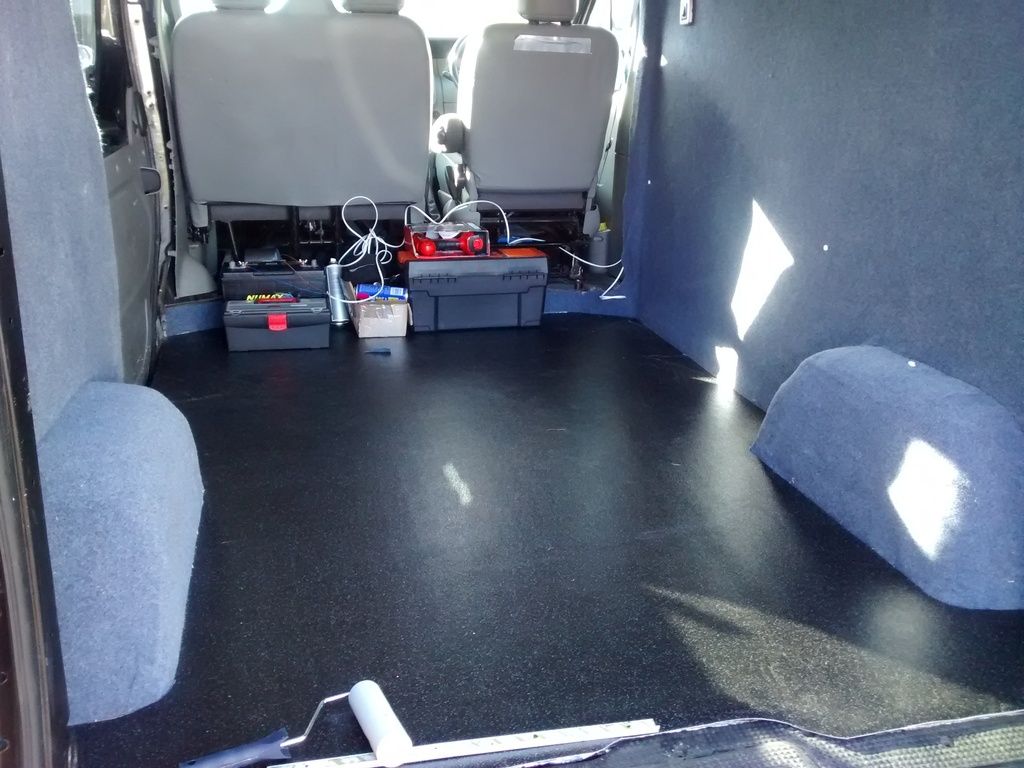 [/img]
Flooring really looks good.
Looking good, it's satisfying getting it right but don't sweat it when it's not perfect. I spent ages when I first carpeted my roof lining, got it perfect but like a fool didn't use heat proof glue then first hot spell down it came.. Using proper glue next time, bashed it in with a couple of annoying wrinkles but never notice them (well hardly ever).
Finally got round to a proper heating and cooking solution after 6 yrs of using our van all year round, a wallas xc duo is on the way. It's a combined diesel heater and stove, can't wait to fit it. It's pricey but will make a huge difference to both day rides, overnights and holidays as my wife suffers from reynauds that is getting gradually worse and the ability to sort out a hot drink and heat the van at the touch of a button, or even leaving it on just ticking away, is going to transform cold days out.
So, thats the majority of the work done now. I just need to get a fold out bed made up and get somw carpet finished off. Then tidy up the wiring and bosh. My wee camper 🙂
[img] 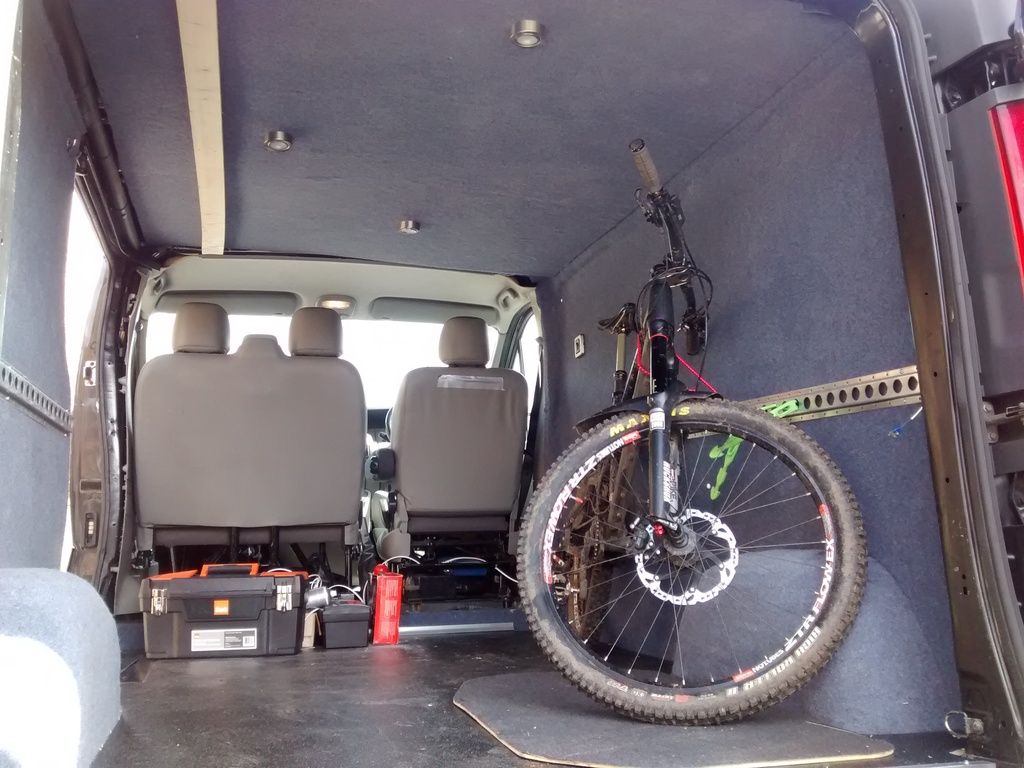 [/img]
[img] 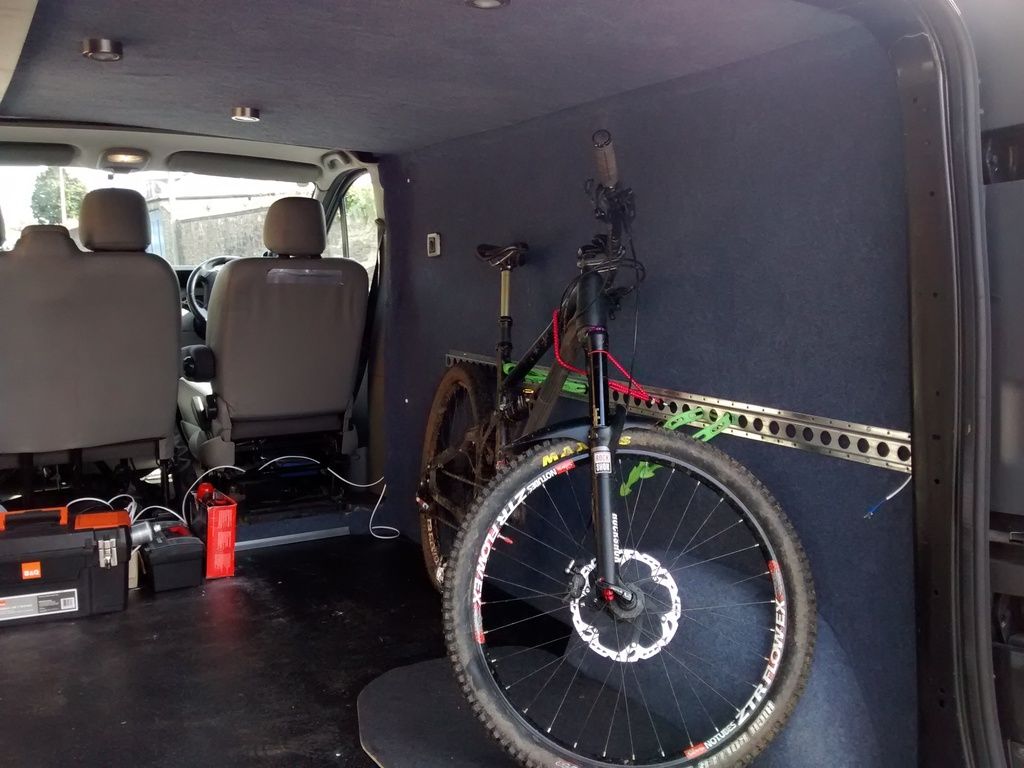 [/img]
That looks great! where did you get the perforated metal strips for the walls?
It's Load Lock track. Available through various outlets.
I painted mine with some Hammerite
[url= https://farm9.staticflickr.com/8182/8066690341_32e2e81567_b.jp g" target="_blank">https://farm9.staticflickr.com/8182/8066690341_32e2e81567_b.jp g"/> [/img][/url][url= https://flic.kr/p/dhPTZX ]IMAG0146[/url] by [url= https://www.flickr.com/people/22384952@N02/ ]ScotRoutes[/url], on Flickr
Everything in my van was on advice from various threads and advice on here. There have been some great ideas thrown my way which have helped me no end. That racking was the icing on the cake so thanks for that buddy.
Much appreciated 🙂
All the electrical ideas came from sazter which was the main catalyst for getting the van the way i wanted it. 🙂 her advice has been a godsend.
Wow! you've got stuck in, excellent work!
Have you stuck the carpet directly over the bubble wrap on the arches? Is it tight enough? (fnarrr) Was wondering about this on the bare metal, weather it needs insulation or if the carpet alone would be enough to stop condensation?
EDIT: About time we saw some pics Scotroutes. Nice roof lining 8) got any more?
Hey twang, if i was dong this again i would not bother bubble wrapping the wheel arches. I doubt i will be out in arctic conditions anyway. But only time will tell if it was needed or not. And yep the carpet stuck fine but i made sure everything was taped up tight with a fair amount of duck tape.
Cheers for the info Mac, I may one day get around to carpeting it, maybe...
Being a decorator an all, I've been having thoughts of hanging wallpaper 😀
Todays (pathetic) efforts..
Redid my roof insulation, replaced the nasty rockwool for slighty less nasty polystyrene..
[img]  [/img]
lights sort of wired up..
[img]  [/img]
[img]  [/img]
Need to stop this obsessive van ****ificating now and get some riding in... 😮
Nice one, you are putting more effort into the base than i did and i think it will serve you better in the end. I take it those roof struts are just screwed into the vehicle with those tech screws you mentioned?
[quote=twang ]EDIT: About time we saw some pics Scotroutes. Nice roof lining got any more?I was really lucky with the roof lining. I was just about to start fabricating one from plywood when this popped up on ebay. It's out of a minibus version of the Trafic/Vivaro so just popped straight on. I had to add another rooflight but all the wiring was there for it. If I'd known in advance, I'd have fitted the extra speakers up there too.
TBH, I've gone for a pretty minimalist approach; no leisure battery, no intention of fitting heater/cooker or whatever. I still want it to work as a van and I'm used to camping so don't really need additional comforts.
Modifications are;
Rear windows (95% tint)
Removeable seat in a 2+1 configuration. As you see, I can turn them around when I want to use the van as a camper.
Roof bulbs changed for LEDs in original fittings (so they work with the doors)
Additional 12V/3W spotlight inside the rear door on a swivel mount
12V sockets - 1 at window, 2 at rear door. These run off the battery so stay on when ignition is off.
Speakers in the rear.
Insulation and carpeting as already mentioned. I opted to box the wheel arches as this makes for better insulation (sound and heat) and gives a wee seating platform.
Load lock track for hooking stuff up
Rear doors are also insulated and partially carpeted.
Load nets to fit rear door cards.
I was also a bit of a tart and bought replacement B pillar covers that hadn't been cut for the bulkhead.
Not many more photos I'm afraid.
[url= https://farm9.staticflickr.com/8314/8066689418_73dca822af_b.jp g" target="_blank">https://farm9.staticflickr.com/8314/8066689418_73dca822af_b.jp g"/> [/img][/url][url= https://flic.kr/p/dhPTJ3 ]IMAG0147[/url] by [url= https://www.flickr.com/people/22384952@N02/ ]ScotRoutes[/url], on Flickr
[url= https://farm9.staticflickr.com/8033/8066688452_6e54b3bcc6_b.jp g" target="_blank">https://farm9.staticflickr.com/8033/8066688452_6e54b3bcc6_b.jp g"/> [/img][/url][url= https://flic.kr/p/dhPTro ]IMAG0148[/url] by [url= https://www.flickr.com/people/22384952@N02/ ]ScotRoutes[/url], on Flickr
[url= https://farm9.staticflickr.com/8036/8066686914_152a669698_b.jp g" target="_blank">https://farm9.staticflickr.com/8036/8066686914_152a669698_b.jp g"/> [/img][/url][url= https://flic.kr/p/dhPSYS ]IMAG0149[/url] by [url= https://www.flickr.com/people/22384952@N02/ ]ScotRoutes[/url], on Flickr
Things to do?
I fancy creating a couple of storage boxes, probably in front of the wheel arches, just to stop stuff floating around the rear.
A couple more storage nets for the walls.
A false floor/raised bed with storage underneath (needs to be completely removable though)
A tip?
Fit an internal handle to the rear door that closes first. I used a wee strap bolted on to an existing bolt (not in the photos).
A wee bit of an update. I managed to get the flooring finished with some edging.
The fold out bed has been built but needs taken apart as a few areas need sanded and aligned so its a smooth movement but it works pretty well.
I was in a bit of a rush as i was racing at Dunkeld this weekend and a bunch of us were meeting up on Friday night and i wanted a decent van by then.
[img] 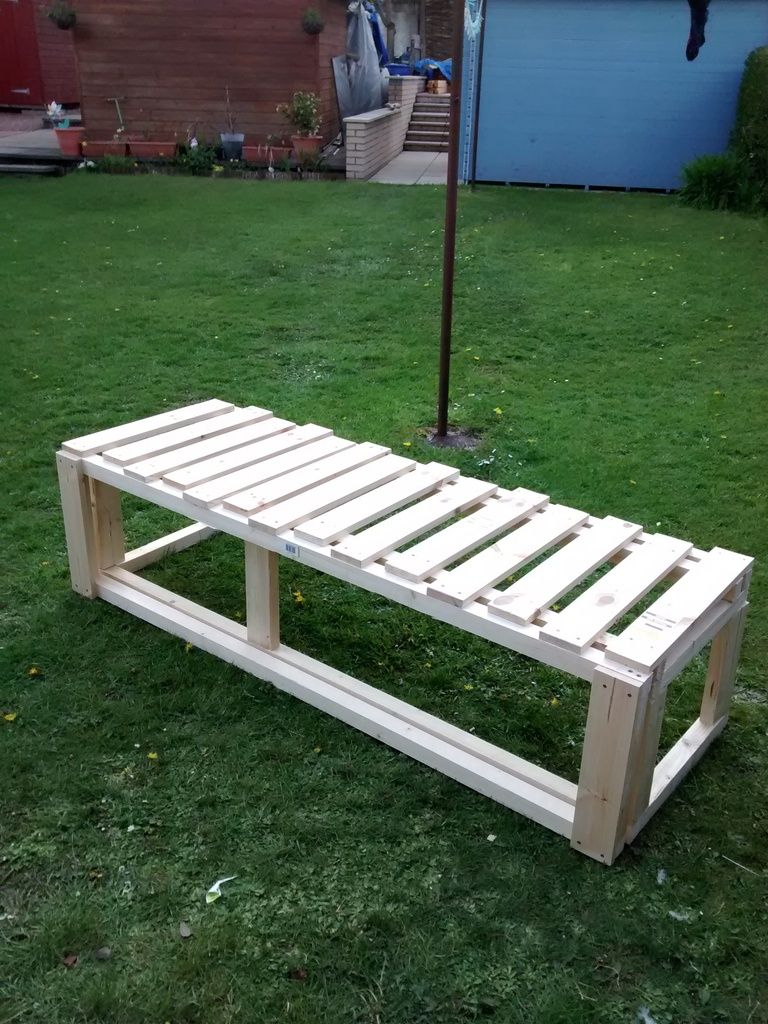 [/img]
[img] 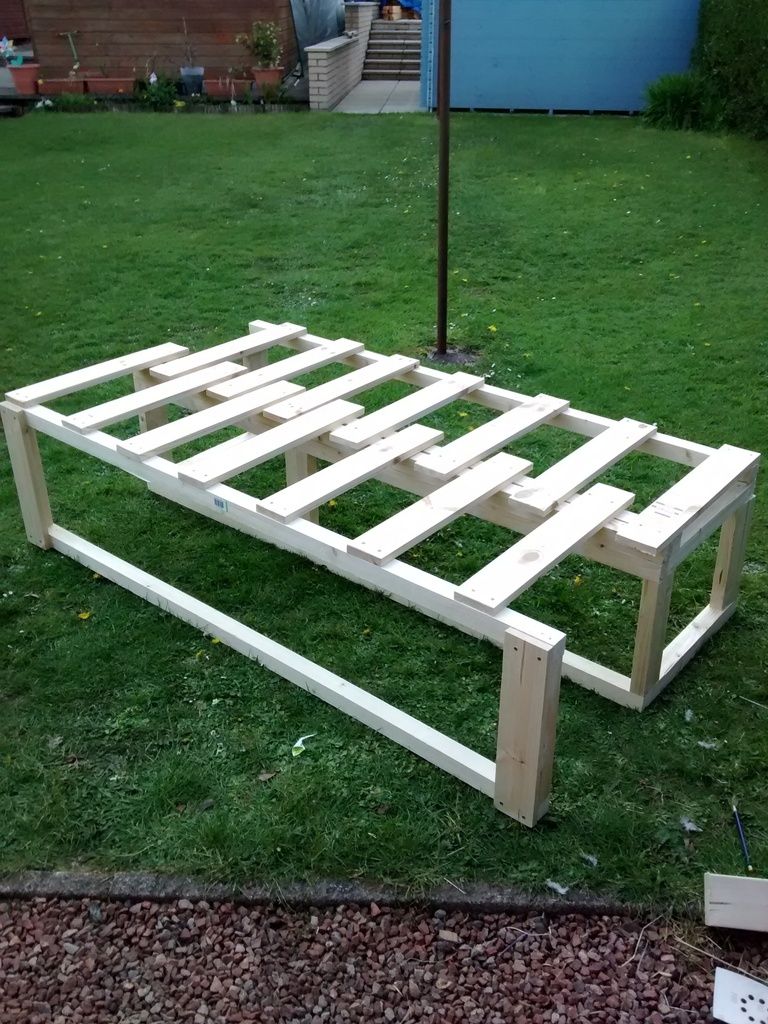 [/img]
[img]  [/img]
[img] 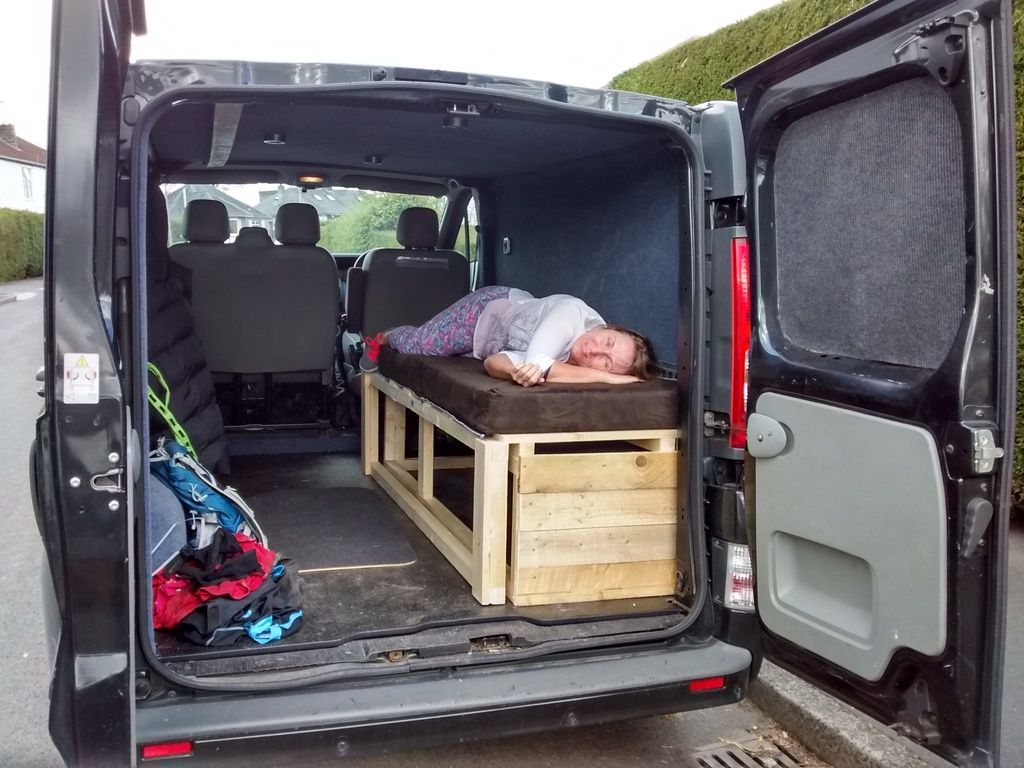 [/img]
[img]  [/img]
I still have the split relay to wire in and to ge some curtains up between the cab and the back but as it is very useable i am pretty happy for now 🙂
