Yep. 380.
no idea… none at all
A 540 might make a slight difference to speed, too 🙂
Work has started on my scratch build. Aluminium sheet has turned up and I’ve started working out where everything is going to go. Also had the shell turn up, ready for cutting up as I only intend to use the front half.

Although difficult to picture at the moment, this is what I’m aiming for

@flange Looks like a fun project, are you going to build a full tube frame?
I am indeed - 4mm tubing turned up today. It’s a lot of work if I’m honest, but quite therapeutic. Currently testing to see if I’ll MIG or braze - I’ve got a MIG so that’s the cheaper option but I think braze will look nicer. Then there’s the cutting and fish-mouthing of the rods themselves...lots to work out!
I find I enjoy the build more than running them sometimes. I’ve fairly recently started to braze a few bits together but before that I used mig for all my rc metalwork. The brazing gives a lovely finish with good prep but I actually found not doing fish mouths on the mig welded bits worked better as the wire filled the void. I tend to use fairly high amps and a medium wire speed then tack both sides of the joint.
Where did you source your tube? I normally use solid rod as it’s easier to find locally.
Here’s the last cage I used the mig on.

I’ve been playing in the garden with my Top Force, turning the boost & turbo up on the ESC. Made it fly 😁 but then bust it 😦
Needs a new rear diff as I’ve stripped the splines on the out drives. It was quick though! Briefly.
Replacement driveshafts for my FTX Mini 2.0s still haven't turned up after 4 weeks....
I spent an hour making a replacement cross journal from two bent brass pins, dental floss wrapped round and superglue.
Hope the replacement parts turn up soon as I'm not making another one!

Merak
Member
@weeksy
I’m sure I have a 540 motor in a box somewhere.If you drop me a line I’ll send it to you.👍
And I've got a spare one too for when Harry gets around to building his. 🙂
Again, drop us a line and I'll stick it in the post.
@demonracer - that’s awesome! Really nice welds too. Interesting what you say about prep and not bothering to mitre if I’m using the mig, if the come out like that I’ll not bother!
I just sourced 4mm solid rod off eBay, it’s not too expensive. On the model above is that going on a standard chassis or are you building that too?
Wow, that’s impressive.
Racing fighter build coming along nicely, doing a section every few nights. Last night was gear box and rear subframe. Really enjoying it so far.
Only one mistake so far when I fitted a rear wishbone to the front. At least it was a quick fix.
Can’t put off cutting the body out much longer. Might get a chance today if the boy gives me half an hours peace.
Thanks to whoever recommended JIS screwdrivers. Got a cheap set off Amazon and definitely makes the build easier.
@flange Thanks, Tacking it together without a close joint really did give a smoother weld for me, some mitres might still be needed it tube joints an extreme angle. Here’s a picture of another cage I built using the same technique.

The cage above bolts up to an axial Axial chassis and the Toyota fj I showed before had a cut down Scx10ii chassis built in, it has running gear from the same chassis with the gearbox rotated 90 degrees to give more room For a possible interior.

The last picture is of a cage I brazed together for a friend, the joints are slightly neater but it was more time consuming to build.

@clubby the JIS driver is a great help building tamiya. Are you going to cut the body with scissors or score with a knife and snap?
That. Is. Awesome! Well done sir, that’s fantastic work! Can I ask how you bend the tubing? Pipe bender or big hammer?
My rear axle turned up today so I’m back in the conservatory tonight to figure out how to fit it. In other news my youngest step daughter destroyed my carisma Range Rover gearbox today so I need to have that in bits!
clubby
Thanks to whoever recommended JIS screwdrivers. Got a cheap set off Amazon and definitely makes the build easier.
That might have been me. I really struggled until I found a suitable screwdriver!
Mine is the Neo Fighter, but I think I prefer the body & wheels of the Racing Fighter - it's the same chassis though.
When you get to the shocks, take your time & try to have something to hold them vertically, even if you make a folded card stand or something. I have seem some forums where they polish the shafts before assembling.
Also you literally get just enough shock oil. I think I ended up filling the first shock spot-on, then very slightly over-filled the second shock. This meant that the third & fourth were a bit underfilled. Just take your time - I was keen to get on, so probably rushed it a bit.
@demonracer I went with a combination of both. Body was a lot of curves and cut outs. Rough cut with kitchen scissors to trim waste, then curved craft scissors for the body cut out. Used a knife for the right angle cut on the back of the cab. Found the long cuts on the body too tricky to knife trim due to flex and the difficulty of supporting the inside. Curved scissors were great but still a very stressful 45 minutes.
Merak, check your PM pleas 🙂
@weeksy IIRC if your going to replace a 380 with a 540 motor you'll need an 18T pinion, maybe worth a google to confirm, i seem to remember doing it on my black grasshopper...
The baby FTX Colt has arrived and is charging
[url= https://live.staticflickr.com/65535/49812505558_3fba1aa50d_5k.jp g" target="_blank">https://live.staticflickr.com/65535/49812505558_3fba1aa50d_5k.jp g"/> [/img][/url][url= https://flic.kr/p/2iTL7sJ ]2020-04-24_11-42-23[/url] by [url= https://www.flickr.com/photos/152318156@N08/ ]Steve Weeks[/url], on Flickr
[url= https://live.staticflickr.com/65535/49813046981_a5b400da83_5k.jp g" target="_blank">https://live.staticflickr.com/65535/49813046981_a5b400da83_5k.jp g"/> [/img][/url][url= https://flic.kr/p/2iTNTpB ]2020-04-24_11-42-18[/url] by [url= https://www.flickr.com/photos/152318156@N08/ ]Steve Weeks[/url], on Flickr
[url= https://live.staticflickr.com/65535/49812505098_fa8e5a64b0_5k.jp g" target="_blank">https://live.staticflickr.com/65535/49812505098_fa8e5a64b0_5k.jp g"/> [/img][/url][url= https://flic.kr/p/2iTL7jN ]2020-04-24_11-42-12[/url] by [url= https://www.flickr.com/photos/152318156@N08/ ]Steve Weeks[/url], on Flickr
[url= https://live.staticflickr.com/65535/49812504893_b00e1d5ba2_5k.jp g" target="_blank">https://live.staticflickr.com/65535/49812504893_b00e1d5ba2_5k.jp g"/> [/img][/url][url= https://flic.kr/p/2iTL7gg ]2020-04-24_11-42-06[/url] by [url= https://www.flickr.com/photos/152318156@N08/ ]Steve Weeks[/url], on Flickr
i bet your neighbours love you...
Grasshopper looks better.
i bet your neighbours love you…
Yeah, kids playing in the street, should be in school.....oh...
mutter.... grumble....
Just seen this FTX copy in Aliexpress....
Could be tempted for 72 quid posted. Looks like many parts are transferable as well.
Having been dipping in and out of this thread for a while now, I'd just like to say I hate you all...
With that in mind I dug this out of the garage today;


It's an Associated RC8 with an RC Products electric conversion that I took in PX for a JConcepts BJ4 when I owned a model shop that was the distributor.
ooooohhh
I gave my RC10 away 🙁
@flange I normally bend the rod with a combo of a hammer, big vice and some kind of form, either a socket or a nice big bolt is good.
Which axle did you go for? Are you building it as rear wheel drive?
@Tiger6791 I've had a few RC10s including a World's car, a B3 and a B4. Last cars were a Losi XX4 with many, many bespoke parts and the B4, I haven't raced since 2007 though.
Never got to a Lossi
Used to race Airevalley buggy club.
Started with a Hornet and ended spending a small fortune in Otley modelsport
Think I went
Tam Hornet
Tam Avante
Sch Cat & Cougar
RC10
Then girls & pub...
@weeksy What sort of run time are you getting off the batteries on your Grashopper now that you've fitted bearings?
It's over an hour mate, but not measured it sorry, I'd think 90 minutes
stumpy01
When you get to the shocks, take your time & try to have something to hold them vertically, even if you make a folded card stand or something. I have seem some forums where they polish the shafts before assembling.
Also you literally get just enough shock oil. I think I ended up filling the first shock spot-on, then very slightly over-filled the second shock. This meant that the third & fourth were a bit underfilled. Just take your time – I was keen to get on, so probably rushed it a bit.
Great advice, thanks. Took a cardboard box and made four holes in the top to keep the shocks upright. Kit must have changed though as I’ve about half the bottle of oil left! At least I hope it’s changed. Shocks are amazing wee bits of kit. Enjoyed building them almost as much as the gearbox.
Body currently drying waiting on third coat of paint. Main body looks good, but unsure about wing. Think I went a bit heavy on first coat. Also difficult to get into side plates. We’ll see later on.
here's my RC bruiser - its an Axial yeti rock racer
I used to race 1/10th electric indoors RC and also electric buggys but just wanted something to have a bit of fun with....this thing is mental, currently running 3S Li-po pack and some crazy fast brushless motor.(can accommodate up to 6S !)
only getting 25 minute run times, but the upside is that it will wheelie off the throttle and flat out must be doing around 30mph which considering its size ain't bad (its marketed as 10th scale but its mahoosive..)
great fun as a kit to build as its quite a complex set-up suspension wise with double wishbone up front but live axle on 4-link trailing arms out back. Handling is a little 'interesting' to say the least with some major grip-roll issues out of the box (only cured by fitting some denser foams inside wheels..
[url= https://i.ibb.co/xJyL0MC/IMG-20200425-172808.jp g" target="_blank">https://i.ibb.co/xJyL0MC/IMG-20200425-172808.jp g"/> [/img][/url]
[url= https://i.ibb.co/0K3GFfx/IMG-20200425-173053.jp g" target="_blank">https://i.ibb.co/0K3GFfx/IMG-20200425-173053.jp g"/> [/img][/url]
[url= https://i.ibb.co/kcvcZZ8/IMG-20200425-173139.jp g" target="_blank">https://i.ibb.co/kcvcZZ8/IMG-20200425-173139.jp g"/> [/img][/url]
[url= https://i.ibb.co/r4g95ng/IMG-20200425-173024.jp g" target="_blank">https://i.ibb.co/r4g95ng/IMG-20200425-173024.jp g"/> [/img][/url]
@demonracer - at the moment I’m just using a spare from an old FTX canyon for mock up. I’d like a yeti score but they seems crazy money, so maybe something off eBay. It’ll be 2wd, hopefully with a 3s. I’ve got a bit of a mix of components that I’ve pilfered from other cars so who knows whether it’ll work!
Going to start bending and cutting pipe this evening. Then maybe some welding tomorrow fingers crossed!
Life at a different pace. Been having fun building obstacles. Son is def getting the hang of driving!
Grasshopper bundle with bigger battery, fast charger and bearings bought! BOOM!
Fessed up to the wife about the cost in advance and had the "You're not going to lose your job are you?" chat.
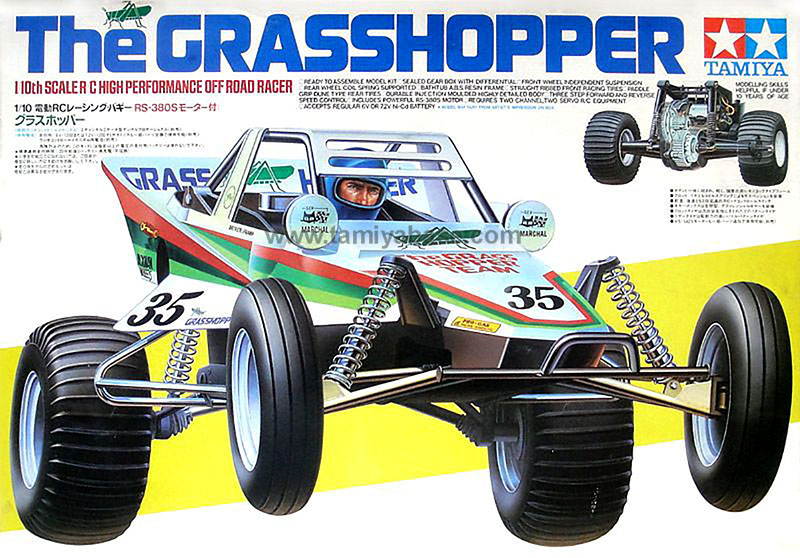
Feel equally guilty and giddy. I've wanted one of these since I saw one in Beatties off Market Street in Manchester when I was a kid.
I am 51.
Hmmm, was considering one of FTX colts for my daughter but looks way too quick for a 4 yr old!
Quite fancy one myself though!
When this shit show is over shall we arrange a play date for the North West chapter? Might get messy with us all on the same frequency though.
The colt is a bit much for little ones, our near 5 year old loves it but can't do throttle control at all so just does steering.
He still loves it though. Currently modding some 1600mah batteries to fit
Yeah boy!
Drop us your new address and I'll send you a 540 motor. 🙂
Cheers fella.
I am genuinely excited about getting this. I blame you.
This image from the mid 80s was burned into my mind.
Sounds like a plan to me!
Binners next.
I'm sure we could find him something that doesn't turn too far to the left. 🙂
