UPDATE: Reviews section refreshed, redesigned, searchable: Go take a look
Looking fwd to seeing how this goes legend! Hopefully it arrives in time for Dunkeld this weekend (assuming you can make it)!!!
160mm in the end, coz moar! Think I'll end up with a 64.5 degree Five at the end of this, most be close to a record...
My 140mm Spitfire is now at 64.1 deg, and that's with the fork shortened from 160 to 150mm. Just seems to work for how I ride, even on flat trails!
Thinking about this for my 2014 34's. They are not that plush compared to my 32's. While I'm at it would increase the travel to 150mm. Never tried a coil fork before.
Although I can't find out any information on their website.
Don't think he does the kit you're after. Might be worth dropping him an email though
I now consider myself in a race against RB, but as I keep getting a " 😉 " at the end of every email I reckon I'm winning.....
I have also had a 😉 at the end of every email.....but I've only had one email.
If it's a race you want I'd better start preparing since I want to put the coil in the DPA fork on my hardtail and swap it with the solo air on my FS. (I intend to do away with dual position which didn't turn out to be as useful as I thought even on a hardtail.)
With someone like Richard at CRConception, if enough people show interest and email him a little petition asking for a 34 spring, I'm sure he'd knock one up. I think it would be worth a try!
Anyone know if he's likely to send out a note when the kit is on its way?
Just badger him a few times....he'll tell you when its posted. The coil turned up about 4 working days after I ordered.
No instructions in the kit btw, they are on the website.
Let me know how it goes.
I saw the website instructions, doesn't look any more complicated than swapping an airshaft....hopefully all will be self explanatory
Yeah, the clip is a bit of a ball ache in comparison to the big circlip used with plier holes on the air shaft model.
It requires a technique a little bit like seating a tyre. Hold one end of the clip, whilst pushing around in a circular motion until the whole clip snaps in.
I assume you couldn't just use the snap-ring from the air shaft?
You could try I guess, I used the one provided.
Anyone recieve their coil kit, yet?
From his email last night, they've all been posted today!
I've not heard anything? Got my solo air cap etc all ready and waiting but wasn't going to hassle just yet.
yep, mine was posted today.
top man richard.
Rubber_Buccaneer - Member
I've not heard anything? Got my solo air cap etc all ready and waiting but wasn't going to hassle just yet.
I just dropped him a friendly email so I knew roughly when to expect it. iirc his words were "all the kits are leaving tomorrow" so I assume that includes yours!
Which kit have people ordered from crc? My French isn't particularly great and I'm wondering which option I should be choosing for a 170mm Lyrik. Is this the coil kit everybody is talking about:

There is also a file titled 2017 spring kit which is €135. Not sure what the difference is?
Thanks
I have ordered a 2017 spring kit for a 160mm pike but they are also available for a 170mm lyric. What you linked to is a hydraulic cartridge.
I use the translator built into my browser to translate the site. It isn't perfect but helps. Other text I type into google translate. Download the order spreadsheet, it lists the options and has some English 'help' boxes
2017 kit I believe refers to his current design rather than a fork. Up until fairly recently his design was a bit....... interesting!
Yes, I hope I've understood correctly
2017 spring kit = coil replacement for air spring
Cartouche = replacement damper
Cartouche all in one = combined coil spring and damper
All I wanted was the coil spring Tom has been so pleased with, the damping cartridges are an unknown to me so I'd probably look somewhere more local for any upgrades/adjustment
Yes, I hope I've understood correctly2017 spring kit = coil replacement for air spring
Cartouche = replacement damper
Cartouche all in one = combined coil spring and damperAll I wanted was the coil spring Tom has been so pleased with, the damping cartridges are an unknown to me so I'd probably look somewhere more local for any upgrades/adjustment
Very helpful. So the spring kit is basically just a coil on the air side and the charger damper in a lyrik/pike remains on the other side. I guess the competitor to the spring upgrade is a luftkappe, but a spring seems like an inviting option.
First go out with the coil at Grenoside this weekend, baby head sized rocks on the Steel City DH were a fair bit more muted than before and the fork even felt livelier! It's not suddenly a new fork, but it's definitely an improvement as I suspected from other rides!
I couldn't push hard though as I totalled my ankle in December, tweaked it recently and now it seems unstable.
Just received my invoice with tracking details 🙂
01/30/2017 Pris en charge LORQUIN BP
Hope to be fitting it at the weekend 😀
Pris en charge SARREBOURG PDC1
I'm sure there's a reason they're 10km away from each other 🙂
Probably yours is headed for the UK and mine is going who knows where 🙂 I couldn't find Angleterre in the address drop down so opted for Royaume Uni
I had my coil package delivered earlier today.
Probably fit in the next few days.
If it performs well, which I expect it to, then I will order another kit for my new bike.
Rubber_Buccaneer - Member
Probably yours is headed for the UK and mine is going who knows where I couldn't find Angleterre in the address drop down so opted for Royaume Uni
haha nah you're grand, mine is addressed the same way
Now at Charles De Gaulle .......... *waits patiently*
Im thinking of doing my 2017 29er Lyrik from air to coil. Do you retain the existing air topcap for that as well?
Has anyone done a Lyrik yet? Any comments?
Kit is now in the hands of the local postie. Hopefully get it installed tonight
Mine is also out for delivery but I can't see me fitting it before the weekend
...and even than it won't be until after Saturday morning's ride on a rubbishy old air spring 🙂
Installation took me (a cack handed, slow, slightly drunk mechanic) about two hours.....do it on Friday....go for a ride with your new toy.
Boing!
[img] 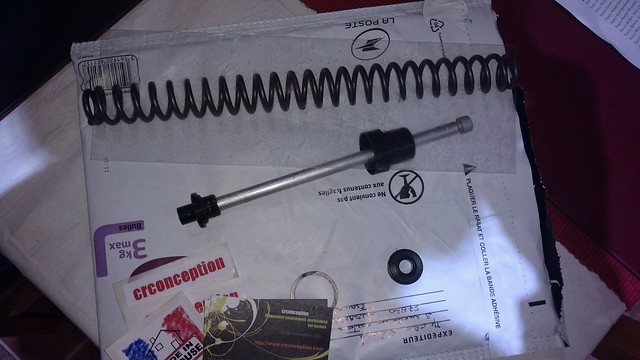 [/img]
I'm digging the whole "made in my house" thing, but the contraption really looks made in his house :/.
Won't the spring ping the insides of the uppers, rendering them unusable for future air "downgrades"?
Very possibly, but there's not much you can do about that. Also, that's just what fork parts look like. Wouldn't expect RS stuff to look any better/worse
I don't know. There is a transparent sheet there that goes inside the stanchion to shield it from the spring. I'd hope it will do the job.
The spring is nicely finished and other parts are more functional than beautiful but they do appear to be just that, functional.
I'm looking forward to giving it a go. Fingers crossed the spring rate is right for me
Ah, missed the big transparent sheet, expected collars on the spring.
It's the matte/raw aluminium look of the shaft that's throwing me off, but there's no need for anodizing or polishing as there's no seal on that surface. Fair enough :).
Is legend down the [s]shed[/s] workshop?
I'm digging the whole "made in my house" thing, but the contraption really looks made in his house :/.
Won't the spring ping the insides of the uppers, rendering them unusable for future air "downgrades"?
Every coil I have ever owned has rubbed on the inside of the stanchions, Marz, Foz, Rock Shox....all do it. This one actually rubs the least.... The only way to totally mitigate coil bind would be to go back to his old design whereby the shaft extended all the way along the inside of the coil, with the coil tightly wound around it.
The clear insert seems to work when it comes to protecting the inner stanchions.
I can see why the circlip thing will be a fiddle Tom, it's twice around!
Yeah, that was quite fun. I used some thin pliers to help, don't be scared to bend it/open it up, to get it in - it rebounds to it's original shape well.
I like the design to be honest - once you've got the assembly in, you don't have to remove the lowers to change the spring rate - you just drop the spring in from the top. Which will make life easier if you start hitting the pies.
I just used the finger technique in the instructions- took 30 seconds 🙂
Whole job took 45mins including getting the fork off and on the bike. Really easy to do and what a difference as soon as you get on the bike!
Show off.
Also, it's teh awesomez isn't it?
Now I need a coil for the back, because the monarch feels even shitter than usual now. It used to be that the Reign flattened bumps better at the back than the front, then the front was a bit better after the FAST damper mod and certainly less spikey than the rear....now it's laughable...the front just devours things like they aren't there where as the back spikes massively trying to keep up with it. It's the first time I've had a bike where there has been such a night and day difference between the front and rear performance.
Skillz 8)
Admittedly I had warmed up by swapping over an air shaft on my mates Pike just before 😉
