- This topic has 4,412 replies, 728 voices, and was last updated 1 hour ago by nixie.
-
What is the last thing you made? (pics pls)
-
OllyFree MemberPosted 2 years ago
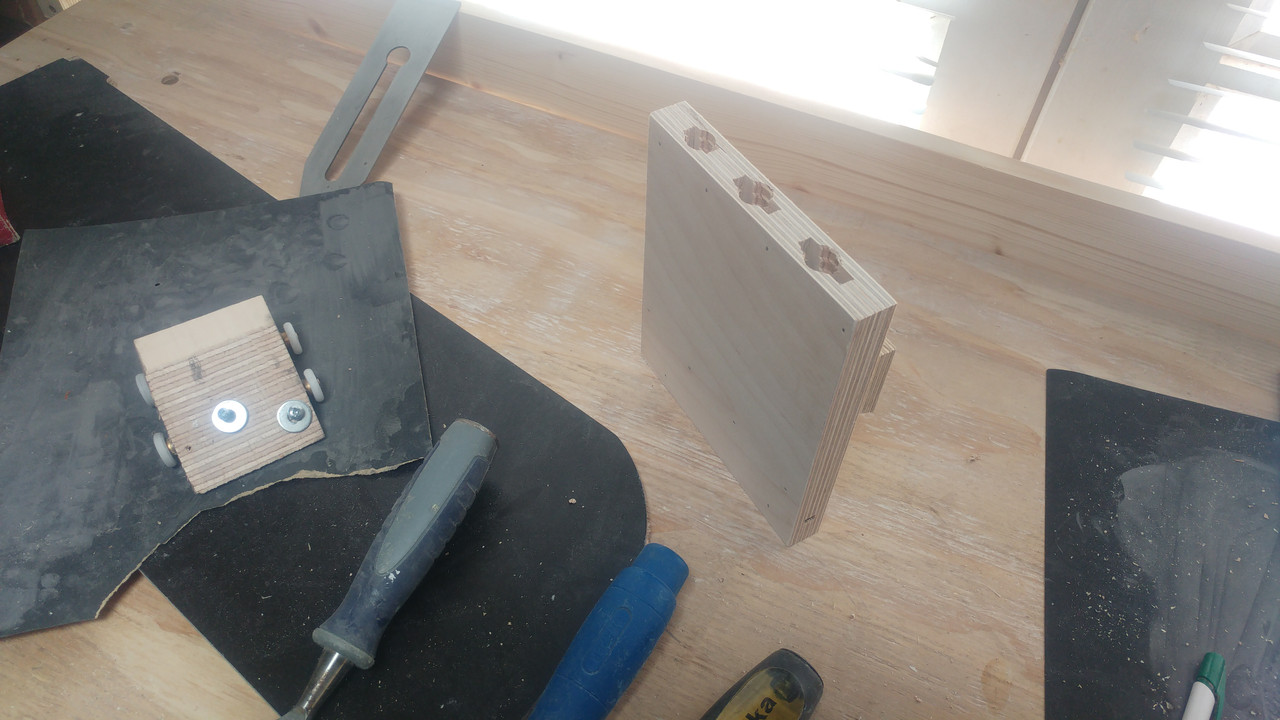
My small collection of chisels has been rattling around in the bottom of the toolbox for too long.
My No.4 Plane leaves stripes, cause the blade is so mangled from misuse
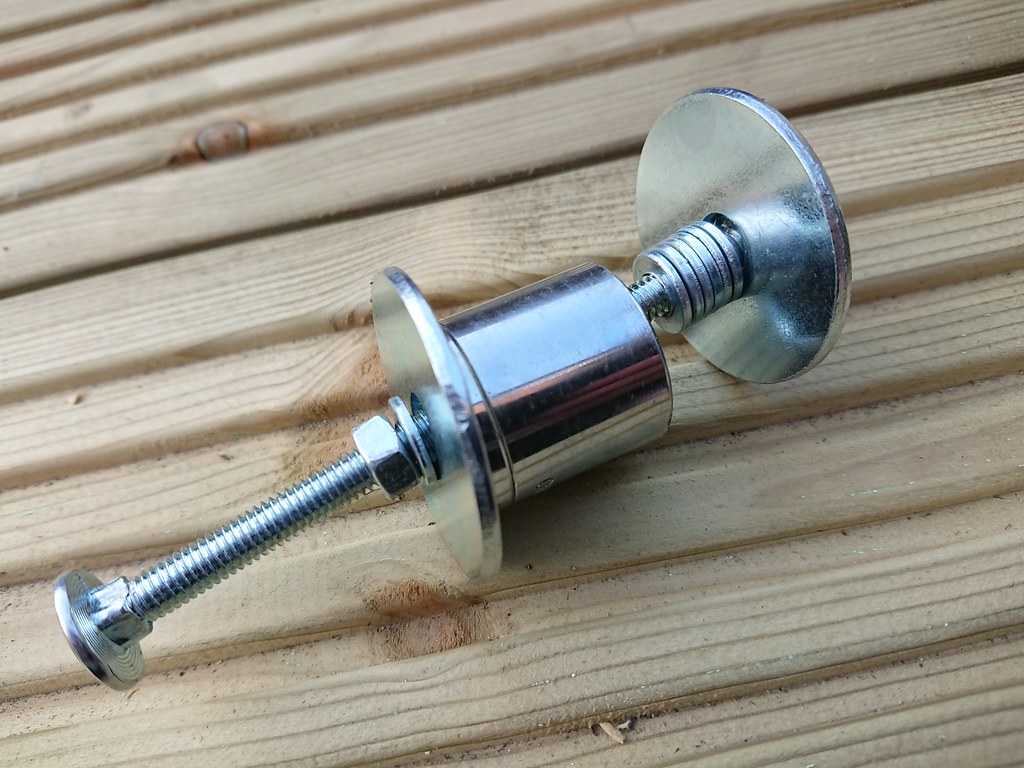
Made a honing sled from some offcut of aluminium, and a set of shower door roller wheels. Drilled and tapped holes for the wheel bearings and the clamp. Pop rivets on the “square” edge.
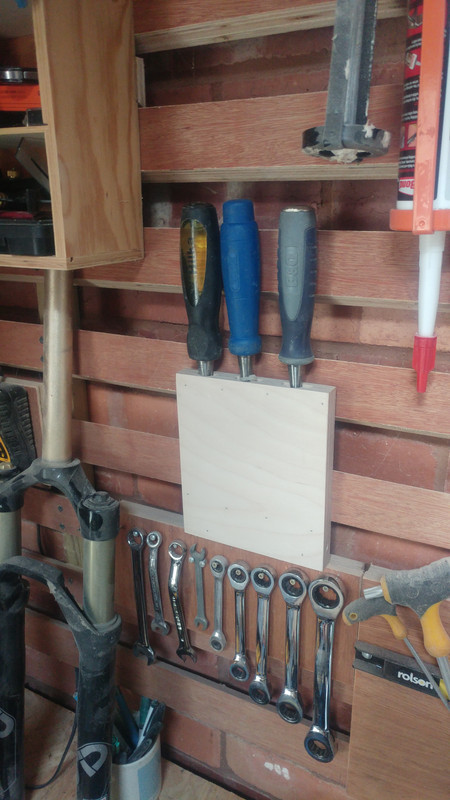
Chisels are now fantastically sharp, and far too dangerous to have loose in the toolboxSo i made a box
To go on the tool wall/rack
WorldClassAccidentFree MemberPosted 2 years agoOkay Olly – I am off to the garage to do some R&D* on that idea as I have a load of chisels which everyone else seems to think are screwdrivers or for scraping the pointing out of paving slabs. It would be good to have them properly sharp again.
*Rip-off & Duplicate
OllyFree MemberPosted 2 years agoIve subsequently seen a few people make similar on youtube, and it turns out you can buy them for not a lot of money too, but i first saw it here:
WillHFull MemberPosted 2 years ago↑ same. I’m on the verge of just buying a new set of chisels, but making something like that looks like a challenge. Might see if I can 3D print one…
kayak23Full MemberPosted 2 years agoLooks great that Olly 👍
Did you figure out a specific angle?
I assume it’s a fixed angle because of the four wheels.
NeatoOllyFree MemberPosted 2 years agoon the second image you can see a plywood version, i rough cut the correct angle from a 36mm chunk of ply off cut, and that was ok.
i was looking around for something to improve it and found that the aluminium stock i had was already the correct dimensions to give a 25 degree angle, so just went with that. saves me from having to work out an angle each time, if i can just drop it in and barely lift the front wheels to set the angle.tthewFull MemberPosted 2 years agoWhy not do away with the front wheels altogether, and just attach a little spirit level bubble at the correct angle? Clamp the chisel so the bubble is centred and hone away.
kayak23Full MemberPosted 2 years agoThe angle changes with different types/thicknesses of blades is all.
My plane blade is very different in section to my Japanese chisel for example, and would result in a slightly different angle.
Cool idea though and nice build.
Usually, chisels and planes are ground at 25 degrees and honed at 30.
Means if you get a little chip you’re not there for a day trying to get rid of it.Also is a pretty good compromise in terms of being a fine enough edge, and being strong enough to last an acceptable time.
Generally when honing on abrasive paper, you want to just hone on the pull stroke so the paper is in tension.
MrSparkleFull MemberPosted 2 years agoInteresting. A nice little project that I might have a dabble at. There are versions online and they are hinged and tensioned with a bolt and wingnut so you can change the angle easily.
MrSparkleFull MemberPosted 2 years ago… which you can measure using an iphone in Measure, I’ve just discovered..
timbaFree MemberPosted 2 years agoI used to have a honing guide like this one. The single wheel started to wear a groove in my stone
I now have some big triangular lumps of wood cut to different angles that I sight to while holding the chisel/plane iron by hand
Be careful cutting triangular wedges on a table saw. They wedge if you do it the wrong way around. I cannot think how I know this 🙂hazel123Free MemberPosted 2 years agoThis is a good question. I need to make something. Got out of the habit of hands on stuff since the pandemic and a busy life. Intend to get out and “make” some photographs now the weather is better.
simply_oli_yFree MemberPosted 2 years agolast thing from me was an oak side table to be used as a plant stand.
Top made from a slice of oak, legs from oak which was burnt (Japanese Shou Sugi ban method).Wife has recently made a couple oak and epoxy kids tables/floor tables as a project to sell. Ideal for playing/drawing or even family games night.
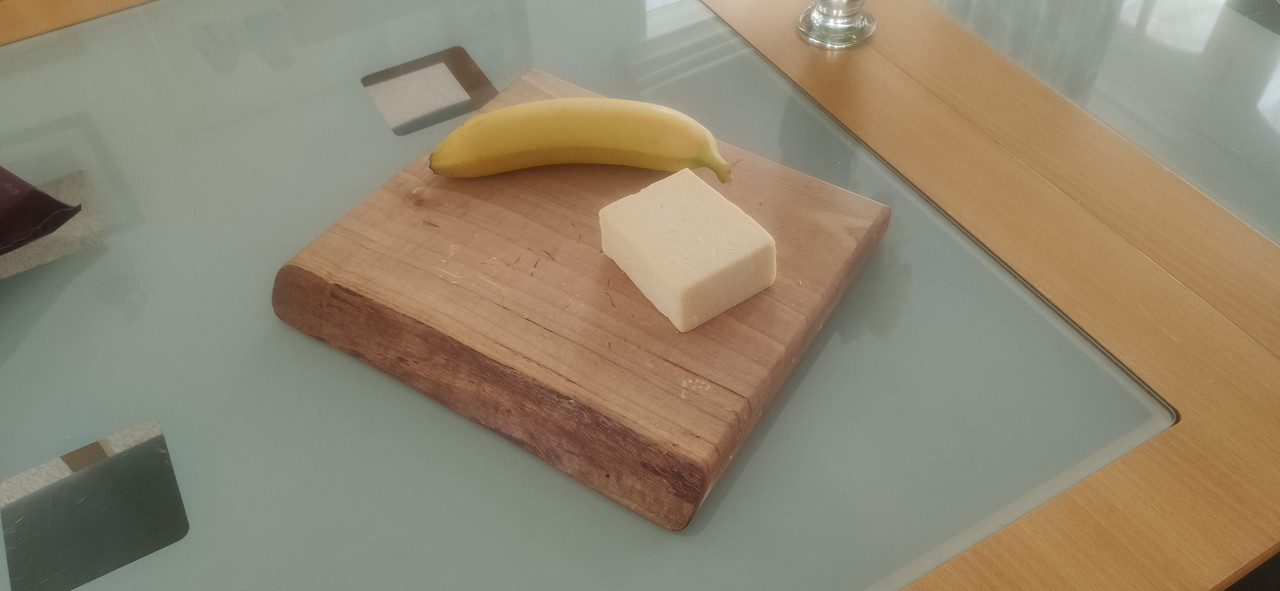
WorldClassAccidentFree MemberPosted 2 years agoThis is really just a test piece made from a very dished slice of oak (I think) that has been kicking around the garage since I decided it was too dished to use.
I wanted to test my new planer / thicknesser so took the bottom off the dish and the top off the lips until I got a level piece of wood. I ran a router around the cut edges and left the live edge (and wood worm tracks), oiled it and it is now a cheese / fruit board going frr to the first taker on Facebook (or here if you are quick).
thenorthwindFull MemberPosted 2 years agoBeen re-arranging the garage recently (a years-long ongoing project TBH) and, after much indecision, decided the best solution for the 5 bikes currently in there was a partition at the front facing the shutter door – previously they were on one of the side walls, but that wasn’t ideal for a number of reasons.
I built a 4′ partition from 15mm OSB, hinged at the sides and in the middle so it can be moved (sans bikes, obviously) if I need to get something big into the garage. My garage is conveniently almost exactly 8′ wide and 8′ high, which makes for optimal sheet material usage. Less conveniently, both the floor and ceiling slope slightly away from the house.
I’ve had this idea for a bike racking system for a while… the hooks are on boards mitred at the top and bottom, and slide along, but are captive in, rails mitred at the same angle, kind of like a double French cleat.
This means the hooks can be moved to squeeze the bikes into a smaller space. With the weight of a bike on them, they’re pretty secure, but can just about be shuffled across. This does make the ones in the corner tricky to get to, but I just don’t have any more space and it beats having one leant against a workbench. Five bikes on a 4′ board, with bars sticking out on one side. The hooks can also slide out completely if I need to fold the partition flat against the wall for some reason.
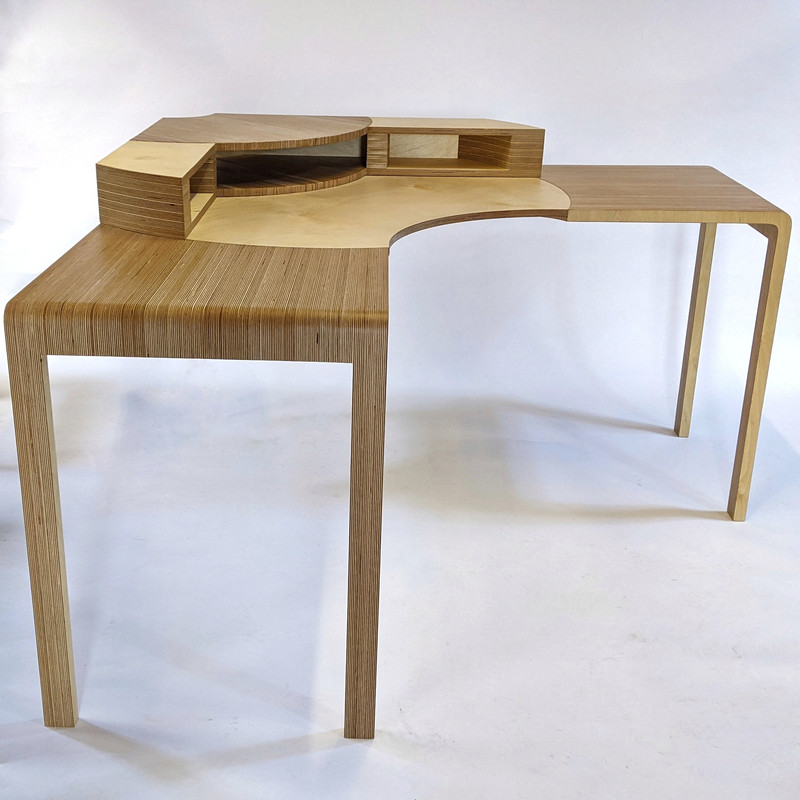
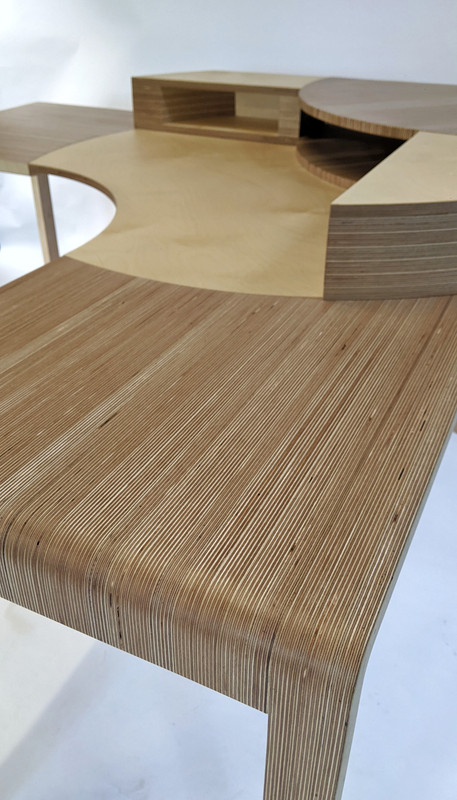
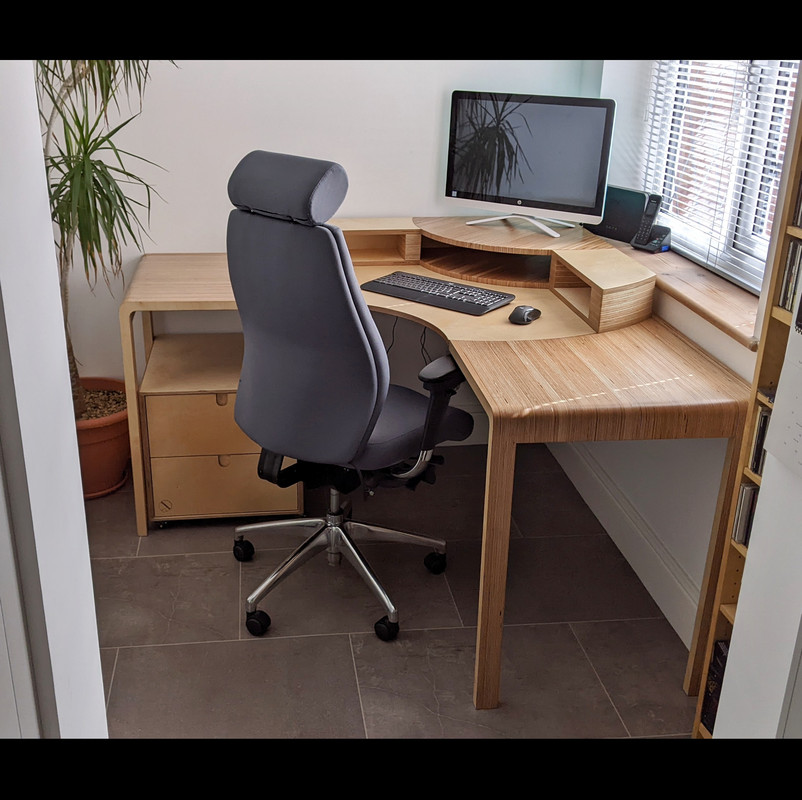
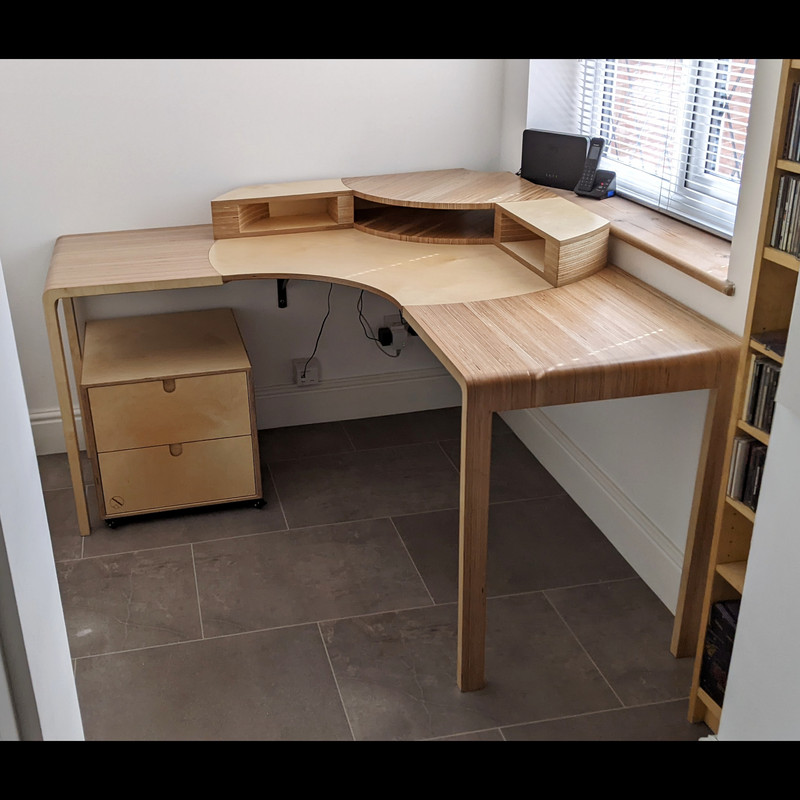
kayak23Full MemberPosted 2 years agoMade a corner desk for a home office in Birch Plywood.
Probably the last birch plywood I’ll buy for a bit with the current sitch… 😕
Was just under £100 a sheet when I started this. Probably can’t even get it now…WorldClassAccidentFree MemberPosted 2 years agoKayak
That is a large unsupported span. Is it also fixed to the wall along the back edge?
Also, can’t quite see the join between the ply and the circle, it is just a butt join and if so, is it dowelled, biscuited etc?kayak23Full MemberPosted 2 years agoKayak
That is a large unsupported spanNah, it’s got two heavy duty steel shelf-type brackets underneath supporting it plus struts along the back edge.
You can just see the bottom of one of them in the bottom pic.It’s in a tiny room so had to be take apart-able. The two outer leg sections are rebated, the central section sits into this rebate, is jointed by several Dominos, and then multiple allen bolts into threaded inserts lock it in place.
It’s solid, but I hope he doesn’t start tap dancing on it all the same. 😉
Rich_sFull MemberPosted 2 years agoWanged together a set of shelves for my office/shed. C24 timber in 195×45. Double width. “Rustic” looking.
Started off by pegging the shelves together, quickly gave up and used 100mm screws.
Made one version on the floor, and then another one on top to line it all up. Then realised I had 200cm width of room to lift up 180cm of shelving. Had about 5cm spare in the end.
Also, varnishing is a pain.
bigdeanFull MemberPosted 2 years agoAm due to move jobs soon, will be the first time since I was 18 that I’ve not been close to any machine tools.
So had a last play last week and finally finished a small case had draw up last year.colournoiseFull MemberPosted 2 years agoNothing in the context of this thread, but effective and saved a LOT of sweariness.
Finally getting round to ‘raw’ing and rebuilding my new-ish to me Spesh Epic. Bought a bearing extraction kit (the type with the expanding wedges that you then drift out) but it was useless – guessing the bearings haven’t been changed since the bike was built in 2012 and were a little stubborn… A trip to B&Q for some m6 bolts and a few washers and a rummage in my socket sets created a frankentool that had all the single bearings out in under 15 minutes (having previously failed to dislodge the first one after nearly an hour of trying).

At least the simple bearing press that I also bought from the same supplier worked fine…
squirrelkingFree MemberPosted 2 years ago@colournoise that looks like what I was fitting hub bearings with the other night, used my bearing/seal driver threaded bars and some appropriately sized sockets. Can’t think of a reason to buy a “proper” driver kit unless I hit a weird size.
@olly your cleated wall is exactly what I have planned for my shed. How did you make your chisel holster?WillHFull MemberPosted 2 years agoThat’s really nice Hobster. What are the white dots? Something inlaid? And have you made some equally impressive counters?
WillHFull MemberPosted 2 years agoI’ve just bought a new leaf blower, and since the end of the tube on the old one was starting to wear away from contact with the ground (I tend to use the tube to scrape up stubborn bits), like this…
…I thought I’d have a crack at making a sacrificial strip to mount at the end of the new one.
Knocked together in Tinkercad and then 3D printed. Sank a couple of M3 threaded inserts into the lugs, and a couple of wee bolts to tighten it up on the end of the blower tube.
walowizFull MemberPosted 2 years agoMade a corner desk for a home office in Birch Plywood.
Probably the last birch plywood I’ll buy for a bit with the current sitch… 😕
Was just under £100 a sheet when I started this. Probably can’t even get it nowThat desk is a fantastic piece of work, lot of detail going on there in a corner desk, great design too. Without giving away trade secrets, how do you get the curved sides that taper to the legs?
walowizFull MemberPosted 2 years agofinally finished this backgammon board
That’s lovely work hobster.
There really are some very talented people on STW.
HobsterFree MemberPosted 2 years ago@willH the dots are mother of pearl.
I haven’t made any counters as think it may be more hassle than its worth but if I don’t see any that I like it may have to be done
kayak23Full MemberPosted 2 years agoWithout giving away trade secrets, how do you get the curved sides that taper to the legs?
Thank you 🙏
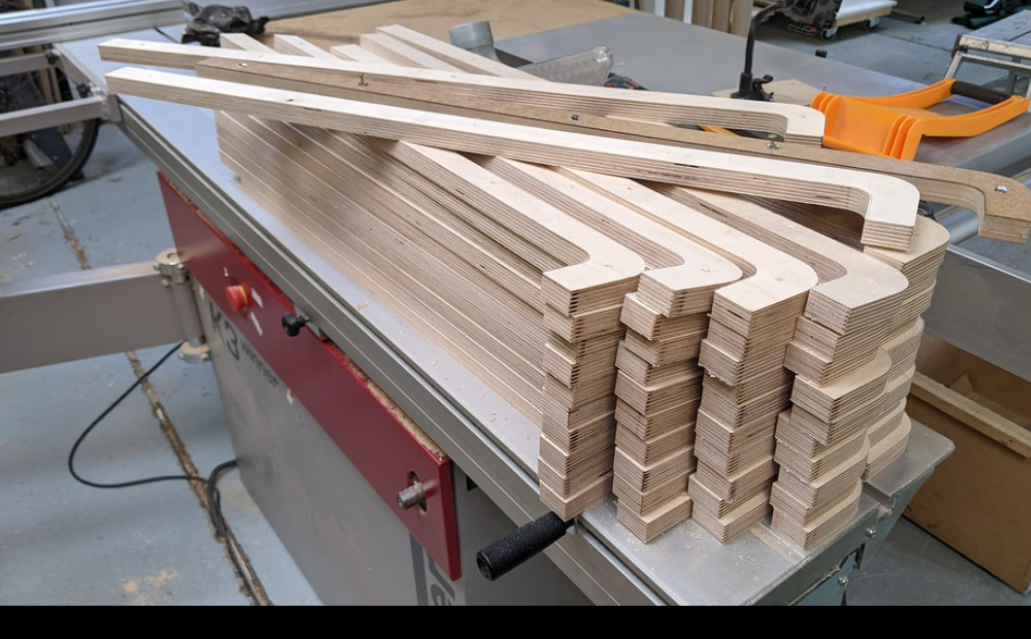
Each ‘wing’ is based on one template, which is a very simple 90 degree L-shape, 30mm width. The legs are x3 layers of 18mm ply, and then the inner portion is the same shape but with only a slight L-length.
All stacked and bonded together.If making images are of any interest, they’re on a Flickr album Here
Basically a lot of repetitive template routing.
pk13Full MemberPosted 2 years ago@hobstar
Lovely that is. it inlay over ply(board) or solid
10/10 just lovely
WorldClassAccidentFree MemberPosted 2 years agoMy latest masterpiece with something of interest for:
car lovers – Is it s DB5 or DB6 or…
cyclists – there is a team interloper and the last guy being left on the corner
cartoons – Meep Meep!
mrmonkfingerFree MemberPosted 2 years agoCleated bike hooks is brilliant. I’ll be cloning that on my bike wall.
HobsterFree MemberPosted 2 years ago@pk13 its solid wood with the points routed out and then filled with resin.
Veneer over ply or MDF may have been a better approach due to wood movement.
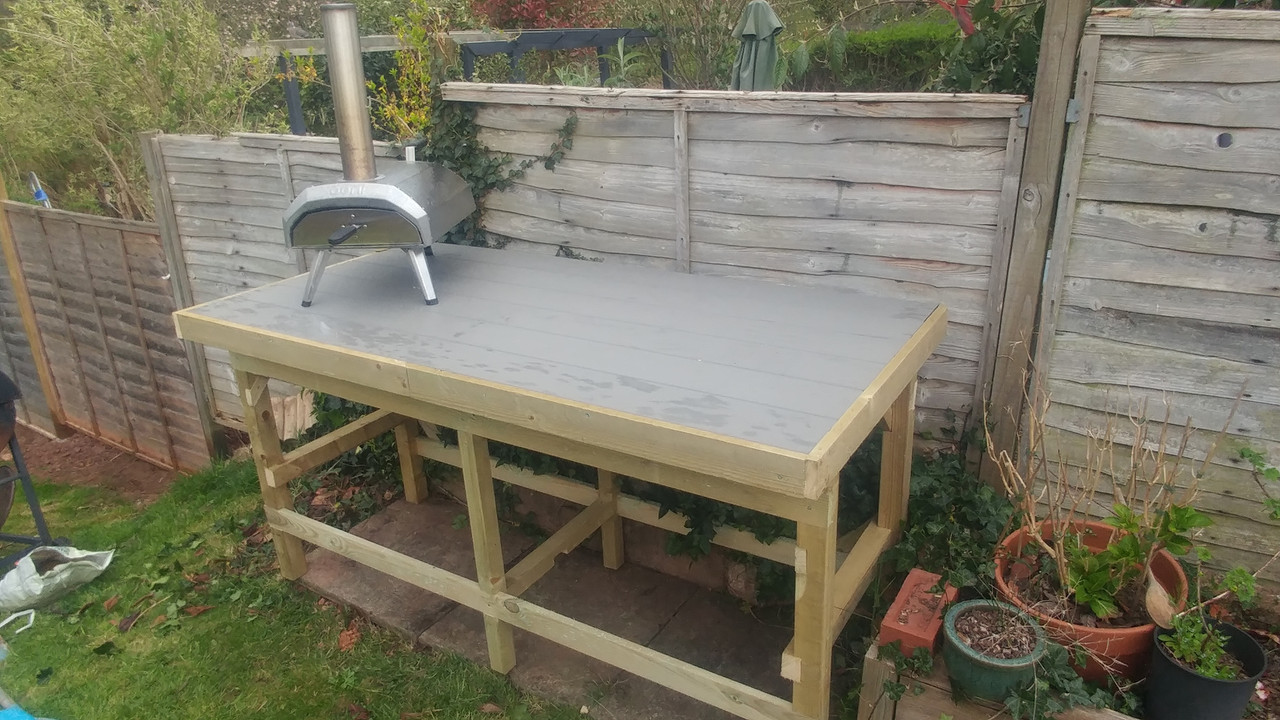
OllyFree MemberPosted 2 years agoKnocked up a table for the Pizza oven to sit on, as it currently sits on the picnic bench, elminating the option for sitting at the picnic bench.
Cheapy B&Q pressure treated timber frame, but decided to use composite (plastic) fence panels for the top to make a clean ish surface to lay out food for pizza assembly
Time will tell whether the plastic sags in the sun, but i figure its designed to be outside so should be ok.benp1Full MemberPosted 2 years agoNothing as neat as on here, I’m more 1st fix than 2nd fix or joiner 🙂
Have been collecting large items in the van to make into things. Mainly pallets but also picked up a washing machine
Washing machine has become a firepit. Have made a top for it so it’s got a waterproof lid but also a wooden lid to make it into a drinks table. Largely bodged from other bits
Made a potting table for the wife, and a wood store for off cuts of pallet that are either for burning on the firepit or making into other things. I actually had quite a bit of wood and it was taking up space in the garage, wanted to get it outside but didn’t want it sitting in the rain
Have also been making bits for an RC scale crawler course in the back garden. Nothing fancy at all, just a few bits to have some fun on
My 2 favourite tools at the moment are my impact driver and air nailer. Think I need to get a pallet breaker bar to make getting them apart easier. Sometimes I just chop them up into smaller bits with the circular saw but having the longer bits in one piece is handy


You must be logged in to reply to this topic.