- This topic has 4,412 replies, 728 voices, and was last updated 1 hour ago by nixie.
-
What is the last thing you made? (pics pls)
-
AlexSimonFull MemberPosted 5 years ago
Some great stuff up there. Like the arcade cab. – there’s nothing like having proper arcade sticks and microswitches
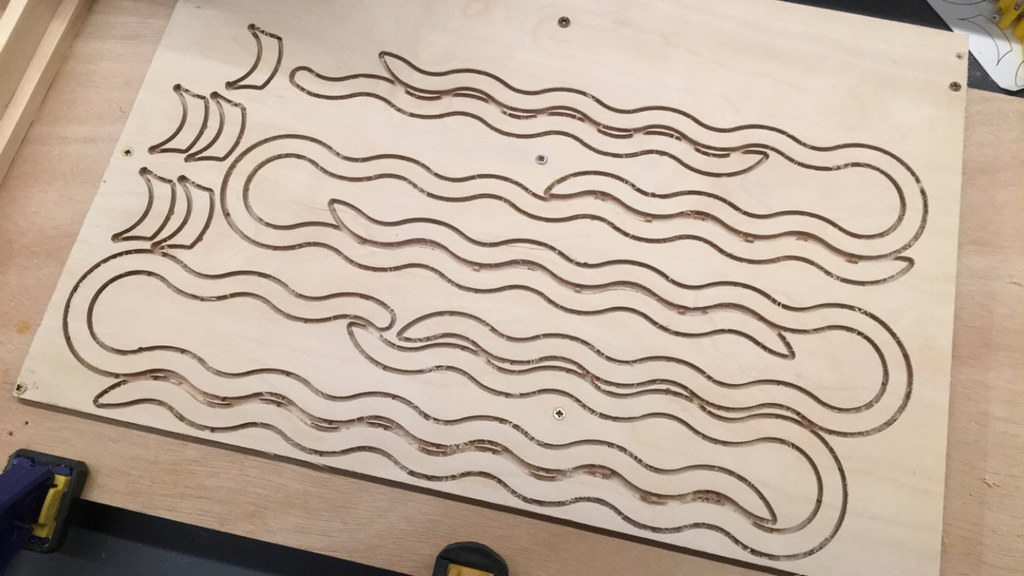
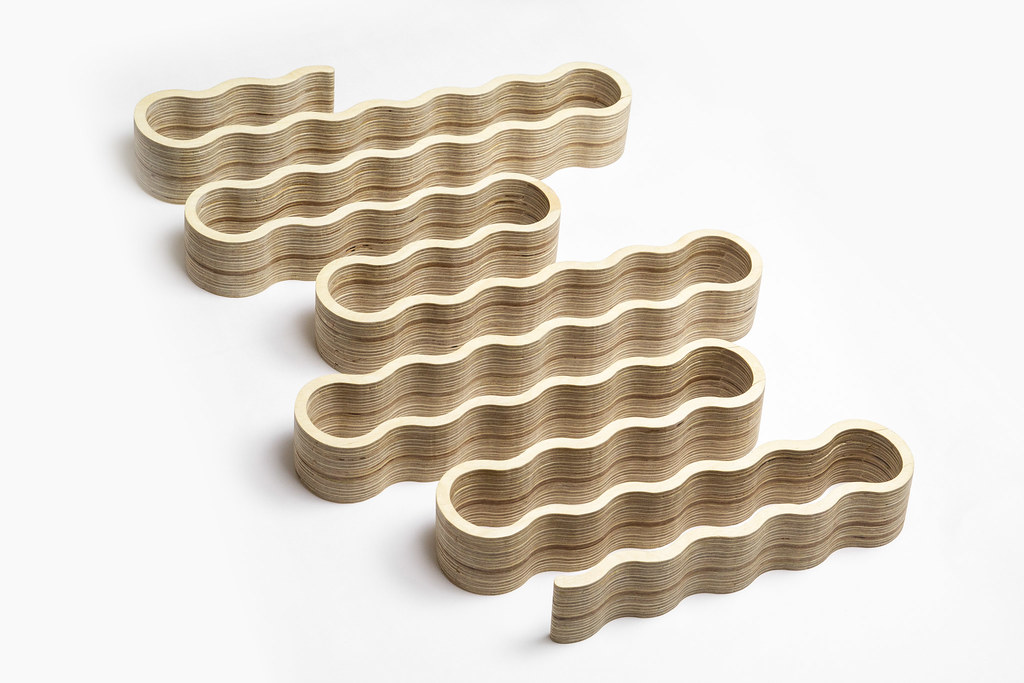
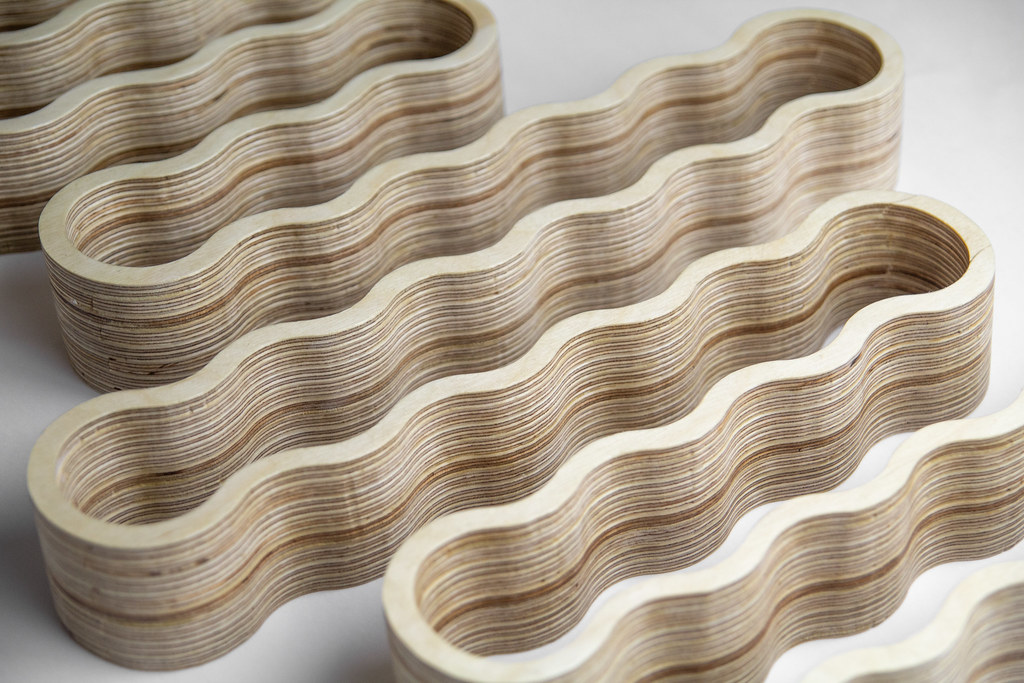
AlexSimonFull MemberPosted 5 years agoIt looks like my obsession with plywood edges isn’t going anywhere soon.
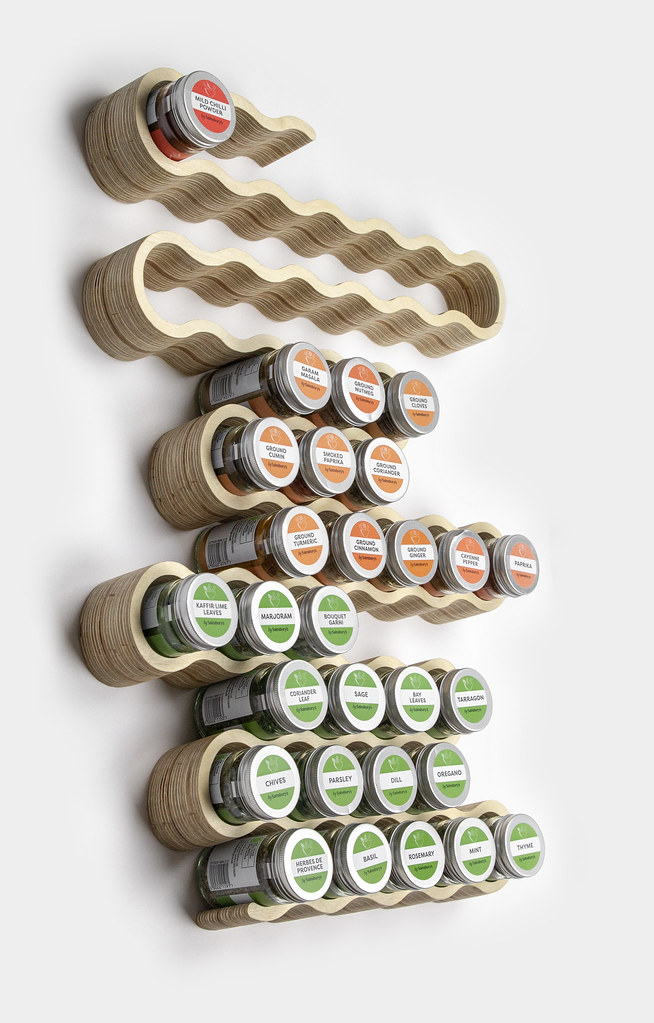
Made a ridiculously labour-intensive Spice Rack.
First project with my home-made CNC router.
Designed around the Sainsbury’s spice jars.
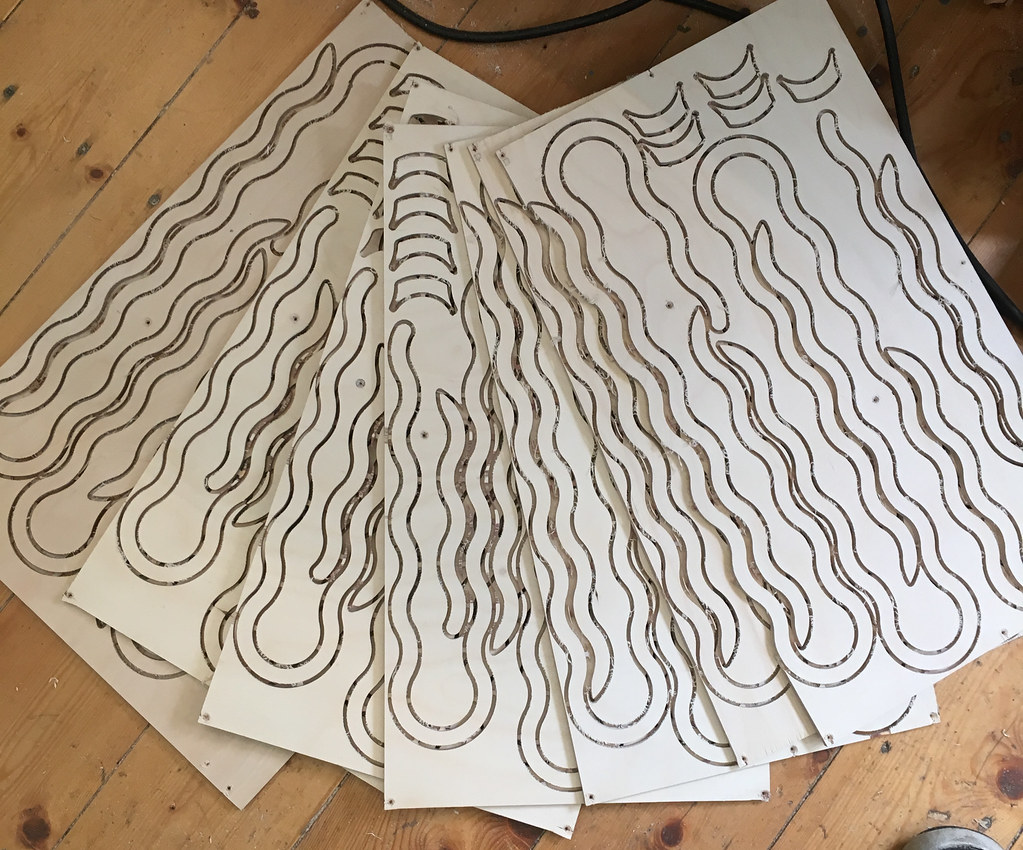
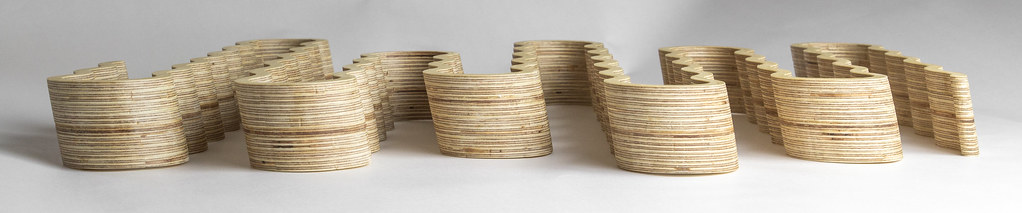
Far too much manual work after the CNCing for it to be repeatable. Deviated from the original plan to leave the layers stepped and got a bit ambitious making it all smooth.Made out of 8 alternating grain direction layers of 6mm Baltic Birch Ply.
1. Design in Fusion 360 and split up the design so that it doesn’t waste wood.
This is for 4 of the layers, there was an opposite design for the other layers so that the splits weren’t in the same place in all of the layers.

2. Cut all 8 on the CNC – each layer took 1h20, although over time I managed to get this down to about 50mins by improving speeds and feeds.
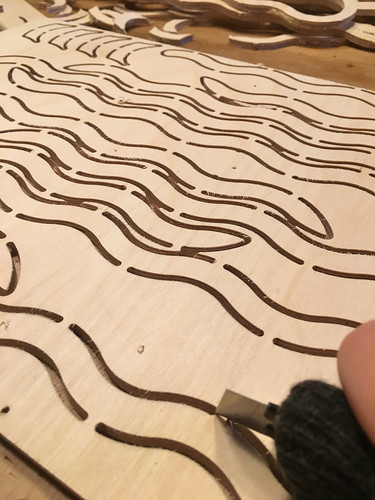
3. Cut out all the tabs
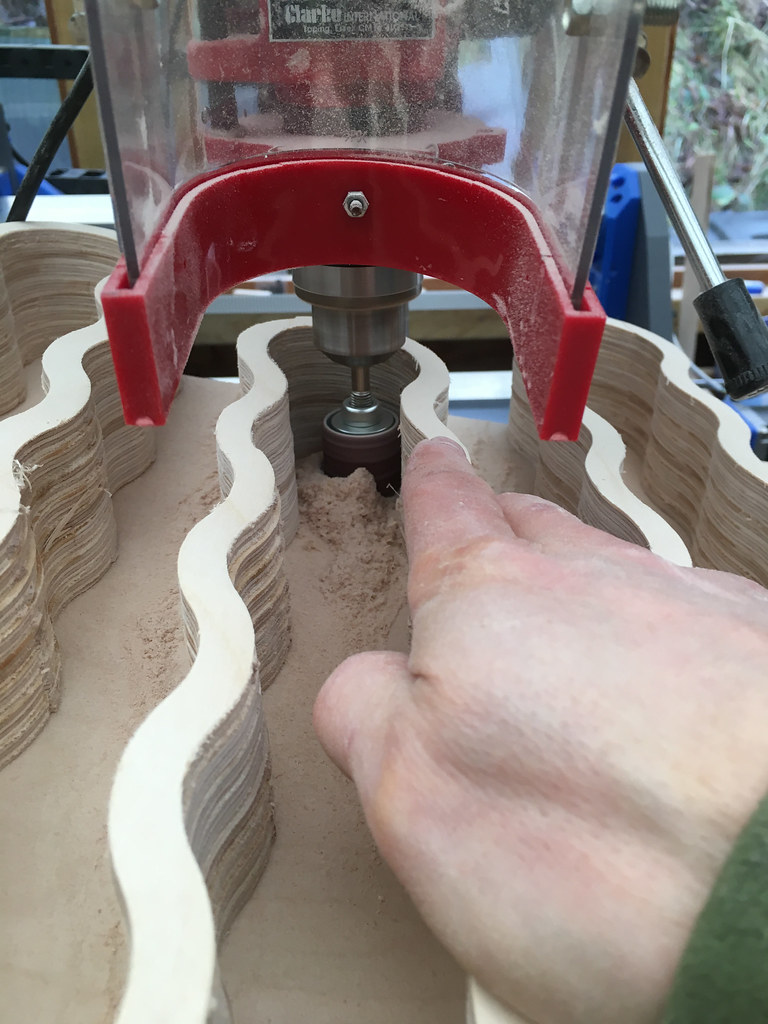
4. Begin the tedious task of glueing them all together slightly stepped. Originally, I was going to clean them up and then step them and leave it. But I got ambitions and decided to try and sand it smooth.
Even though I have 20 clamps – I ran out every layer.
5. After 8 half-hour sessions of gluing it was time to sand. Oh. My. God. Various hacked together sanding rigs and 12 hours later it was done. Best method (not pictured) was wrapping a 12mm drill bit in sand paper roll until it was thick enough to be useful – at least that was full height. I gave up before it was perfect as the whole structure was getting too thin.
6. Osmo and done. Now I need to find some way to attach it to the wall lol – probably fancy PU glue.
RetrodirectFree MemberPosted 5 years agoThat’s really nicely done, especially the subtle angle that it holds the jars at
MoeFull MemberPosted 5 years agoMods! Please delete this thread, my wife has just found this thread and this lot are getting me soooo much earache! 😀
siwhiteFree MemberPosted 5 years ago@AlexSimon – Possibly a bit late for this suggestion, but would canting your router over by 5 degrees in your CNC have negated the need for your sand-a-thon?
kayak23Full MemberPosted 5 years agoLove that spice rack! That’s well good.
Workbench is great too. Very handy 👍
Kayak23, what timber did you build those cabinets from?
Main carcasses are mdf, light wood internals are birch ply, door frames are tulipwood with 6mm mdf panels routed to make them look like tongue and groove.
Finished this big bench today for a friend who’s taking over a restaurant. Reclaimed oak flooring for the slats.
View this post on InstagramA post shared by black tea one sugar (@blackteaonesugar) on
AlexSimonFull MemberPosted 5 years agoThanks for the kind words!
@AlexSimon – Possibly a bit late for this suggestion, but would canting your router over by 5 degrees in your CNC have negated the need for your sand-a-thon?
It would work, but I couldn’t find a way to do it without re-cutting some side plates (as the whole z-axis would need to be tilted) and rebuilding a fair bit of the machine. At the time it seemed too much, especially as this was the very first cuts with the machine!
I haven’t totally ruled out the idea now that I know how much work was involved though.AlexSimonFull MemberPosted 5 years agoHi mickmcd – I’ve got dovetail bits, but I couldn’t see how to achieve the same effect – it would undercut all the way around, instead of undercut on one side, vertical on the ends and then taper on the other side. I think having a tilted z-axis is the only way, but it’s a fair amount of work (but not impossible 😉 )
thetallpaulFree MemberPosted 5 years ago@Kayak23 – Where did you get the mechanisms for the slide out part of the wardrobe? Google foo is lacking today. Would be ideal for our eldest’s bedroom.
Lovely work as always. In fact the majority of the stuff on here is excellent. There are some real talents about.mickmcdFree MemberPosted 5 years ago@alex Simon ah another idea sort of sine table for your router so a bit of wood / wedge that’s tilted /angled over to your spindle ..
tiimFree MemberPosted 5 years agoBrazed a disc brake mount into my friend’s early 90’s dawes tandem so he can upgrade from his current coaster brake:
Testing:
After:
Will take a 203mm disc on a coaster-disc brake converter, should reduce faff when he removes the wheel, plus, actually do some slowing down.
(Frame is off for strip and re-spray, hence not worried about the terrible toxic paint)Edit: Give up. No idea why they’re not showing. Maybe it’s just me.
kayak23Full MemberPosted 5 years ago@Kayak23 – Where did you get the mechanisms for the slide out part of the wardrobe? Google foo is lacking today. Would be ideal for our eldest’s bedroom.
Do you mean the tall pull-out section? Locks online. They were actually a real pain to do. They’re basically larder runners but built as replacement runners for metal, cage-style larder units.
I got 3 sets and kind of spliced them together, 2 bottom, 1 top. The unit still droops slightly as it’s very heavy, though well within the specified limits.
They’re also not full-extension so the unit doesn’t quite come completely out.
Still, the Hafele versions for bespoke larder units are something like £350. These were about £30 each.
If what you’re trying to do gives access to the sides (my cupboard was tight to a wall) then look for extra heavy duty runners. The type they use on slide out platforms such as on fire engines etc. They extend far but you can’t separate the halves like you can with lighter duty runners.
GreybeardFree MemberPosted 5 years agoEdit: Give up. No idea why they’re not showing. Maybe it’s just me.
I think you linked the imgbb pages with the image on not the actual .jpg images. See if this works:
redthunderFree MemberPosted 5 years agoI needed a quick ground quiver for garden archery practice…
stumpy01Full MemberPosted 5 years ago^^ that disc brake mount looks nice!
Paintjob needs some work though….
stumpy01Full MemberPosted 5 years agothetallpaul Subscriber
@Kayak23 – Where did you get the mechanisms for the slide out part of the wardrobe?I got 3 sets and kind of spliced them together, 2 bottom, 1 top. The unit still droops slightly as it’s very heavy, though well within the specified limits.
They are probably very similar, but have you looked at Accuride drawer slides? Possibly a bit more expensive, but they have a large range. We used to use them at the last place I worked for installing ink systems into large custom inkjet print solutions.
avdave2Full MemberPosted 5 years agoI look at that donkey and I think someone had to design that, someone had to make it, someone had to sell it to the buyers at the garden centre and then a customers had to come in and buy them. And I ask myself how did all those things happen without one person standing up and saying no no no not in my name! `:-)
redthunderFree MemberPosted 5 years agoThat was my Nans Concrete Donkey….it weighs a ton.
It must be at least 50 years old. I do look after it with a coat of paint from time to time in the Worms style.
Nod to Andy Davidson.
redthunderFree MemberPosted 5 years agoNice looking pie. We need more foody creations on this thread. 🙂
avdave2Full MemberPosted 5 years agoThat was my Nans Concrete Donkey….it weighs a ton.
I’d actually assumed you lived with your nan redthunder. `:-)
thetallpaulFree MemberPosted 5 years ago@Kayak23 and stumpy01 – Thanks guys. I’ll have a look at those suggestions. Cupboard will be in a similar position to Kayaks, and will be used for storing toys, so may need to hold a fair bit of weight. I could split that cupboard into several pull out sections.
I’ll see what the director of house alterations thinks.unsponsoredFree MemberPosted 5 years agoI have been using a Monster Bike bag for years. The bag has been modified over the years, but the bikes have got bigger, handlebars wider and the old bike bag was pretty much at the limit for my bike. I’ve been meaning to make a new one for ages and got around to it this week.
<div style=”padding:16px;”> <div style=” display: flex; flex-direction: row; align-items: center;”> <div style=”background-color: #F4F4F4; border-radius: 50%; flex-grow: 0; height: 40px; margin-right: 14px; width: 40px;”></div> <div style=”display: flex; flex-direction: column; flex-grow: 1; justify-content: center;”> <div style=” background-color: #F4F4F4; border-radius: 4px; flex-grow: 0; height: 14px; margin-bottom: 6px; width: 100px;”></div> <div style=” background-color: #F4F4F4; border-radius: 4px; flex-grow: 0; height: 14px; width: 60px;”></div></div></div><div style=”padding: 19% 0;”></div><div style=”display:block; height:50px; margin:0 auto 12px; width:50px;”><svg width=”50px” height=”50px” viewBox=”0 0 60 60″ version=”1.1″ xmlns=”https://www.w3.org/2000/svg” xmlns:xlink=”https://www.w3.org/1999/xlink”><g stroke=”none” stroke-width=”1″ fill=”none” fill-rule=”evenodd”><g transform=”translate(-511.000000, -20.000000)” fill=”#000000″><g><path d=”M556.869,30.41 C554.814,30.41 553.148,32.076 553.148,34.131 C553.148,36.186 554.814,37.852 556.869,37.852 C558.924,37.852 560.59,36.186 560.59,34.131 C560.59,32.076 558.924,30.41 556.869,30.41 M541,60.657 C535.114,60.657 530.342,55.887 530.342,50 C530.342,44.114 535.114,39.342 541,39.342 C546.887,39.342 551.658,44.114 551.658,50 C551.658,55.887 546.887,60.657 541,60.657 M541,33.886 C532.1,33.886 524.886,41.1 524.886,50 C524.886,58.899 532.1,66.113 541,66.113 C549.9,66.113 557.115,58.899 557.115,50 C557.115,41.1 549.9,33.886 541,33.886 M565.378,62.101 C565.244,65.022 564.756,66.606 564.346,67.663 C563.803,69.06 563.154,70.057 562.106,71.106 C561.058,72.155 560.06,72.803 558.662,73.347 C557.607,73.757 556.021,74.244 553.102,74.378 C549.944,74.521 548.997,74.552 541,74.552 C533.003,74.552 532.056,74.521 528.898,74.378 C525.979,74.244 524.393,73.757 523.338,73.347 C521.94,72.803 520.942,72.155 519.894,71.106 C518.846,70.057 518.197,69.06 517.654,67.663 C517.244,66.606 516.755,65.022 516.623,62.101 C516.479,58.943 516.448,57.996 516.448,50 C516.448,42.003 516.479,41.056 516.623,37.899 C516.755,34.978 517.244,33.391 517.654,32.338 C518.197,30.938 518.846,29.942 519.894,28.894 C520.942,27.846 521.94,27.196 523.338,26.654 C524.393,26.244 525.979,25.756 528.898,25.623 C532.057,25.479 533.004,25.448 541,25.448 C548.997,25.448 549.943,25.479 553.102,25.623 C556.021,25.756 557.607,26.244 558.662,26.654 C560.06,27.196 561.058,27.846 562.106,28.894 C563.154,29.942 563.803,30.938 564.346,32.338 C564.756,33.391 565.244,34.978 565.378,37.899 C565.522,41.056 565.552,42.003 565.552,50 C565.552,57.996 565.522,58.943 565.378,62.101 M570.82,37.631 C570.674,34.438 570.167,32.258 569.425,30.349 C568.659,28.377 567.633,26.702 565.965,25.035 C564.297,23.368 562.623,22.342 560.652,21.575 C558.743,20.834 556.562,20.326 553.369,20.18 C550.169,20.033 549.148,20 541,20 C532.853,20 531.831,20.033 528.631,20.18 C525.438,20.326 523.257,20.834 521.349,21.575 C519.376,22.342 517.703,23.368 516.035,25.035 C514.368,26.702 513.342,28.377 512.574,30.349 C511.834,32.258 511.326,34.438 511.181,37.631 C511.035,40.831 511,41.851 511,50 C511,58.147 511.035,59.17 511.181,62.369 C511.326,65.562 511.834,67.743 512.574,69.651 C513.342,71.625 514.368,73.296 516.035,74.965 C517.703,76.634 519.376,77.658 521.349,78.425 C523.257,79.167 525.438,79.673 528.631,79.82 C531.831,79.965 532.853,80.001 541,80.001 C549.148,80.001 550.169,79.965 553.369,79.82 C556.562,79.673 558.743,79.167 560.652,78.425 C562.623,77.658 564.297,76.634 565.965,74.965 C567.633,73.296 568.659,71.625 569.425,69.651 C570.167,67.743 570.674,65.562 570.82,62.369 C570.966,59.17 571,58.147 571,50 C571,41.851 570.966,40.831 570.82,37.631″></path></g></g></g></svg></div><div style=”padding-top: 8px;”> <div style=” color:#3897f0; font-family:Arial,sans-serif; font-size:14px; font-style:normal; font-weight:550; line-height:18px;”> View this post on Instagram</div></div><div style=”padding: 12.5% 0;”></div> <div style=”display: flex; flex-direction: row; margin-bottom: 14px; align-items: center;”><div> <div style=”background-color: #F4F4F4; border-radius: 50%; height: 12.5px; width: 12.5px; transform: translateX(0px) translateY(7px);”></div> <div style=”background-color: #F4F4F4; height: 12.5px; transform: rotate(-45deg) translateX(3px) translateY(1px); width: 12.5px; flex-grow: 0; margin-right: 14px; margin-left: 2px;”></div> <div style=”background-color: #F4F4F4; border-radius: 50%; height: 12.5px; width: 12.5px; transform: translateX(9px) translateY(-18px);”></div></div><div style=”margin-left: 8px;”> <div style=” background-color: #F4F4F4; border-radius: 50%; flex-grow: 0; height: 20px; width: 20px;”></div> <div style=” width: 0; height: 0; border-top: 2px solid transparent; border-left: 6px solid #f4f4f4; border-bottom: 2px solid transparent; transform: translateX(16px) translateY(-4px) rotate(30deg)”></div></div><div style=”margin-left: auto;”> <div style=” width: 0px; border-top: 8px solid #F4F4F4; border-right: 8px solid transparent; transform: translateY(16px);”></div> <div style=” background-color: #F4F4F4; flex-grow: 0; height: 12px; width: 16px; transform: translateY(-4px);”></div> <div style=” width: 0; height: 0; border-top: 8px solid #F4F4F4; border-left: 8px solid transparent; transform: translateY(-4px) translateX(8px);”></div></div></div> <p style=” margin:8px 0 0 0; padding:0 4px;”> New bike bag made this week. #cordura camo, @alpkit buckles, bound seams, gutterman thread, YKK weatherproof zips. Daisy chain tape so straps can be moved or removed. Happily swallows my large bike with rear wheel on. No daft pockets or anything else that just gets snagged. #myog #custom #diy</p> <p style=” color:#c9c8cd; font-family:Arial,sans-serif; font-size:14px; line-height:17px; margin-bottom:0; margin-top:8px; overflow:hidden; padding:8px 0 7px; text-align:center; text-overflow:ellipsis; white-space:nowrap;”>A post shared by Phil Carr (@unsponsoreduk) on <time style=” font-family:Arial,sans-serif; font-size:14px; line-height:17px;” datetime=”2019-02-22T20:14:56+00:00″>Feb 22, 2019 at 12:14pm PST</time></p></div>
<script async src=”//www.instagram.com/embed.js”></script>
squirrelkingFree MemberPosted 5 years agoI do look after it with a coat of paint from time to time in the Worms style.
That was the first thing I thought of! Best garden ornament ever.
Incoming!
MurrayFull MemberPosted 5 years agoLooks great unsponsored, where did you get the daisy chain tape from?
jakd95Free MemberPosted 5 years agoFancied a small frame bag for my Solaris to save using a Camelbak on shorter rides (pump/tube/tool/snacks etc.). A few hours and I’ve made this:
 unsponsoredFree MemberPosted 5 years ago
I made the daisy chain. Lots of sewing. The seat belt tape runs the whole length of the bag on both sides. I then stitched 25mm on to it for around 2/3rds of the bags length on both sides.
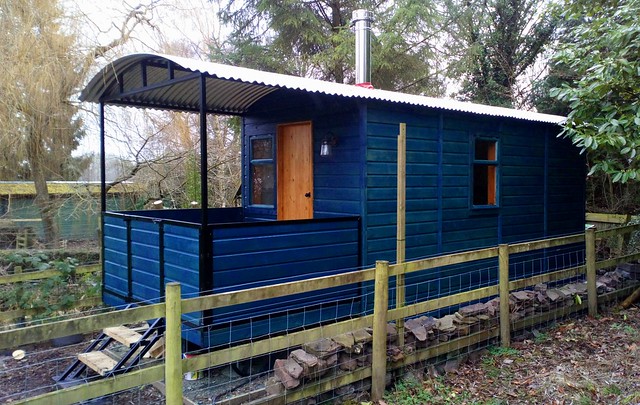
neilc1881Free MemberPosted 5 years ago[url=https://flic.kr/p/2dMxB2L]DSC_0949[/url] by neil.d.cox, on FlickrMade a railway carriage styled hut
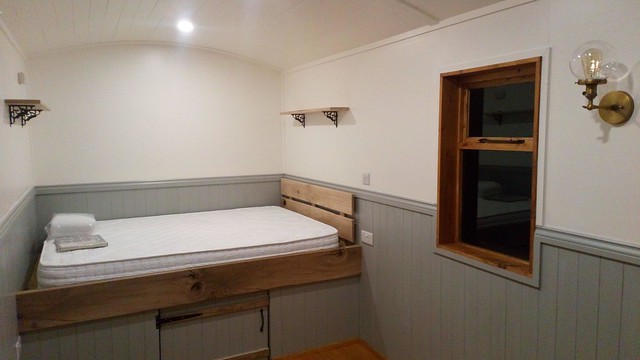
[url=https://flic.kr/p/2dMxBAw]DSC_0993[/url] by neil.d.cox, on FlickrInside
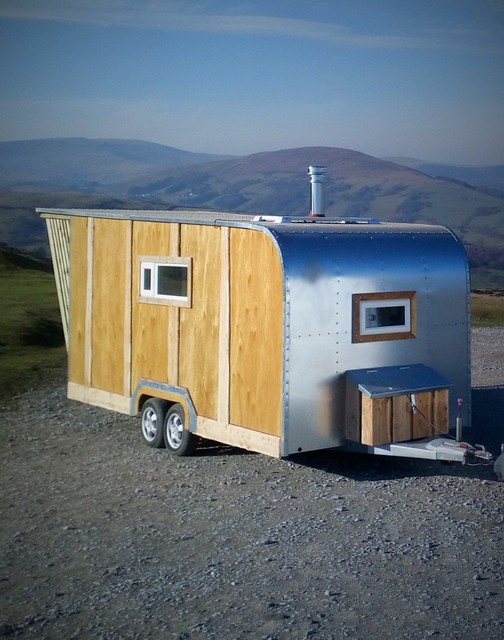
Also took my last build up the mountain for some photos on a nice day… Still need to find a buyer for it.
[url=https://flic.kr/p/2eTu78T]DSC_1003 2[/url] by neil.d.cox, on FlickrMurrayFull MemberPosted 5 years agoThanks unsponsored, looks great! I’m too lazy to make the daisy chain, I’ll stick to a fixed position when I make my Duffbag Monster replacement.
MikkelFree MemberPosted 5 years agoMade a longboard.
Next up, trying not to break my legs.[url=https://flic.kr/p/R7JfpX]IMAG0719~2[/url] by msh_sco, on FlickrthegiantbikerFree MemberPosted 5 years agoStarted doing a bit of digging at my local woods (with permission) and have a load of brambles to clear. Didn’t fancy spending £40 on a brush cutter so whipped this up from a hawthorn branch and an old saw blade. Giving it a first test tomorrow so hopefully it does a good job.
Left some of the serration on when sharpening, but may grind it down to a straight blade in the future if I find it snagging.neilc1881Free MemberPosted 5 years agoThanks kayak, loving your work too 😉 If only one of the ~40 ebay watchers bought the thing! Need to clear some room for the next project – hopefully got a 7.5t horse lorry to convert in the near future.
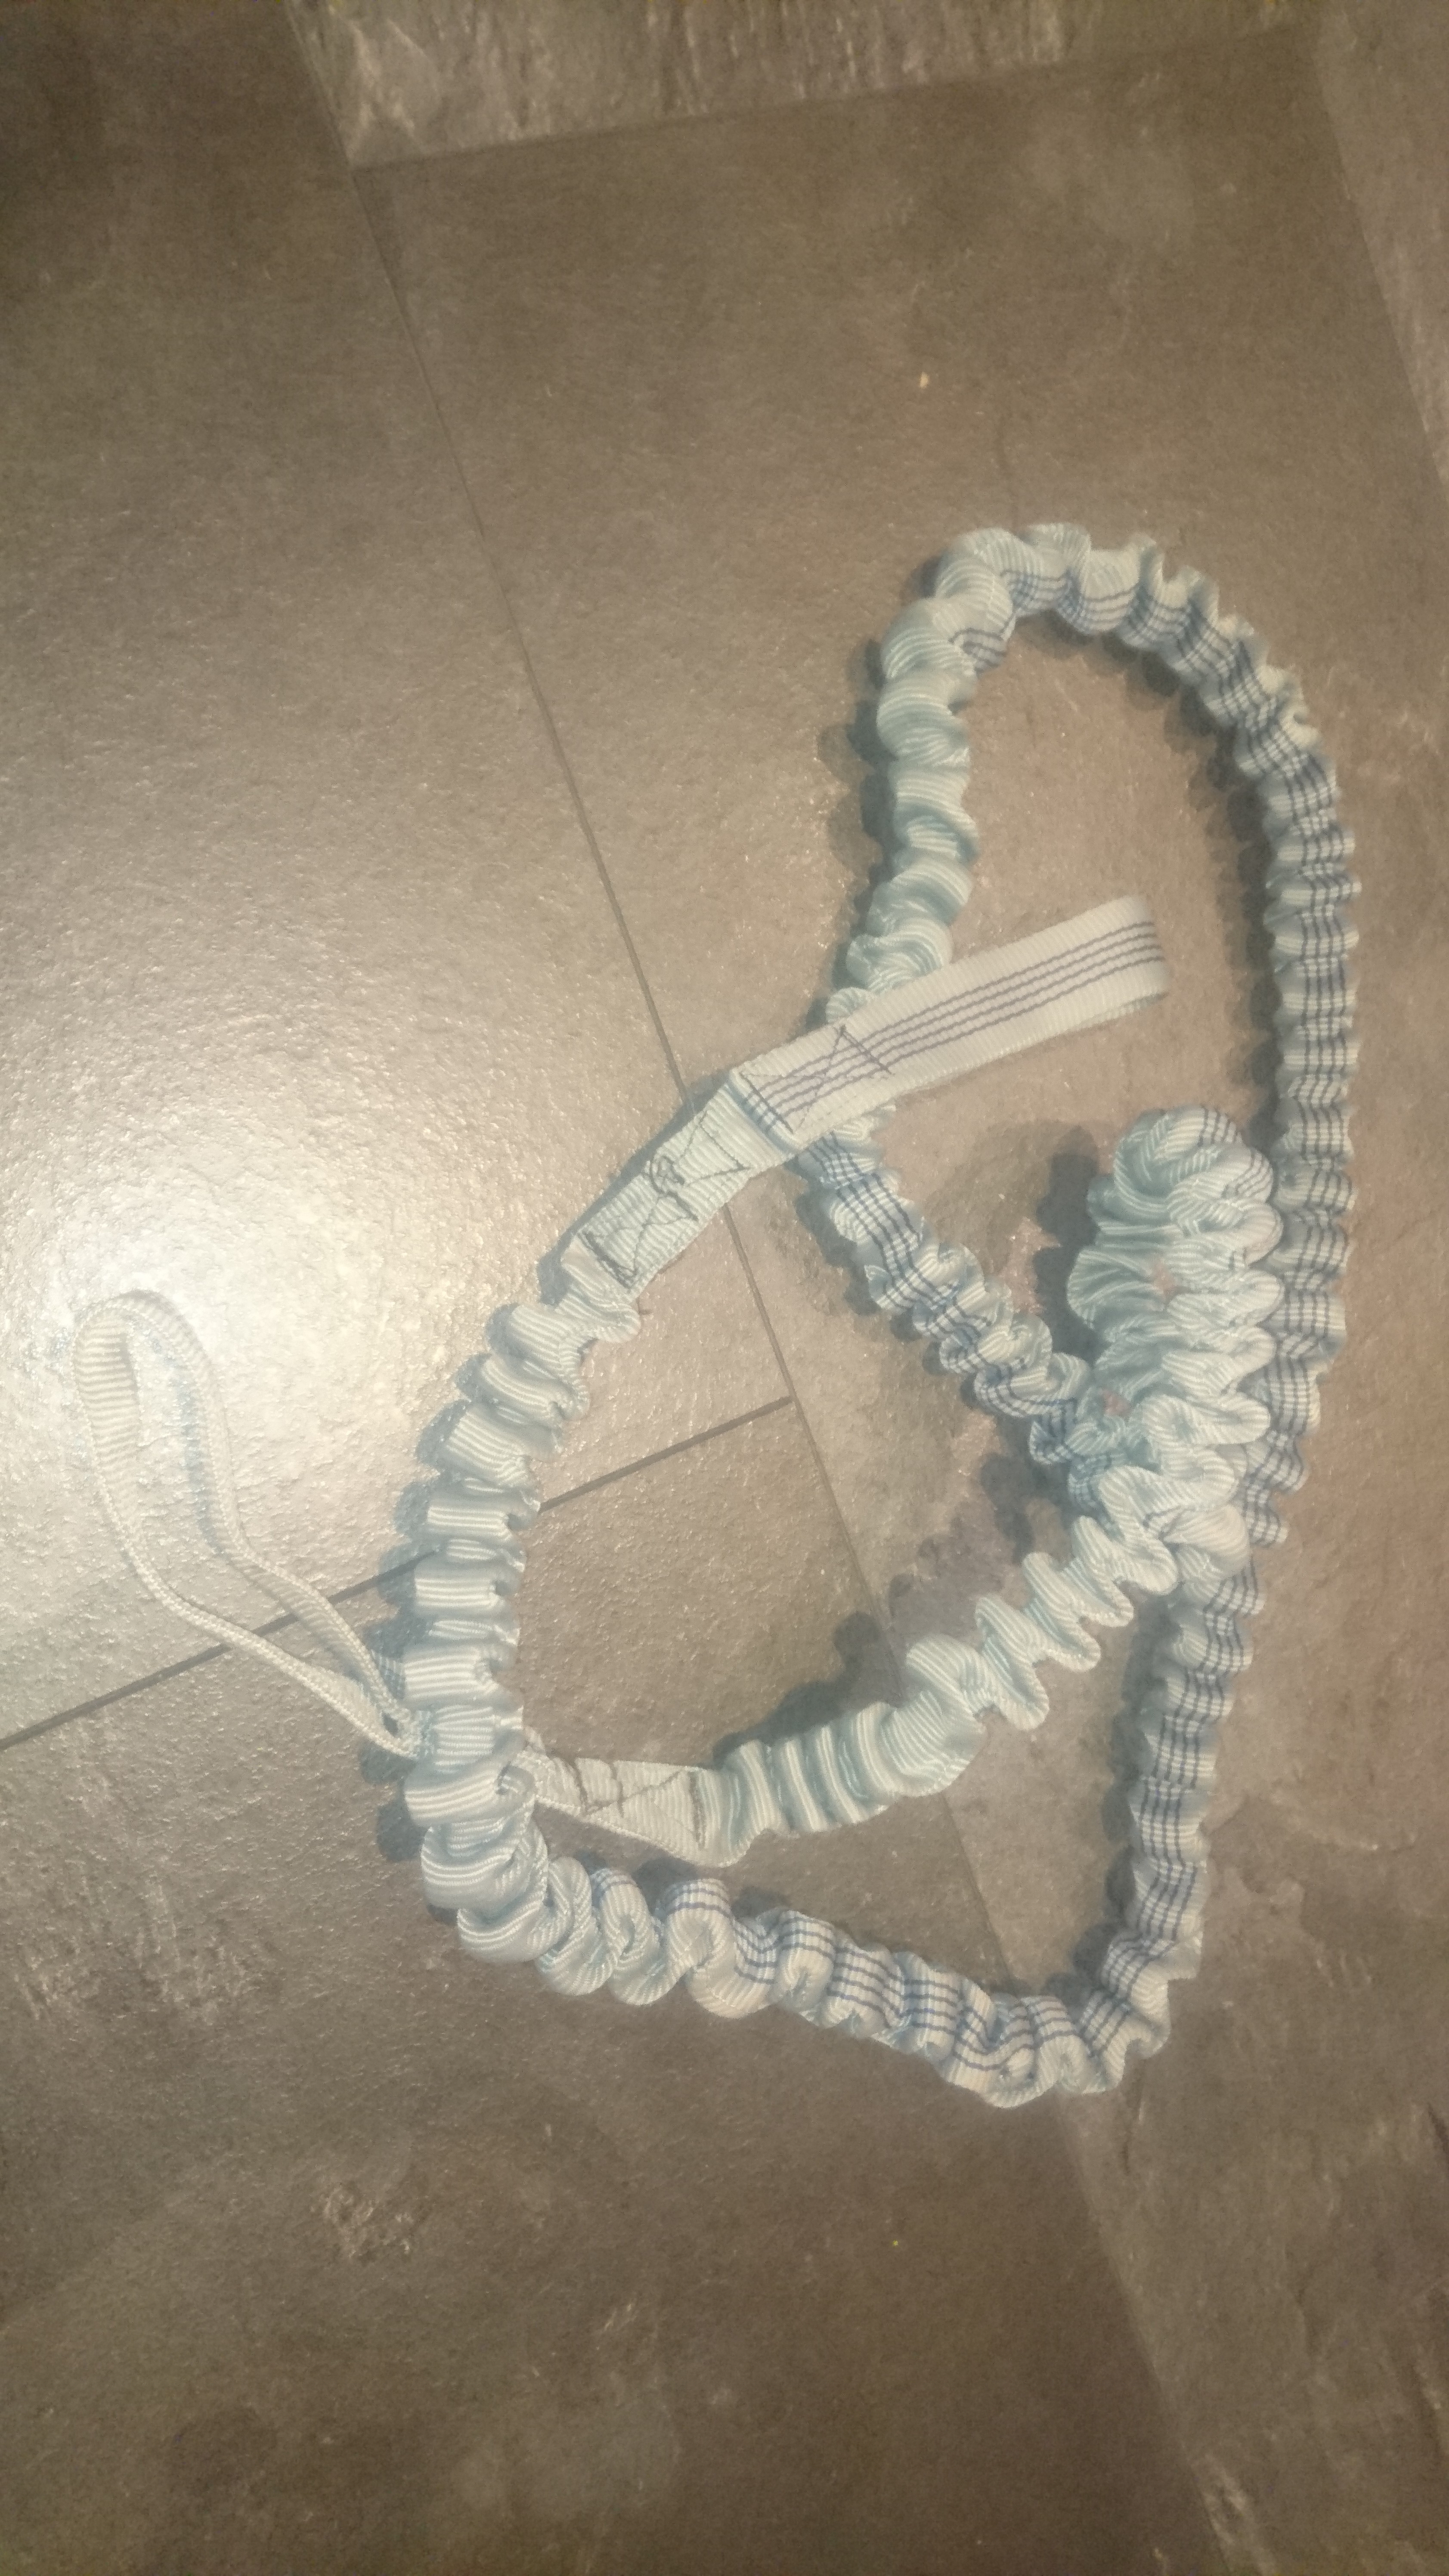
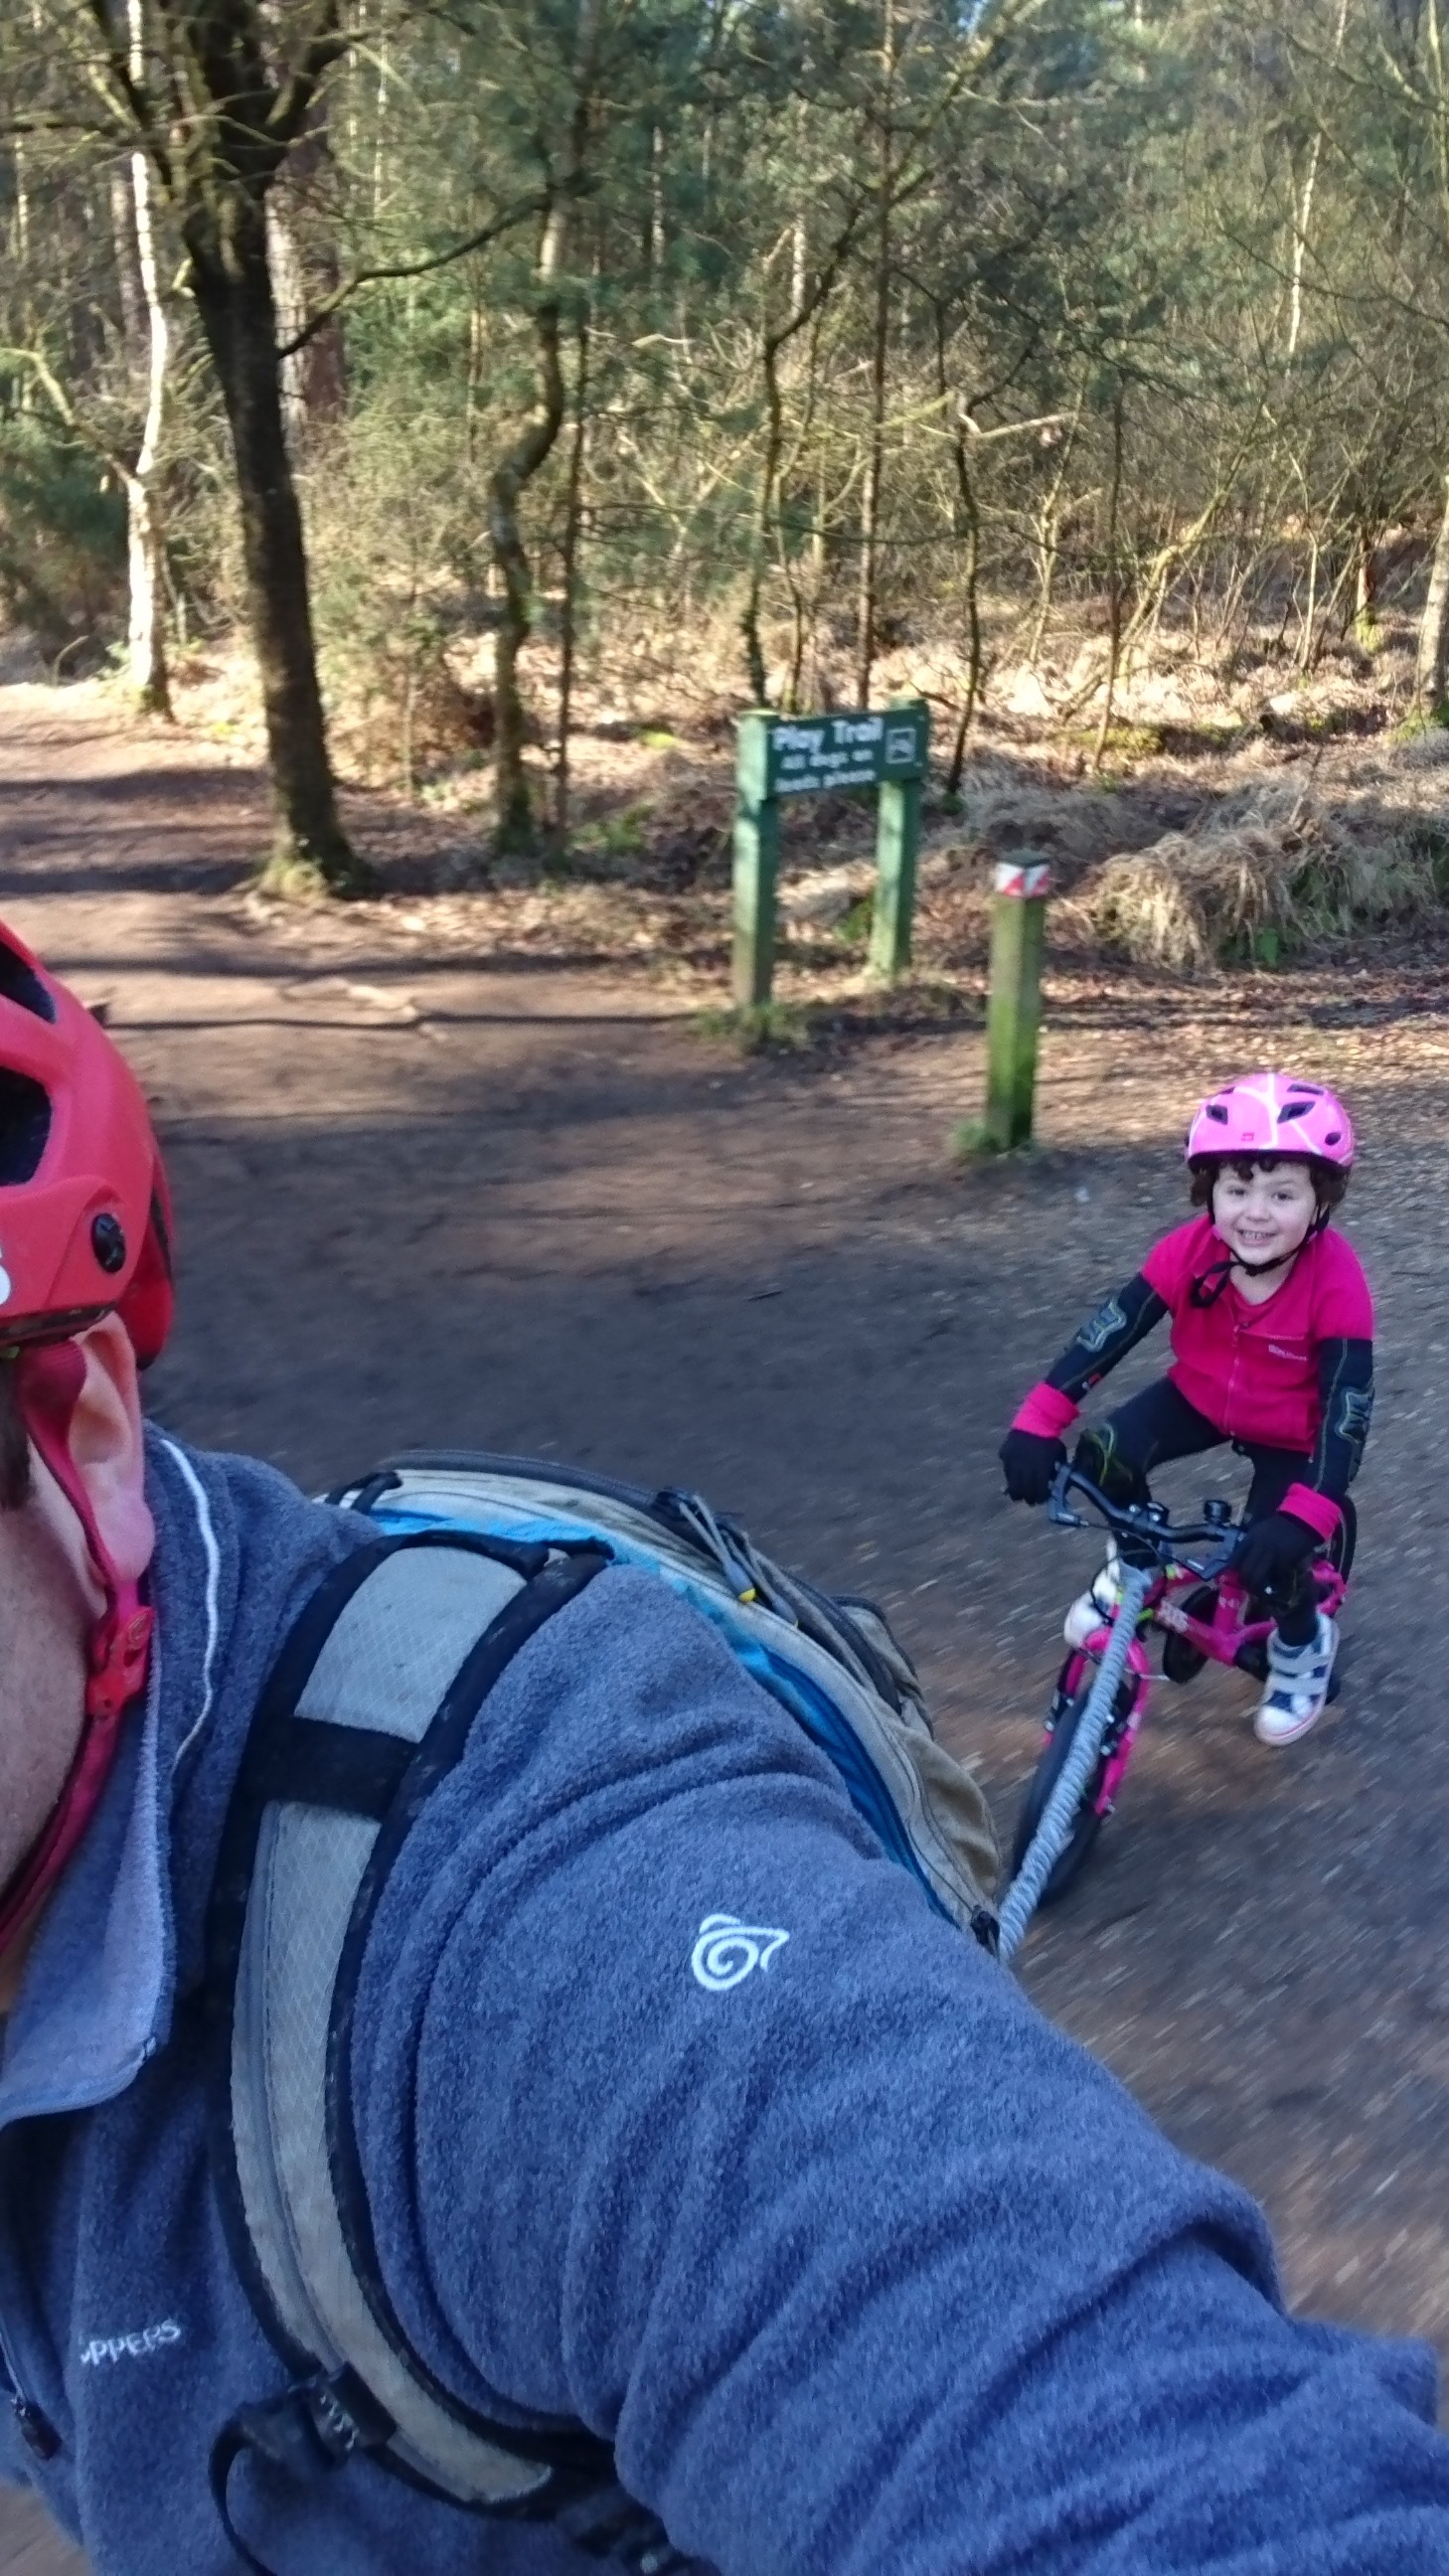
jonm81Full MemberPosted 5 years agoAs our 4 year old daughter can now ride she needs a bit of help on the hills. I looked as a Tow Whee but nearly £50 for a bit of springy rope was taking the piss. So, for £6 of bits (some tubular webbing and some shock cord) from Go Outdoors and a bit of sewing I made one.
It worked great and the wee one loved getting a tow up the hills.
AlexSimonFull MemberPosted 5 years agoYep – good work jonm
That shiny hut is awesome too – good that you got some good photos before it’s inevitable sale


You must be logged in to reply to this topic.