- This topic has 30 replies, 11 voices, and was last updated 14 years ago by cp.
-
That 50 Quid Bleedin Trout Lumi can LED light ( its good news)
-
spangelsaregreatFree MemberPosted 14 years ago
Hi,
I thought there has been lack of light threads lately so took to opportunity to post a new one!!!
After seeing the original Trout post on the DX Bastid light I opted to buy one and have been using it for a while now. As posted many times it is very good and provides more than enough light for my commuting and off road duties and certainly was a big improvement on the twin Lumi Halogen system I had been using.
Prior to this I had put a cree 1w LED in one of the Lumi cans which worked well as "be seen light" but was too floody to see by. I could not be arsed (and don't have the technical ability) to mod up one of the cans with some LEDs.
However, when I saw one of Trout's post for an LED conversion I thought I would give it a go. I fancied having a spare in case Bastid died on me. I also thought it would be an interesting comparison as had I realised Trout did the conversion I might have considered that over the Bastid in the first place.
Anyhoo I emailed Trout and he quoted £50 for a single can conversion which puts it at the same price as the Bastid. Obviously that is just for the can, but I would guess those of us with the halogen Lumi already have chargers and batteries so the real cost would be the same.
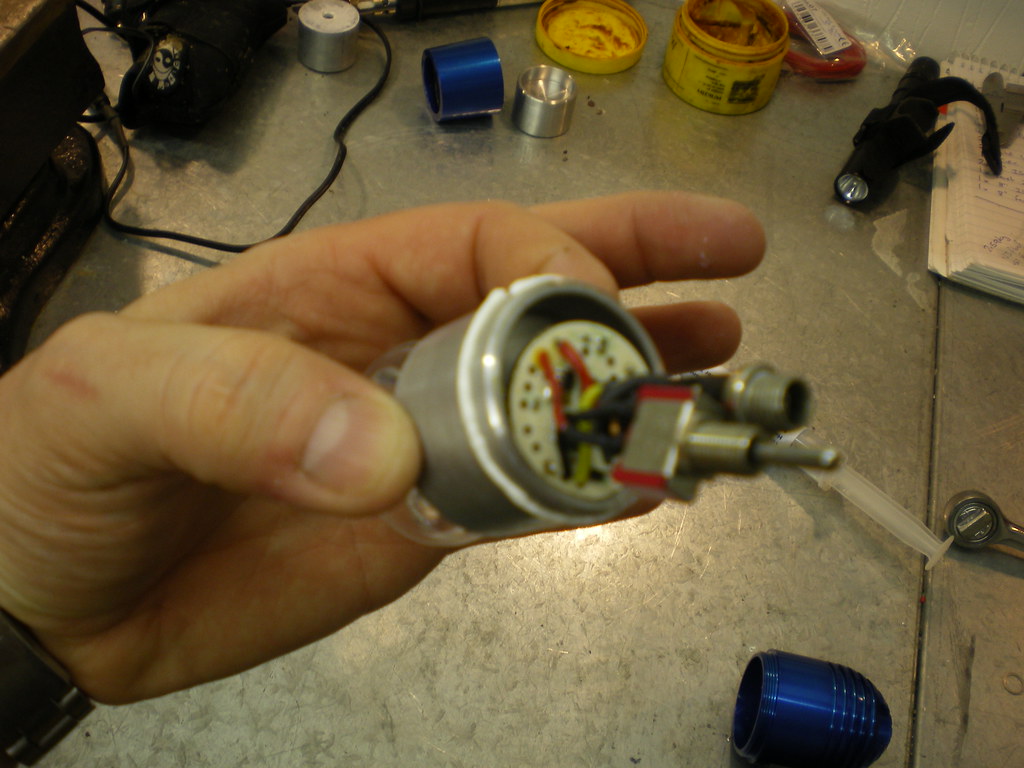
I sent the can to Trout in August. It was all going well until got an email from him saying he had issue with something techy which had resulted in something blowing up (which brought an image to mind of a mad scientist with a blackened face standing over a charred lumi can!!).
This was duly sorted and I received the light back today. Here is a pic.

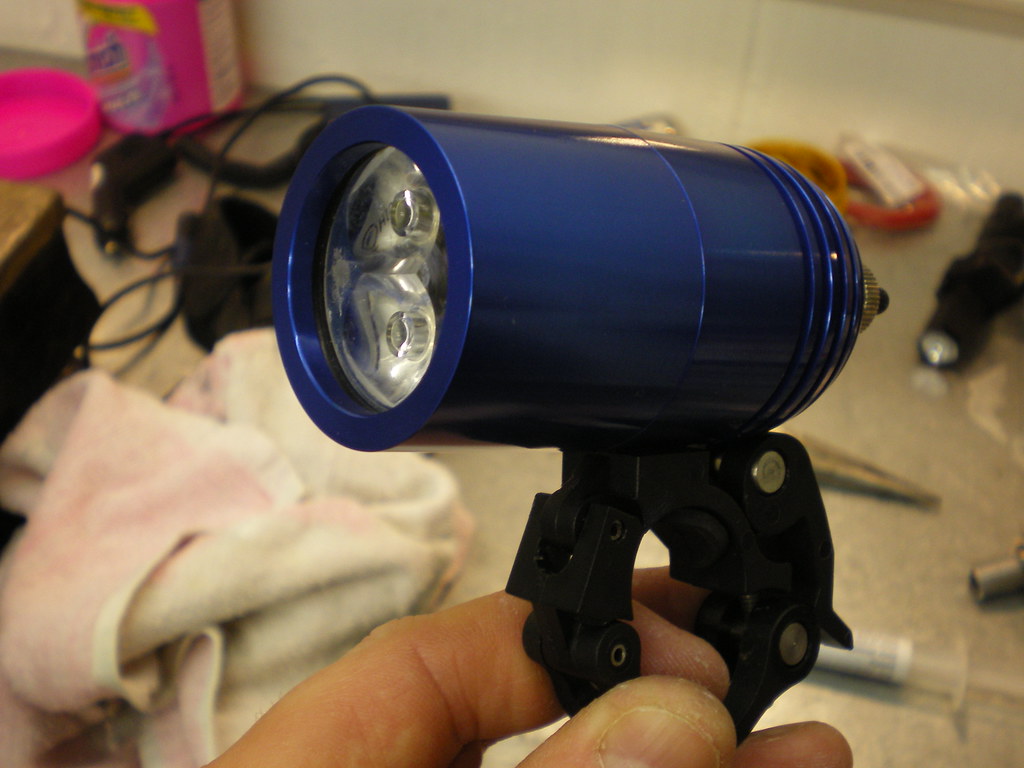
It is a three LED with two modes (operated by the Lumi switch) and you have to unplug the power lead to turn it off. The build quality is excellent and it looks like it has been well sealed.
I can't do any beam tests until Sunday night when I intend to take the bike out with the Bastid and the Trout out for a direct real world comparison. However here is a quick shoot out between the two for anyone who hasn't already got bored and closed this post and gone on to read about Striking posties or loft insulation.
Cost – both will set you back £50. However with the Bastid you get a battery and charger for that so it wins here.
Build quality – the Bastid does the job but Trout's light just looks like it would stand up to pretty much anything.
Modes – The Bastid is slightly more refined in that you can turn it off and it has a high, low and flashing mode. Trouts is simply a high and low effort. To turn it off, take the lead out.
Weight – the Bastid is almost half the weight due to the heavy Lumi battery. However, I have two lead battery so I could use the second lead for the Lumi rear light.
Possible problems – Trout has given a disclaimer with this conversion that it would be prone to melting if left on whilst not riding due to the lack of cooling. TBH I melted my first Halogen Lumi when I first got it so it is not an issue for me.
So had I known about Trout's Lumi conversion light before I bought the Bastid would I have bought it instead. Probably yes (and saved myself £50) in that I already had the battery and the charger and his stuff is second to none in terms of build and design. However, it is good to have both as I now have spare as I commute in the dark all year round.
Will update on the beam test tomorrow.
Regards
saladdodgerFree MemberPosted 14 years agoI am in the same position with the "bastid" which is superb but I also have a set of Lumi cans and batterys and it is a shame not to use em
please let me / us know about the comparison of light output IU am interested
troutFree MemberPosted 14 years agoHi Spangles
Glad it arrived and works , the said issue was a blond moment and the bloody stupid centre negative of lumi stuff I got it working and sealed up ready to send back and then plugged it in to my own correctly wired battery yep poof no worky light no more . 😥
and before I heap of lumi cans arrive at the hatchery I am out of the triple led boards , and have put conversions on hold whilst getting the other stuff done ( dont know if I am allowed to mention the "other stuff" on another thread ) with out it costing me money
saladdodgerFree MemberPosted 14 years agoTroutie
Being blond is a medical conditon so I can wholeheartedly understand 😉
spangelsaregreatFree MemberPosted 14 years agoHi,
Okay, got out tonight to try the comparison.
In a nutshell the DX light is marginally better. It has a wider beam and it has roughly about a 20 to 30m longer beam range. Basically when riding down a single lane road the DX gives a bit more focussed sight.
However, I was still confident descending at around 30mph and cars are still flashing me on high beam with the Trout Lumi can!!! On a wider main road it provides similar performance to the DX somewhere between a car dipped and main beam.
I also rode a little bit of forest single track (intersting on drop bars and slicks). You really notice shadows with this beam (compared against a halogen). It performed well here to though the slightly narrower beam is noticable especially on the twisty bits.
So in short I would have been more than happy if I had just bought this over the DX. The DX beam pattern is better but the Trout Lumi can conversion will give you just as much fun in the dark!!
Regards
troutFree MemberPosted 14 years agoNice one Spangles thank for putting it up as a comparison
dont forget the bastid has one extra ledwhat about heat stone cold I bet when moving
spangelsaregreatFree MemberPosted 14 years agoTrout,
Can't say I really noticed any heat from it TBH. I took the can off the bike as soon as I got back (after about 15 minutes of riding) and it certainly wasn't hot in any way.
Regards
VortexracingFull MemberPosted 14 years agoI'm considering the cutter budget kit for a lumi conversion (see seperate thread) a few people have mentioned they may want one.
Just a small point, i'm not 'stepping on your toes' with this am I troutie?
BTW it's a serious question
troutFree MemberPosted 14 years agoVortex hell no ways and if you need any help from the experience I gained doing a few just ask .
not had a look at the budget kit is it a mr11 sized triple
because if so the led board is only 32 mm diameterthe one for spangles is a triple xpe 20 mm board and optic
gives you a bit more meat for a heatsink .and some more space in the back for a driver.If you want to just get some drivers I have 5 triple xpe boards and 30 triple optics so you can have them at cost to me
I can also put you on to a driver on ebay which I have used .
stumpy01Full MemberPosted 14 years agoI've been looking at the Cutter Lumi conversion with the Bflex driver – is this a similar set-up?
Why the light can only be turned off by pulling the lead out? I know from a pdf I've got about the cutter lights that a switch from Maplin is required (something to do with latching or non-latching) to get the cutter kit working – is this the same kind of thing? Or do you have a hi/low ont the switch and hence no off position.
And that heatsink – the aluminium disc I saw in another thread – is that a purchased or manufactured item? That was my main concern about swapping over to the Cutter kit – how to dissipate all the heat – although it's never been a problem with the Halogens, so would it actually be an issue with the LEDs?
Been mulling this over for ages, and will probably never get round to it at this rate – to be honest the halogens are plenty bright enough but the thought of getting more light & longer battery life is appealing.
spangelsaregreatFree MemberPosted 14 years agoYes the switch is high low. You have to pull the lead out to turn it off.
However, it doesn't really get hot on low so you can stop for a while without having to turn it off.
Regards
troutFree MemberPosted 14 years agoStumpy
spangles light was not a cutter kit it was made from bits had the driver is a dumb driver and switches in a resistor for the low level .
and no resistor = high .
I would have needed a 3 position switch for an off setting and just used the lumy switch to keep the cost down .the heatsink was machined by me to suit the leds and optic .
yes it does matter about keeping leds cool
VortexracingFull MemberPosted 14 years agoThe problem i found with the bflex in the halogen can is purely down to available room.
thats why i opted for a HID housing. It allowed a nice heatsink/transfer block of ally and still fit the switch and socket in.
I think the budget kit form Cutter may have to forgo the switch and socket if I try to get it into the halogen can.
still measuring and trying a couple of options, if it does go in with the switch and socket it will be bloody tight!
and cheers troutie for the nod, just didn't want to upset anybody.
The kit is a MR11 with a large driver board (it's that that is proving difficult to accomodate)
I'll get one ordered and see what I can fettle.
cheers for the offer of help BTW
cpFull MemberPosted 14 years agoi got both switch and connector in the lumi halogen can with the cutter budget kit. I made a heat transfer widget out of an old seatpost with cut outs around the switch and connector. This clamps between the back of the led board and the back surface of the can. the driver 'just' fits in there, though its a squeeze, and I've cut so much of the 'spacer' away I'm not entirely happy with the heat-transfer performance. will prob remove the switch and possible connector too, hard-wire a cable into the back and put a connector in-line to the battery.
nunuboogieFree MemberPosted 14 years agoTrout i would be interested in you converting my lumi halogens, how long before you can do it?
Not sure i would be able to do it myself NO electrical knowledge at all!VortexracingFull MemberPosted 14 years agocp, the old driver (which is what I'm assuming you used) is like this
the ones they are shipping now are like this
they are quite a lot bigger ie 33mm x 25mm
troutFree MemberPosted 14 years agonunuboogie
I cant see me doing any conversions this side of november with the workload I have just put myself under .
I have the leds and optics and 1 little driver for them I will turn you a heat sink to match and if you bribe Vortex to assemble it for you I will happily post them to him or you
drop me a mail and I will sort out the coststumpy01Full MemberPosted 14 years agoSo, am I right in thinking that in the Lumi can you would have to squeeze (front to back):
– lens (optic, or whatever it is called)
– LED board
– driver board
– wiring
– switch & connector (fitted already to back surface).and you would basically need to wire the LED board to the driver board and then from the driver board you would need to wire to the switch & the battery connector?
And does the LED board & the driver board get toasty, or is it predominantly the LED board? Does it have specific points you can heatsink off? Or is it a case of trying to get something thermally conductive in contact with it & hoping it dissipates the heat suitably?
VortexracingFull MemberPosted 14 years agoStumpy, you forgot the heatsink, that onto the rear of the LED board.
i would wire the led's then run the wire through a hole in the centre of the heatsink, solder them to the driver board and then solder the wires from the driver board to the switch and socket. The assemble from the front, push the switch and socket in and don't forget the thermal paste around the heatsink, so it has a good thermal path to the can (also need it between the led board and heatsink).
I found it easier to solder it all together outside the can, check it works than assemble.
Oh and remember to wrap insulation tape around the driver to stop shorting.
stumpy01Full MemberPosted 14 years agoAh…..cheers vortexracing…so that's where the heatsinking comes from – is it this one: http://www.cutter.com.au/proddetail.php?prod=cut765 (the black finned one on the Cutter website) or the troutie made one that you are referring to. I can see how it all gets a little bit squeezed in the Lumi halogen can!
I wonder if a screw-on extension to the Lumi can would be feasible – something long enough to accomodate the optic, led & heatsink assembly that screws onto the existing external threads on the can with some kind of fins on to allow for extra heat dissipation (and the driver, switch & connector remain in the original can). Although this is where it starts to get pricey I guess, unless you have access to some machine tools.nbtFull MemberPosted 14 years agotrout – Member
I have the leds and optics and 1 little driver for them I will turn you a heat sink to match and if you bribe Vortex to assemble it for you I will happily post them to him or youI'd be interested in that kind of "here are the bits you need, now put it together" kit for a lumi can. Can't afford anything for the next month or two though
DoctorRadFree MemberPosted 14 years ago33mm x 25mm
I guess there's not enough room in a Lumi can to get this circuit board behind a heatsink? Have been wondering if a solution might be to mount the board 'in-line' with the power cable somehow so it doesn't have to be inside the cans? Could then go with a bar mounted switch to select between the two brightness modes and off.
Waterproofing might be an issue though, any thoughts? Wonder if you could 'pot' the whole lot in Plasdip or something similar?
VortexracingFull MemberPosted 14 years agoThis is what i'm considering, the drawing is a section of the heatsink with the LED board on the front and an end elevation showing the slot.
There appears to be JUST enough room to get a good heatsink in the can, it will have to be cleared around the captive nut in the bottom of course.
But the main aspect is that with a cut in the heatsink it should be able to support the driver with the 33mm dimension just squeezing into the can and thus the 25mm length sitting behind the flat face of the heatsink.
The wall thickness of the heatsink would have to be 1-2mm only to stop it shorting any tracks on the driver board. But it only has to transfer the heat to the can
If you look into one of the cans there may even be enough room for the switch and socket, but TBH it's very very close.
apologies for the drawing but i'll knock a proper one up when iv'e done some more measuring.
and BTW stumpy it was a bespoked heatsink NOT the cutter one
kinda666Free MemberPosted 14 years agoI've toyed with the idea of converting my halogen can, but there really isn't much room in there, if i did do it i'd probably have the power socket attached to a lead, same with the switch, and have it remotely operated somewhere on the bars, so it'll free up a bit of space at the back of the can!
Just aquired a hid housing though so gonna stick a 35mm Xpg kit with a bflex in it, should see around 1000 lumens! 🙂VortexracingFull MemberPosted 14 years agoThere is enough room in the HID can, it makes a cracking light.
I've got an heatsink for that very application if you want it.
spangelsaregreatFree MemberPosted 14 years agoOoooh this thread is getting very techy!!!
Had hoped to do a night ride tonight but the anklebiter is in projectile vomit mode (and has been all day- fun) so not a goer.
Going to use the Lumi this week for the commutes to give it a good try out.
Regards
stumpy01Full MemberPosted 14 years agoBlast it – just gonna have to stick to the halogens for now. Don't know what i am complaining about though to be honest – they are still great lights.
Bloke at work who runs the machine shop is very experienced with the whole engineering side of things – he always seems to have a perfect solution to the problem you can't quite work out.
I think when I have some time I will look into this a bit more and perhaps draft in his help on the machining side of things.BadlyWiredDogFull MemberPosted 14 years agoWhy would you want to put a heatsink in the can? Surely you're aim is to get the heat generated by the LEDs to the outside of the can where it can be dissipated as quickly as possible. I've converted two lumi halogen cans with Cutter kits, a quad and a triple, and was more concerned with outwards heat transfer and insulating the controller from heat as much as possible. To improve heat transfer from the can itself, I used the heat sink from a radio-controlled car motor stuck to the outside of the can with double-sided thermal transfer tape. The sink from, I think, a 540 motor, is a near perfect fit and it gets hot very, very quickly, suggesting that it's working as it needs to. I'm not convinced that sticking big lumps of metal inside the can achieves very much at all.
VortexracingFull MemberPosted 14 years agoit's not a big lump of metal!
if you look at the drawing it's a can shape, the front face allows the LED board to be attched using heatsink paste, and the outer face of the 'can' is a very good fit into the lumi housing thus transferring heat from the LED board to the halogen can. I also use heatsink paste between the 'can' and the housing.
we only refer to it as a 'heatsink' for ease.
DoctorRadFree MemberPosted 14 years ago@Vortexracing – if you manage to get your internal heatsinks working so that the cheaper Cutter kit can be used with Lumi cans, I'd certainly be interested in a couple if the price was reasonable.


The topic ‘That 50 Quid Bleedin Trout Lumi can LED light ( its good news)’ is closed to new replies.