- This topic has 90 replies, 37 voices, and was last updated 12 years ago by ir_bandito.
-
Let's see your modified kit
-
jamesoFull MemberPosted 12 years ago
Let’s see the best and worse of your kit modifications, DIY parts, re-finished and customised stuff etc…
Anything personalised just for the sake of looking different, matching your bike better, working better or just the result of a bored evening in the garage – why, how.
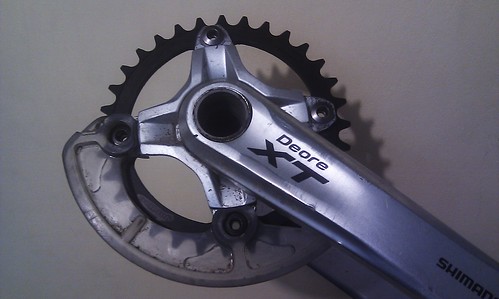
A few bits I’ve done recently here :
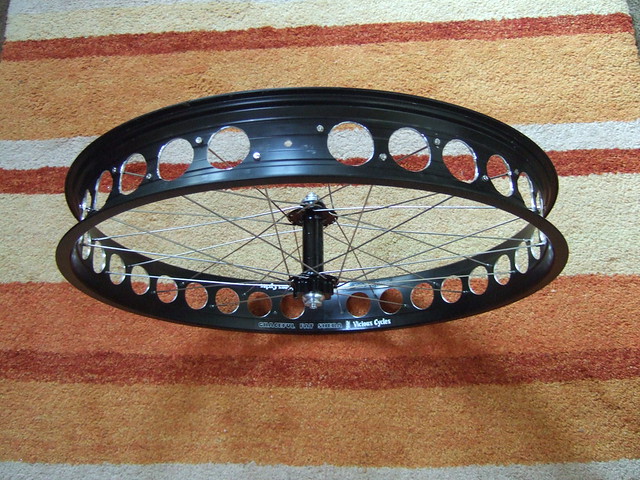
Jones-style cut-down cassette carrier to use 7 9spd sprockets on my Hope SS hub – done with a file and time, did the first one with a facing tool but still needed to use the file to finish it flat. I really like this mod for using gears on the SS hub, got 12-32T with only 2 of the higher gears missed out.
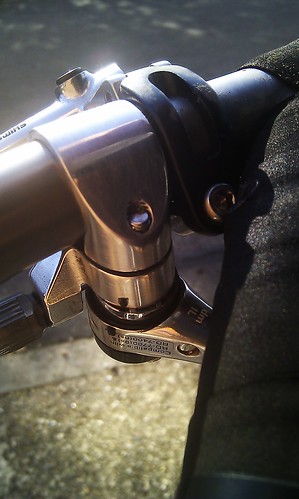
Polished thumbie mount for an under-bar thumbshift – a quick easy one. Works really well with the H-bars.

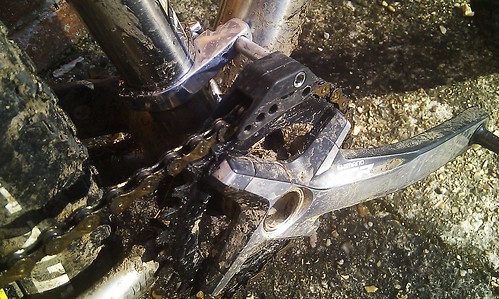
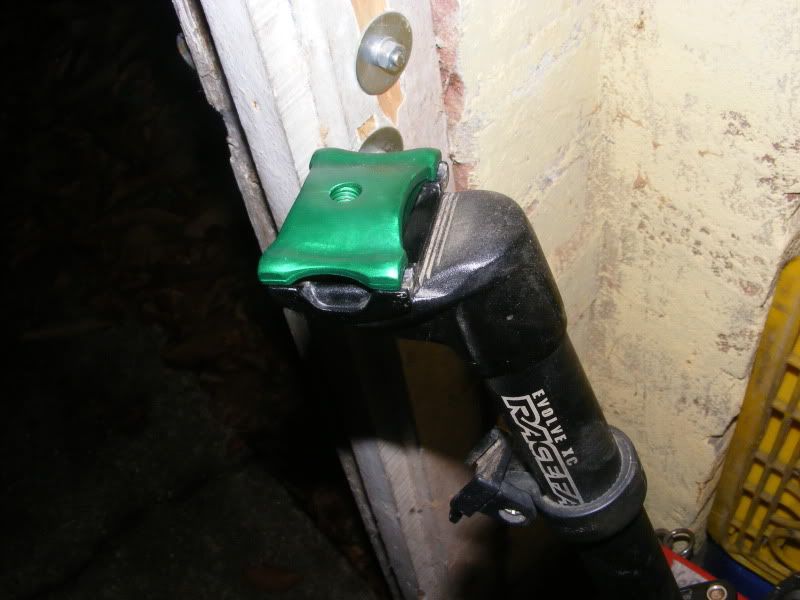
IMAG1067 by james-o, on FlickrSuperstar chainkeeper – re-shaped clamp area, stripped + polished and drilled out the cage. Couldn’t get a Paul Comp version easily and this was cheap.
IMAG1063 by james-o, on FlickrNow if i could find a mini-anodiser or ceramic coater..
doof_doofFree MemberPosted 12 years agoI’m using a mini cassette on a Hope SS too, though I just chucked mine on the mill at work 🙂 I’m using 7 cogs off an 11-34 XT cassette, dropping the 11 and 15t. To me having a 11t and 12t always seemed pointless, and the dishless rear wheel is nice.
Apparently you can fit 8 10sp cogs on a Hope SS hub too.Also, a Fox 180 Van 36 can be dropped in travel to as little as 135mm using a 160 Van spring and Fox spacers and no need to spring cutting.
Edit – James: Steve the anodiser is the man you want for small volume work.
crogthomasFree MemberPosted 12 years agoDoes manufactured count as modified? When the need arises, the occasional evening is spent in the ‘shed of dread’ making loud hammering noises and the occasional small puff of smoke, just like in the cartoons. Some creations that I have pictures of are:
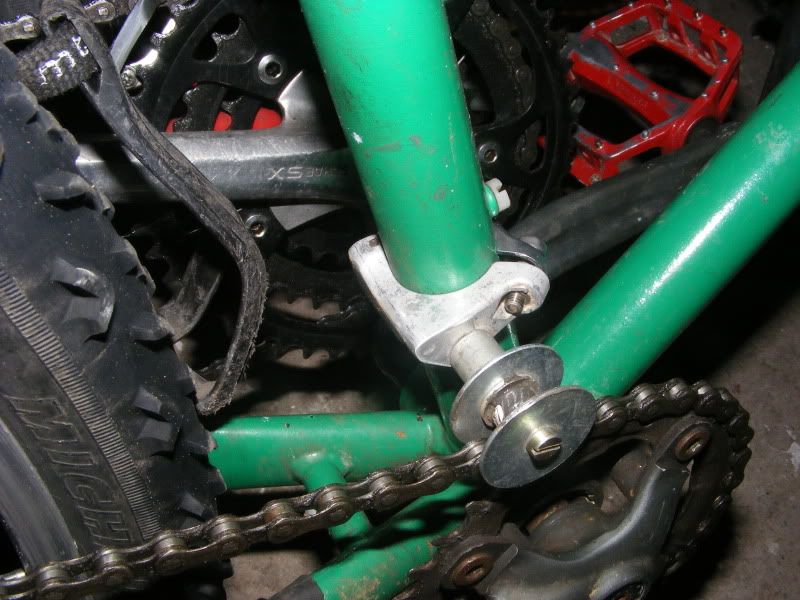
A chain retainer made using on old derailleur, some spacers and washers:
Slotted X7 shifter levers, to remove the useless indicators and save some infinitesimally small amount of weight:
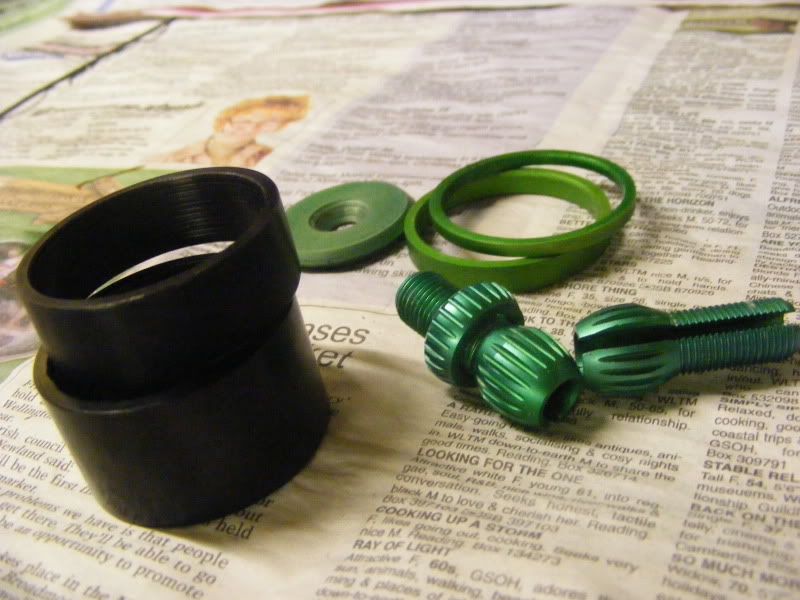
Modified Raceface seatpost clamp. I’ve seen a few like this one where either the bolt is too long or the hole too shallow. This prevents it clamping the saddle properly. The solution is to drill the hole all the way through, then anodise it green of course. I like green:
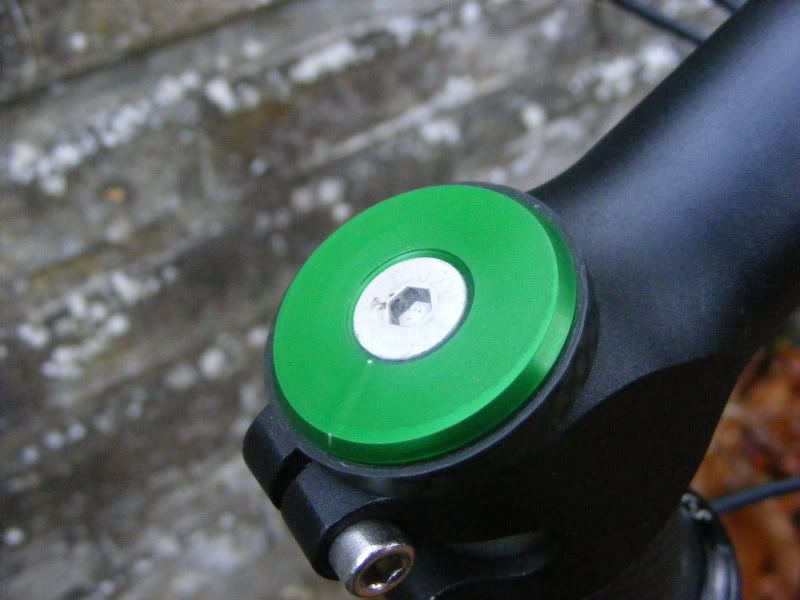
Headset top cap designed to use a countersunk bolt, much lighter because there’s no dead metal around the top of the bolt. Used with an aluminium bolt it practically disappears due to it’s own lightweightiness:
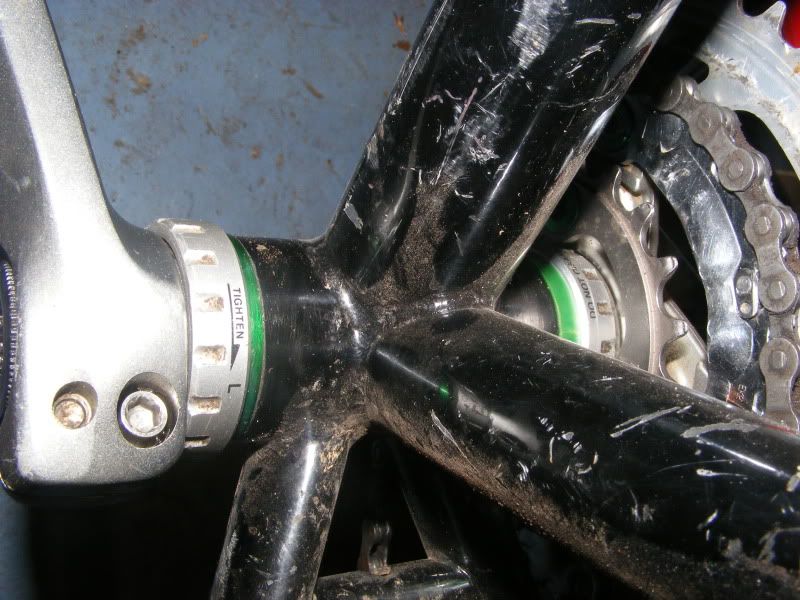
HT2 bottom bracket spacers of special thicknesses, 5mm for where two 2.5mm ones are usually required, and 1.5 & 4mm for Shimano BB’s where the 6mm bearings have been replaced with 7mm width bearings:
Singlespeed sprocket spacers. Not difficult to get hold of, but just because they are the same diameter as BB spacers and I had the metal already in the lathe:
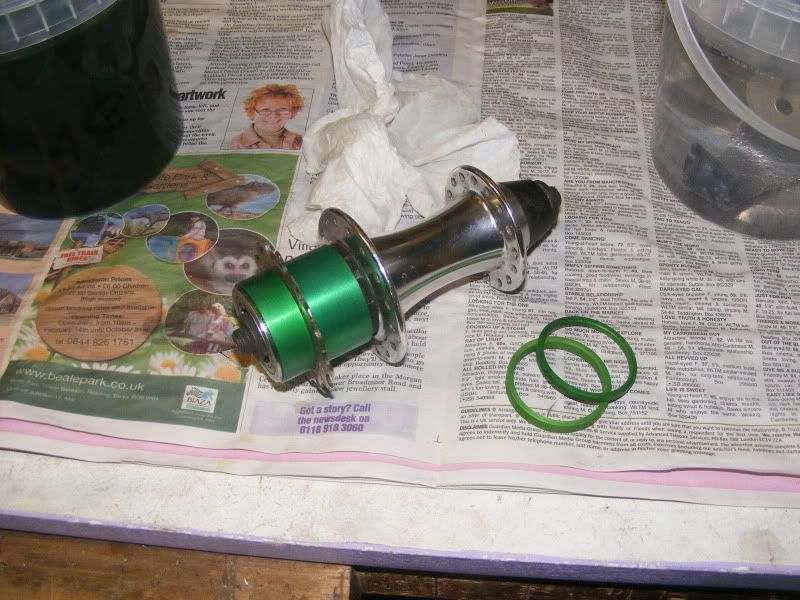
More anodised spacers and things:
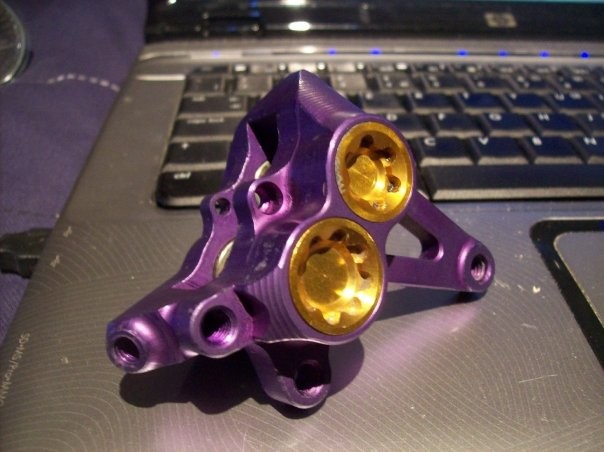
ir_banditoFree MemberPosted 12 years agoyou knew this was coming:
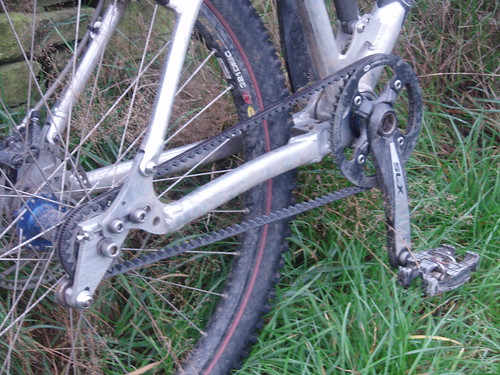
PA300017 by ir_bandito, on FlickrDropouts machined by a friend of a friend to fit 10mm bolt in Hope Pro2 with increased belt length and tension
Awaits Epicyclo and Ade Ward….
ir_banditoFree MemberPosted 12 years agoAnd some earleir iterations:
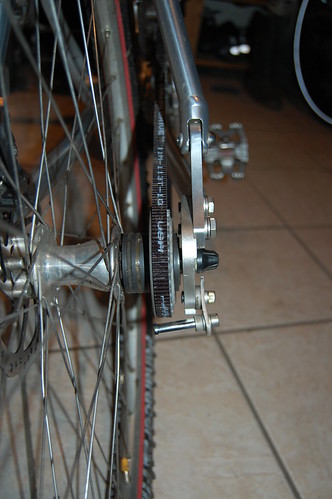
Snubber Mk1:
DSC_0925 by ir_bandito, on FlickrBent!
Dropout Mk1 with integrated snubber (the Gates snubber bent too) which I made on hand mill:
DSC_0407 by ir_bandito, on FlickrGot around the belt climbing issue, but couldn’t maintain belt tension
jamesoFull MemberPosted 12 years agoI like the dropout for belts.. would the snubber work better if it was moved forward to the are where the belt and cog mesh first?
ir_banditoFree MemberPosted 12 years agoI copied to the positional geometry from Gates, just put a sensible sized cross-section inplace to hold it there (and I’ve told Karl Nicolai his design is no good)
I think the position its in is where the belt starts to climb out when under tension, so no need to have it lower. in theory, higher tension removes the need for the snubber, but probably knackers the bearings.geoffjFull MemberPosted 12 years agoThis thread is useless without
picturessome cutlery/carbon fibre/epoxy-based **** whittery! 😉crogthomasFree MemberPosted 12 years agojameso – Member
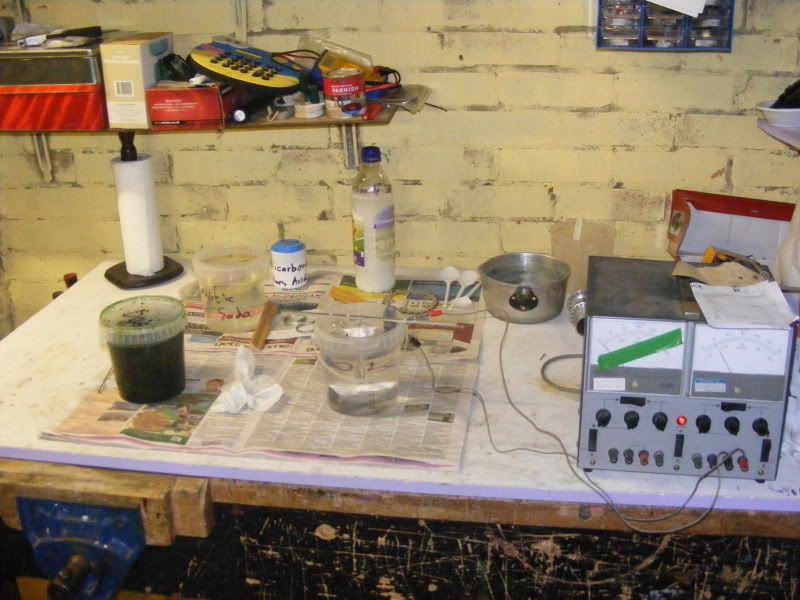
crogthomas, do you do the anodising yourself?I do, but it is an almighty pain in the posteria, very tricky to get right the current, voltage, duration, acid concentration, cleaning and electrical contact. I do it because it amuses me, not because it makes sense to do so.
jameso – Member
I like the dropout for belts.. would the snubber work better if it was moved forward to the are where the belt and cog mesh first?I was thinking the same. Where it is, if the belt climbs onto the peaks of the cog, its then too late for the snubber to do anything. If it was forward of the centreline it would prevent the belt ever climbing up in the first place. See my chain retainer above as an example. It doesnt have to touch the belt, just be there to guide it onto the cog if it bounces around.
ir_banditoFree MemberPosted 12 years agoQuick think about this and a FBD in my head.
For the belt to be “trying” to climb the teeth, its because the tension in the upper run is enough to pull the belt all the way around the cog and there’s enough slack in the bottom run to allow it to slip round. Where the belt joins the cog, the belt wil be pulled against the teeth but still into the cog, its not until you get part way round that the resultant force is in the right direction to overcome the friction against the teeth and cause the belt to slide up. Hence, the snubber roller is towards the bottom, but not AT the bottom.I can tell the belt still occasionally rubs against it as there is a stripe on the back of the belt, and you can occasionally hear it whirring, but its only under absolute max torque on really steep slow climbs.
(just in case, FBD = free body diagram)
jamesoFull MemberPosted 12 years agoI do it because it amuses me, not because it makes sense to do so.
A perfectly good reason… : )
epicycloFull MemberPosted 12 years agoI think the belt tries to ride up because of flex in the chainstay.
That causes the rear sprocket to be pulled out of parallel with the front, so the row of belt teeth are arriving at the cog at a slight angle, and thence to catch on the top of the teeth and try to ride up.
It’s why a stiff chainstay is important.
I do not use much more tension than I would with a chain.
I have not tried the new CenterTrack belts which apparently help solve this problem.
ir_banditoFree MemberPosted 12 years agoThe flex is certainly an issue, which is why I’m using a bolt-in hub – I’ve had issues with the belt slipping off the unflanged side in the past. As you say, centre-track would solve it.
I don’t think its the belt teeth catching on the cog teeth though, just amount of slack in the lower run allowing the belt to be pulled round and up on the teeth when under greatest load.
mick_rFull MemberPosted 12 years agoDoes a whole bike count? (warning – E-stay 29er content)
http://www.retrobike.co.uk/forum/viewtopic.php?t=167593Apologies about the photo size – there are some better resized pics down the bottom of the page. Anyone cleverer than me that can linky to the photos?
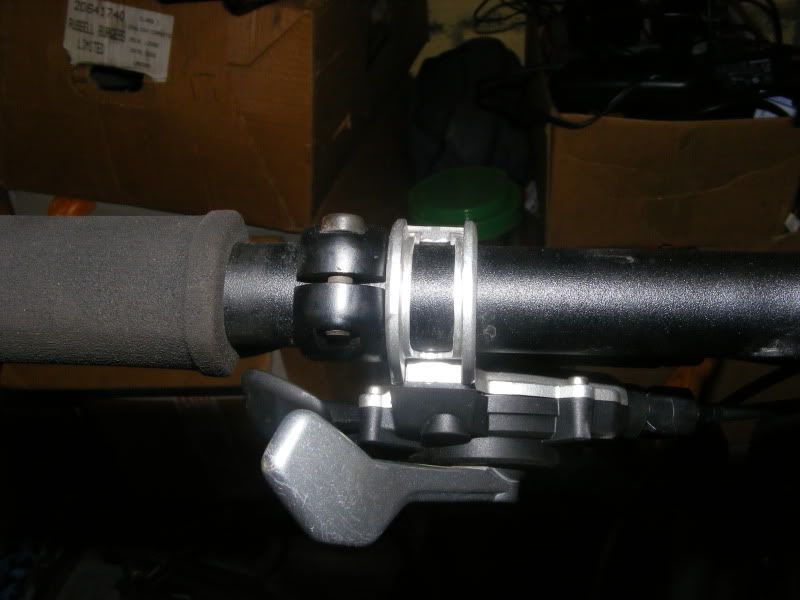
nixieFull MemberPosted 12 years agoNot as impressive as some of the above but I’ve modded the spare hole on the right hand Hope XT matchmaker to mount the poplock lever for my Rebas. Does away with the whole mount, looks neater and brings the lever into a much better position.
jamesoFull MemberPosted 12 years agoNicknoxx, who made that for you? Nice dropout.
Here’s another home-bodge, a rear cycra guard trimmed down and mounted to a fork with a bottle cork, a self-tapping screw and a zip-tie – works a lot better than the old down-tube mounted guard
IMAG1100 by james-o, on FlickrA broken bashguard cut down to make a mini-bash for the SS –
flowFree MemberPosted 12 years agoCould some one please tell me WTF is the point in having a single speed with gears? Surely you are just in denial and should go back to a proper bike?
nixieFull MemberPosted 12 years agoCould some one please tell me WTF is the point in having a single speed with gears?
Do you mean the singlespeed hub mods above?? Surely its because you want gears but either don’t need the full range, or want less dish in the rear wheel (for more strength).
nixieFull MemberPosted 12 years agocrogthomas, did you use a kit for doing the anodising? Been thinking of doing some myself.
StonerFree MemberPosted 12 years agogreat work nicknoxx. And jameso, now Im a proud owner of one of them noodly things, that looks a great idea.
This is my bodge of a speedbone to fit a rohloff into a Ti29er with slotted dropouts.
mamadirtFree MemberPosted 12 years agoChainguide for my Absolut SX, made from 2 x DMR old Chain Reactor hinged clamps and a Superstar plastic guide. I’ve used DMR clamps many times before along with a MRP/DMR roller, bolt and spacers but this time due to the bend in the seat tube, the position wasn’t quite right and I couldn’t get the guide to sit low enough, hence the extra bracket made from a cut down clamp.
Works very well, quiet as a mouse, but the plastic guide is susceptible to being knocked upwards out of alignment – I guess serrated washers may help . . . or less crashing 😆
crogthomasFree MemberPosted 12 years agonixie – Member
crogthomas, did you use a kit for doing the anodising? Been thinking of doing some myself.No, I did it myself using drain cleaner, battery acid, an old lab power supply and some clothes dye.
It’s dangerous, smelly, inconsistant and takes ages.
If you want to spend your entire evening dressed in overalls, rubber gloves and goggles, with your eyes watering and the hairs in your nostrils burning, all to produce one anodised trinket that you might have to strip back and do again, then it’s a great pastime. Otherwise I’d recomend getting someone else to do it for you. Far more sensible.You can buy kits though, like this one:
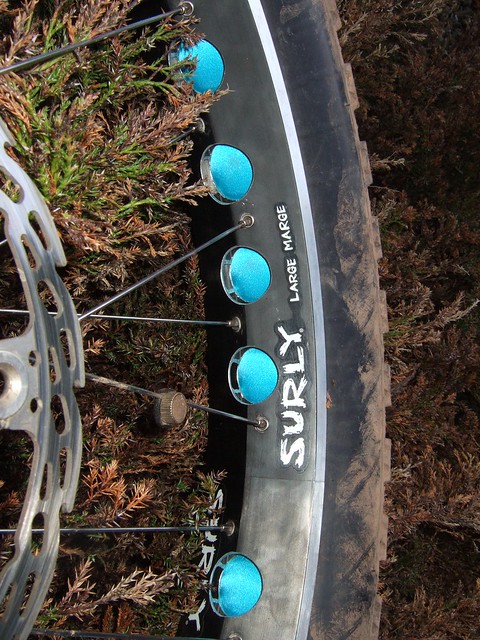
http://www.frost.co.uk/automotive-electroplating/aluminium-anodising-kit.htmlsinglespeedstuFull MemberPosted 12 years agoYou can’t beat a bit of good old fashioned drilling.
I was told this would explode in flames and kill me if i so much as looked at it. 😆
Still going strong along with three others that i’ve done the same to.
2010_1126cheeserim0015 by singlespeedstu, on Flickr
2010_1129cheesewheel0025 by singlespeedstu, on Flickr
2011_0212holeymarge0004 by singlespeedstu, on FlickrremoterobFree MemberPosted 12 years agoThe last one looks like it could be fun when it gets muddy.
flowFree MemberPosted 12 years agoDo you mean the singlespeed hub mods above?? Surely its because you want gears but either don’t need the full range, or want less dish in the rear wheel (for more strength).
Like conventional builds aren’t strong enough, and missing a few sprockets will make all the difference in weight.
amediasFree MemberPosted 12 years agoDo you mean the singlespeed hub mods above?? Surely its because you want gears but either don’t need the full range, or want less dish in the rear wheel (for more strength).
Like conventional builds aren’t strong enough, and missing a few sprockets will make all the difference in weight.then how about “because they want to…”
always been good enough reason for me


The topic ‘Let's see your modified kit’ is closed to new replies.