- This topic has 2,564 replies, 264 voices, and was last updated 2 weeks ago by Merak.
-
Tamiya and other R/C vehicles (not just for Christmas)
-
clubbyFull MemberPosted 3 years ago
When I see some of the hop-up parts, part of me wonders if you’re replacing a sacrificial, cheaper part with something more robust that will in turn lead to something less sacrificial and more expensive taking a hit. I’m sure if you upgrade everything it’s OK but is there a right way and a wrong way to do it?
I look at lots of shiny parts and came to the same conclusion.
Seen online people with my buggy replace chassis bridges with metal ones then complain they’ve broken the chassis in a crash. Also seen a lot of snapped metal steering parts. Biggest problem at the moment is the shortage of spares.Amazed though at how tough these things are. I’ve spent the last few battery charges trashing the bmx track and taking some pretty hefty hits. One side of drive a bit noisy now though. Need to strip down and clean as it’s probably all clogged with dusty.
Luckily I have a brushless motor on the way, so it’ll be apart anyway. 🙂
Also ordered some soft truck tyres and inserts to try and improve traction.
Oh and some mega sticky diff oil. Oh, and mad bull steering arms for an experimental truggy build, and a some small spares just in case. List got bigger and bigger but postage costs more than the spares so just as well to get them while I was ordering.Hopefully after this I’ll be able to clear those damn doubles down at the bmx track.
clubbyFull MemberPosted 3 years agoJust watched that video. Had already been looking at G Made BOM and Axial crawlers and that isn’t helping.
Damn you Rusty!!!scuttlerFull MemberPosted 3 years agoI just bought a Mad Bull (assuming the ebay listing wasn’t fraudulent or misrepresentative of stock – last one left).
I’ve not done this before. Please welcome me to this thread. I am gonna be your worst newb nightmare.
I’ll start here – it comes with an ESC but I’ll obviously need controller+servo, battery and charger which are commonly sold as packages. Any packages to get / avoid? Spare battery from the outset? – As a night-riding mountain biker I understand the importance and cost of a decent battery. I have some thread lock and retaining compound but any other basics to get?
If this goes well I’ll be scratching the 35 year old itch that is a Hotshot.
househusbandFull MemberPosted 3 years agoAnyone got a photo of this preload cable tie thing to share?
Although might not be exactly what you’re after but this is something I might try, sometime…
clubbyFull MemberPosted 3 years ago@scuttler my pack came with a £30 controller and receiver and not sure I’d benefit from anything better.
Bigger the better as far as battery is concerned. I’d rather have one big one than a number of smaller ones. I went for 4400 but you can get 5000. Smaller are lighter but I’m not racing and would rather not have to change while I’m out. Nightmare of losing body clips in long grass.
Get a fast charger than will also handle lipo’s. You might not want them now but the price difference is small.
Mad Bull’s tyres are BIG. Get a high torque servo, with metal gears if you can afford it.Most of all, don’t take it too seriously. Read the build manual through before you start and buy a set of JIS screwdrivers (cheap on Amazon).
Welcome!!!!
RustySpannerFull MemberPosted 3 years agoclubby
Subscriber
Just watched that video. Had already been looking at G Made BOM and Axial crawlers and that isn’t helping.
Damn you Rusty!!!Sorry. 🙂
I fancied a crawler but really didn’t want to spend stupid money.
It’s been great fun, tbh.
It’s been up real Welsh mountains and entertained climbing huts full of kids of all ages.
Nothing has broken.
No, I’m sure it’s not as capable as an Axial, but I’ve resolutely avoided upgrades – you just have to think more about line choices.
Not a kit, but you can take it apart easily, it’s a simple little thing.
Only downside is a big turning circle, but it’s an inherent part of the crawler design.It comes with a low capacity battery, but the bigger capacity ones I use for the Lunchbox and buggy fit fine.
Harry_the_SpiderFull MemberPosted 3 years agoI’m using this kit, but with bigger batteries.
I’ve got 2 x 3300mAh and 1 x 5000mAh. I carry a spare as the Mad Bull gets through them at twice the rate as the Grasshopper as it has a bigger motor and is 50% heavier.
Tamiya Radio Control RC Car 2000mAh Battery and Charger Bundle 1
I’m pretty sure that Howes will let you upgrade the battery for a bigger one. Charger takes about 1hr/1000mAh, so 3 hours for the smaller batteries and 5 hours for the bigger one. The radio that they supplied was a CODE by Schumacher and works well. So well that I bought another. However, when I first unpacked it I thought it looked like cheap crap and continued moaning about it for a day or so until I realised it had protective tape over the decals. Peel that off and it looks 100% better!
PierreFull MemberPosted 3 years agoHi @Scuttler, welcome!
I’ve got one of these in the Mad Bull:
https://www.modelsport.co.uk/enrich-power-5000mah-7-2v-nimh-stick-tamiya/rc-car-products/396624
…it lasted around an hour of running around the park this lunchtime, which was truly surprising – we ran out of time before we ran out of battery!Get a good charger though – on the recommendation of this thread we’ve got a SkyRC e680, it brought some life back into the old and very knackered NiCad and NiMH batteries that came with the old Mad Bull, but it’s the best way to make sure any battery lasts as long as it can. And it will handle LiPos too, when the time comes…!
We’ve got a Flysky GT3C transmitter and receiver. It’s a bit of a budget option but it’s serving us fine. It came with no instructions and the interface definitely takes a bit of getting used to, but it’s been fine for the money, so far.
Harry_the_SpiderFull MemberPosted 3 years agoUpdate on the preloading…
We’ve just been for our daily “Razz” and both cars seemed quicker and handled more sharply. However, the Mad Bull barrel rolled a couple of times when cornering at speed, which it didn’t do previously, and is now upside down with Araldite on the A-Pillar that snapped.
I’m going to remove the preload from the rear end.
The Grasshopper was way better handling than previous and quicker too as the front end wasn’t compressing so much under load.
VanHalenFull MemberPosted 3 years agoGlad teh zip tie trick is workign for others!
how do you get the mad bull to roll!? its got such a wide wheelbase – you`ve done well there! we only run ours off road so that may be a factor. mine spends most of its time going sideways..
I took mine ot teh local bike jumps yesterday – that was fun – kids loved it too of course…. cant quite clear the jumps so i need more power! (or a broom to smooth the run ups as traction was a definite issue!)
i`m going to get decent dampers once they come in stock as i think a few crashes were to it just bouncing around randomly. it would also make much less scary bottom out noises on landings! haha
just ordered a radio for teh sonic fighter so we can have 2 cars going at once – they arrive today so i`ll be having an interesting conversation with teh wife later! haha
VanHalenFull MemberPosted 3 years agoHarry – this is how i`ve taken the play out of my mad bull steering link. washers at the steering rod link end and a plastic spacer on the servo end. (i hope the image works)
 Harry_the_SpiderFull MemberPosted 3 years ago
I’ve not got any significant play in my Mad Bull steering.
I rolled it on tarmac in a bus turning circle doing full speed full lock turns.
To check it wasn’t a fluke I rolled it again. And so did my lad :-/ Previously it would just sit down low on one side and drift. Hopefully by removing the spacers from the rear shocks the body will roll a bit more rather than flip.
Araldite is still curing. Going to leave it another 24 hours.
VanHalenFull MemberPosted 3 years agomy old car is held together by superglue and epoxy resin! the front swing arms are superglued, the chassis is superglued in 2 places and epoxied in 1 and the front suspension mounts are epoxied with strenghting bars added!
i view car repairs like scars for bikers… haha
scuttlerFull MemberPosted 3 years agoThanks so far for the guidance on batteries, controllers etc. All my stuff is now in transit so looking forward to kicking off building this next week. Are there any particularly helpful online resources for getting going on this (building, fixing, upgrading) besides a forum about mountain bikes 😉
Harry_the_SpiderFull MemberPosted 3 years agoAre there any particularly helpful online resources for getting going on this (building, fixing, upgrading) besides a forum about mountain bikes 😉
Nope. All World Knowledge is here.
clubbyFull MemberPosted 3 years agoI’ve spent more time on Tamiyaclub and Tamiyabase recently than I like to admit.
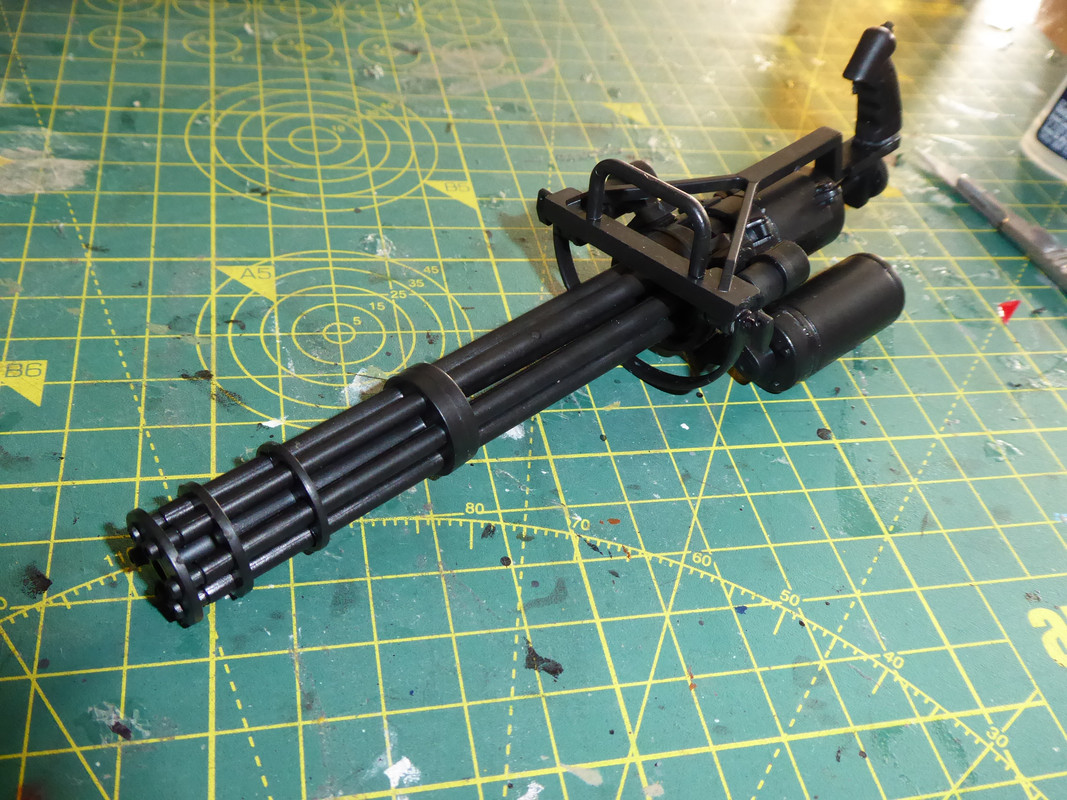
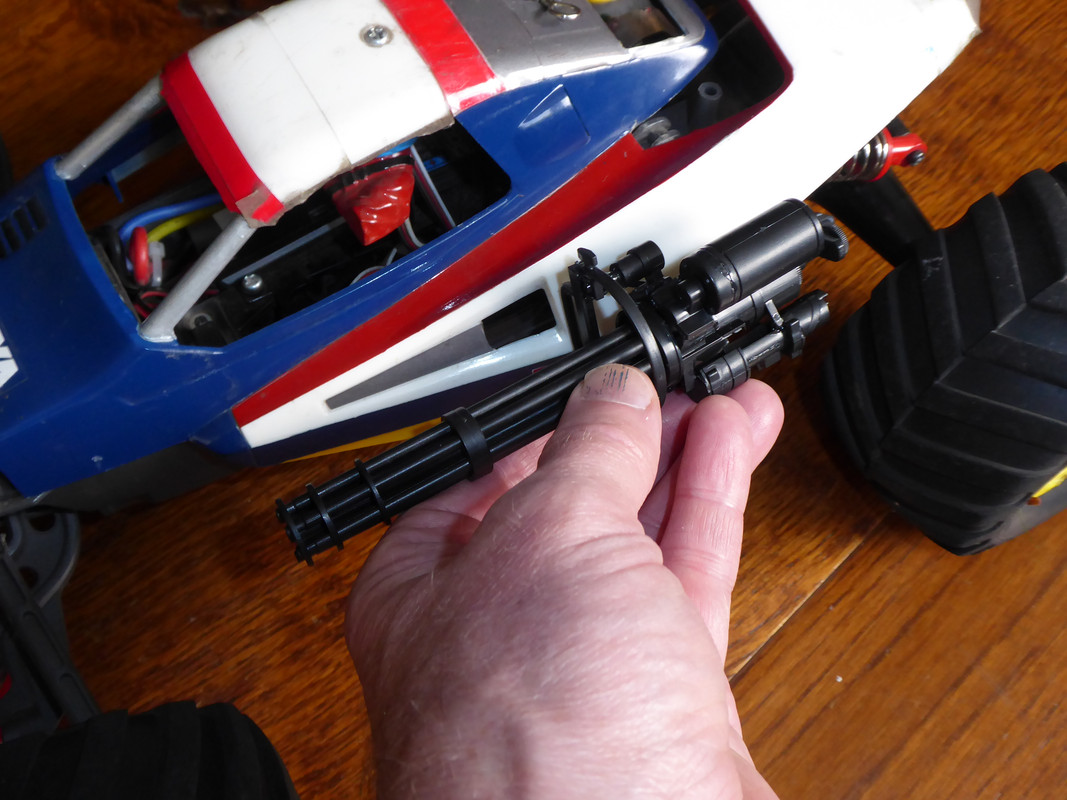
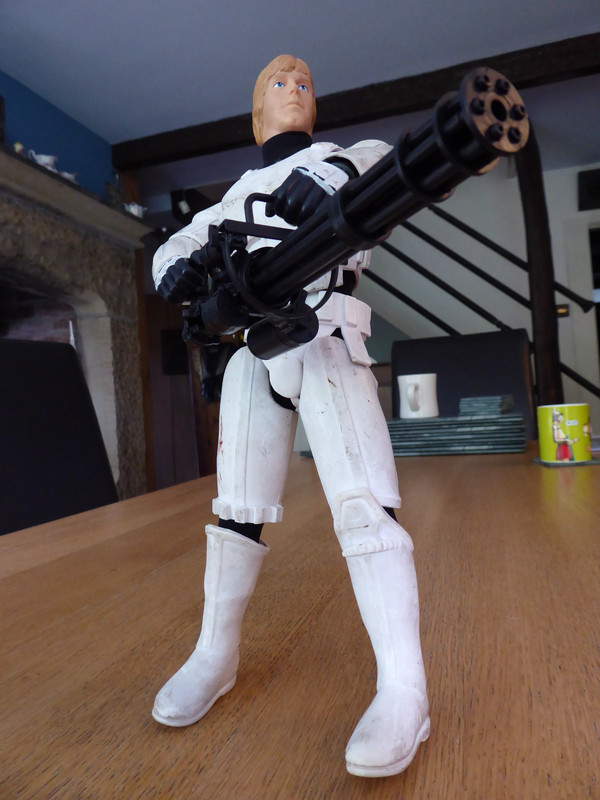
Harry_the_SpiderFull MemberPosted 3 years agoBuilt up one of my two cheap eBay Miniguns that’ll be going on a new body shell for my “Rogue Trooper” Mad Bull.
I’ll only be able to use one of them as the other would foul the battery case.
Which means that Luke Skywalker just got a whole lot more bad-ass.
reluctantjumperFull MemberPosted 3 years agoThanks to you lot and this thread I’ve ordered a kit to build up and learn with again. Was dispatched on Monday and arrived at the local depot Tuesday afternoon. Since then the tracking has shown it just get moved round the warehouse from awaiting despatch to loaded then back! Are UPS always this crap? Can’t get hold of them via phone or email and the automated phone tracking system just says the same as the online one – it’s bouncing round the warehouse.
I want to build and play!
reluctantjumperFull MemberPosted 3 years agoWent with a Lunchbox as I’ve always liked the look of them. Added bonus is there’s no real incentive to upgrade it past bearings and lights so it’ll keep the spending under control! If I get back into it properly I’ll look at a better car once stocks replenish of the more tweakable options.
benp1Full MemberPosted 3 years agoI reset the steering endpoints on my car and the turning circle is ace. Been using on tarmac the last few times for some fun sessions, including a little race circuit set up on a disused car park. Loads of fun but have used a lot of tread on the tyres, may need to run two sets of wheels with on and off road tyres
reluctantjumperFull MemberPosted 3 years agoThe Lunchbox has arrived!
Going to start building it tonight then plod along while I think of what colour to paint the shell. Got some dark blue and bright orange spray paint with it but the blue is a lot darker than I thought, it’s almost black! Originally was going to spray the wheels orange to match the decals and the body blue as I don’t want a bright colour, the decals add enough for me. Might still do it as a new shell and stickers is only around £30 so I can do a different colour one if I don’t like it and use the original when my nephew will inevitably want a go.
Quick Q: Got a 3000mAh NiMH battery and a charger that can do 1/3/5A. Do I still have to do the old battery conditioning trick as with the NiCad bateries of old of running it to near (but not totally) flat before the next charge and what amp setting is best? There’s conflicting info about whether I need to charge at the full 5A or a slower voltage and trickle charge.
VanHalenFull MemberPosted 3 years agoI think with a nimh battery a slower charge 1-2amp is better for the battery. Faster charges may reduce lifespan ( but you’ll get to play more). Maybe do a mixture.
I’m no battery expert though so happy to be corrected!
wishiwascalledsteveFull MemberPosted 3 years agoUpgraded the stock brushed motor in my FTX carnage to a hobbywing 4000kv brushless motor…. Holy hell it is fast. A couple of flips from turning too tightly on full power and I obliterated the body shell.
Also upgraded the stock NiMH battery in my daughter’s FTX vantage, to a 2s lipo. But it burnt the motor out within a minute.
This is getting an expensive hobby
wardeeFree MemberPosted 3 years agoAlso upgraded the stock NiMH battery in my daughter’s FTX vantage, to a 2s lipo. But it burnt the motor out within a minute.
That doesn’t sound right. A 3s or higher battery might gives those symptoms, but not 2s.
the nominal voltage difference between 6 cell nimh and 2s lipo is only 0.2v. It’s a little bit more power but nothing that would cause a motor to expire that quickly unless there was already another problem.Did you replace the battery because the car was getting slow and the battery going flat prematurely?
It sounds like something is stalling the motor. Is the transmission binding? Remove the pinion and check it rotates freely.
Or you may be running far too high a gearing. Have you changed the pinion, or installed bigger wheels?
Or throttle has been applied when something is obstructing the car, e.g. solid kerbs, deep mud, long grass etc.
To get a motor to smoke in one minute you need to really abuse them hard.
Could also be chemicals on the commutator e.g. too much oil applied to the bushings or freshly applied motor cleaner will cause burning.
wishiwascalledsteveFull MemberPosted 3 years agoCheers Wardee, replaced as the original battery were low capacity around 1300mah, swapped to 5000mah lipos.
No binding etc, everything runs smoothly and no chemicals. This was on short grass, daughter ran it for a short time before it cut out and the was some smoke and strong burning smell.
Can see some burn/smoke marks on the plastic inside the motor.BearBackFree MemberPosted 3 years agoLots of pages here, but my soon to be 10yo wants to move up to a 4wd car from his MadBull. we did oil dampers, glued tires, tie rod steering but is still a basher.
He wants a Traxxas Slash, but can anyone whos followed all this suggest what the current darling car is?
4×4, prefer not R2R, brushless. Bullet proof, but repairable.scuttlerFull MemberPosted 3 years agoMad Bull arrived today. Mad week or two with work though so I might have to put it away for a while.
BulletFull MemberPosted 3 years agoI’m new to all this too but have a Associated Rival MT10 on order – gets good reviews.
https://www.modelsport.co.uk/rc-electric-models/rc-car-categories/9900/990010&ManufacturerID=2&ChassisID=2032mrlFull MemberPosted 3 years agoI have had my eye on a MT10. Other options were the maverick Strada MT brushless or the the Arena granite brushed. Maverick is the cheapest but is smaller and more truggy like. Wil have to wait until the next pay check anyway!
FuddFree MemberPosted 3 years agoLots of pages here, but my soon to be 10yo wants to move up to a 4wd car from his MadBull. we did oil dampers, glued tires, tie rod steering but is still a basher.
He wants a Traxxas Slash, but can anyone whos followed all this suggest what the current darling car is?
4×4, prefer not R2R, brushless. Bullet proof, but repairable.If you want a kit then your options are Tamiya at the low end or a high end racing buggy such as Losi, X Ray or Associated. Everything in between seems to be RTR these days.
MerakFull MemberPosted 3 years agoA new project.. 2007 Monte Carlo Impreza.
It seems getting paint is an issue…
minley1Free MemberPosted 3 years agoI have just finished building one of these.
LC Racing EMB1 Buggy (1/14 Scale)Harry_the_SpiderFull MemberPosted 3 years agoOur Council lawn mower pilots are clearly off furlough as the Civic Turf opposite my house has had a trim. 15 minutes of flat out rooster tails in the cut grass later and the Mad Bull 3300 mAh battery is flat as a flat thing and hot to touch!
The Grass Hopper did not live up to it’s name as it kept beaching, so had to make do with a razz in the bus turning circle.
clubbyFull MemberPosted 3 years agoWe’re going to need a bigger boat!

I knew truck tyres were going to be bigger but I never expected that big.
Anyway, brushless motor and ecu are fitted. Holy flaming balls of poop!!!
Trial run in the garden resulted in uncontrollable back flips and hair trigger. Quickly turned down the initial punch setting to its softest and it’s now much better. Definitely have to drive the car rather than just punching the throttle all the time, but good fun. Still very easy to donut and power slide if you want to. Increase in speed is mad. One thing I hadn’t expected is that it’s so easy to jump using the throttle rather than just pure speed, makes landings more controllable. Unfortunately, the dirt jump yoofs were using the bmx track, so I couldn’t see if I can now clear the doubles. Tomorrow maybe. Only issue is the tendency to grip roll, if I come off the throttle too hard. Needs some more suspension fettling to help with this.
Have also added some motorbike wheels weights (40g so far) to the front of the car to help with balance.
Final tweak was to add some heavy diff oil. Did a bit of reading and went for 500000 cst, which is like clear treacle. If you remember soft eject cassette players, it’s very like the stuff they used on the eject mechanism. Has really stiffened up the diff and helped me get out the car out of soft stuff that would have had one wheel spinning away on its own before.
Next plan is bigger front tyres. Have wider mad bull axles and have hex adaptors coming. Not sure whether to use wider buggy wheels or go bonkers and get a set of mad bull wheels to use truck tyres.
Lastly, has anyone got a Kamtec shell? Seen a Baja bug shell for £15 that looks good.
lairdburkartFree MemberPosted 3 years agoReading this has got me into rc again. Dug out the old hornet from the loft for the kids. The old speed controller is a bit wiffy but it runs.
Found my old hpi rush. Was a bit worried about the neighbours with the noise. And the nasty fumes with the kids. So put a 540 motor and a speed controller in it. Made a motor mount with a bit of radiator bracket from the kitchen. And off we go! Thought it would be pants. Nope. It’s ace. And can run on 7.2 volt for kids and 11 volt ( the grown up battery as my kids call it). So much fun. Proper nerding out.
Good job a lot of Tamiya is out of stock at the moment or my missus would kill me.
I’ll wait for Father’s Day😛reluctantjumperFull MemberPosted 3 years agoGot my lunchbox up and running 😎
Had a bit of a play with the suspension on it as stock just means it pushes under power and understeers off the power until it gets to a certain speed then grips and tries to turn over. The issue is the front suspension puts loads of positive camber on at the standard ride height so that only the outer half of the tyres is in contact with the ground. As I’ve got the standard shocks on it it’s easy to add some spacers to the top of the rods to lower the ride height using some cut rubber tube left over from the bump stops. 10mm on the front and 6mm on the rear sorted it and gave it a bit of a rake too (channeling my inner Newey…). Behaves much better now with predictable front turn-in and it can now be made to have some lift-off oversteer!
Have decided to paint the shell the dark blue I got too, leaving the wheels the standard yellow for now but think I may go chrome. Did have a bit of an issue painting the shell though, was being a bit too cautious with the fine coats so it was not getting particularly glossy. Sanded back the paint and went for a slightly heavier coat and it worked! Trouble is I only got one side done as the tin ran out. Another one ordered but means I have to run it sans shell for a while longer. Was hoping to get the paint done today so it could dry and have the decals put in tomorrow before putting a clear coat on over the weekend.
Think I’ve got the bug again. Next payday may involve ordering a 4wd buggy of some description if there’s any stock available 😁
reluctantjumperFull MemberPosted 3 years agoThought I’d do a little update on the Lunchbox progress as I’ve been busy doing a mod or two!
Did the ride height mod as detailed above, greatly improves the handling and stops the front suspension generating loads of positive camber.
Before:
After:
Much better and has added a bit of rake to the chassis too.
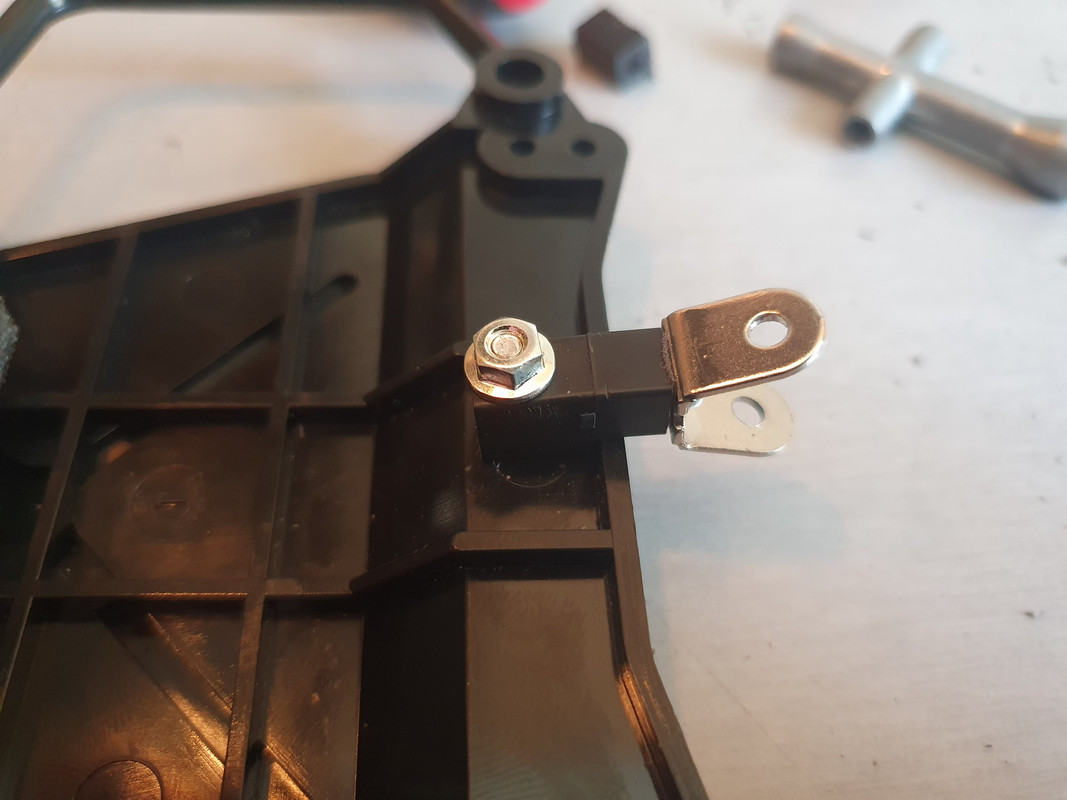
Next thing to look at was addressing the slap of the rear suspension as you put the power on, a known issue. Looked at the 3rd shock method and at a brace for the pivot arm. It was this that got me thinking. It’s £20 or so for the pivot brace online but I’m sure I could make one from the spares in the kit. Found a black part 9 that was roughly the right shape and a spare shock mount. Cut the plastic part to form a mounting platform for the shock mount. The shock mount then got tweaked to fit around the gearbox pivot housing like so:
Drilled a hole so I could mount it to the battery tray and a corresponding hole in the tray and used a spare small but and bolt to securely attach it:
[url=https://ralphrobertspersonaltrainer.com/dont-drink-calories-5-low-cal-alcoholic-drinks-for-your-tropical-vacation]best low cal alcoholic drinks[/url]Bolt it all back together and the result looks like this:
No more slap when putting the power on and the suspension still articulates fully as it should!
All for the total cost of £0. Very pleased with the result.


You must be logged in to reply to this topic.