- This topic has 2,328 replies, 145 voices, and was last updated 20 hours ago by natrix.
-
Christmas Airfix!
-
timbog160Full MemberPosted 2 years ago
I have to say I think that Hurri looks great. As ever the problem with these kits is where to put them! I somewhat ruthlessly binned half a dozen of my earlier efforts the other day, none of which I was entirely happy with. Felt better once done!
Freester – when it comes to modelling every day is a school day. I think it is rather like I imagine golf to be in that respect!
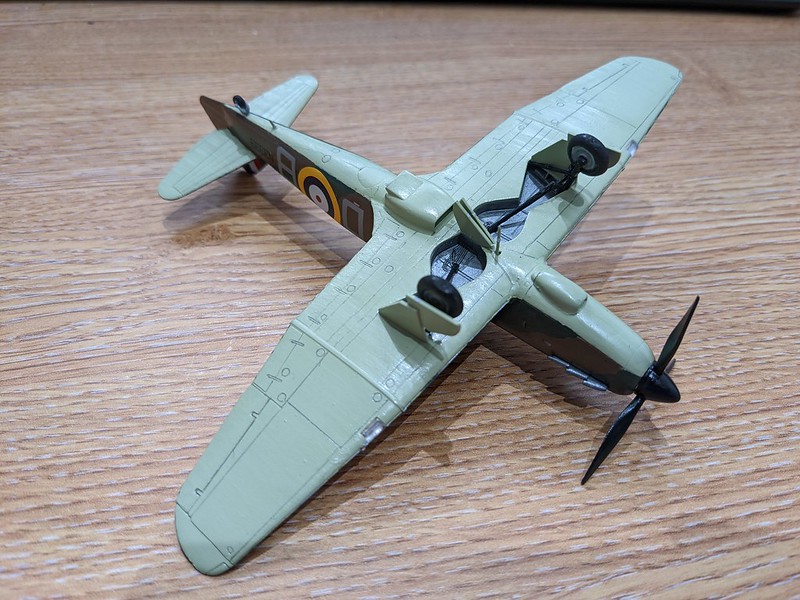
stumpy01Full MemberPosted 2 years agoI started a model plane around March/April 2020 and got it mostly done in a few weeks.
I then needed to buy some gloss & thinners etc before finishing it and never got round to it, so it sat on a shelf.
I ended up in Hobbycraft after Christmas and they had the bits I needed, so I finally got it finished.I’m not massively pleased with it because I put the first coat of paint (from a starter kit pot) on without any thinners and it was a bit gloopy. But, it’s not too bad.
If I do another model I would probably get something a bit larger & more detailed.
I’d like to try some of the realistic weathering techniques so would have to read-up on how to achieve those finishes.Anyway, this is a 1:72 scale Bolton Paul Defiant mk 1 built from an Airfix starter kit.
 [url=https://flic.kr/p/2mYXmQS]PXL_20220124_112933511[/url] by STW stumpy01, on Flickr[url=https://flic.kr/p/2mYQFZa]PXL_20220124_112403609[/url] by STW stumpy01, on Flickr[url=https://flic.kr/p/2mYW7zy]PXL_20220124_113010642[/url] by STW stumpy01, on FlickrFreesterFull MemberPosted 2 years ago
@stumpy01 that’s a fine job. Did you mask the camo pattern or hand paint the shape?
stumpy01Full MemberPosted 2 years agoPJM1974
That Defiant is very tidy, good job there.
Thanks. I’d forgotten how small the 1/72 models are!
It’s been over 30 years since I did one.Freester
@stumpy01 that’s a fine job. Did you mask the camo pattern or hand paint the shape?I did it free-hand although I drew the shape on first with a pencil copying the pattern from the box.
I did think about masking but I had no idea how I would mask a twisting shape. Amy techniques?
I want to do an ME109 but don’t know how to achieve that grey speckled camouflage without an airbrush….
There are a few colour schemes without that, but the speckled camo is very distinctive.FreesterFull MemberPosted 2 years agoI want to do an ME109 but don’t know how to achieve that grey speckled camouflage without an airbrush….
Quick kits Owen shows you how…
Trouble is he makes it look easier than it is my results are never as good as his lol
timbog160Full MemberPosted 2 years agoNice work Stumpy. I rather like the poor old Defiant, although they were roundly derided. The ‘gas patch’ is a nice touch. They were supposed to turn a different colour if poison gas was detected, but by all accounts would rarely work when tested 😀
Scale wise I think 1/48 gives you a good compromise between more detail and keeping it manageable and not too expensive..
PJM1974Free MemberPosted 2 years agoI want to do an ME109 but don’t know how to achieve that grey speckled camouflage without an airbrush….
See if you can find some foam packing material, cut off a triangular piece that’s approx 4mm wide, dip into paint, blot until only a trace of paint remains on the foam and apply with fine tweezers.
nickcFull MemberPosted 2 years agoThe old school (and cheap) method for Luftwaffe mottling is to take a large round headed brush and cut it across (so it’s large and stubby). small amounts of paint dabbing it on thinly applied over several coats.
stumpy01Full MemberPosted 2 years agoPJM1974
See if you can find some foam packing material, cut off a triangular piece that’s approx 4mm wide, dip into paint, blot until only a trace of paint remains on the foam and apply with fine tweezers
Great!
I was thinking about it earlier & wondered if a small blob of open cell foam would work.
Sounds like it has potential.
@nickc – I like this idea too. There’s a local shop that does a range of cheap brushes, so I’m happy to buy a few and butcher them to practice with.I also need to get some broad, flat brushes for larger areas of single colours.
While I’m getting painting tips…..😀👍
How do people mask large straight lines to paint from both sides?
What I mean is, if I mask & paint one side (let’s say the under-fuselage) in a light colour how do I then mask the other side exactly along the painted line to achieve a straight edge?
Current thought is to paint the lighter colour without a mask aiming for a small amount of over-paint, then mask the straight line and paint the darker colour? Sand off the over-paint first?FreesterFull MemberPosted 2 years agopaint the lighter colour without a mask aiming for a small amount of over-paint, then mask the straight line and paint the darker colour?
I wouldn’t say I’m experienced but that’s what I do. For camo even put down the lighter colour all over then mask the for the darker pattern.
timbog160Full MemberPosted 2 years agoRe masking camo shapes pencil is as good a plan as any. If you were to get an airbrush a good tip is to use rolled up blutac to create the edges then fill in with tape. The fatter you make the blutac, the softer the edges will be. I’m not sure it would work for brush painting, but if you stuck some strips of wide masking tape to your cutting mat, you could cut them to the shapes you need. Whether it would be more effective than a steady hand I’m not sure!
timbog160Full MemberPosted 2 years agoAlso with mottling remember less is more! It’s easy to overdo it. Plan to do it in a couple of sessions. Stop the first session when you think you’re only halfway through and come back to it later. You might find you don’t need to do much more.
timbog160Full MemberPosted 2 years agoA modicum of progress. The interior is almost complete bar a few details, and the fuselage ready to be closed up. A LOT of test fitting was required to make sure everything lines up just so. The clear cowling also fits over the engine, which I’d read can be a problem.
I opened one of the panels to show a little of the interior detail, using Dymo label tape as a guide (the old thick plastic stuff) and a scribing tool to make progressive gentle passes until it went through, then finished off with a knife and sanding stick. Quite pleased with how that went.
StirlingCrispinFull MemberPosted 2 years agoStupid Question:
I have just bought a tank!
Airfix A01315V WWI Male Tank MkI.My son has just got into WarHammer and uses water-soluble paints.
Can I borrow his paints ?Or do I need to go full Humbrol like when I was a kid?
(This will be my first kit for almost 40 years. Very excited).Thanks!
Harry_the_SpiderFull MemberPosted 2 years agoYou can use WarHammer paints. Just prime it first.
I use Tamiya acrylics. Relatively cheap, easy to use and easy to clean up after.
PJM1974Free MemberPosted 2 years agoMy son has just got into WarHammer and uses water-soluble paints.
Can I borrow his paints ?Absolutely – Warhammer have an excellent range of metallic paints that brush very well too.
It’s probably sensible to prime the model first, if you can’t get your hands on a can of primer then spray a thin coat of Tamiya black over the completed model and you’ll have a paintable surface ready to paint on.
stumpy01Full MemberPosted 2 years agoBlimey! timbog, that paint work looks amazing!
I love the lever of intricacy, but struggle with the idea of doing it myself for parts that are going to be closed up and never seen again.
I like the idea of a cut-out panel in the fuselage!For washes and other effects is it best to use a mix of enamel paints on top of acrylic? I watched a video of a guy doing washes in enamel on top of (I think) acrylic paint. He said this was because the thinner he used to remove excess wash wouldn’t mess up the underlying acrylic paint work.
PJM1974Free MemberPosted 2 years agoFor washes and other effects is it best to use a mix of enamel paints on top of acrylic? I watched a video of a guy doing washes in enamel on top of (I think) acrylic paint. He said this was because the thinner he used to remove excess wash wouldn’t mess up the underlying acrylic paint work.
In theory, this should work provided that you’re applying an oil wash on top of a well-cured gloss coat. Personally, my experience has been mixed, I’ve used Humbrol washes in the past and have seen my paintwork stripped away underneath. I use Vallejo model washes which are water based, but have yet to adversely affect acrylic paint.
Harry_the_SpiderFull MemberPosted 2 years agoGoing to use a Mig panel wash this weekend for the first time. Will post progress, unless it is a disaster.
timbog160Full MemberPosted 2 years agoOn washes yes I think the main thing is that the paint you’re putting the wash onto is resistant to whatever thinning medium you’re using for the wash. If in doubt test a small area first. My sense is that enamel thinners would be a lot more aggressive than acrylic, so I think it would work better the other way round…
Thanks for the kind comments, but I would say a)photos can hide a multitude of sins b)I’m fortunate to have an Iwata airbrush and compressor which massively flatters my skills – so good it feels like cheating 😀
For the interior I’m still experimenting with this blackbasing method which I really like as it is very controllable and easy to do (with an airbrush). Black primer, then roughly fill the centre of panels, then a thin overall layer to create a nice shading effect. Once you’ve got the hang of thinning the paint correctly honestly it’s dead easy and quick. It’s also very easy to achieve consistent results too, which I’ve always found a lot more difficult when trying to shade individual panels. Normally I’d put a wash on too but none of this is visible anyway so was really just practice…
FreesterFull MemberPosted 2 years ago@timbog160 very impressive looks superb.
This week I learnt that Humbrol enamel thinners neat on plastic is nearly as bad as model cement (glue). People complain white spirit is hot but I’d argue thinners is worse, lol.
stumpy01Full MemberPosted 2 years ago@PJM1974 – I didn’t realise you could get water-based washes. I might give them a go.
I ordered a 1/48 scale Tamiya Sea Harrier model last night. It was one of the first models I made when I was about 10 years old I think & my brother smashed it to bits throwing his screwed up school revision notes at it. So, looking forward to having a go at it.
Apparently the model is a bit clunky in regards to detail, but I am not overly bothered by that.
I need to write a list of things to buy before making a start on it.
Masking tape
Some of that micro sol stuff for the decals
Wash
A broad brush
Liquid mask perhaps?and then all the paints of course…
Looking forward to it already! Hopefully this one won’t take me almost 2 years 🙂
timbog160Full MemberPosted 2 years agoYou need to speak to Harry about Shars – he’s the resident expert 😀. For masking tape it’s Tamiya every time for me, but then I use the blue stuff for big areas.
Looking forward to seeing it. Nice to see this thread picking up a bit of traffic again!
mogrimFull MemberPosted 2 years agoSaw this on Twitter yesterday, might be of interest if you’re in the area:
Perhaps leave the wallet at home, though 😀
Harry_the_SpiderFull MemberPosted 2 years agoI’d love to go to that, The Tank Museum is superb!
Also if you haven’t checked out their YouTube channel you should.
stumpy01Full MemberPosted 2 years agoSo last night I bought £60 worth of paints, a dark grey wash, a couple of flat brushes, masking tape etc. For my £10 Sea Harrier 😂
Some of the paint will last for years I imagine, as I only need a drop for a light here and there.
Only thing I forgot to buy was plastic filler and could probably also do with some fine sand paper.Looking forward to it all arriving!
Harry_the_SpiderFull MemberPosted 2 years agoPaints and other bits will last for ever.
Your future £10 kits will cost £10! Probably 😉
StirlingCrispinFull MemberPosted 2 years agoLove the Tank Museum Youtube channelL David Fletcher is awesome.
Reading one of his books (the Haynes Manual on the Mark IV tank) and it is remarkable how little is known about the development of a machine just over a century old.
The book led me to this 1917 film featuring footage from late 1916.
The Battle Of The Ancre And Advance Of The Tanks
https://www.iwm.org.uk/collections/item/object/1060008185The thousands of men marching everywhere, and the mud, makes it a remarkable watch. No mention of death though in what was obviously a propaganda film aimed at an audience which had lost a generation of men.
stumpy01Full MemberPosted 2 years agoAnother stupid questions (I’m good at those)….
How do people dose out their paints & thinners?I’ve got a little palette I use & have just been dipping a brush into the thinners & letting it drip off into the palette & then using a cocktail stick to do the same for the paint – so for the 1:72 scale plane I just did, counting out about 30 drops of each was enough to get one coat done on the plane.
But, that’s going to be a pain in the arse for larger models.
Small pipettes, I suppose? Have I just answered my own question?!
Harry_the_SpiderFull MemberPosted 2 years agoPipette for thinners, a brush/pour for the paint.
Got a hundred pipettes on eBay for a couple of quid a few years back. Still got most of them!
timbog160Full MemberPosted 2 years agoI use a small plastic syringe for thinners, gives you a bit more control.
Also, product review incoming – just bought some Mig Ultra – it’s a clear acrylic glue for canopies. Non fogging, easy to clean up and supposedly very strong. I normally use Future floor polish or PVA so very interested to see how this goes…
timbog160Full MemberPosted 2 years agoFor dishing out and mixing paint I use wooden coffee stirrers – have collected thousands over the years…
stumpy01Full MemberPosted 2 years agoInteresting stuff about mixing! The Tamiya instructions for the paintwork state that the upper fuselage should be done in a mix of 3:1 Dark Grey:Royal Blue to make Extra Dark Sea Grey.
I decided it was going to be way to difficult to mix consistent colour batches using that, so have bought some Extra Dark Sea Grey (Humbrol I think), which probably won’t be blue enough, but will hopefully get me in the ball park.It also says for a light on the tail, to use Buff + Lemon Yellow. I am guessing that means to mix the colours & that it will come out to a murky orange colour. I’m a bit surprised it wasn’t another Tamiya colour just to make me buy another paint pot for a few drops of paint 🙂
I’ve just ordered some pipettes, a range of sandpaper & some plastic model filler, as well as some cocktail sticks to apply it with.
I wasn’t going to bother with filler but from what I have seen of the reviews for the Sea Harrier model, it’s a very old one & the fit isn’t great; especially on the engine cover behind the cockpit which will be quite a prominent place to have gappy bits.FreesterFull MemberPosted 2 years agoInteresting stuff about mixing! The Tamiya instructions for the paintwork state that the upper fuselage should be done in a mix of 3:1 Dark Grey:Royal Blue to make Extra Dark Sea Grey.
I decided it was going to be way to difficult to mix consistent colour batches using that, so have bought some Extra Dark Sea Grey (Humbrol I think), which probably won’t be blue enough, but will hopefully get me in the ball park.Quite a lot of Revell kits require mixing paints. My most recent completion (actually a Hobby Boss) required a mix for the main body colour. In my case 4:1 so I’d stir one colour with a bit of sprue. drop 4 drops (or multiples thereof) into the palette followed by 1 drop of the other colour. Don’t sweat it, it came out good enough for me. If you’re doing a full coat you won’t notice the difference if any between coats.
If you want to be a bit more accurate those Calpol syringes are pretty good.
PJM1974Free MemberPosted 2 years agoI wouldn’t worry about colour accuracy too much – aircraft were left to the elements and invariably paint faded and flaked. Colours were often patched up in the field, with whatever stocks of paint to hand.


You must be logged in to reply to this topic.