- This topic has 2,327 replies, 145 voices, and was last updated 17 hours ago by nickc.
-
Christmas Airfix!
-
FreesterFull MemberPosted 2 years ago
@Harry_the_Spider no it’s the one at Bournemouth Aviation Museum fantastic little place. A lot of sawn off cockpits as well as a few whole planes but the kids can sit in most of them.
I *may* have sat in the Lightning cockpit myself. 😉
Harry_the_SpiderFull MemberPosted 2 years agoI may have say in the Harrier at St Mawgan. It is a very small and busy place.
Harry_the_SpiderFull MemberPosted 2 years agoGoing to tackle my Sea Vixen next.
One of my favourite looking aircraft, but something of a death trap for those that served with it!
Harry_the_SpiderFull MemberPosted 2 years ago@freester. I see from BM that you are starting your Sea Vixen too.
Mine is the Cyber Hobby version. Instructions don’t say it, but the nose ballast is 25g apparently. I’m going for fishing weights and PVA as I’ve bought a resin nose cone that is solid, so I can’t fill it with liquid gravity. I’ll try an get a tyre balance weight in too if I can get it under the cockpit floor.
Also, the seats are way under sized, so I’ve gone with some Pavla resin ones that were about £3 each inc postage.
Been waiting for years to build this, but every time I’ve opened the box I’ve been daunted by the superb quality of the mouldings and the risk of buggering it up!
I think I’m ready.
FreesterFull MemberPosted 2 years agoYeh I’m doing the 1/72 Revell Sea Vixen. It’s my son’s. I know a lot of people say the nose doesn’t look right but as far as we’re concerned it resembles a Sea Vixen.
I want him to do as much as possible so will have to suppress my inner perfectionist. The instructions say 25g of weight. I got some liquid gravity from my local hobby shop.
eddiebabyFree MemberPosted 2 years agoI’m going for fishing weights and PVA as I’ve bought a resin nose cone that is solid,
I used to build RC Gliders and to get weights for them I used to go the local dive shops and buy kilo bags of lead shot ballast from them.
timbog160Full MemberPosted 2 years agoWell, well, well, look what’s just turned up to go with my SAS Jeep. Both kits I wanted as a kid – only took me 40 odd years to get my wish 😀
 Harry_the_SpiderFull MemberPosted 2 years ago
Started my Sea Vixen.
WIP thread.
https://www.britmodeller.com/forums/index.php?/topic/235104424-cyber-hobby-sea-vixen-faw2/
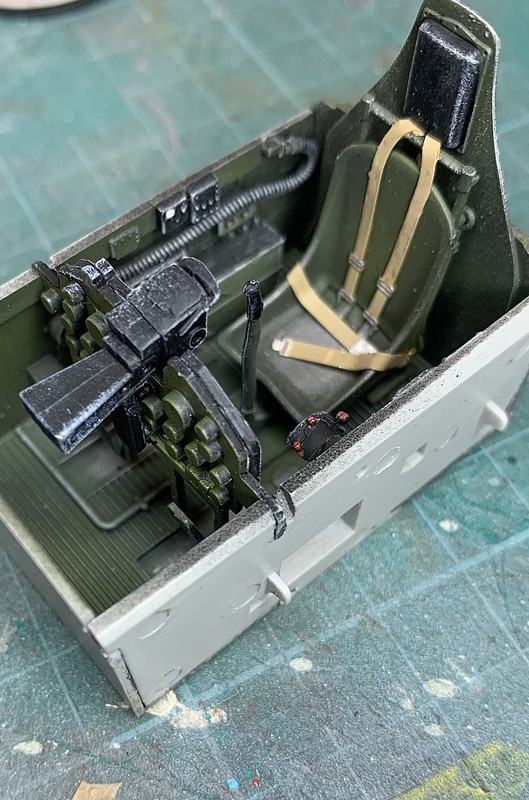
timbog160Full MemberPosted 2 years agoHarry those seats are incredible – they don’t just look a bit on the small side they don’t even look the right scale!
Harry_the_SpiderFull MemberPosted 2 years agoAs the cockpit is so dark you could probably get away with packing the kit ones up my a few mm, but the resin ones were only £2 each.
FreesterFull MemberPosted 2 years agoFollowed. I’m doing the Revell kit with my son. I’m gonna do it straight out of the box but I have ordered some decals because my son wants it to be XP924 the last flying Sea Vixen (before her belly landing 🙁 ).
FreesterFull MemberPosted 2 years agoI’m going to have potentially 4 models on the go. I’ve got a little 1/72 Thunderbolt I’m doing with my son. Fuselage assembled doing the painting.
Early stages of painting Sea Vixen parts before assembly.
Ditto for a 1/72 Hobby Boss Tomcat.
Then an Academy 1/72 F/A-18 arrived yesterday I’m going to do the Britmodeller group build. It’ll be OOB. I suspect the Tomcat will have to take a back seat.
FreesterFull MemberPosted 2 years agoWell me and Jr been making slow but steady progress on his Revell Sea Vixen
Mostly his work I helped a bit with the masking tape belts. It’s not up to the standard and detail on Britmodeller but it’s better than painting them on.
And our first mod out of the box… He wanted it to be ‘Foxy Lady’ so I got some decals off the dreaded bay…
Harry_the_SpiderFull MemberPosted 2 years agoGood stuff.
I’m at a similar point and want to get a bit more done over the weekend.
Hopefully I’ll have the engines in and the fuselage buttoned up. A bit concerned about the horizontal joint from intakes to nose though.
I’m going for the 899 NAS scheme from 1971, purely because it has the winged fist on the tail and a shark mouth on the nose.
ChrisLFull MemberPosted 2 years agoHmm, I think I decided I’d share Warhammer things when they involved some converting or other modelling effort, didn’t I? So here’s a stupid little Imperial Guard light tank that I converted out of a larger Imperial Guard IFV and a spare turret. It is supposed to be as illogically impractical as other Warhammer 40,000 tanks.
The finished piece:
A WIP shot that helps show which bits were scratch built (white plasticard) and which bits were taken from actual kits, with or without some conversion effort:
timbog160Full MemberPosted 2 years agoSmashing that, nice bit of dry brushing!
What this thread needs though is a Big Jug! P47D Razorback in 1/32 to be precise…!
It has taken a loooong time to get to this stage, due to many other commitments. It’s quite an involved build and lots of dry fitting and test fitting is recommended and you need to be patient. A lot of the parts can be problematic if the stuff you’ve done 2 or 3 steps ago isn’t just so. Fitting the interior into the fuselage will be a major test of that.
Bizarrely the kit includes a clear engine cowling to show off the yet you be built engine. Even more bizarrely I am leaning towards keeping it clear, just because I’ve never seen it done. There is quite a nicely rendered piece of nose art on a decal, and I think it might look interesting to put that on the clear cowl, varnished over. We will see. I have seen some warnings that the cowl does not fit over the engine in any event so it may have to be painted anyway.
ChrisLFull MemberPosted 2 years agoThanks guys. 🙂 There’s quite a lot of snobbery about dry brushing but I think it produces quite a nice worn look on stuff like my tank and I’m prepared for things to look not quite perfect in return for the time savings that dry brushing can provide compared to manually highlighting things!
That Thunderbolt cockpit looks impressive (and large)! I’ve got a 1/32 Tamiya Phantom kit that has clear radome parts, I have wondered at times whether I could use an airbrush to paint most of the radome but have one clear bit allowing the interior detail to be visible and manage a nice fade between the painted and clear bits.
FreesterFull MemberPosted 2 years ago@timbog160 that’s some serious looking detail in that cockpit. Nice work.
timbog160Full MemberPosted 2 years agoThanks Freester. Size helps to be fair 😀. Never been much cop at 1/72, although they are far easier to store!
Harry_the_SpiderFull MemberPosted 2 years agohttps://photos.app.goo.gl/zqM5BmFmU42R8uUy9
Coming together. The fit is absolutely superb, but I’ll have to leave it now so that the booms don’t droop and skew the tail.
@freester look out for blind holes in the underside of the wings. Maybe the Revell instructions are better than the Cyber Hobby, but I missed one as there is an extra one on the starboard side.FreesterFull MemberPosted 2 years ago@Harry_the_Spider thanks for the heads up I’ll check the instructions.
The main fuselage assembly ground to a halt today this don’t look right around the undercarriage hole. Jr gutted.
Got the kit from Jadlam… Do I email them or Revell direct?
FreesterFull MemberPosted 2 years ago@Harry_the_spider I’ve just looked at your pics again. Yours looks like an FAW1 the booms on the top of the wings don’t look big enough they should extend over the front of the wings for an FAW2?!
timbog160Full MemberPosted 2 years agoI’d send a pic straight to Revell. The big manufacturers keep lots of spares in for just such an eventuality.
timbog160Full MemberPosted 2 years agoLooking good so far Harry – I hadn’t appreciated it’s size relative to a Phantom, can’t imagine you got too many of them to a carrier…!
scratchFree MemberPosted 2 years ago@freester – There QC should have picked that up, that’s a short in the moulding, not enough plastic has been injected to bridge the gap at that point, or plastic not hot enough, I’m assuming the tail fins should be symmetrical as well but they’re not.
Get it back to Revell, I’d be expecting a new kit!
Harry_the_SpiderFull MemberPosted 2 years agoBooms on, making it look ugly.
Sea Harrier for scale.
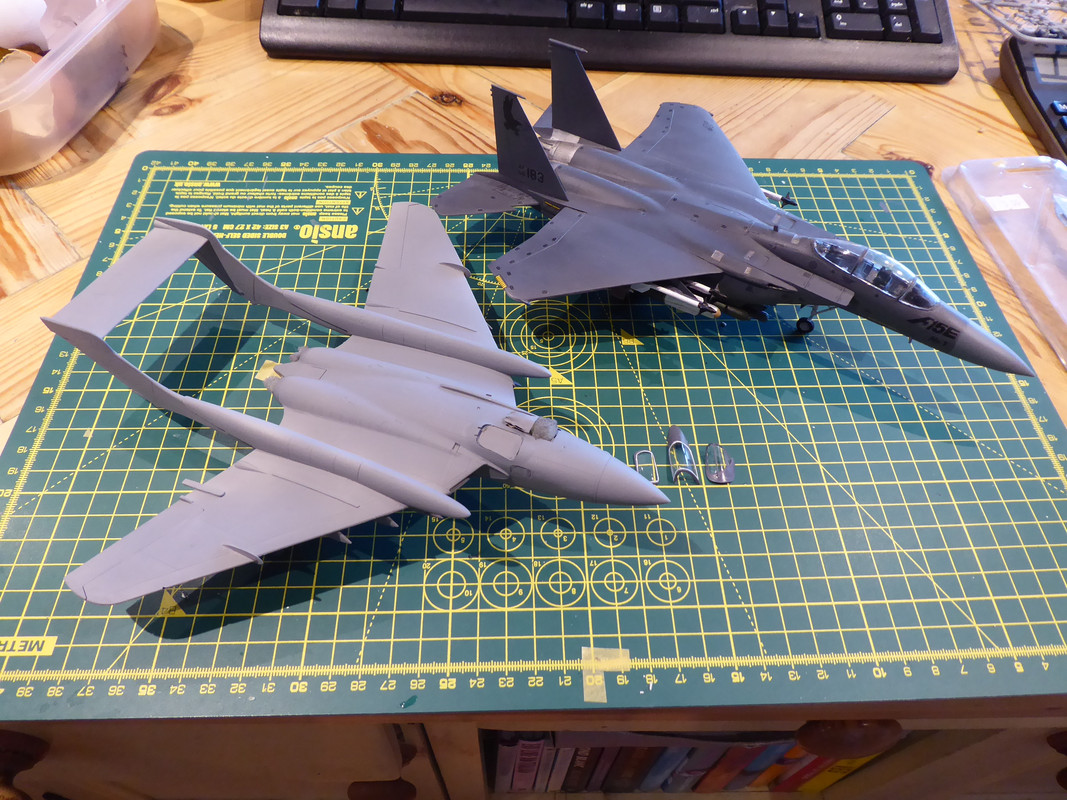
Harry_the_SpiderFull MemberPosted 2 years agoPrimed. F15E for scale.
Was disproportionally pleased with my canopies until I realised that I had painted the hatch cover for the FAW.1 option.
timbog160Full MemberPosted 2 years agoNo such thing as too much practice when it comes to canopies Harry…!
Harry_the_SpiderFull MemberPosted 2 years agoYears too late I have finally started the “Scrape the mess off with a cocktail stick method”. That a revelation!
No more masking and spraying the glass. From now on I’ll brush paint it, tidy up the (considerable) excess then stick it on right at the end.
Harry_the_SpiderFull MemberPosted 2 years ago@Freester Any joy from Jadlam?
I’m off to the shops again as I’ve found out that the wheel wells and the door interiors are a greeny/bluey/grey that I don’t fancy having to mix a couple of times, so I’ll see what Tamiya and UKIP Jim at the LMS have to offer.
RockhopperFree MemberPosted 2 years agoWell its finished bar a couple of small bits and maybe some weathering but to be honest I’ve lost interest in it now! Its a really nice kit but my attention to detail just doesn’t do it justice.
Harry_the_SpiderFull MemberPosted 2 years agoA big rascal!
I know what you mean about losing interest. I’ve got a Victor, SU34 and A-10 sat half finished.
FreesterFull MemberPosted 2 years ago@rockhopper NIIIIIICEE and BIIIIG 🙂
@Harry_the_Spider – nothing from Jadlam but I also sent an email to Revell service and they have replied already asking for an address to send replacement parts.FreesterFull MemberPosted 2 years agoWasn’t sure whether to post these or not. My 1/72 P47 has turned into a bit of a mule. Challenging blue camo, and a metallic underside.
All hand brushed using Revell enamels. Thinned with Humbrol Thinners. I masked the metallic painted a few coats of black and then 4 or 5 coats of Revell Aluminium 99. I’m kinda happy with the metallic finish and the edge / masking. The dark blue camo looks I’ve done it with a felt tip pen. Some paints go on so well, look so nice. Others are just frustrating!


You must be logged in to reply to this topic.