- This topic has 690 replies, 36 voices, and was last updated 3 years ago by zilog6128.
-
Cheap 3d printer kits – Experiences?
-
WorldClassAccidentFree MemberPosted 6 years ago
Unforseen benefit of Brim.
When you print starts to lift you an use the brim to tape it in place. Hopefully I have saved this one. I think the lift was caused by ‘someone’ deciding the room was stuffy and then opening the windows and doors to let some fresh air in.
Lovely fresh air about an hour into what was up until then a perfect print.
 [url=https://flic.kr/p/234RWJ7]20180207_170904[/url] by WCA!, on Flickrstumpy01Full MemberPosted 6 years ago
WCA – I’ve seen people use a hot melt glue gun to re-stick a lifting part and also those 3D doodle pens that you can get. I like the tape idea on the brim. Did it work?
stumpy01Full MemberPosted 6 years agoHas anyone got any experience of calibrating the extruder steps, to check that there is no over/under extrusion.
I want to do mine, but keep seeing contradictory evidence on how it is done & whether the standard firmware on the CR10-Mini will let you write to the EEPROM.
I have seen that mattercontrol will let you send a command to feed 100mm of filament to check how much is extruded and then set the steps per mm accordingly. But, I am concerned that the printer won’t then let me save the updated numbers without having to fart around loading different firmware on; I really don’t want to do this at this early stage of using the printer.
I’ve downloaded mattercontrol tonight, so we’ll see how it goes.
WorldClassAccidentFree MemberPosted 6 years agoStumpy – The tape held for the last 2 hours of the print and it was perfect. Result!
Please post up your findings regarding firmware etc. I was wondering the same. I did the 100mm test and got 99mm (or something like that) but couldn’t work out how to make the change to correct it.
MilkieFree MemberPosted 6 years agoI think the CR10 is based on Marlin firmware, therefore you just need to add an extra line to the start of the gCode.
http://marlinfw.org/docs/gcode/M092.html
Taken from the link below:
…navigate via the main menu of the printer to Control>Motion>Steps/mm and enter it there. Alternatively put a M92 command into the start gcode of your slicer.https://www.thingiverse.com/groups/creality-cr-10/forums/general/topic:19224
stumpy01Full MemberPosted 6 years agoMilkie, thanks for doing a bit of digging.
I had already had a read through that Thingiverse topic, but wanted to get away from having to modify the gcode to alter the steps/mm. I don’t know why, but I would prefer to have that value stored inside the machine as a set-point, rather than it being ‘programmed’ via the GCode.
Makernoob on YouTube has done a good video on how to do this via mattercontrol. He makes no mention of having to use custom firmware, but then he isn’t using a CR10 as his example.
Here’s a link to the vid. It might be worth a watch through WCA:
I installed Mattercontrol onto the laptop last night. I am going to try to find some time between now & the weekend to at least hook it up to the printer & see if the two will talk to each other! The discussions I have seen regarding com ports & baud rates don’t fill me with much hope! 🙂
MilkieFree MemberPosted 6 years agoManaged to setup my OctoPi to control my printer. I can now control it by the built in webpage, or if I can’t connect to my home network I can control it via Telegram which is very much like Whatsapp.
Now I have managed to reduce the focal length of the camera, I can design a new mount for it, currently it is held in place with some Gorilla tape & card. ^The yellow thing is an old mount I thought I would print to see if it can be adapted.
After printing a couple of things this week (clip mount above and front face for the OctoPi), I have noticed I need to replace a couple of things. I need to replace the bronze bushings, 8mm rods (x8) and bearings. It does make quite a noise on fast small movements due to a bit of play between rods/bearings/bushings, but the quality is still good. I just can’t find any info on how to replace the rods!
AlexSimonFull MemberPosted 6 years agoOctoPi is definitely on my todo list – Well done Milkie! – was it easy?
stumpy01Full MemberPosted 6 years agoI’ve seen some people mention having problems with Octopi crashing during a print & causing the print to fail. Is this something you have experienced?
A bloke at work has an Ender2 and runs Octoprint on it. He keeps trying to persuade me to give it a go.
I still haven’t found the time to calibrate the extruder….at the weekend I printed a soap dish which turned out pretty well; not perfect, but pretty good.
I also did a sensor housing for a bloke at work who is working on an electronics project. I had to use supports & found them very hard to remove from inside the housing. I used the default Ideamaker settings though, so that can probably be improved.
I am realising that I could really do with a day to myself with a list of settings to adjust and some simple test prints to run through. Never gonna happen at the moment though with family commitments and other jobs to do….
MilkieFree MemberPosted 6 years agoIt hasn’t crashed, but it has had a couple of second’ish pauses. I use the OctoPi for transferring gcode files to the printer SD card by WiFi. I then start the print from the printer as I like to be there when the first layer is being printed. This means it doesn’t do anything weird like crash or pause. I can then use OctoPi to cancel the print, view the print and see how far along it is. Probably the best bit on OctoPi is the TimeLapse feature. I keep forgetting about it and you cannot start it once you have started a print. One day I might remember.
I know that feeling about not having to time to configure! I really should print a few things to configure the settings and get it dialled in, but I don’t have the time.
I hadn’t switched my printer on in quite a while, I just turned it on and started printing. It didn’t have a dust cover, so the bed was covered in dust, I didn’t level the bed, and didn’t clean and lube the rods! Printed really well though, once I dusted it with my hand.
When I could be bothered and had time. I would print these:
Calibration Tower, for getting the right temperature
https://www.thingiverse.com/thing:729703This one helps with overhangs and finding any loose belts, etc.
https://www.thingiverse.com/thing:1019228I would also print another tower in vase mode, with temperature decreasing every 10/15mm to find out which temperature was the strongest. It is worth doing, but if you are changing brands of filament you end up having to do it with each roll.
stumpy01Full MemberPosted 6 years agoI’ve got this temp tower ready to go with the gcode modified to alter the temp at each level.
https://www.thingiverse.com/thing:1028352
The more video’s and articles I look at, the more I realise that I have done virtually nothing to get my print optimised yet. I stuck in the default values that were provided on the USB drive with the printer. I am sure they are OK, because the thing prints but it’s now getting it printing really well.
I still need to sort out: extruder calibration (and possibly X, Y & Z), temperature (of bed & nozzle), retraction settings (including learning more about coast & wipe settings) and probably some more stuff that I’ve jotted down but can’t quite remember!
Then I need to tinker about with support settings because the only time I have used that so far, it was a pain to remove the supports & they left a horrible mess behind.
At least I seem to have achieved a level set-up for the moment. Last night I wanted to print another object for a work colleague. I mentioned above I’d done a sensor housing for a bloke at work – well he only gave me half of it. So, he gave me the other half & I did that last night. It was probably <10 mins from turning the printer on, to having it putting down the first layer. I just did an auto home, loaded the filament & purged some out to make sure it was flowing OK, put some fresh glue down on the print bed and then pressed go. I didn’t even clean the bed after the last print, just put fresh glue on top of the old stuff. It printed fine.
I’ve found a useful setting in Ideamaker as well. You can adjust your print profile (e.g. use your standard PLA profile, but change the infill to 100%) and then ‘close without saving’, but slice with those settings. By default, ‘close without saving’ dumps the changes but there’s a tick box in preferences that will let you slice with those altered settings. I guess those settings remain until you either alter them, or close Ideamaker (I didn’t try it).
thepodgeFree MemberPosted 6 years agoJust about to start modelling some parts for the lad’s brio set… this is what 3D printers are really made for, modding toys
AlexSimonFull MemberPosted 6 years agoJust about to start modelling some parts for the lad’s brio set… this is what 3D printers are really made for, modding toys
Indeed – I try to call my toys tools, machines or whatever, but it’s basically the same thing 🙂
stumpy01Full MemberPosted 6 years ago<div>
Just about to start modelling some parts for the lad’s brio set… this is what 3D printers are really made for, modding toys
</div>
Excellent! I’ve got a list of things to make for my daughter, but not actually got round to them yet:
– Personalised Headbadge for her Quadie bike
– Flame attachments for the same bike
– New handles for some foam paint rollers that don’t actually roll
– Name badge for her door.
There are some good Brio models on Thingiverse, I think…. https://www.thingiverse.com/tag:Brio
thepodgeFree MemberPosted 6 years agoThere are also some rubbish things on there too. An hour of printing later and I have some track connectors that are far too short hence me modelling from scratch not just downloading stuff.
WorldClassAccidentFree MemberPosted 6 years agoStumpy – I have been making good use of my enforced sick leave and lack of mobility to play extensively with my 3D printer. I have videod my experiences to show how I calibrated my printer, flashed the firmware, levelled the bed etc.
Here’s how to flash your firmware : https://youtu.be/BC5FMVLTX1E
And once you do that you can actually save the changes you make when calibrating the printer. : https://youtu.be/xYuvd_ujLGM
If you subscribe to the channel you will see about a dozen 3D printing videos plus other random shit from my life. It is not a commercial channel and I don’t get paid or free gifts so don’t expect too much 🙂
SammyCFree MemberPosted 6 years agoOk, so how much overhang can you have before it needs to be supported during the print?
stumpy01Full MemberPosted 6 years agoCool WCA, nice one. I’ll have a look and see what you’ve been up to! 😀
SammyC – I think that depends a lot on your printer, settings, material, print settings etc. You can get overhang tests to see what your set-up can do.
WorldClassAccidentFree MemberPosted 6 years agoSammy c – my temp tower test which is video 10-1 I think shows unsupported spans and what happens to them. They droop. Different slicing software makes a difference
papamountainFree MemberPosted 6 years agoAny of you cr-10 owners seen this whole debate? – https://www.th3dstudio.com/creality-cr-10s-v2-0-and-creality-cr-10-v1-1-2-board-issues/
and – http://jozerworx.com/?p=260
My cr-10 mini seems to be displaying this behavior. Can flit 3-5C on the nozzle sometimes and after cooling down on my last print, bed at room temp was flitting up to about 8C.
Big discussion about it on the facebook group.
stumpy01Full MemberPosted 6 years ago^^^ I’ve seen the random debates about this but to be honest have ignored them for the most part. There is so much ‘modding’ stuff out there, that while this got my interest I just thought it was another thing that for the moment I didn’t really need to concern myself with.
But – having seen that…..perhaps it is worth doing something about. I haven’t noticed any temp fluctuations & to be honest I am sceptical if it makes any real world difference. I am not entirely sure what part is affected & where the read-back on printer display is coming from.
As I understand it, the hot-end is heater via a small cartridge heater into an alu block. The odd instantaneous voltage spike into the cartridge heater, won’t massively affect the actual temp of the block due to it’s thermal mass. Obviously if these spikes are occurring very frequently, it will perhaps cause an increase in block temperature but it won’t be an up-down-up-down change.
I could see it perhaps being more of an issue with regards to control, and the PID control of the heating system, as well as causing premature component failure.
I’ll keep an eye on it.
My Wife used to work in the electronics industry and is a dab hand at soldering – so I can employ her services if need be to do a repair! I’ll probably check to see if replacement boards are available before doing that though!!
AlexSimonFull MemberPosted 6 years agoIf i’d noticed any problem in the prints, I’d be worried (normal CR-10 here), but I haven’t so I’ll ignore it unless something more official is published.
WorldClassAccidentFree MemberPosted 6 years agoI. Have a revolution tarantula rather than a cr10 but when I did a temperature tower there was little difference I the print between 228 and 240 hot end so I doubt that a couple of degrees will matter. Same true for the bed temp I imagine.
WorldClassAccidentFree MemberPosted 6 years agoHas anyone noticed difference in the strength of prints at different temperatures?
Previously I was printing PETG at 240 but after printing a Temperature Tower I reduced this to 234.
The first thing I noticed were that the model warped and lifted slightly at the lower temperatures. This was similar to the temp tower where the lower temperatures ‘dragged’ more and pulled the model off the bed eventually.
The second was that the printed model seemed more brittle. In fact, one o<span class=”text_exposed_show”>f the brackets snapped which has never happened before.
</span><span class=”text_exposed_show”>Anyone else seen similar?
</span><span class=”text_exposed_show”>I am currently reprinting at 240</span>
Video of temp tower lifting from 48 seconds
MilkieFree MemberPosted 6 years agoI was like OMG OMG watching your video! I agree that 234°C does seem the best, but tbh none of that print looks any good. I can just see that you had a problem on layer 2/3ish.
I haven’t printed in PETG as I haven’t needed anything better than PLA, it seems find for mounts/spacers/tools. My experience is only with PLA really, I do have some ColorFabb nGen to try though.
I have found if I print at a lower temperature it is, the less likely it will warp from the bed, but also less likely to stick to the bed.
If the temperature is too low, I can peel the layers apart, they don’t bond.
If the temperature is too high, the PLA becomes too brittle.
I print at a lower temp than higher, prints come out better, bridging better, quality better. If I start getting underextrusion then i generally know to bump up the temp by 5-10°C, if that doesn’t work I clean my nozzle inside n out.
Regarding the Slicer differences, have you setup the slicer profiles so they are using one for your printer? I remember having a print similar to yours and it was because the profile was not for my printer.
WorldClassAccidentFree MemberPosted 6 years agoPrinting PETG at 240 seems to give the best finish/durability blend. I have lots of prints looking better than the Temp Tower I assure you 🙂
The Slicer settings started as the defaults that come with Slic3r when you down load it as part of Repetier Host. I then upped the nozzle and bed temp and thickened the perimeters as I was making prints that would be taking some strain. Once things were working I just left them alone.
If you look on my YouTube channel there is a short clip comparing Sic3r with Cura which shows the settings I use for both when printing PETG. I don’t find it any harder to print PETG straight to glass than I did PLA. Never tried ABS……..
stumpy01Full MemberPosted 6 years agoFinally got round to fiddling about with calibrating the extruder.
I used mattercontrol to connect to the printer. Sending a command to extrude 100mm, actually extruded 99mm so it was virtually spot on.
I’ve adjusted it anyway by adding the extruder e-step value to my start gcode, but I’m sure 1% increase won’t make much difference.
I printed a test piece for work on Saturday, but knew I wouldn’t have enough filament. I risked it anyway & it was actually really useful. Because I had to stop the print around the 50% mark, I was able to inspect the internal features & see what I need to work on in terms of settings.
I definitely thing that there is not enough plastic going down – the first layer has visible gaps in it, as do subsequent layers. There are also gaps between the shell & infill, even where the infill percentage was set to 100%.
This is what I was hoping calibrating the extruder would cure. But, it appears to be cock-on. So, with my new Hobbyking filament, I plan to do a 1 layer thick cube to measure & use to adjust my extrusion multiplier; I’m hoping the wall thickness will be <0.4mm.
Once that is done, I’m gonna do a temp tower as well & hopefully this will put me in a better place, set-up wise. I’m still using the main values that I dumped in to get the thing running. I don’t know, but wonder whether 200deg C is a bit low for the hotend temp, which could also explain why not quite enough filament is being put down.
I used this guide for extruder calibration. It’s one of the clearer ones I have found:
WorldClassAccidentFree MemberPosted 6 years ago200 sounds a bit low but then I normally use PETG filament so can’t really comment but remember that it might be your slicer settings causing the issue. I had a problem with infill not staying in place because I had the speed too high.
This video has the settings that work for me in both Cura and Slic3r starting about 1:40
Maybe if you compare them to yours you might find some big differences. I would be interested in seeing what settings you use as a comparison.
stumpy01Full MemberPosted 6 years ago200 sounds a bit low but then I normally use PETG filament so can’t really comment
Yeah, that’s why a temp tower is on my to do list. I didn’t bother with it for the included filament, but it probably would have been a good learning exercise.
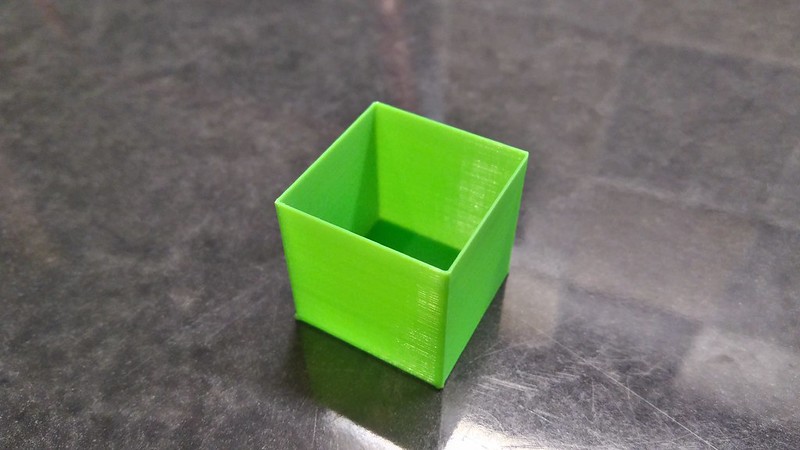
I just did a calibration cube with my new HobbyKing PLA to measure wall thickness. Came out at 0.44mm wall thickness although gonna measure it again tomorrow when it’s completely cooled. If the dims don’t change, then I need to bring the extrusion multiplier down a bit.
This stuff printed really easily. Stuck to the bed straight away and looks really nice. I’ll upload a pic (although it’s not terribly interesting!) Still got a bloody elephant’s foot!
[url=https://flic.kr/p/21Z1XKb]25mm calibration cube with single wall thickness (0.4mm nominal) to get my new HobbyKing PLA tuned in.[/url] by STW stumpy01, on FlickrWorldClassAccidentFree MemberPosted 6 years agoI recently did a temp tower (https://youtu.be/7VzpQRq2Ov0) and it showed that the best detail came out at 234 although it printed much the same for anywhere between 228 and 240.
What was more interesting to me was when I actually printed something at 234 it tried to lift and warp much more and came out quite brittle compared to the stuff I printed at 240.
The ideal temp for printing detail wasn’t the same as the idea temp for printing..
If I could be bothered I would probably play more with the slicer settings to see the differences I could make. My first thoughts are print at 240 but with a bit more cooling fan and slightly slower perhaps. That might cook the filament properly but still preserve the details
stumpy01Full MemberPosted 6 years agoWell, that’s a bit crap. I tried a temp tower tonight and it didn’t work….
It started well & I did it on a raft. That was at 200deg. C and looked fine. I left it to go downstairs and when I checked the camera it had stopped. I wondered what was going on & went to check on it; then realised halfway up the stairs that it had probably paused while increasing hot-end temp to the start temp of 240deg C for the tower.
When I got to the printer, the first issue I realised was that the temp change gcode causes the printer to pause with the head in the same position. And obviously while it’s paused, it oozes a bit. This is no good because when it starts up again, it will cause a problem with printing. There was a melted pool beginning to form on the print & starting to coat the nozzle. I haven’t seen anything about it on temp tower descriptions that I’ve seen, but I wondered if I needed to put an X/Y shift command into the gcode while the temp change is occurring to stop this melting pool.
The second possibly more serious problem is that the hot end wouldn’t get to 240deg. C. It was up at 234 when i walked in, but then fluctuated down to 221, 226, 231, 234 and kept cycling around there. I’ve got a plan to do some small 10mm cubes like the one I posted above, at 200, 220 and 240 deg C to see if it was the change in temp from 200 to 240 that has caused this, or whether the hot end can’t reach 240.
I’ve got a few theories
– some people have mentioned that the 12V PSU isn’t acually putting out 12V from the factory & can be adjusted with a pot on the PSU itself.
– there is an issue with the PID control (which might explain the rapidly changing temp value.
– the under-spec capacitor issue on version 2 boards that there have been various reports of. I think papamountain posted some info about it the other day.
It’s annoying because I haven’t had any temperature issues up to now & the temperature had appeared stable.
stumpy01Full MemberPosted 6 years agoAnyway – as an update to the above…
Before going to bed last night I fired the printer up again and manually set the nozzle temp to 200, then 220 & finally 240 deg. C using the control box.
For each setpoint, the nozzle had no problem getting there. With the 240deg. C setting, it hunted around a bit as it got close & oscillated around the set-point once it was there.
I also noticed that the temp reading of the bed (no heating requested) was bouncing around by a couple of degrees which apparently is another indicator that the board has this cap issue.
I’m gonna e-mail gearbest about it and see if they have any solution – whether they can send me out a new board.
At the weekend, I’ll probably take the control box apart & see what version of board I have. The capacitors are very cheap, so if it comes to it I will get some & get the board modded. There’s a TV shop on the high st that I think does surface mount repairs & there’s also a few people at work who are experienced with this kind of thing too, so it shouldn’t be too big a task to get the cap replaced.
I’ve modelled up a single layer of the bridging temp tower test. I can print it off at discrete temp points & use to compare.
WorldClassAccidentFree MemberPosted 6 years agoI used this temp tower : https://www.thingiverse.com/thing:2625999
I slicered it in Cura and then manually edited the gcode to change the temperatures to better suit the range I wanted.
Thc Cura gcode is easier to edit than the Slic3r gcode as there is a comment at the start of each layer so it is easy to find the line that sets the temperature. I just used Nordpad to do the editing….
There didn’t appear to be a pause while the nozzle temperature changed.
I can email you thre actual gcode file if you want but you will have to edit the temperatures back down to the correct range for you.
stumpy01Full MemberPosted 6 years agoHi WCA. Thanks for the offer, although I’ve got the gcode edited.
There are two temp set codes that I have seen mentioned. One is change temp & crack on, while the other is change temp & wait until the set point is reached.
The tutorial I used, advised to use both, so the printhead gets to the new layer, the temp demand increases, but the printer doesn’t carry on until the new temp is reached. But, as I alluded to above, this has the unfortunate effect of leaving a gooey mess behind while the printer waits for the temp to be reached.
With my errant temp stability at higher temperatures, I think running discrete temperature models might be the best way forward for the moment.
papamountainFree MemberPosted 6 years agoInteresting. My temps were fine I thought when printing the first few things, then seemed to do what you describe bouncing around a bit. The vid of the cap issue being sorted shows it moving around a few degrees before the fix and after the fix it didn’t move more than about 1c…
Last time I looked they hadn’t released a new working board and the ones being sent out (2.1?)had the same problem.
Talk was of them using a chinese LMP2596 chip in some boards instead of decent jap one etc which was the reason the voltage ripple was there in the first place which then needed addressing with bigger cap. The ones with a decent chip, even though they had an underspecced cap, had less ripple and therefore the new cap wasn’t needed.
Interested to see which board you have in your control box. I really need to check mine too.
Let us know what you find.
Obviously this may not be the prob at all mind you.
Like you, if I decide to change it, I will probably take to tv repair shop, even though i’m pretty handy at soldering. Can’t see them charging much and they are used to fitting smd components.
papamountainFree MemberPosted 6 years agoOh and I saw the info about power supply output voltage. Someone upped theirs to make their bed heat up quicker..
WorldClassAccidentFree MemberPosted 6 years agoI have published my first ‘thing’ on Thingiverse : https://www.thingiverse.com/thing:2812005
AlexSimonFull MemberPosted 6 years agoGood stuff WCA – hope it’s keeping you more comfortable too!
NorthwindFull MemberPosted 6 years agoMy A4 is almost built, after a super-slow delivery. The difference between this generation of kits and the Tevo is just ridiculous, it’s not quite ikea assembly but it’s not far off and the basic platform is rock solid (it’s a delta so smaller print area but realistically should be big enough for most things). Might have it printing today, if I can be arsed.
Slightly held up by the traditional incremental design changes- the “how to build” video is fairly out of date in places but it’s nice to see how they’ve made improvements too. I’m looking forward to getting this big mad plastic-shitting spider into service.


The topic ‘Cheap 3d printer kits – Experiences?’ is closed to new replies.