- This topic has 713 replies, 3 voices, and was last updated 6 years ago by yourguitarhero.
-
Brewers of STW
-
teacakeFree MemberPosted 9 years ago
Hello Brewerists!
I got a few bits of gear and a Coopers IPA kit for my birthday. Got it all mixed and fermenting earlier this week and I’m now just waiting for the gravity to stabilise.
I work for a malt distilling company so I’m pretty knowledgable on the science of what’s going on but need to learn the skills of doing it with home kit and also what boiling and hops is all about?!
Two questions from me:
1. I have a 23 litre fermenter but have just bought kit to do an all grain recipe and I’d like to keep it to 10 litres so I can experiment. Is it an issue NOT to fill the fermenter to the top? My logic – CO2 is more dense than air so will quickly displace the air and will perform as normal . . . thoughts?
2. How long do most people wait between mashing in and boiling? My logic would say that by boiling all of your first wort (or all your wort if not sparging) you’ll be killing the enzymes and won’t be converting all your carbohydrates, particularly dextrins so you’re missing out on sugars. Maybe efficiency at this level isn’t an issue in home brew?
Thanks and I’ll keep you posted on my bottling and maturation of the Coopers kit . . . not expecting too much 😉 Just order ingredients for a St Austell Tribute 🙂
peterfileFree MemberPosted 9 years agowelcome to the fold teacake!
1. sticking 10 litres into a 23 litre FV for primary won’t be too problematic since as you’ve said the Co2 will blanket the beer. Bigger problem if you were transferring it into an FV with loads of headspace for secondary etc. I wouldn’t worry.
2. mash for an hour (although, I’ve read that conversion actually takes place in the first few minutes, so not quite sure why we mash for a whole hour, but it’s pretty standard to do so). Then go straight from the end of your mash/sparge to boil temp. Even with no attempt to improve efficiency, it’s easy enough to hit upwards of 70% efficiency using even BIAB, so at this level we’re talking the difference of a few pence for each jump up in overall efficiency. I never worry about it.
yourguitarheroFree MemberPosted 9 years agoHad the boiler in my flat replaced today.
Now have a whole new, empty cupboard where my water tanks used to be.
The copper hot water tank would actually have made a really good kettle!
Too big to handle brewing like that in a flat.Plan is to make it into a brewery.
End goal is to have pressurised kegs in fridges feeding taps through the wall on the right (which is my kitchen) gobuchulFree MemberPosted 9 years ago
Well after a few kits since Christmas I did my first all grain brew yesterday.
The whole thing has escalated very quickly and thanks to the joy of Ebay “Collection Only” bargains I have far too many barrels and FV’s already!
I picked my full AG kit for £70, only been used a couple of times and in excellent condition.
I got this recipe off the interweb, it’s a St Peters Golden Ale clone, one of my favorites, so I hope it works out well.
Pale malt 4000g
Wheat malt 100g
Crystal malt 220gChallenger hops 7.6%AA 34g @ 90 mins
Golding hops 4.6%AA 20g @ 10 mins
Golding hops 20g @ 0 minsOG 1.048
Estimated FG: 1.011
Estimated ABV: 4.7%
Colour: 18 EBC
Bitterness: 30 IBU
Final Volume 23lI came up a bit short with 20l at a OG 1046 so I need to tweak a few things.
It’s hard work compared to using kits mind!
The beautiful smelling hops just before they went in the boiler.
mugsys_m8Full MemberPosted 9 years agoSacling question: I have a recipe I want to do (Abbeydale Moonshine), but using the Massive Brewery kit. The recipe I have is for nearly 22l so I need to scale it down. How do I do this? Is it jsut scaling all ingredients down realtively? Or is it not (as I think it might well be)?
Recipe is:
Type: All GrainDate: 23/12/2007
Batch Size: 19.00 LBrewer: Troy H
Boil Size: 21.75 L
Boil Time: 60 min
E Brewhouse Efficiency: 75.00
Ingredients
Amount Item Type % or IBU
3.50 kg Pale Malt, Maris Otter (Thomas Fawcett) (5.9 EBC) Grain 100.00 %
16.00 gm Williamette [5.50 %] (Dry Hop 3 days)
16.00 gm Williamette [5.50 %] (30 min) Hops 9.1 IBU
16.00 gm Williamette [5.50 %] (25 min) Hops 8.2 IBU
16.00 gm Williamette [5.50 %] (20 min) Hops 7.2 IBU 1Pkgs American Ale II (Wyeast Labs #1272) [Starter 2 L] Yeast-Ale
Beer Profile
Est Original Gravity: 1.044 SG
Measured Original Gravity: 1.010 SG
Est Final Gravity: 1.011 SGEstimated Alcohol by Vol: 4.26 %
Bitterness: 24.5 IBU Calories: 90 cal/l
Est Color: 8.4 EBC
Color: Color
Mash ProfileCarbonation and StorageCarbonation Type: Kegged (Corn Sugar)
Volumes of CO2: 1.8
Pressure/Weight: 30.9 gm
Carbonation Used: – Keg/Bottling
Temperature: 15.6 C
Age for: 28.0 days
Storage Temperature: 11.1 Cjohn_drummerFree MemberPosted 9 years agoI came up a bit short with 20l at a OG 1046 so I need to tweak a few things.
does your boiler have a tap? how much liquid does it take before starting to come out of the tap? work that out and then scale your brews up to include that dead space and then you’ll get the amount you’re aiming for. Or thereabouts
For example, I know my boiler has 4 litres dead space below the tap so if I want to do a 23L brew, I scale it up to 27L and then at the end of the boil, I should get 23L in the fermenter.
If I get less but stronger then I know I need to add some water back in – best using bottled water for that. Or I shrug my shoulders and agree to have a bit less but at a stronger ABV
The recipe I have is for nearly 22l so I need to scale it down. How do I do this? Is it jsut scaling all ingredients down realtively?
pretty much, yes.
I use Brewmate software, available free from http://www.brewmate.net – set your batch size to whatever your recipe says, then enter the ingredients as in the recipe. Then adjust the volume down accordingly, and the software will do it all for you.
simplesallthepiesFree MemberPosted 9 years ago4L deadspace, all that lovely beer going to waste 🙂 Couldn’t be doing with that 🙂
john_drummerFree MemberPosted 9 years agowell most of it is goop from the hops, and the hot-break protein, and stuff, so I prefer to leave it where it is 😉
mugsys_m8Full MemberPosted 9 years agohmm this looks good John. Thanks. Downloaded and playing…but I can’t get the IBU anything near. How do I put the hops into the software as per the recipe?
john_drummerFree MemberPosted 9 years agoThe fermentables go I the top half of the screen, hops in the middle third, and others eg Irish moss at the bottom.
Hops can go in as leaf or pellet – select leaf.
You can set up the AA values of the hops and the sugar content of the grains in the setup section. Also in setup you an choose all grain, extract or BIAB. I use BIAB.
There’s a Brew Day tab that tells you how much liquid you’ll need. And a Timers tabThere are also loads of recipes on. Brewmate.net. Some duplication though
To play with the OG and IBUs you can toggle Grain Mode iirc. Using my iPad at the mo so I don’t have immediate access to Brewmate but I’ll update tomorrow at the latest
mugsys_m8Full MemberPosted 9 years agoThanks John, I can get a IBU of 26.4 (aiming for 24.5). Also colour is out at 10.2 (aiming for 8.4). Wonder if it’s the preset alpha of the williamette hops that is causing this difference.
brocksFree MemberPosted 9 years agoHello brewers
First brew on the go at the moment just a question about temperature if it’s not in correct temp range what actually will or won’t happen regarding fermenting? Thanks in advance, brew on the go is a coopers IPA!john_drummerFree MemberPosted 9 years agoAlpha acid content will vary from one pack of hops to the next. Should be on the label. Won’t make any difference to the colour though, that’s in your specialty grains.
To modify your IBUs, reduce or increase the quantity of your bittering hop I.e the one that boils the longest. Don’t mess with the aroma hops though 🙂
To reduce the colour, reduce the quantity of the darker grains and increase the quantity of the paler grains to match, or vice versa to darken itYou should be able to modify alpha acids, colours and sugar content in the Settings tab.
remember Brewmate is a US program so their defaults may differ from ours, so to be as accurate as possible, try to update the grain and hop settings for each pack. If you can be bothered 😉
brocks, re temperature- if it’s lower than recommended it will still ferment, just not as fast. If it’s above recommended, you could get some ‘off’ flavours e.g Apple, banana. Better a bit too cool than a bit too warm
Word of warning re the coopers IPA – it takes about three months of bottle conditioning to begin to be anywhere near its best.
teacakeFree MemberPosted 9 years agoBrocks – John is spot on about banana flavours with high temp fermentation.
I’ve just started opening my first brew (a Coopers IPA as well!) and while it is fine to drink the banana nose and flavour is, interesting! I’ll store them away and hope it improves. 3 months noted on the calendar.
Next up for me is a St Austell Tribute copy. I’ve been messing with Beersmith – will keep you posted.
Friend of mine from Holland shared a glorious Tripel he home brewed at the end of last year. That’ll be my third brew sorted then . . .
Question about BIAB bag – I found some viola (curtain backing material) – do I really need to sew it into a bag or could I just stuff it in the pot and throw the grain inside, then hoof the whole lot out after mashing is complete?
Happy brewing!
john_drummerFree MemberPosted 9 years agoYes you could, but I find a bag keeps it all neat while you run a couple of litres of hot water through it for a final sparge before adding that back into the boil
Goddam predictive text 🙁
teacakeFree MemberPosted 9 years agoFirst all grain mash done! Lovely smell in the kitchen. Was a little ahead in SG pre-boil but the weakness of my hob meant I ended up a little bit back (I’ll need to tweak the equipment profile).
Biggest issue i faced – scaling the grist and water but NOT scaling the hops. Target was 32, Beersmith estimates 65! Waweee!
So now we wait and see what we get out of it. Itching to get going on another mash at the weekend so might get ordering . . .
yourguitarheroFree MemberPosted 9 years agoLittle update.
Got a new setup – 24l pot that works on my induction hob.
started mashing in the oven as it has a 65c temperature setting that seems very accurate.Also shelved out my brewery cupboard:
Got a couple of batches of Arrogant Bastard on the go in there. One with US-05 yeast and a second with S-04.
Eventually will clear out a little more space in the bottom and put in a keg fridge, some gas and regulators and run 2 lines through the wall into the kitchen and have taps.
Need to perfect my brewing first, hence the small batches. Have enough fermenters to have 5 on the go at once so can keep experimenting.
yourguitarheroFree MemberPosted 9 years agoHmm silly onedrive pictures
Has a very steady temperature of 18c in there. No heating and very thick brick walls. Should be good for fermenting.
john_drummerFree MemberPosted 9 years agodemo day tomorrow at my LHBS.
Chocolate Stout or Caragold (Citra/Cascade hoppy golden ale) ?
gobuchulFree MemberPosted 9 years agoDid my third AG brew yesterday. It was a Brew Dog Punk IPA clone from The Malt Miller.
They do AG kits.Great service from them as well.
The Chinook hops smelt fantastic. Well looking forward to this one.
I’ve got 3 brews fermenting at the moment.
Might try a single hop/single malt brew next time, this IPA looks interesting.
brantFree MemberPosted 9 years agoAny Calderdale residents or those passing through Hebden Bridge might be interested to know Drink? – the bottle shop on Market St owned by Hebden Bridge Brew Co/Bridestones is doing a homebrew competition soon where the winner can do a full brew with them at the brewery.
john_drummerFree MemberPosted 9 years agoChocolates stout it was. Took a couple of samples ” here are two I made earlier”, went down very well
teacakeFree MemberPosted 9 years agoGot a few bottles of my St Austell tribute copy/cock-up (2.5 times to much hops!). It doesn’t come across as bonkers bitter as I expected – Beersmith says 65 IBUs. I bottled 2 litres and have dry hopped the remaining 6L with 10g Cascade and will bottle that this weekend.
It’s quite a hazy beer which I guess must be due to the amount of hops I’ve thrown at this recipe?!
Going to brew on Friday night with the remaining malt I have. I’ve got a Maris Otter/Munich mix and will add Cascade. Going to try for an American IPA style.
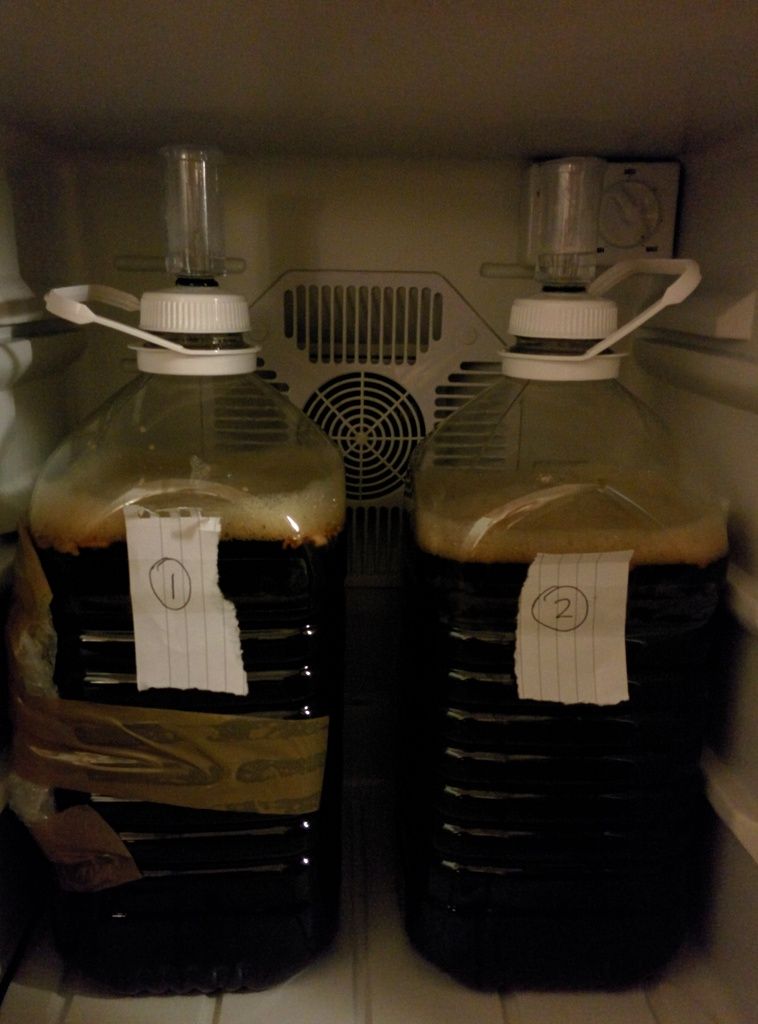
peterfileFree MemberPosted 9 years agoI’ve now started splitting all batches into 2, so that I can do “experiments” and fine tune beers while being able to do a side by side comparison.
e.g. playing around with different yeasts, dry hopping rates, length of time in primary, secondary v no secondary, spice and other additions etc.
Should be quite fun and really useful being able to open two bottles of beer made from the same wort and pick out the differences that each change makes!
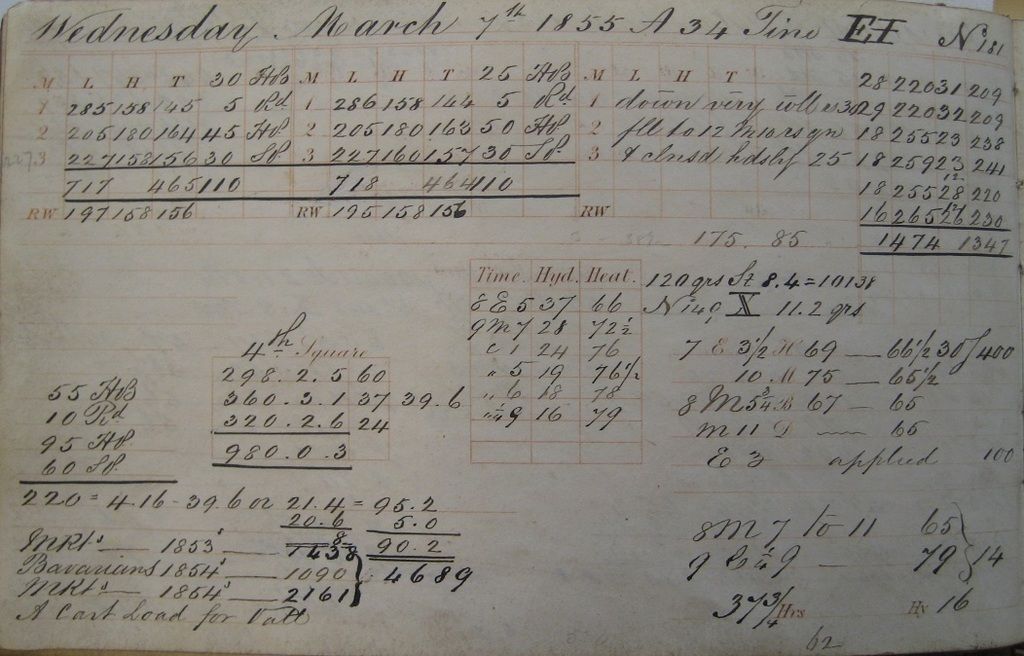
The beer in the fridge is an export india porter. One of my favourite commercial beers is Kernel’s EIP, which from a bit of digging around I found out they’d based on Barclay Perkin’s recipe from 1855.
I managed to get a look at the original 1855 recipe (see pic below) and after some historical digging around, worked out what the grain bill was. But it didn’t seem quite right. I won’t write the grain bill here, since it was really fun trying to work it out and I’d hate to spoil the fun for anyone who googles looking for it. If for some reason you do want it, email me!
I emailed Kernel in the hope that they’d be able to cast an eye over my proposed grain bill and let me know if I’d picked it up correctly and the response was utterly brilliant. They gave me a full run down of what they changed in BP’s recipe and why and some brilliant advice for putting it together. I didn’t think Kernel could go up much higher in my expectations, but they’ve managed it!
🙂
NZColFull MemberPosted 9 years agoIn case anyone else is interested my Grainfather has arrived and I have zero time to use it so is for sale, new and unused. There is one person interested but not confirmed. I can let you complete the purchase and get it shipped to you for £600 total, all you owe me is the deposit I paid. Email me if interested – for the moment I am far too busy !
yourguitarheroFree MemberPosted 9 years agoAny tried coffee flavour in their beer?
Brewed a chocolate stout the other day. Thinking I might split the batch and add some coffee to one half.
What’s the best way – chuck some coffee beans in?
yourguitarheroFree MemberPosted 9 years agoAh cool – I’ll try that. My pal has a coffee shop round the corner from my flat so I’ll get him to make me an espresso.
Did you sell your Grainfather?
Smudger666Full MemberPosted 9 years agoGents (or those close to Edinburgh at least) I just accompanied my newly 18 year old lad to a brew session at Stewart’s Brewery in Bilston. Their cRaft beer kitchen lets up to four folk do a 40 litre brew for £180 – with the option to increase the brew to 80l for another £55.
I’ve done a few kits in my time and thought it was a good birthday a pressie for him as well as seeing how the pros do it. I’ve been tempted to do a brew from grain/hops but never really knew enough to take the plunge – the guy who ran the session was really good and never stopped talking about what was going on.
First really sunny day and we got to spend the gaps between adding stuff and boils to sample the 20 odd beers on tap in outside.
we go back a week today to bottle the160 or so that’s now brewing away! Can’t wait.
yourguitarheroFree MemberPosted 8 years agoDecided (against my better judgement – rightly so) to build a website for a friend’s business startup.
As it was a pain in the ass, I thought I’d think of the money not as money, but as a treat:No real financial justification for it or anything, just seemed cool and less of a hassle than my pot.
Took me a little while to put it all together and figure out how it worked.
I got it from the homebrew shop on my street (www.brewstore.co.uk) who kindly gave me grains/hops/yeast for a brew with it.Did my first brew on it – went great! Very easy, and no mess in the kitchen. Normally I splash so much wort around that I have to do a couple of mopping sessions around after. I have a very small kitchen.
I also got a much greater volume of beer for the same time spent.
This is how much my old brews produced:
This time round I almost filled the fermenter.
Efficiency was through the roof as well – 93%!
Recipe was a pale ale. 4.7kg of grains got me 27 litres of wort at 1.047 to boil down.Overall, an extravagant purchase but a good one. Will be doing another brew this week for my friends’ wedding at the end of July.
I also just had these guys delivered:
Just need to get some more wee bits and some gas for them and I’m a couple of steps closer to having a bar in my house. My friends’ parents are retiring and closing down their hotel so I’m going to see if I can go round and get some bar kit off them.
peterfileFree MemberPosted 8 years agoExcellent! Was it easy enough to clean afterwards?
I’ve been toying with the grainfather for a while, but I can’t seem to pull myself away from building a nice shiny HERMS 3 vessel set up (I like building things so that would be part of the fun).
Good work on the cornies…I’m picking up a chest freezer on Wednesday that can hold 6 🙂
I entered a couple of beers into the London Amateur Brewers comp, which is a big one, and both scored in the top 10%, despite them being beers I was not particularly happy with. I quite like sticking random beers into comps since it’s useful to have someone who can detect defects giving an opinion. I know what I like to drink and whether I’m happy with a beer, but my palette isn’t sophisticated enough to identify all the undesirable characteristics of a beer.
That Export India Porter I brewed a couple of months ago has turned out to be the best to date.
My friends’ parents are retiring and closing down their hotel so I’m going to see if I can go round and get some bar kit off them.
Give me a shout if there are any gas manifold/regulator boards up for grabs! 🙂
yourguitarheroFree MemberPosted 8 years agoYeah, it’s easy to clean – you get some cleaner with it, fill it up with water and use the pump to swoosh it all around everything.
In fact, gonna do another brew today I think
teacakeFree MemberPosted 8 years agoNice set up there YGH!!! I had my appraisal yesterday and received a “clean bill of health” (his words not mine) – so my bonus is en route . . .
Thought I’d share a bit of learning regarding labels for bottles.
I’ve been using canva.com to design trendy looking labels in a few mins.
Then I print them off using a colour laser printer, cut to size and use milk to stick them to the bottles. Yes I said milk.
Soak a sponge in milk, use this to wet the back of your label (like your granny used to do with stamps) then stick to bottle. I find this very robust, quick, cheap and easy to clean them off afterwards.
It doesn’t smell or discolour either. Magic!
peterfileFree MemberPosted 8 years agoTeacake, you could also try Grotag, who make professional and reusable labels for you. Not particularly expensive either.
I just use liquid chalk pens!
yourguitarheroFree MemberPosted 8 years agoDid another brew with the Grainfather – screwed up though. I wasn’t reading the instructions properly and put the grain in the basket before it went in the strike water – causing it to overflow. Had to pump some out and then squash all the grains down to get them in. Didn’t get anywhere near my gravities – think the grain was too compressed.
Also tried just chucking the hops in it for the boil. That didn’t work out – big mess to clean up and lost some of the wort as it was too hop infested to pump or pour out.
Back to using hop bags!To be fair, I was trying a beersmith recipe and had wanted to reduce the alcohol content significantly, so in a way it worked out…..
Another brew on tomorrow night – nettle beer!
teacakeFree MemberPosted 8 years agoNettle beer – ace! There was a nettle based drink being made down in Devon and the poor guy was put out of business because HMRC decided it wasn’t a beer so he had to pay extra tax. Sad story.
Peterfile – Grotag, that’s not what I was expecting?! Something to do with Dungeons and Dragons style game?!
I presume you mean grogtag – can’t get their page to open at present.
What are your thoughts on the Grainfather YGH? Any complaints?
teacakeFree MemberPosted 8 years agoWhat’s doing Brewerists?
I’ve been brewing like a mad man but tonight will be my first one in 5 weeks as my 2nd son was born 5 weeks ago on Saturday! Naming that wheat beer after him 😉
I think my biggest improvements recently have been adding a ball valve to my mash tun (makes draining it loads easier). I also realised the stone outbuildings are very temperature stable – this has meant I don’t need to build a beer fridge just yet, but I do need to choose my beer based on the weather conditions.
I’m starting to tinker a bit with water chemistry to get better bitterness from my beers.
Getting a Belgian Dubbel on tonight. Cocked up the calcs for the first one which was 9.3% instead of 6.5%ish.
What recipes are people enjoying right now. Any new kit on the go?
I’ve been playing with making yeast starters and think I’ll make a little stirplate and evens tart propagating from slants as I see this as a big cost saving (buy a liquid yeast for £6.50 once and get several batches out of it).Cheers!
peterfileFree MemberPosted 8 years agoCongrats on the new arrival teacake! 🙂
I’ve had a bit of a building frenzy in the last couple of months. I’d promised myself I wouldn’t commit to any “serious” kit until I’d been brewing for a couple of years and that if I was still hooked after that long then it was a safe bet it wouldn’t gather dust.
I bought everything in dribs and drabs as I found parts I needed (easier said than done!) and then built it all up in an outbuilding.
the current set up consists of:
Yeast starter/harvesting equipment – build a stir plate and have selection of flasks, centrifuge tubes and other gubbins that allows me to not only hit proper pitching rates, but also to overbuild starters and store yeast, giving me an endless “free” supply of any liquid yeast I buy.
70 litre stainless HLT – with a 3kw LWD element, sightglass, ball valve.
50 litre stainless thermopot mashtun – this thing is amazing. Took a reasonable amount of drilling and angle grinding to convert to bottom drain, but I have zero deadspace and due to its design I lose less than 0.5 degree over a 60 minute mash even when it’s only a third full.
70 litre stainless boil kettle – another 3kw LWD element, stainless steel braid filer (build from some engine braiding and stainless fittings), ball vavle etc. This allows me to comfortably brew double batches if needed.
6 keg(!) keezer. This took forever to put together but it is absolutely brilliant. I converted a large chest freezer to accommodate 6 cornies by building a collar to raise the lid. I then added co2 and a full gas management system (got lucky and picked an old coca cola gas management board which is perfect for the job) and put together an STC set up for temp control.
2 fermentation fridges – this was my favourite bit. The outbuilding isn’t close to my house and controlling/monitoring the fridges was going to present a problem. Solved that with a Raspberry Pi, Arduino, couple of relays, a Mifi module, dynamicDNS and the excellent brewpi software. I can now control the fridges from my phone wherever I am. I was particularly pleased with this because I had to do all the soldering and software stuff myself, which was new territory. A few hiccups but got there in the end…hugely satisfying!
closed co2 transfers – I put together a little system that allows the direct transfer of beer from the FV to the keg in a completely closed co2 system, meaning the beer is never exposed to oxygen from the moment the yeast is pitched until I drink it.
Oddly enough, I’m actually drinking very little beer these days, probably around 5-7 beers a week, I give most of it away. The cost and effort required for a big batch is so close to that I was used to for small batches that it makes sense to brew more and spread the love amongst friends 🙂
I’m still doing either very early or very late brews. I enjoy getting up at 5am to preheated strike water and being finished up by the time others are waking up!
teacakeFree MemberPosted 8 years agoFlippin’ ek! That’s a lot of building and a serious set up. A friend runs a brewery and said once you buy stainless FVs then you’re in trouble!
How long can you keep one yeast strain going? Do you put them on agar and freeze? How useful is the centrifuge and how do you use it?
My next process improvement will probably be sorting out fermentation temperatures by building a fermentation fridge. Will take your earlier advice on water analysis too.
Same as you – my actual consumption is quite low. I won the local home brew competition which has nice.
Friday’s Belgian Dubbel went really well and is fermenting just now.
Upcoming brews: Winter ale, oak infused Wee Heavy, Milk or Oatmeal stout.Babies are up between 6 and 7am so my brewing needs to be at night but it would be nice to do morning brews. Set a new record of 3 hours from mashing in to closing the FV – biggest bottleneck now is waiting for the wort to start boiling on the kitchen stove!


The topic ‘Brewers of STW’ is closed to new replies.