I’ve been making a small Cherry and Oak box to hold a small sculpture/award. The award is a bronze of a stag beetle.
I’m adding a brass beetle inlay in the lid to tie them.
Used a 1mm router to try to cut some of the leg material away, and made a tiny chisel out of a jigsaw blade.
Wow, kayak, that’s superb work!
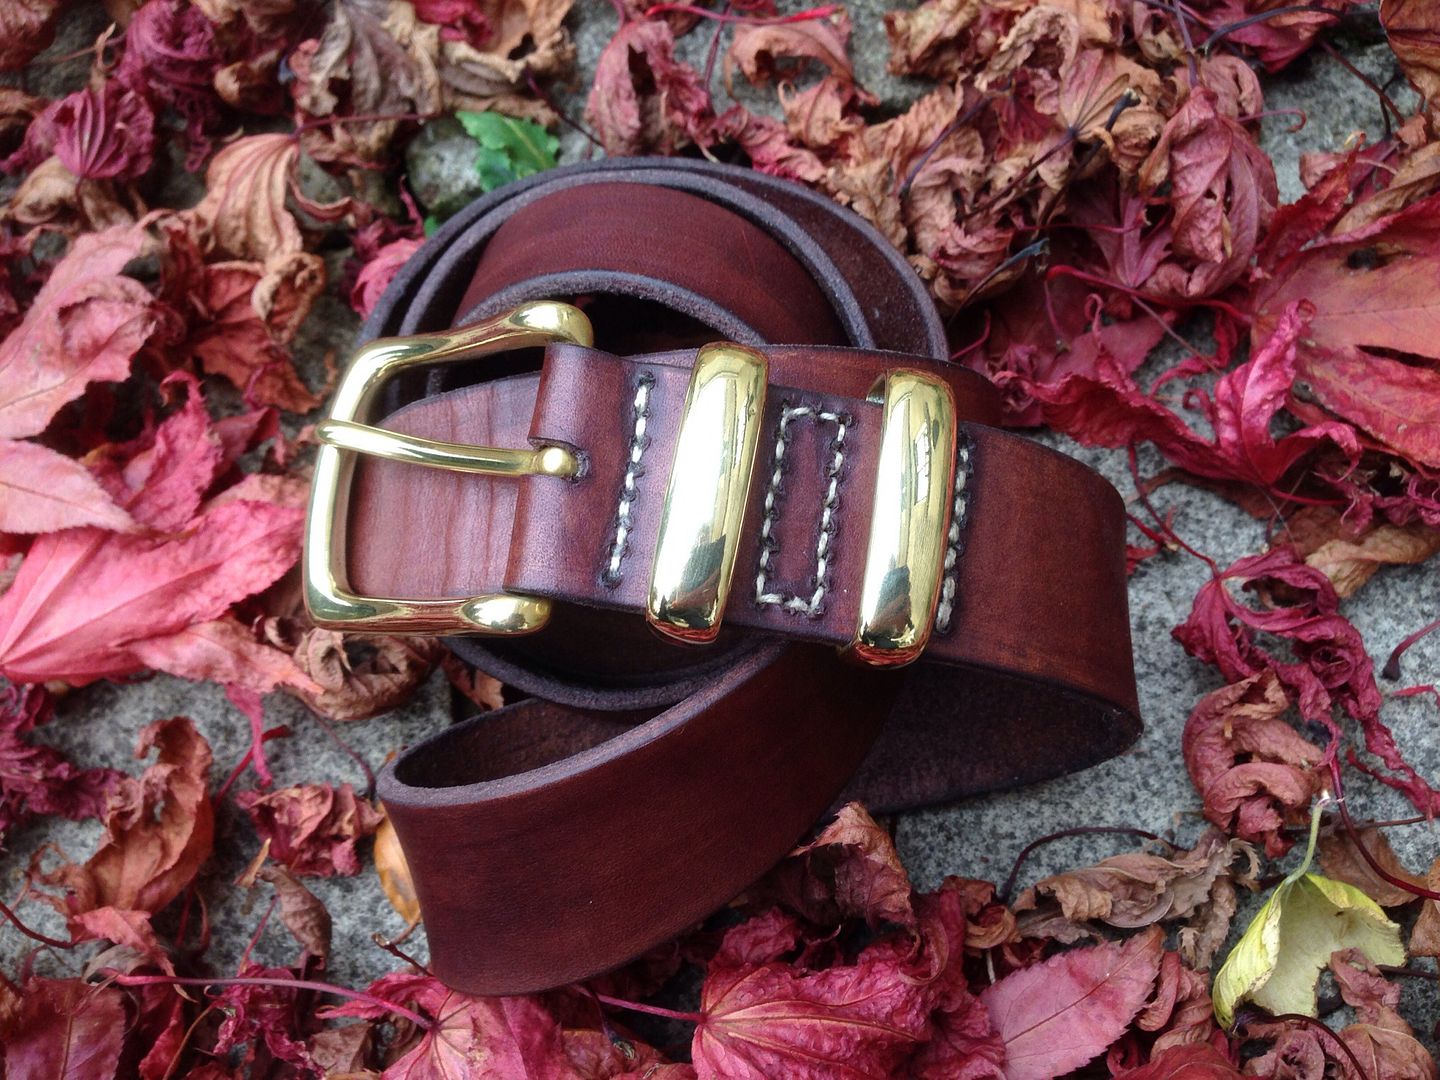
Nowhere near as impressive as what most have shown, but within my limited range of skills, and facilities, I’m quite pleased with this belt. Brasswork from one I bought years ago, but was now too short, so I bought some 4mm vegetable tanned harness leather, skived down one end, drilled it with a 2mm drill, stained it, then stitched it with white waxed thread, and punched it to fit. Couple of evening’s work, and it’s no longer lurking unused in a drawer:
Kayak ,what do you use to stop the brass work tarnishing after it’s finally in place?
I don’t think ultimately you can stop it tarnishing but I would imagine following the oil and wax finish I’ll give the whole thing that a bit of a buff up with a kitchen scourer or light wire wool and a little more wax would bring it back to shine.
First time I’ve done it actually so basically I am making up the above! 😉
That looks great Kayak! I’ve not come across that process before – do you have to neutralise the fuming or does it just cease once the ammonia’s removed? Does it affect the glue joints?
do you have to neutralise the fuming or does it just cease once the ammonia’s removed? Does it affect the glue joints?
You don’t neutralise it and it doesn’t affect the glue. That’s about as dark as that will go now. It was in the fuming chest all weekend. You can do it at home in a sealed bag if you fancy a go. I’m really into it at the moment.
The cherry surrounding has darkened a bit too. I didn’t expect that as it’s not known to react , but it’s definitely got darker. Looks great in the flesh though. 🙂
Gonna put a strap round the bottom legs so it can’t spread and it’ll double as keeping it together when folded. I’ll do any cutting outside that’s the missus’ work mess in there.
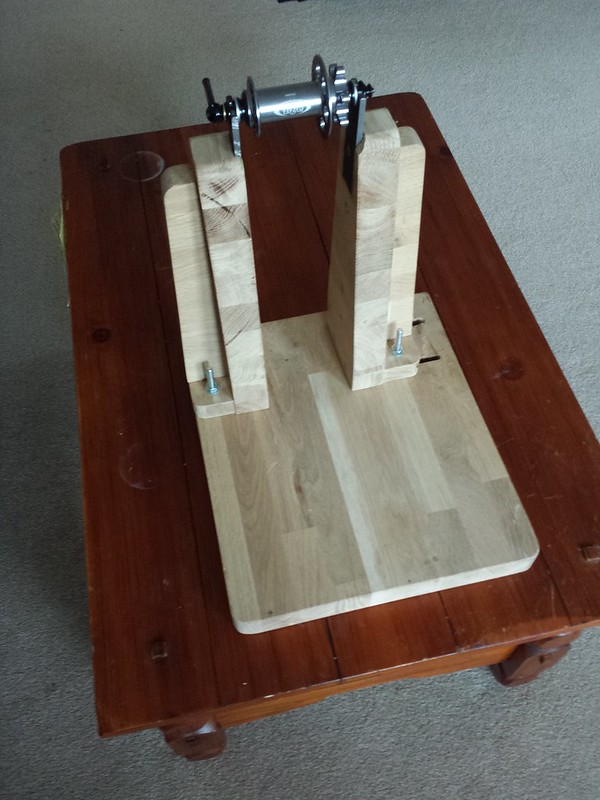
I was given some offcuts from the flat upstairses’s’ss oak worktop. Added up nicely to what I needed for a Musson truing stand.
An extra wide verion – the uprights are 40mm wider in total than Mr. Musson’s pattern, and the available width on the base was only 28mm wider than Mr Musson’s 300mm. But with recesses cut for the plates to be flush with the wood and 5mm steel rather than 6mm steel, we’re bob-on. Which is a bit academic, as I can’t really see myself building 150mm hubs, but it’s nice that I could if I wanted!
Bolts are recessed in the base in a 13mm slot, which keeps the bolt heads from spinning on tightening and means I could do away with the battons at either end and not scratch the dining room table. But this created another problem in that it’s quite hard to pick up – I might cut handholds out of the bottom/side edge of the of the base.
Other things left to do are radial/lateral guides, glue back the chip on the right hand upright, and investigate some whitewash/lime finish for the base, and then oil the lot. Or just build these two wheels and put it away. It works!
Oh, and I made a hole in my hand as well, in that big muscle at the base of your thumb. A classic: “This is dangerous, I should probably find a safer method. But I’m being careful, so it’ll be fine.”
Stabbed myself really quite hard with a wood chisel. Made a proper job of it: a nice deep one that I could see stuff in. Luckily the mrs was out so I could get myself steri-stripped up without unnecessary questioning.
Here’s a few pics of the balance bike I’m making for my daughter. Main tubeing is 2″ aluminium. Head tube, seat tube, swing arm and stem are CNC machined. Forks are modified Fox 36 uppers with CNC machined dropouts… [IMG]http://i729.photobucket.com/albums/ww299/deesta-pics/IMAG2087_zpsfe1389ce.jpg[/IMG][IMG]http://i729.photobucket.com/albums/ww299/deesta-pics/IMAG2196_1_zpsaff0b37a.jpg[/IMG]
Well, a bodged attempt at a door. I wanted something thick and reasonably strong so went custom with some treated timber from the local wood yard. Never attempted anything like it before so it was a bit rough but turned out okay in the the end.
Here are the bits of timber glued together and drying. I used some solvent based Gripfill which wasn’t ideal, especially as I applied a little too much to start with. You live and learn…
A bit of a leap and it’s been chopped and the top and bottom bits put on, sanded and painted.
…and here it is just hanging. Finished with the bracing in the inside…


 [/url]
 [IMG]http://i729.photobucket.com/albums/ww299/deesta-pics/IMAG2087_zpsfe1389ce.jpg[/IMG]
 [IMG]http://i729.photobucket.com/albums/ww299/deesta-pics/IMAG2196_1_zpsaff0b37a.jpg[/IMG]


