- This topic has 2,723 replies, 43 voices, and was last updated 6 months ago by desperatebicycle.
-
Tripster ATR finally built up – lush!
-
boxelderFull MemberPosted 9 years ago
awful roads around London
Really? that’s what gold paving does for you
somafunkFull MemberPosted 9 years agoTo be fair to matts the roads in London are mostly paved with 24 carat gold, it’s far too soft as a suitable road surface, perhaps Boris should offer a Platinum coating upgrade specifically for use by the Righteous Tripster Owners Club.
dodgyFree MemberPosted 9 years agoVery nice Matts. I note you have a zero layback seatpost, I found I really needed layback as the frame is a fairly relaxed fit for me.
Let us know how you get on with that?
mattsFree MemberPosted 9 years agoUseless t***s at Upgrade and Winstanley’s have sent me the wrong fugging bung again! 👿
somafunkFull MemberPosted 9 years ago
Do they not read this page to get info on the bikes they sell?, if not then it’s about time they did.
They either didn’t listen to you or read your email correctly regarding the issue with the 22mm steerer, get one from somewhere else then bill them for the expense and your wasted time.
mattsFree MemberPosted 9 years agoOk, I take that back… 😳
The one they just sent me has got a removable secondary sleeve to give it 2 thicknesses. Headset sorted.
 somafunkFull MemberPosted 9 years ago
Haha!, just as well you noticed before you got all…..
Bad mutha …… on them
somafunkFull MemberPosted 9 years agoAhh well…..Looks like i’m in for a round of healthy bit of a dick jesting (see page 43 – brooks saddle)
Just back in from a 2 hr ride where i managed pathetic little distance (13miles) due to the hellish winds and my arse hurt like hell for the entire journey (castelli sorpasso bibs so not the pad either), saddle is the correct height, fore and aft is correct so i’m away back out for a 30 min ride armed with my 5mm allen key and i’ll try adjusting the angle – otherwise someone on here is going to get a bargain.
Arse indeed!. 🙁
mrblobbyFree MemberPosted 9 years agoDo like the look of those Cambiums. Aren’t Brooks’ leather saddles famed for having a bit of a break in period? Maybe the same with the Cambium?
brassneckFull MemberPosted 9 years agoAs for the chaise longue – The Mrs owned it before we met and I can’t get her to part with it…
I thought it was one of those ‘special’ chairs!
Matts – £1.99 Pinarello one from CRC fits (22.2mm according to cap) and seems to work. I’m not sure I’m 100% confident in it, but mainly as it’s my first carbon steerer build – might throw the LBS a few quid to look it over once I’ve built it if I’m still not sure, but once the stems clamped on it feels fine.
About half way to pics. Any ideas on how to de sticker a Ragley carbon post? Seems quite well lacquered in.
cloudnineFree MemberPosted 9 years agoThe bung just pre loads the bearings no?
It’s the stem which basically holds it all together.. Just make sure you’ve done that up to the right NmsomafunkFull MemberPosted 9 years agoArse still hurts, in fact my arse bones are still painful as i sit here 2 hours after cycling home from work…. No matter what angle i adjusted it to it just did not fit so FAIL on my part and serves me right as there was nothing wrong with the comfort or fit my fizik Kium Aliante but i fell for the Brooks hype/marketing and convinced myself i needed one to give that finishing touch to my Tripster, after all they are de rigueur on all touring bikes and you can’t call yourself a cyclist unless you have a Brooks.
Ho…Hum – Guess it’s going on the classifieds later tonight, damn shame as it does look the absolute mutts nuts.
somafunkFull MemberPosted 9 years agobrassneck : Once you have the correct preload on the headset bearings using the steerer bung and tighten the stem steerer bolts to the correct torque then the steerer bung does absolutely nothing so it’ll be perfectly fine.
somafunkFull MemberPosted 9 years agoHmm, it was £116 from Evans but i was hoping for £90 posted next day delivery on the classifieds – less than 4 hours use with all the packaging as shown on previous page, dunno if you’d still be interested at that price?.
therevokidFree MemberPosted 9 years ago£90 posted you say … done sir 🙂
bank transfer ok ?email me therevokid at gmail dot com
mikemoriniFree MemberPosted 9 years agoA bit off topic, but I thought as this is the thread for all things Tripster I’bd bung it here.
Kinesis are bringing out the Tripster Ace.
Looks a possible C2W tool.
As it uses the original ally tripster frame it could be converted to drops etc.
http://www.bikebiz.com/news/read/core-upgrade-2pure-ison-paligap/017426brassneckFull MemberPosted 9 years agobrassneck : Once you have the correct preload on the headset bearings using the steerer bung and tighten the stem steerer bolts to the correct torque then the steerer bung does absolutely nothing so it’ll be perfectly fine.
Yeah, thats what I figured. Just wanted to be sure, no one likes a wobbly front end 😯
Now, can anyone recommend a torque wrench for allen bolts 🙂 – it’s nipped on to ‘just holding’ whilst I’m building .. which brings me to the cabling (my first drop bar build in case its not obvious) – am I right in thinking gear cables need ferrules to nest into the shifters, whilst the brake cables are just outers? Not clear from what is supplied in the groupset boxes (it was all pukka boxed) in the way of instructions.
crimsondynamoFree MemberPosted 9 years agoWhat compressionless cables for 105 and Hy/Rds?
Is Yokozuna noticeably better than Jagwire Racer?
EDIT: I do get judder, so looking to upgrade.
crimsondynamoFree MemberPosted 9 years agoI have the Jagwires on that same set-up.
do you judder?!
notmyrealnameFree MemberPosted 9 years agoNow, can anyone recommend a torque wrench for allen bolts – it’s nipped on to ‘just holding’ whilst I’m building
Try one of the Norbar models. Not cheap but well worth the money.
I’ve managed to lose mine somewhere so I’m just about to order a replacement TTi20 3/8″ drive one.iugeFree MemberPosted 9 years agoHi All.
Just received the new frame from Merlin.
I Have some problem to insert the expander inside the fork tube.It’s my first time building a bike so I could have done something wrong,but it seems the tube diameter is just a little less than 23 mm while the expander is obviously 23 mm, so it does not fit.
Do you think it is possible?mattsFree MemberPosted 9 years agoYup, read the last 4 pages – This batch appears to have the wrong headset in the box.
Winstanley’s spoke to Upgrade and they sent out a replacement.
HoratioHufnagelFree MemberPosted 9 years agoI have the Jagwires on that same set-up.
do you judder?!I had judder with some Avid’s and the TRP’s that replaced them. I replaced the cables with Jagwire ones and put copper grease on the back of the pads, and they stopped juddering. So either one of those things, or both in combination, apparently fixed the issue.
somafunkFull MemberPosted 9 years agoBrassneck : This 2-24nm Torque Wrench is quite decent for bike stuff (i have one along with my ritchey torque keys)
A torque wrench is not that accurate when used at the lower/upper extremes of it’s settings – they are designed to be used within the middle range so the above wrench will be more accurate at the type of torque settings used on bike products such as stem bolts/seat bolts, crank bolts etc rather than a wrench that has a torque setting that starts at 4nm or 5nm. The ritchey torque keys are handy in use as they are preset with a very positive feel/click when the torque setting is reached. If you want to get picky about torque settings then there are products such as this facom torque bit driver but unless you are continually building expensive carbon components it may be considered rather overkill for a home mechanic.
When you buy a new wrench it is advisable to exercise it a few times at it’s very upper setting on a suitable very tight bolt (any bolt will do as long as the torque setting is reached) before unwinding it and storing it at it’s lowest setting.
Crimsondynamo : I have tried both Yokozuna and Jagwire on my Spyres, the Yokozuna has a very stiff housing and is a pain in the arse to form tight radius bends so it can sit well under bar tape, it gave a very good solid brake feel when i used it with my Ultegra levers/SLC Spyres and it’s absolutely bomb proof in construction but to be honest i would just as happily use the Jagwire compressionless housings as it’s far easier to work with, I currently use Jagwire and i’m perfectly happy with it – easier to work with and there’s no difference in lever feel.
It may be the discs that are causing the juddering?, i say this as i have experienced no juddering or brake squealing at all with my Spyres, not even in very wet or muddy conditions but i have fitted XT 6 bolt rotors with alloy spiders, from my perspective i feel that the supplied TRP disc rotors with flimsy arms allow for a certain vibration to pass through the disc under heavy braking which builds up to an oscillating vibration across the surface that presents itself by howling like a skelped banshee on a full moon, i also set my Spyres up with the aid of this hayes pad alignment tool, i realise that your hy/rd set up may be different in operation but the set-up and alignment of pads to the disc is crucial for effective braking. (a set of feeler gauges will do the same job but i’m a sucker for tools).
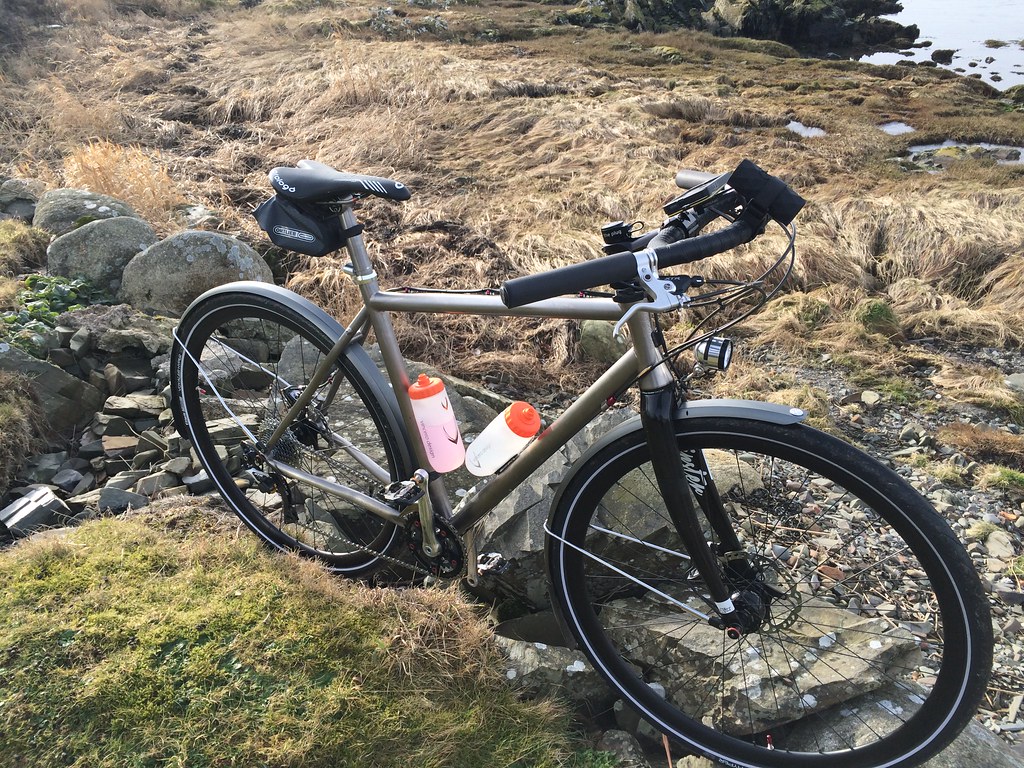
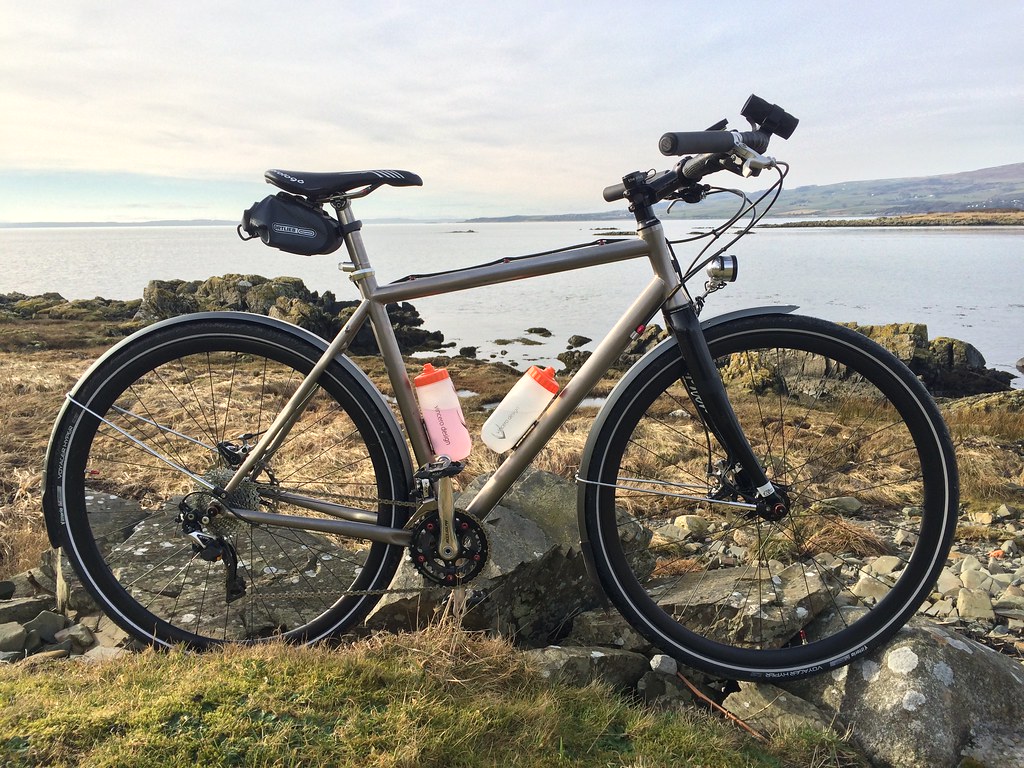
I guess it’s about time for a quick update on how my rebuilt tripster is riding,
It’s just the absolute bomb (to steal a phrase from the yoof’s), the Jones Loop bars make such a massive difference to how i can handle the genuine off road excursions as the riding position allows me to keep a wide stance and grip whilst maintaining full braking control along with the ability to view the trail ahead, previously i had to get down into the drops if i wanted to get full braking control as the hoods only offered so much braking performance and the chance of my hands being shook loose whilst on the hoods was rather high.
When on the road the increased comfort from the upright position is very noticeable, i never used the drops anyway so the position whilst using the Jones bars suits me fine, it’s not a racing bike so i’m not fussed with the increased drag from being upright, intact i’d say being upright has improved my quality of riding so it’s a massive win. And if i so desire to get out the wind i can hold onto the front loop which drops my position considerably but it’s not that comfortable for me for extended periods so it’ll be a last resort in gale force winds.
The dynamo lighting is just the most amazing revelation – why haven’t i used a dynamo before?, i just jump on and ride….no faffing about with batteries, wondering if i’ve charged them or if they’ll last the ride or messing about strapping them on around the bike. And the light spread from the Edelux ii front light is very effective at lighting up the road in front of me rather than illuminating everything around me in a massive arc of light like my solar storm off road lights, the Edelux is a far better light to ride with on the road. I was initially fretting about the extra weight of the hub but it’s just 200 grams ?- what’s that in the real world? – i certainly have not noticed it and a strap on battery pack is more than that anyway so it was an unnecessary worry. The bearing/hub service life of 50,000 km (or is it miles?) is something i shan’t have to worry about for a long time. The USB charging plug on the stem is great – I have a wee speaker that fits on my handlebar called the Buckshot that sits in a velcroed bracket, it’s great paired up with my iPhone which sits in a Topeak Ride case on my handlebar so i can listen to tunes whilst i ride, or the other fine day i watched/listened to “A Sunday in Hell – Roubaix 1976” whilst out on a road ride, meanwhile my phone charge was kept topped up and i attempted to sprint along with the film and commentary when the cobbled sections popped up in the film 😀 .
The King rear hub is nice and quiet (unless i freewheel suddenly down a hill), the increased speed of engagement/pick up compared to the Hope on my Hummer is very noticeable, to the point that i recently stripped my Hope freewheel to see if it was damaged but nope – it was spotless inside. Never owned a King hub before but for 20 odd years i’ve always wanted one.
The Middleburn crankset and bb just works perfect (and looks the dogs bollox, not that that matters eh? 😉 ) along with the XTR shifting which is butter smooth and very light, the addition of the XTR clutch rear mech has reduced the chain chatter to zero when playing about off road so hopefully i’ll avoid a repeat of the drivetrain explosion that happened back on page 20 (ish). I’ve ordered a set of the Trickstuff Claptons and XTR Mounts as i want to try the XTR shifters further up the Jones bars and need a hinged clamp so i can fit them inside the loops – it’s all minor fettling regarding getting that perfect position for comfort and use.
The PDW mudguards (i refuse to call them fenders) are very solid and not the slightest bit of movement, they are very easy to adjust for when i fit different tyres as all it takes is a 2.5mm allen key on the locking section of the stays and you can move them in/out to suit the clearance over whatever tyres you are running, i did need to order the extra long rear stay so bear that in mind if your going to try them out on your tripster.
Not much else to say?, the pauls love levers/brake levers are one of those bike jewellery items that just offer the finishing touch to the build, they probably offer very little in the way of braking leverage over a suitable Avid or similar lever but they are a genuine work of machinist art and i could justify them with ease, very nice folk to deal with as well.
I’ve used the bike to get back n’ forward to work everyday since it was built back up, and i’ve been out on it every work night along with decent runs on road/off road/forest roads on my days off so it obviously works for me in it’s current incarnation, it’s definitely been worth trying a different build from the normal drop bar set-up and i’d go as far as saying the frameset suits the Jones bar set-up even more than drops, it does for me and what i want out of it anyway.
Speaker mounted on bars and Topeak iPhone case inside the loops, gotta have my tunes when riding.
cloudnineFree MemberPosted 9 years agoSomafunk.. Every time you post a new picture there’s something else I spot that gets added to my want list.
Didn’t realise those caliper alignment tools existed.. But I’ve just bought onesomafunkFull MemberPosted 9 years agoYeah, it’s such a simple wee tool but it can save you ages faffing about trying to get correct caliper spacing by the usual methods, just make sure it is spotless when you use it as greasy marks from your fingers may otherwise be transferred to your pads or discs.
When I worked in the shop it was one of my most used tool box items and no-one knew such a tool existed, the feeler gauge arms can be bent rather easy by ham-fisted attempts to insert them so take it easy and never lend it to mates as they’ll almost certainly bugger it up.
cloudnineFree MemberPosted 9 years agoThose mudguards.. gotta get me a set of those too… they are really slick looking.. where’d you get those from? Need to stop looking at your bits now.. 😆
somafunkFull MemberPosted 9 years agocharlie bike monger for mudguards, you’ll need the 45mm City’s and longer rear 45mm City stays from paligap or just ask Charlie to supply the longer stays when you order. You’ll also need approx a 10mm spacer to fit on the front lower disc side mount to clear the calipers
robdobFree MemberPosted 9 years agoHi guys – interesting thread! So much to read…
I’m thinking of going with a dynamo setup for my new Tour De fer which I have ordered but I’m not sure what to get. I like the USB charging thingy but that thing that attaches to the stem (somafunk has one) seems very expensive when you add the light and the hub/wheelbuild on.
My brother (peterpoddy) saw the Busch and Muller new range and pointed me towards a light in here: http://www.bumm.de/fileadmin/user_upload/Katalog/B_M__Catalogue_2014_15__English.pdf
The Lumotec IQ2 Luxos 179U is suitable for the road and looks good on mild offroad too (I won’t be going proper offroad, maybe sustrans routes and rough lanes at the most), has 90lux output (no idea on lumens), handlebar control, cache battery, USB charging , daytime running light, standlight, daytime sensing (yowsers!) and rear light connection monitoring. I think he said it’s about £130 but that seems like a bargain to me!!!
What do you think?
Also, I have no idea what hub to get…. any ideas?
somafunkFull MemberPosted 9 years agoI looked at those Busch & Muller lights and they seemed perfectly up to whatever use i could possibly have for it but being the bike tart (dick?) that i am i had to go for the more expensive option, i doubt my set-up is any better or offers any more functionality in the slightest – I’d happily run a Lumotec luxus U – especially with 90lux output and handlebar controls.
As for dynamo hubs the SP dynamo hubs as used by USE Exposure get a very good write up from users.
hummerliciousFree MemberPosted 9 years agoI’ve just ordered the Plug and back up battery for mine….


You must be logged in to reply to this topic.