- This topic has 16 replies, 9 voices, and was last updated 6 years ago by trail_rat.
-
Stair refurb. Next project
-
DT78Free MemberPosted 6 years ago
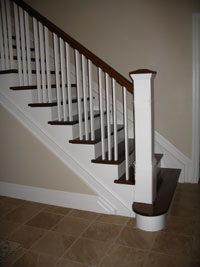
Stairs in new place have no spindles, with small children it’s pretty dangerous so needs sorting.
Had a refurb company round and a sole trader, both say they will only do the job if they replace the newels. They said this without even checking integrity or level, and said that’s just how we do it. Both quotes are close to the 4K mark which is frankly absurd for a small ish staircase.
Just been costing out a budget option via wickes. I’ll need base rails, spindles and the job won’t be without a bit of hard work as the original rail is 30mm not 32mm. Will probably need some fisnishing trim and paint. I reckon the materials are less than £150…. Yes won’t look as awesome as oak but will be safe and I’ll have a big chunk of change if I cock it up won’t be too much wasted.
Now what tools will I need? Presume a sliding bezel, some form of nail gun and maybe a table saw to ensure the angles are cut consistent? I have a handmedown jigsaw and circularsaw
navajo77Free MemberPosted 6 years agoI’m a carpenter and it’s not a hard diy tbh , quite possible with hand tools only and if you’re painting it any gaps , cuts not in line can be filled and painted , sliding bevel , spirit level , hire a bradder ( finishing gun if need to and use 4 inch bolt/screws through the newel to fix handrail , google stair specs , i.e. Handrail heights and spindle spacing … don’t rush it and you will be fine
timbaFree MemberPosted 6 years agoTake your time with the number of spindles and the number of gaps to get the spacings right
I assume that the 30mm is the groove in the handrail? If you want a painted finish you can make a base rail from planed timber and a quadrant moulding to match
30mm planed (finished-size) square section and you have a staircase, plain and simple, but many are
nickjbFree MemberPosted 6 years agoAs timba says, if the size is non standard then buy some square section. Personally I prefer that to fancy spindles. You can play with the spacing if you want a little more style eg.

As for tools. No need for a nail gun for a one off. Also a mitre saw for the cutting. Handy for other jobs around the house. The evolution rage is a nice DIYers option.
DT78Free MemberPosted 6 years agoThanks for the tips, evolution rage is an interesting name for something that could remove fingers! Mitre would also be useful for other projects.
Like the idea of doing something different with spindles. Had a look at regs the handrail isn’t at the regs height (it’s 700mm from tread) which is probably why they are saying the perfectly good newel and handrail need to come out too.
If I can work out how to post a photo I’ll upload a photo. It’s quite small really. Short lower section, right angle and the diminishing with large handrail screwed to the wall. 13 or 14 treads. Prob less than 20 spindles needed
trail_ratFree MemberPosted 6 years agoACH my post didn’t post.
That quotes outrageous. Possibly 600quid in redwood or 1k-1200in oak for materials at the merchants unless you want big ass spindles.
Should be a days labour possibly less for someone who’s done it before.took me 1 day with a late start to remove a breezeblock/plaster handrail and to build the woodwork to the regulations and I’ve never done it before -or since 😉
I would recommend hiring a nailer it makes life alot easier when hidden nailing.
timbaFree MemberPosted 6 years agoThe regs probably don’t apply to existing stairs, check with your local council. The 100mm sphere between spindles is sensible, especially if you have small children
DT78Free MemberPosted 6 years agoTook a couple of photos here
https://www.flickr.com/photos/44108154@N06/I’m thinking about just running spindles top to bottom on the triangle section and leave upper handrail in situ.
Other option would be to remove it and cut it to try to make a diminishing rail and then step out for the rest of the flight. This might be past my beginner level woodwork skills.
Plan is to paint so filling and sanding gaps is okay, in fact all of the woodwork has ‘character’ so a perfect finish could look odd. Plan to trim the cupboard door similar to the rest of the doors.
Floor is a bit rough and chopped about but looks like it was a dress floor (if that is the right phrase) as not standard boards like the rest of the place. Tempted to try and sand and restore those as well. Or bung over some decent laminate we like parquet style
timbaFree MemberPosted 6 years agoOK, so the obvious problem is that the handrail on the upper section of stairs isn’t in the same plane as the base rail.
I’m guessing that the “wall” below the moulding is actually wood. I would reposition the handrail in the same plane as the base rail and continue it parallel to the base rail until it meets the moulding. You’ll need to take some of the width away where it runs diagonally up the “wall”; the sliding bevel will be handy here. Screws through will give a sound upper support. Google handrail fixing kit for the lower end.
You could fit a handrail to the opposite wall and continue it to the quarter turn, however there are a couple of problems:
Ideally you’d need to go top to bottom of the upper stairs, so more expense
And it’ll take a bit of width, e.g. when moving furniture up and downOnce you start it’ll be less daunting. I expect to see a new post (and maybe a newel post) on here soon 🙂
seosamh77Free MemberPosted 6 years agoI mis-read this as a sitar refurb. I’m somewhat disappointed! 😆
DT78Free MemberPosted 6 years agoOK, so the obvious problem is that the handrail on the upper section of stairs isn’t in the same plane as the base rail.
Yep, as you suggest I’m thinking about the diminishing handrail into the post, and then step it out to continue up like before. I would like to reuse the original rail if I can because it matches the lower section, and I suspect it is a decent hardwood.
Section above is wood, as far as I can tell a hefty timber that is holding up the floor of the bedroom above. One of the reasons I don’t want to bugger about with the second newel is it looks load bearing – though the 2 guys quoting have both said it isn’t. (they are the experts…)
I’m also thinking about adding a half newel at the top and replace the block supporting the top of the rail. That would mean I have to match the curved profile of the second newel, or find a cap that looks very similar to the original.
I can’t see any fixings to how this stairs originally was built – surely it wouldn’t have been built in the 30’s with no spindles at all?
drlexFree MemberPosted 6 years agoI’d be tempted to get a couple of glass panels made up and a few glass balustrade clamps to fit them in place.
TomBFull MemberPosted 6 years agoYou could consider clamping appropriately shaped glass panels to make it all safe, would save on fiddling lots of spindles in and could leave existing handrail in situ? A mate did this and it looks ok. Ideas here, from a quick google…..
DT78Free MemberPosted 6 years agoWe have discussed glass and quite like it, but not sure if it would be in keeping with the rest of the property. Plus still have to sort out the top rail (unless I used a triangle piece of glass)
Bit worried about the dimensions, if something is slightly off with my measurements or the old posts being out of line it could show up, and I imagine the glass costs a chunk more than a few spindles…
Any recommended sites to cost up these options? Quite a few come up on google.
drlexFree MemberPosted 6 years agoI’d go triangular – fix to base / stringer and to underside of ceiling.
No experience of the online sites (stairfurb has an odd shape section that would give you an idea on price -https://stairfurb.co.uk/product/odd-shaped-glass-section/), but I’d get clamps, make up templates in thick card or 4 or 6mm MDF and then get a local glazing firm to supply.ctkFree MemberPosted 6 years agoHave you thought of a single wide piece of wood going parallel with handrail? My 50s house has this.
trail_ratFree MemberPosted 6 years agoWhat i was left of the 1950s horror fest .
and after a weekends work we got ….. Removed the block work and fitted a new banister then clad that stairs in 15mm oak


The topic ‘Stair refurb. Next project’ is closed to new replies.