- This topic has 17 replies, 8 voices, and was last updated 7 years ago by BadlyWiredDog.
-
Rockshox Reverb rebuild experiences
-
BadlyWiredDogFull MemberPosted 7 years ago
My mega-abused Reverb has developed a whole lot of play in the top bushing – the one under the top cap assembly – and is making an alarming clicking noise that you can feel if you hold the nose of the saddle while pedalling. My mate says it’s like riding with the crocodile from Peter Pan.
Rockshox has a rebuild video on YouTube which looks pretty straightforward, I’m just wondering if anyone’s replaced the requisite bushings themselves and, most importantly, whether the Basic rather than the Full Service Kit contains all the parts you need, particularly the lower bushing.
I realise that RS want me to buy a complete new Top Cap / Wiper Kit assembly for £40, but I’m also wondering if it’s feasible to simply replace the worn bushing rather than throwing out a perfectly sound top cap?
Thoughts?
qwertyFree MemberPosted 7 years agoIt’s 40 for the top cap bushing & 55 for a complete seal kit iirc. TF will do a complete service for 85+top cap. So I make that 30 for someone else to do a proper job. Special tools and soft vice jaws needed. TF did mine.
BadlyWiredDogFull MemberPosted 7 years agoThanks for the input. My thinking is that by the time I factor in postage and packing to TF, I’ll have spent almost £100 on an old post, which I could put towards a brand new Thomson dropper. Based on what I’ve read elsewhere, the basic service kit (less than a tenner) plus top cap would do the job and be less than £50, which makes a lot more sense.
Looking at the RS video, none of the ‘special tools’ are particularly difficult to improvise btw. Not saying people shouldn’t use TFT and other suspension specialists at all, but I’m pretty mechanically competent, have rebuilt lots of suspension forks and enjoy doing it. If I can simply re-bush the top cap, I’ll be quids in.
RicBFull MemberPosted 7 years agoI disagree – wrap the shaft in old inner tube, clamp in a vice and unscrew with a big adjustable wrench.
Easier to buy the top cap all as one but I guess you could buy the bushings separately. Don’t forget about the other bushings; if the post has been wobbly they’ll have worn too.
Seal kits aren’t £55! The basic seal kit is £10
RicBFull MemberPosted 7 years agoI’ve completely rebuilt my reverb a few times, including limiting the extension by 5mm (long seat tube on my frame). They’re really not difficult to work on; bit like a Russian doll in that there are tubes inside tubes inside tubes.
However, unless your post is sagging the internals are fine and it’s just the top cap and seals that need working on.
TBH even if you balls it up you could send the post off for someone else to fix so you’ve not really lost anything by trying
BadlyWiredDogFull MemberPosted 7 years agofwiw.
ps: thanks RicB, I’ll go looking for the cop cap bushing and see what I can find. Will post back if I find an option.
mikey-simmoFree MemberPosted 7 years agoHow did you limit the upward travel? I had a look inside my reverb, then put it back together and called someone.
andylFree MemberPosted 7 years agoIt’s silly that you can’t buy the top cap bushing without the whole top cap. I guess you should buy the top cap and seal but still would be cheaper than the whole thing as the aluminium cap is probably the most expensive part.
The full service kit with brass pins is disproportionately expensive compared to the basic kit which can be had for £7-10 and it’s a shame you can’t buy the brass pins separately too.
RicBFull MemberPosted 7 years agomikey-simmo – Member
How did you limit the upward travel? I had a look inside my reverb, then put it back together and called someone.I used a piece of 8mm ID 10mm OD (i.e. 1mm wall thickness) tubing placed just under the piston head. 8mm was the biggest I could manage without blocking the transfer port.

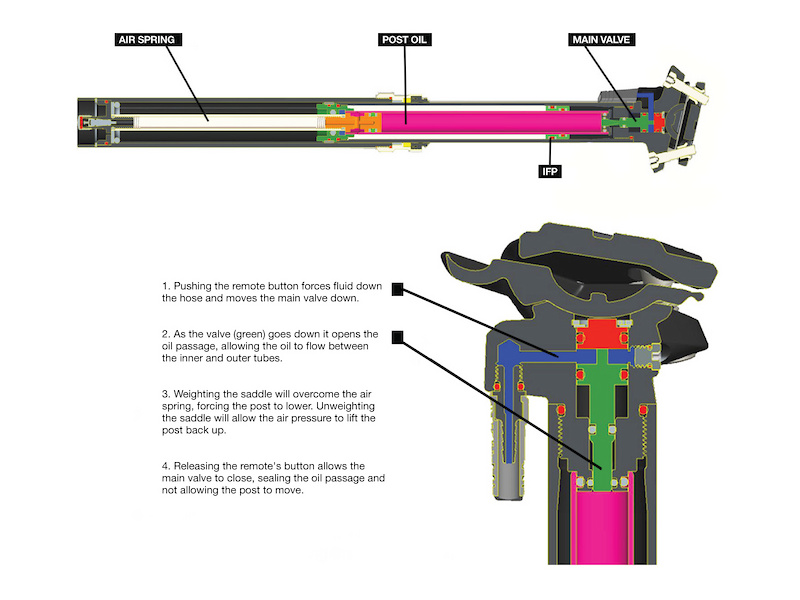
Placed over the silver metal shaft just underneath the piston (the orange bit in the above diagram)
RicBFull MemberPosted 7 years agoI meant 8mm long i.e. limiting upward extension by 8mm was the most I could achieve without blocking the port
Finding the tubing was hard – ended up asking for loads of samples from various companies and eventually found a size that worked. Sometimes my obstinate refusal to give up does work out well!
RicBFull MemberPosted 7 years agoIf you’re going to rip your reverb apart completely I’d strongly recommend upgrading the IFP to the newer design, which is supposed to massively reduce the sagging problem:
BadlyWiredDogFull MemberPosted 7 years agoAny idea where those are available? I’ve had a quick google and ordered the basic service kit and the top cap – about 30 quid from bike-discount fwiw – but I can’t track down the Internal Floating Piston on this side of the Atlantic.
To be fair, the only minor post sinkage I’ve had was sorted by topping up the air pressure, but I hear what you’re saying about it making sense when the post’s stripped down anyway.
Thanks.
tillydogFree MemberPosted 7 years agoI think the updated IFP is in the full service kit. (I remain to be convinced that the IFP is anything to do with the sagging problem, though).
If your post isn’t sagging, it’s possible to do all the mechanical stuff without disturbing the oil side of things at all.
I found this very helpful.
steel4realFree MemberPosted 7 years agoNice one tilly – I’ve done my own basic service but never got that far.
Anyone found something useful on how to at least just do the basic service on a Stealth version ?
BadlyWiredDogFull MemberPosted 7 years agoYeah, I saw that, mostly I’m just concerned with the excessive play and the resulting clacking noise… on the plus side, I don’t need a bell, people can hear me coming from miles away :-/
BadlyWiredDogFull MemberPosted 7 years agoJust thought I’d update this quickly in case it’s useful to someone else going forward. I bought both the Top Cap (30 quid from Germany) and basic service kit. It’s just taken me around 30 minutes to basically change the lower bushing, which was properly trashed and the top cap, which also contained a trashed bushing – the bushing material was peeling off and worn away in both cases.
I also changed the o-rings I came across and the circlip at the bottom of the post. I didn’t bother with the inner oil workings as I had no ongoing issues with the post going up and down etc, just back and forth play you could feel and hear. The RS video is good, you can do without the vice and soft jaws etc with some gentle improvisation and I didn’t bother to disconnect the remote or even take the saddle off as I wasn’t planning on messing with the inner gubbins..
Just put it all back together and the awful clanking and play has gone. There’s still a little rotational play, but then there always was, even from new. Feels solid again.
I’d say the whole process is well within the realms of the straightforward for anyone with half-decent mechanical skills and the ability to follow basic instructions. I’m a little, erm, disappointed that the bushes in a seatpost that cycles far less often than a suspension fork should die quite so easily, but given that it only cost me around 40 quid to put right, it’s not the end of the world.
I’m still disappointed that the top cap bushing isn’t designed to be removed and replaced, it just seems like a waste of resources and not something RS should be proud of. It’s straightforward to replace the lower one, why not make the top bushing similarly straighforward?
gravesendgruntFree MemberPosted 7 years agoI agree with you BadlyWiredDog on the top cap,I kept on top of the basic servicing and then the topcap bushing failed and had a good go at taking the post shaft with it.It definitely needs to be more robust-maybe solid nylon type that will wear but won’t just give out.
I now rotate the lower shaft 120 degrees each time I do a service as I hope it’s making the topcap last 3 times longer,by relieving the loaded wear hotspot.I also make sure the lower C bushing has the open bit to the rear of post so load is on solid bit rather than gap.BadlyWiredDogFull MemberPosted 7 years agoI think I’m too lazy to go to those lengths, but a nice idea for more conscientious folk. Cheers!

The topic ‘Rockshox Reverb rebuild experiences’ is closed to new replies.