- This topic has 33 replies, 24 voices, and was last updated 14 years ago by roper.
-
Please tell me how to take a photo
-
roperFree MemberPosted 14 years ago
I have been lent a Nikon D70 with a Nikon AF Nikkor 28-80mm lens (whatever that means 😯 )
I am trying to take a photo of a pencil drawing but it either comes out too dark or the flash reflects the graphite.
I presume I need to go onto manual setting and do something with the shutter speed?
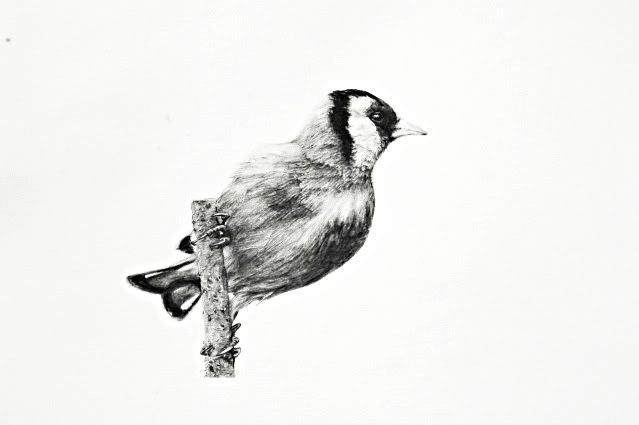
Please can someone tell me what setting I might need?Here is the best I got so far

It was taken outside on Auto setting in as much sunlight as I will probably get but is still to dark. The paper is actually white and not grey 🙁
cheers
idiot roper
chelaFree MemberPosted 14 years agoYou could likely fix it on Photoshop.
But I'd take it outside in not-direct sunlight. Pop the camera on manual and look on the exposure meter in the viewfinder, use something like f8 aperture and then set the shutter speed to overexpose it by a stop or a stop and and half – you'll see this represented as a + on the meter. Press the button. Look at the picture.
mastiles_fanylionFree MemberPosted 14 years agoI would suggest that you need to go into the manual settings and set the white balance manually. You will need the destructions booklet for that. And have a read of this – it might help you…
White balance (It's on page two BTW)But yes – you could do lots of fixing in Photoshop – I am not sure over-exposing in camera is the way to go though – you may lose detail.
Edit – the guide says to over-expose by 2/3rds of a stop 🙂
coffeekingFree MemberPosted 14 years agoBit difficult to tell as we can't see the original and what you think is missing from it?
simonfbarnesFree MemberPosted 14 years agoselect manual aperture as above, then try increasing exposure time until the histogram display shows you're getting pure white – then reduce it a bit so there's still some texture left in the paper
GrahamSFull MemberPosted 14 years agoIf you want the paper to be white then manually set White Balance by pointing it at the paper in the same situation you intend to shoot in.
(or shoot NEF and adjust the White Balance later in View NX).Use the lowest ISO you can, f8, no flash, and a tripod (bike workstand, pile of bricks, whatever)
Use a remote release (or self-timer) to trigger the shot.
Generally it is better to slightly underexpose to capture the near-white details. If the paper is totally white then you'll lose any sense of texture.
OR
Just use a scanner 😀
skiFree MemberPosted 14 years agoSome camera meters are set to a luminance value that is roughly equivalent to the reflectance of 12% gray (or as some will say 18% Gray).
Which basically means if you a taking a picture of a subject that is mostly white, your meter thinks its grey.
More info here:
http://www.digitalartsphotography.com/instructions.htm
So you might need to OVER expose the subject to correct (if you are not using the flash), might be worth bracketing between 1+2 stops.
BTW, neat drawing, is that something you did?
5thElefantFree MemberPosted 14 years agoRetake the same photo in raw. Load into raw editor and fix the white balance and sharpen as required.
piedidiformaggioFree MemberPosted 14 years agopencil drawings are always a bit tricky as the paper is never normaly white and the pencil isn't black. It's always a bit of a compromise.
GrahamSFull MemberPosted 14 years agoSo you might need to OVER expose the subject to correct (if you are not using the flash), might be worth bracketing between 1+2 stops
Only really true if you are taking the purist approach that the image must be a perfect JPG straight out the camera.
If you're shooting something you know you are going to edit later, particularly a RAW/NEF, then it's often better to capture as much detail as you can.
I'd keep a close eye on the near-white details like the "cheek" and breast – as that could easily be lost to over-exposure.
Oh.. also, you may want to switch off Noise Reduction as this looks like a fairly fine image.
5thElefantFree MemberPosted 14 years agopencil drawings are always a bit tricky as the paper is never normaly white and the pencil isn't black. It's always a bit of a compromise.
Good point. You can sort that out in a raw editor again by using curves to bring up the whites, and emphasise the blacks.
iamtheresurrectionFull MemberPosted 14 years agoIt's not the white balance in this instance, it's the exposure as some have suggested.
I'm not familiar with Nikon, but even in full auto mode you should just be able to dial in exposure compensation with one of the control dials. +1 or +2 stops if you're taking it in bright sunlight…
EDIT: From one site on the web: This means you have to hold the +/- button at the same time as turning the command dial to alter the exposure compensation
user-removedFree MemberPosted 14 years agoAuto WB should work no problem. As Ski says above, it's down to the meter not the WB (WB just sets the colour temperature).
Also, I'm assuming that the OP won't have Photoshop, and probably is getting utterly confused by all the talk of jpegs NEF files and so on. I'm guessing he just wants a straight-out-of-camera snapshot.
I'd just stick the camera on manual and over-expose by a stop, stop and two thirds until it looks right.
EDIT: must type faster………
mikey-simmoFree MemberPosted 14 years agoThe camera has done perfect job considering it's using programme and it has not a clue about ehat it's looking at. Use manual, and shoot lots of pictures changing the shutter until it looks ok on the screen. As the paper is suposed to be white (i suspect) it'll need about a stop to a stop and a half over to get it white again. Eg 125 on the screen shoot 50 80 or 60th. Don't forget you know much more than the camera, judge for yourself.
stumpy01Full MemberPosted 14 years agoYeah….you are taking a picture of a lot of white, so the camera is under-exposing, hence the grey looking paper.
Either stick the camera in aperture priority & alter the exposure to f8 using one of the command dials – it's the one in front of the shutter on my D80. You might find nothing happens until you half press the shutter to activate the exposure, so it you twiddle the dial and you get no response, then press the shutter halfway & let go to activate the exposure metering.
Then dial in about +1 exposure by pressing the button with a -/+ on it, while twiddling the command dial (probably the one on the rear). This will make the paper whiter. You can then fiddle with more or less exposure compensation to get the image how you would like it -> higher + = brighter image, lower + or -ve = darker image.When reviewing the images, it is a good idea to look at the histogram graph. You can do this by pressing on the 4-way controller on the back (I think) – and you'll scroll through the viewing options until you get to one with a load of graphs. You don't want the graph to be going off the right hand end – if it does you will be losing detail. You want it close to the right hand end, but not past the right hand end, if that makes sense.
If you are struggling for light with f8 as mentioned, bring this down to a smaller number (larger aperture) – say f6.3 to let more light into the camera and speed up the shutter speed.
Try and keep your camera perpendicular to the picture too.
As mentioned above though – if you can get hold of a decent scanner, you'll probably get a better result.
Oh, one last thing – zoom in slightly from the wide angle of that lens -to about 50mm. This will reduce any distortion from the wide angle of the lens, although as your subject is in the centre of the frame this isn't critical.
FunkyDuncFree MemberPosted 14 years ago…and you don't need a remote shutter cable, expensive and not always necessary, just use the timer function.
GrahamSFull MemberPosted 14 years agoI'm assuming that the OP won't have Photoshop, and probably is getting utterly confused by all the talk of jpegs NEF files and so on. I'm guessing he just wants a straight-out-of-camera snapshot.
Fair enough. Personally speaking I wouldn't take a shot of anything remotely important in JPG, but if it is just a snap that is required then fair game.
you don't need a remote shutter cable, expensive and not always necessary, just use the timer function.
Yep. I did say that. They're not exactly expensive though. It's just a button and a wire. Fiver maybe?
roperFree MemberPosted 14 years agoWell thanks for all of the help.
I think I need a lie down after reading all of that 😀
Someone is dropping off a tripod tomorrow so hopefully I can have more luck then.
Hats off to you photographers though, I don't have the patients or understanding to get a good shot and there are always great photos on this site.Cheers
roper
ski- it is one of my drawings. I have a few and am trying to record them all, so far with little success.
GrahamSFull MemberPosted 14 years agoroper: i'f you'e going to be doing a lot of these, and they are black-and-white then I'd probably suggest just getting a scanner. You'll get a much higher-res images of each one with far less faff.
(or there are places that will scan them all in for you)
MilkieFree MemberPosted 14 years agoAs said above..
Use a tripod
Use custom White Balance using the paper to set the tone of white.
Shoot in Aperture priority mode and use around an f8.
The camera should select a suitable shutter speed, if not increase exposure a little.It looks like you've got dust on your lens or sensor? Top left of the picture looks like a dirty spot, and just above the branch.
You'll get much more consistent results if you use a scanner.
roperFree MemberPosted 14 years agoI think some of the pictures would be too big for a scanner. I try to work as life sized as I can so would have a problem with the larger animals. Saying that nothing really above A3 size.
I have had a go but so far they are worse 😳 , maybe I'll have more success with a re-read and a tripod.
cheers
roper
bombermanFree MemberPosted 14 years agoset the camera to AV mode (aperture variable). Use the little scroll wheel to select the aperture. choose f/5.6 – this is a good compromise which will let enough light in to get a decent shutter speed. Set the iso no higher than 400. try it on 200 first and if the shutter speed isn't fast enough (it needs to be 1/120 or quicker for a beginner for hand held) then bump it to 400. if you go above 400 you'll get noise on the image.
find a good place to position the image – try near a window. or outside like you did.
hold the camera steady with one hand under the lens and the other on the trigger, half-press to focus and gently squeeze all the way in.
bombermanFree MemberPosted 14 years agoI had a quick play with it in Gimp (free photoshop equivalent). Took the curve up quite a way and increased the contrast. then a slight Unsharp Mask to get the details out.
skiFree MemberPosted 14 years agoThe detail in the feathers is amazing roper. Wish I could sketch like that 😉
Do you do commissions?
If so drop me an email.
Ta
jackthedogFree MemberPosted 14 years agoI can't help with the camera issues you're having (other than saying just buy yourself an A3 scanner and have done) but just chipping in to say your artwork is lovely mate, top notch.
donaldFree MemberPosted 14 years agoAll that's wrong is that your picture is a little under-exposed. Ignore 90% of the above and just retake the picture with a little bit of + exposure compensation. You won't need a flash.
Check the results on the screen until it looks right.
MrWoppitFree MemberPosted 14 years agoUse a tripod. Set a slow shutter speed or the auto function, if it has one. No flash.
roperFree MemberPosted 14 years agoThanks for the kind comments, it's always good to get feedback and especially when it's nice 🙂
Ski YGM
bomberman that image works well but I think the graphite now looks more like ink.I would then have to adjust the dark tone too and would struggle getting an image which would match the original, which is sort of the point. I have had similar problems in the past with not-so-good scanners but have been told they are much better now.
I've got the manual for the camera now so fingers crossed.
Thanks again for all the help
roper

The topic ‘Please tell me how to take a photo’ is closed to new replies.