- This topic has 174 replies, 59 voices, and was last updated 10 years ago by JoeG.
-
On one fatty first impressions (anyone)
-
shaggyFull MemberPosted 11 years ago
The rims don’t have a real bead lock but the fit is better than some others. I haven’t tried these tubeless. Mainly because when I have done it on other fat wheels it’s been less reliable than tubes and weighed more.
StonerFree MemberPosted 11 years agocheers on the tubeless/salsa/gordo tips guys.
Having made some crests/rocket rons tubeless I fancy having a go on my “main” front wheel – Gordo + 2.4″ RR. 61mm of low pressure fatness 🙂
I think I’ll take a stab at it.JoeGFree MemberPosted 11 years agoMine Just arrived!!! 2 huge boxes.

Fedex delevered it today, even thought they updated the expected delivery date to Dec 26 late last night. They done good! 😀
So I was a little premature with my “taking forever” post above. 😳
JoeGFree MemberPosted 11 years agoSo, still unboxing and weighing stuff, but here’s my thoughts:
– The tires are HUGE! The tread is HUGE! Mine weigh 1444g and 1516g.
– I like the skewers. Levers look neat and the machined aluminum nut with the captured spring is a really nice touch. F 58g, R 59g
– Tubes weigh 593g each. If the orange decals weren’t bad enough, the valve caps are orange as well! 😀
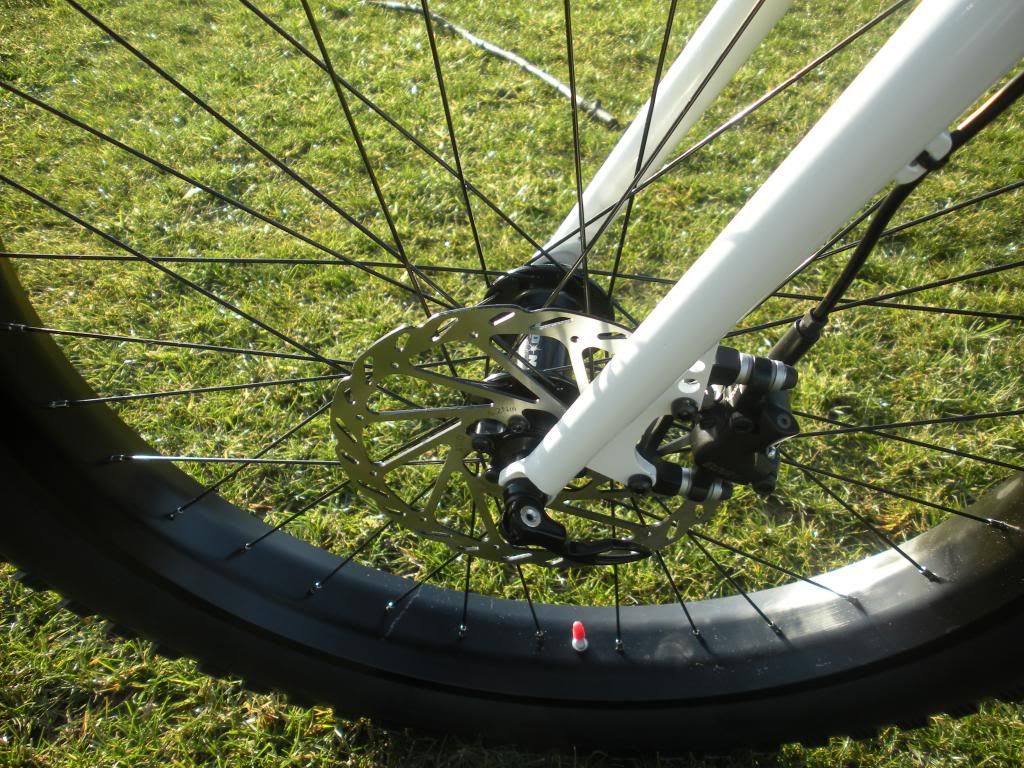
– Front wheel 1722g w/ rotor & rim tape, w/o skewer.
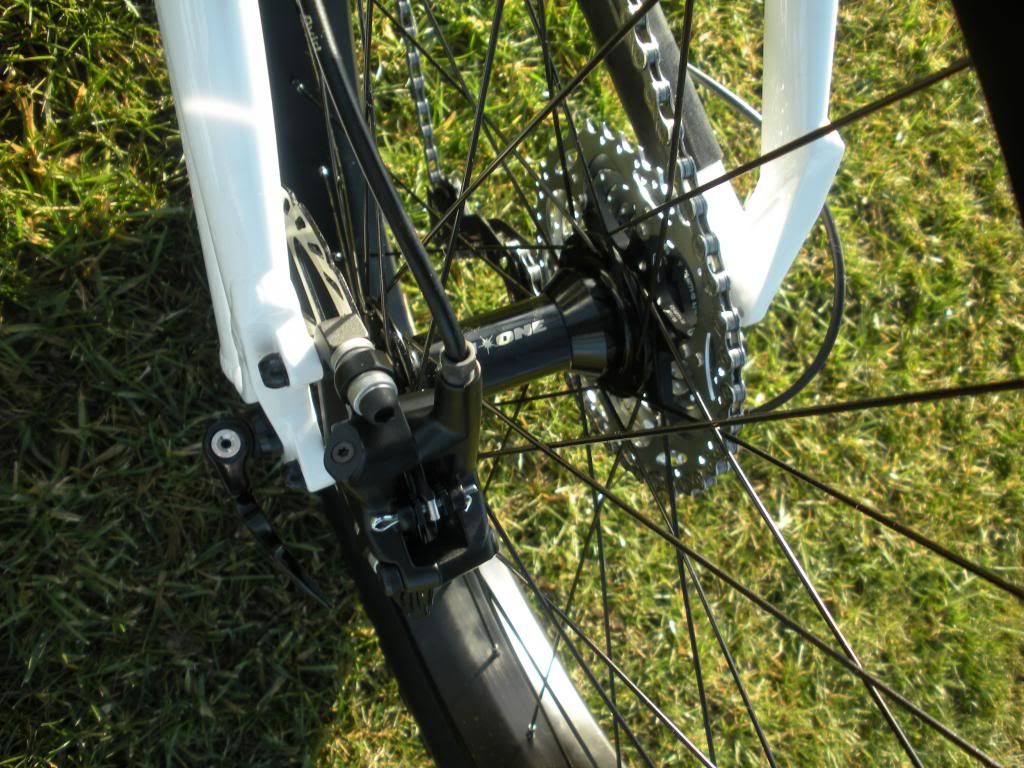
– Rear wheel 2293g w/ rotor & rim tape & cassette, w/o skewer. 30 pt freehub engagement = 12 degrees.
– Rims are pinned, not welded (not a worry to me). I’m concerned that the profile of the rim bead seat might make it tough to go tubeless, as the shelf isn’t very wide.More to follow…
pop-larkinFree MemberPosted 11 years agoOoh excited for you joe- we need photos
Looks like real weight saving on tubes to be had with a DH tube
JoeGFree MemberPosted 11 years agoUpdate #1
Well, I already had to make a trip to the LBS. The socket type Park BB tool I had won’t fit the Howitzer BB as the spindle is in the way. 😳 LBS was nice enough to lend me a wrench type one. The crank and BB that come on the bike are massive. They could handle the fattest of the fat IMO!
And by some miracle, the Race Face Evolve 24-36-bash crankset fits!!!
But there is only one mm of clearance between the chainring and the chainstay! 😯 So I need a 34. But I don’t see 34s on the Race Face website! 🙄 So, asked LBS to look into and order one if possible. Comment on this thread if you’d like to.
More weights:
– Big Nose Saddle 290g. I wonder why they called it that. It looks kinda odd to me. The front part of it is much wider than my regular saddle. 😉 Saddle shell says Velo, the mfr I guess.
– Twelfty seatpost 282 grams. 31.6x 350. Wondering who the little cartoon guy on the back of it is supposed to be. Customer? Designer?
– Cassette 391 g SRAM 11-36
– QR seat clamp 37g.
– Howitzer BB 430 g.
– Truvativ Holzfeller crank (170 mm, 32T) 687 g.Only issue so far is that there was not a chaingiude on the bike as per the specs. Its not a big deal to me as I am going 2x anyhow.
I will post photos of the complete bike, but the garage is not lit well and is a complete mess. And I know the response that a messy garage would get on STW!
Any bets on whether another LBS trip will be needed today or not? 😐
JoeGFree MemberPosted 11 years agoUpdate #2
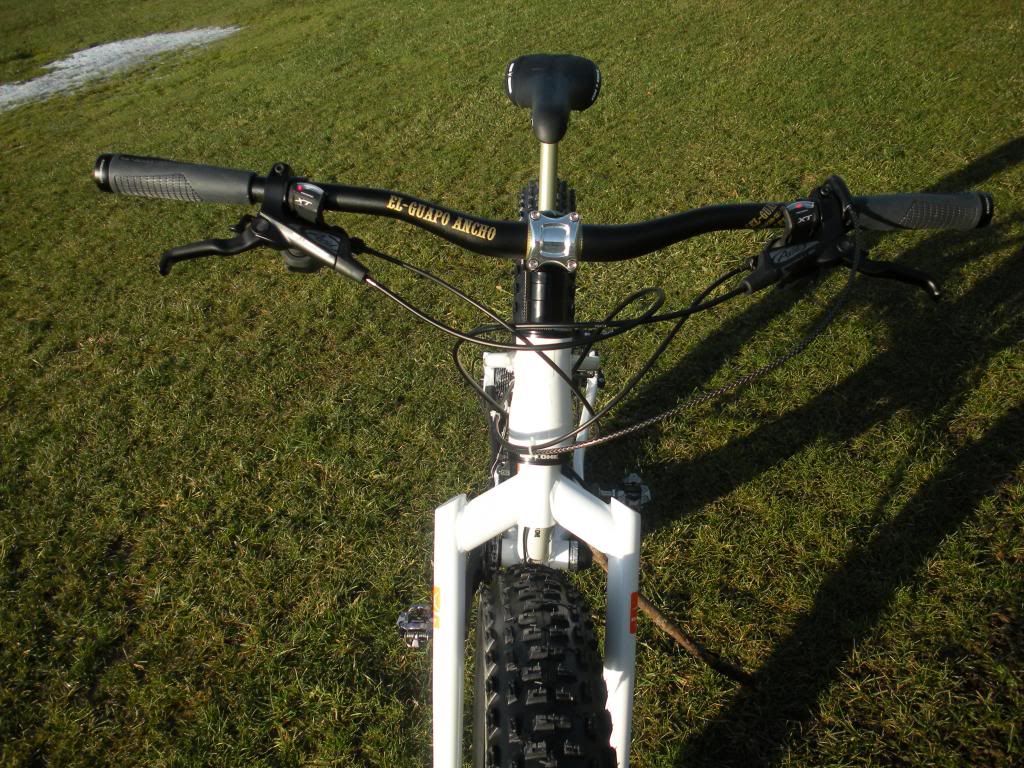
IIRC, the website said that the bike was supposed to come with white bars. My bars are black, and I’m glad! However, the gold print on the bar looks out of place with the rest of the bike as there is no other gold anywhere. Oh, and these bars are 30 inches wide! 😯 My regular bike is 26.5 inches wide. There are some real narrow gaps between trees where I ride, so if I like the wide bars, I may have to go cut down some trees! 😀
As far as headset concerns expressed by someone, I took the fork off, and the headset bearings were nice and smooth. The cups were greased when put into the frame as there were gobs of red grease squeezed out around them. I couldn’t figure out how to get the bearings out of the cups, though. 😳 I didn’t try sharp tools or a hammer, though because I wanted to keep the seals intact. 😉 So I just added a little grease to the top and bottom of the cartridge bearing and reassembled things. On-one provided a 5, 15, 15, and 20 mm spacer on the steerer.
More weights:
– Stem 145 g, 31.8×60 mm. Looks nice. The steel steerer tube is exposed at the rear of the stem, so I need to figure out how to stop it from rusting.
– Fork 1300 g with ginormous crown race attached
– Ancho bar, 316 g, 30″ wide
– Grips 124 g w/ plugs. I will put Ergon grips on mine, but keep these around.
– Front brake – 333 g with 34″ brake line
– Headset spacers (5,10, 15, 20 mm) 21 gramsNow I’m getting hungry. I don’t think that I’ve eaten anything all day, which is not normal. More to follow…
Mal-ecFree MemberPosted 11 years agoTry it before you cut down the bars. I always change cockpit setups but after getting the height right haven’t touched this. Rides very well + the extra leverage is great for thruch moves.
Improvised some mudguards after getting properly soaked riding in the permapuddle filth.JoeGFree MemberPosted 11 years agoMal-ec – Yes, I’m going to try the bars as the designer intended me to; 30″ wide! 😯 And I never mentioned cutting the bars; I said that I would cut down trees if I had to! 🙂
JoeGFree MemberPosted 11 years agoUpdate #3
Question – is it humanly possible to remove a non-removable (black) SRAM 10 speed powerlink from a chain? I’ve used the 8 speed (removable) ones forever and love them. I spent a embarrassing amount of time trying to get this 10 speed one undone. Bare hands, needle nosed pliers, etc. And both LBS close at 6 on Saturday! So the second LBS trip of the day was not possible. Grrr! Then, finally I figured out the answer:

Luckily, I already bought a 6 pack of KMC reusable 10 speed ones off of Amazon! Whew! 😉Then I notice, there is no derailleur hanger on the frame! 😯 WTF! Panic; look through boxes, etc. Oh no, I won’t be able to do anything till next week! Run around, curse, etc. 😥 And as above, LBS closed till tomorrow. Then, I notice that it is still attached to the rear derailleur that I had already removed from the bike as I’m going to put on a Shimano one. 😳 Disaster averted.
The frame was masked where the derailleur hanger attaches to the bike, so its not painted there. There was a bit of paint that squeaked in under the rear edge of the mask, though and it was really thick. Enough to cause the hanger to be misaligned? I dunno, but it was easy to scrape off with a razor blade.
And I found that I needed to run the front brake line in a different way than I’ve ever done before. It seems to route well when its right beneath where the head tube and down tube join. If I put it out in front of the head tube, it was much too long and twisted around all weird. I don’t have a bleed kit for DOT brakes, so shortening the hose isn’t possible for me right now.
So, stay tuned for another exciting chapter of Joe Builds a bike.
JoeGFree MemberPosted 11 years agoUpdate #4
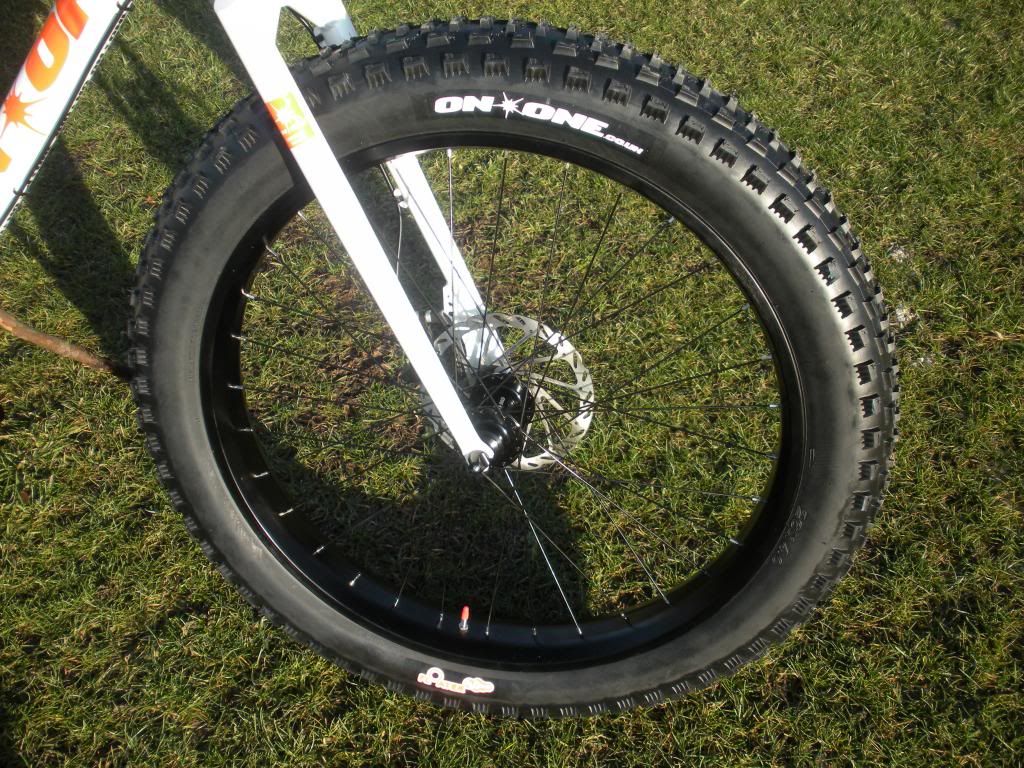
What others have said about the tire beads being loose is true. You know how you can usually use a tire lever to sweep the tire bead onto the rim when they’re not too tight? I was able to use my finger instead of a tire lever, that’s how loose they were. 😯 It does make it easy to align the tire logo with the valve stem, though! 🙂 And when I got the tire mounted and started pumping it up, I think that it took 5 psi or so before the tube contacted the tire tread. Before that, I could feel space between the tire and the inflating tube with my hand on the tread area. I do realize that the pump gauge isn’t real accurate at this low of a pressure.
BIG PROBLEM! ❗ The hub logo is not visible through the valve hole, FFS!* 🙁 Isn’t the wheelbuilder aware of this rule? Do you know how expensive it will be for me to have the wheel rebuilt to align said logo and hole?
Both tires have a noticable “hop” (to use the wheel truing term) to them when mounted on the bike and and spun. The bead is seated fine as far as I can tell. I ran them up to 20 psi, the max on the sidewall, and will leave them overnight. Maybe they’re still a little stiff from being folded up for who knows how long since they were made.
I also noticed that the seam on the rims is at a bit of an angle; it is not parallel to the hub axle. I never noticed this on other wheels, but I never really looked, either. My guess is that at least some other wheels are like this too, but that the width of the rims makes it more noticeable. It is not a concern to me at all, just pointing it out.
There are no logos or stickers on the rim. IMO, it needs at least a little something to dress it up. And the rim needs a name, like the Surly and Vicious ones, too. On-One names everything else that they make, why not the rims?
Oh, and the plastic trim pieces underneath the saddle aren’t held on with regular phillips or slotted screws; they use a hex key. No real value, but it does look really nice.
I also discovered that it is absolutely impossible to mount a disc wheel when the brake caliper still has the little plastic travel block between the brake pads. 😳 Front wheel or rear wheel, it doesn’t matter. Its amazing how easy they go in after it is removed, though. 🙂 Why on earth did Avid make them out of black plastic? They should be a bright color so that you notice them. Its kinda hard to notice a black plastic block in a black brake caliper. Magura uses yellow, which you can actually see.
The brakes drag ever so slightly as well. I loosened the tri-align bolts, squeezed the levers, and tightened the bolts again while holding the levers. I did this 2 or 3 times and its still the same. There is not enough drag to slow the wheel (they spin forever) but I can just hear a little rub. Hopefully this will go away once the pads bed in.
I got one of those Problem Solvers direct mount adapters to mount my front derailleur on. It attached to the seat tube in the area where it is bent. The seat tube is not perfectly round at this spot; I’ve tightened the clamp but can still see daylight between the front of the clamp and the seat tube. I bet that at least a gram of dirt will accumulate there adding unnecessary weight to the bike! 😉
I’m tired and going brain dead. i can’t make sense of how to attach the cable to the front derailleur. So, tomorrow will be cable time. Front derailleur, rear derailleur, KS Lev dropper seatpost.
To be continued.
* I may or may not not give a sh1t about this at all…
troutFree MemberPosted 11 years agoCome on JoeG get the bloody camera going we want pics too please 😉
plecostomusFree MemberPosted 11 years agoPictures needed, you would have been able to undo a ten speed power link with mastelink pliers and probably re use it, fair play with a dremel! There seems to be a lot more information coming to light from customers on this bike now on both here and mtbr. Some similar issues amongst them too. Perhaps it’s been a little rushed this project and launch of a bike. Then again how much is to be expected quality and weight wise with a day bike that’s £999 when everything else is above this price point.
pop-larkinFree MemberPosted 11 years agoTbh- nothing identified so far as made me think I wouldn’t bother
Any component choices will always be a silt of budget but my view is that you would just replace with better quality as they wear out
brantFree MemberPosted 11 years agoThere seems to be a lot more information coming to light from customers on this bike now on both here and mtbr. Some similar issues amongst them too. Perhaps it’s been a little rushed this project and launch of a bike. Then again how much is to be expected quality and weight wise with a day bike that’s £999 when everything else is above this price point.
I don’t understand your point. I am not seeing issues.
singlespeedstuFull MemberPosted 11 years agoI bet Brant loves answering emails from people like joe up there. 😆
Joe.
You sound like you should have gone to a bike shop and ordered a custom built bike and had them set it up for you as you seem incapable of doing it yourself.
Might have cost you a bit more than a grand though…smacaFree MemberPosted 11 years agoI took mine to Sherwood Pines yesterday. First job was to take it to the shop to get both brakes bled though 🙁 (I’d put <50 miles on it prior to this on flat bridle path stuff). The front cones were also loose, but I’d fixed that myself.
As others are noting, my 20″ version is coming in at 36lb with M520s.
I’m used to a 20lb XC bike (Whippet), so it did take a while to get dialed in to the extra effort of the Fatty going up. The rewards were there on the descents and the vast traction going round the corners.
The Fatty feels much less skittish than the Whippet, so even though the conditions were truly horrible (puddles over the BB in a number of places) the extra confidence + massive grip from those tyres meant I was going faster in some places than I would in much drier conditions on the XC bike.
One of the sections is up through a peaty, densely wooded, stretch. Here the soil was pretty much washed away, leaving a rats nest of slippy roots. On those 4.0″ tyres it rode just like a canal path 🙂
Now Sherwood is far from steep, but I found I was extensively using the lowest 3 gears. Personally I think a granny ring would be a good idea for anything much steeper. It just suits the bike’s character IMHO to sit and plod your way up the hills on a moderate spin.
I will be replacing the brakes, though they do now stop thanks to the guys at Sherwood Pines. (XTs to match my other bikes so I can use common pads and bleed kits).
I will be going 2×10.
I might see what is reasonable to do weight-wise, but TBH it’s not for racing, so I’ll see how I get on by adding some gears first.
FWIW I did 2 laps of the Red, each of them just squeezed in under the hour. I guess the most important thing is though I had a great time.
Si
itstigFull MemberPosted 11 years agoWake up Joe we/I need some pictures I have the impression that you are enjoying faffing with fatty :wink:hope it is fettled up soon. By the way any pics?
WoodyFree MemberPosted 11 years agoStill – looks like the Mukluk is actually a better deal anyway. Lighter, better quality parts, higher spec gearing and a proven design.
I’m intrigued as to your criteria for ‘better deal’ druidh ?
I take it you don’t mean buying from HERE 😯
JoeGFree MemberPosted 11 years agoI’m back at it again, everyone.
As far as ple and pop’s comments above, I have not come across anything so far that would stop me from recommending the Fatty to anyone. I’m quite pleased with it, actually. The only real structural change that I would lie to see would be better chainring clearance for up to a 36 middle ring. There is tons of tire clearance on the chainstays, so another 5 mm looks easily doable.
However, I have only tried the stock rims and tires. What looks like excessive clearance now might be just adequate with wider rims and or tires. And there is only so much room around the BB to put everything, so there will be compromises, especially on fat bikes. It looks like Brant leaned heavily toward tire and wheel clearance at the expense of the middle chainring. Some riders will agree, other will not. Its not a showstopper for me so far,
The bike brands have to balance consumer wishes against cost on every build. And fat bike parts like hubs and cranks are still a pretty small part of the market, so there aren’t a lot of choices and the parts are costly. Shimano isn’t in the fat bike market at all, and SRAM’s offerings for cranks are their older Howitzer line. So my guess is that Brant chose to go with a single ring crank to save a few bucks. Maybe some of those bucks were put into the hydraulic disc brakes (instead of mechanical ones), 120 tpi tires, and such.
Some of the upgrades that I am making to my Fatty are just preference, as well. I prefer Shiman over SRAM, so I’m replacing the shifters and rear der and shifters.
I chose the Fatty over the Muk and Pugs that I could have got at a LBS because I thought I would like the Fatty’s slacker head tube and higher BB. Also, the Muk and Pugs have 27.2 seat tubes; I went dropper this year and that really limits choices. And lots of people have Surly and Salsa fat bikes; few have On-Ones, at least in the US!
JoeGFree MemberPosted 11 years agoI almost had a heart attach when I first started working on the bike this AM. I spun the cranks w/o a chain, and heard a clicking sound like a rear freehub! 😯 WTF! Did it again, and again. Took a minute or two, but I found the cause. 🙂 It was that little plastic sticker that they put on there to help you align the front derailleur with the chainring. The sticker was hitting the chainring teeth making the clicky noise when I spun the cranks. 😳 In my defense, the sticker was hidden behind the bash ring so wasn’t easy to see.
So, I figured out the front cable routing. I found out that I don’t need to use the cable stop that is on the frame seat tube. So, pretty close on that, just need to fine tune the limit screws and cable tension.
Rear derailleur won’t go onto the largest cog, though. I’ll recheck the limit screws, cable tension, etc. after I finish eating.
I put that rubber electrical tape on the chainstay to protect the paint. I’ve read about it, but never tried it myself. The tape is 1″ wide, and it takes 2 widths to cover the top and inside of the chainstay. Unfortunately, the seam is right on the corner. So, I’ll have to try and find some 2″ wide if I’m happy with it.
matt_outandaboutFull MemberPosted 11 years agoJoe, I so would have been out on a few rides *before* all your fettling and improvements….Pics and a ride pleeeeease…
JohnClimberFree MemberPosted 11 years agoLet’s face it.
Joe has spent his grand on a bike and couldn’t afford a camera.JoeGFree MemberPosted 11 years agoThe bike is COMPLETE!!! 8)
36 lbs, 15 oz. 😯
Going out to the park or somewhere to take some photos now. 🙂
I may not be able to ride today at all. :(The water is shut off. The municipal authority has had a crew at my neighbor’s house since 10 this morning. They have a backhoe digging in the front yard.
JoeGFree MemberPosted 11 years ago^^
Ride it? Who buys a bike to ride it? 😆No, I have not ridden it yet. My butt has never been on the saddle. 🙁
Just got back from taking some photos. So, should I upload the photos or go for a ride? 😉
SaccadesFree MemberPosted 11 years agoignore that chunky grumpy bollocks, host the piccies then go for a spin.
lovin” the write up!
singlespeedstuFull MemberPosted 11 years agoI’d like to see detailed pictures to show how many degrees the hub markings are out from the valve hole…
I’d also like a vid of the wheel builder laughing all the way to the bank when you ask him to rebuild the wheels.
MarkieFree MemberPosted 11 years agoI don’t think anyone cares anymore…..
Aha, the old reverse psychology…
coastkidFree MemberPosted 11 years agoHandling is great, doesn’t feel slow + sluggish like the Pug I tried a few years ago.
This is a more and more used quote i would love to see put into practice… 🙂
JoeGFree MemberPosted 11 years agoThe bike
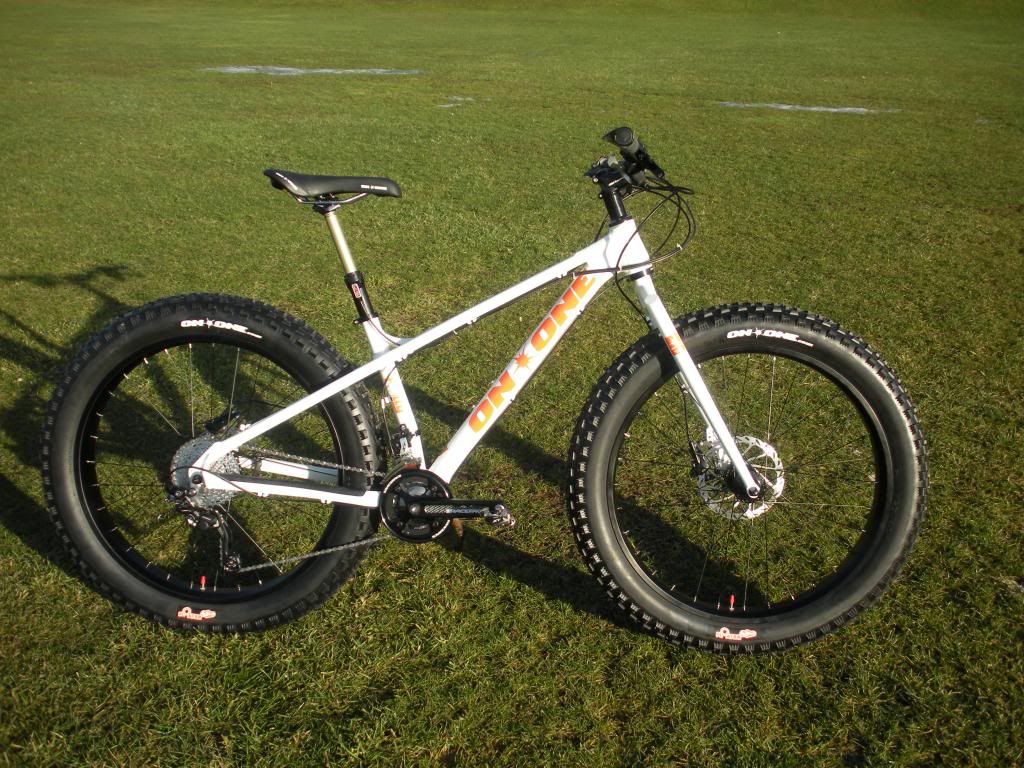
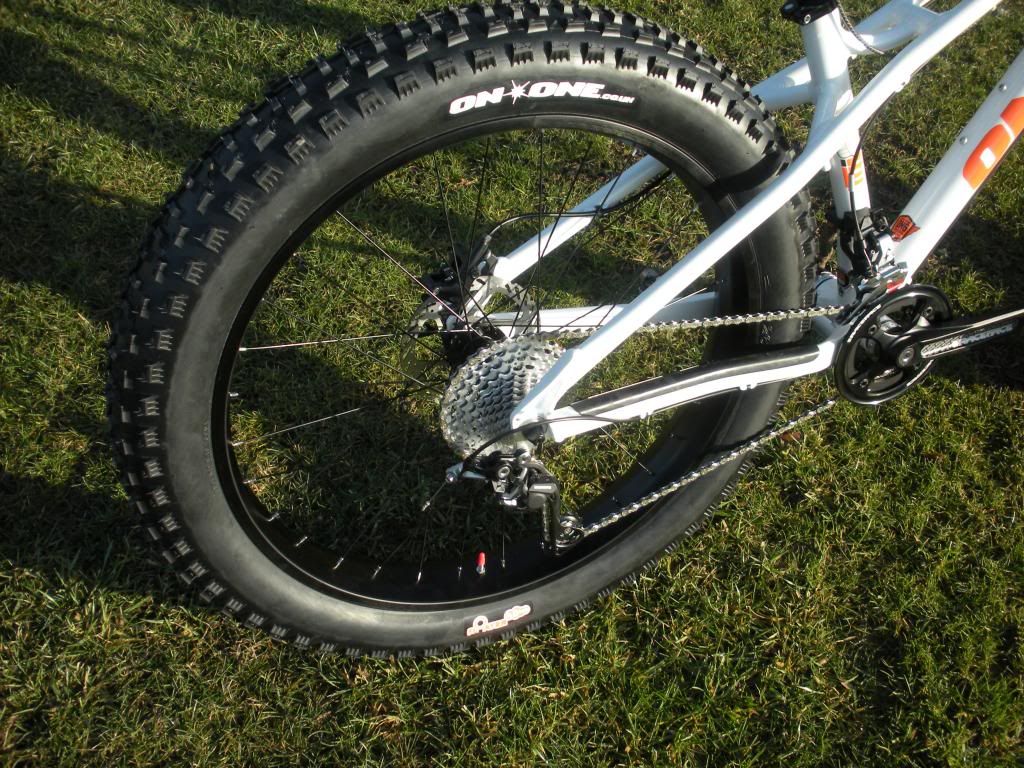
Rear wheel and drivetrain
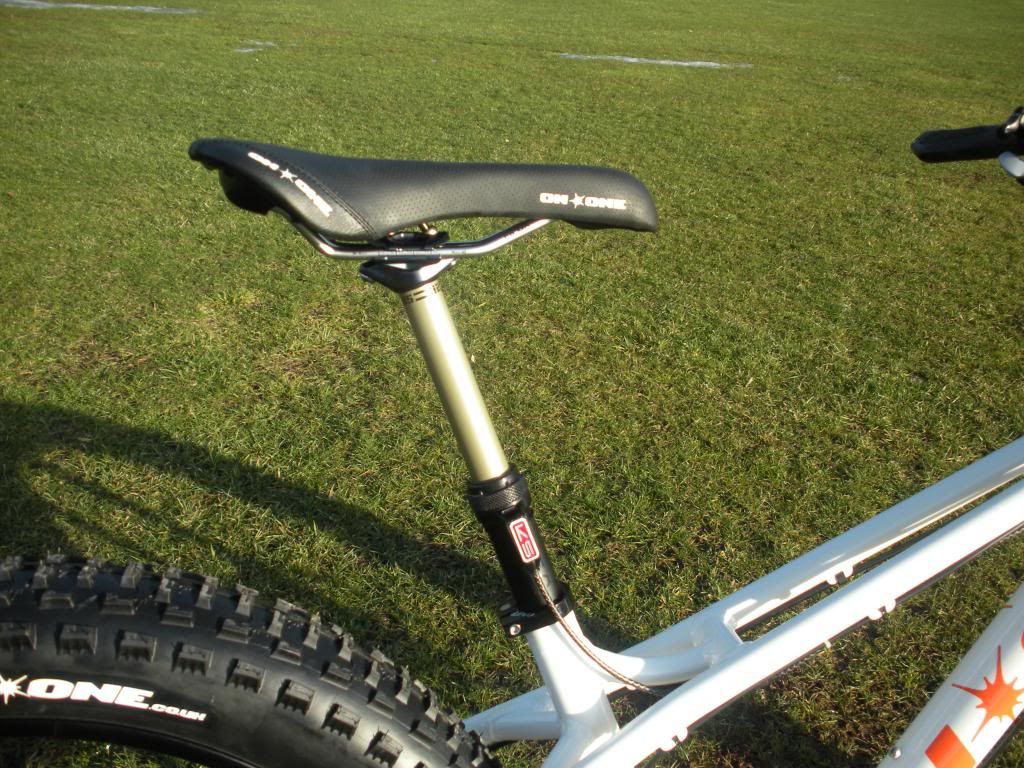
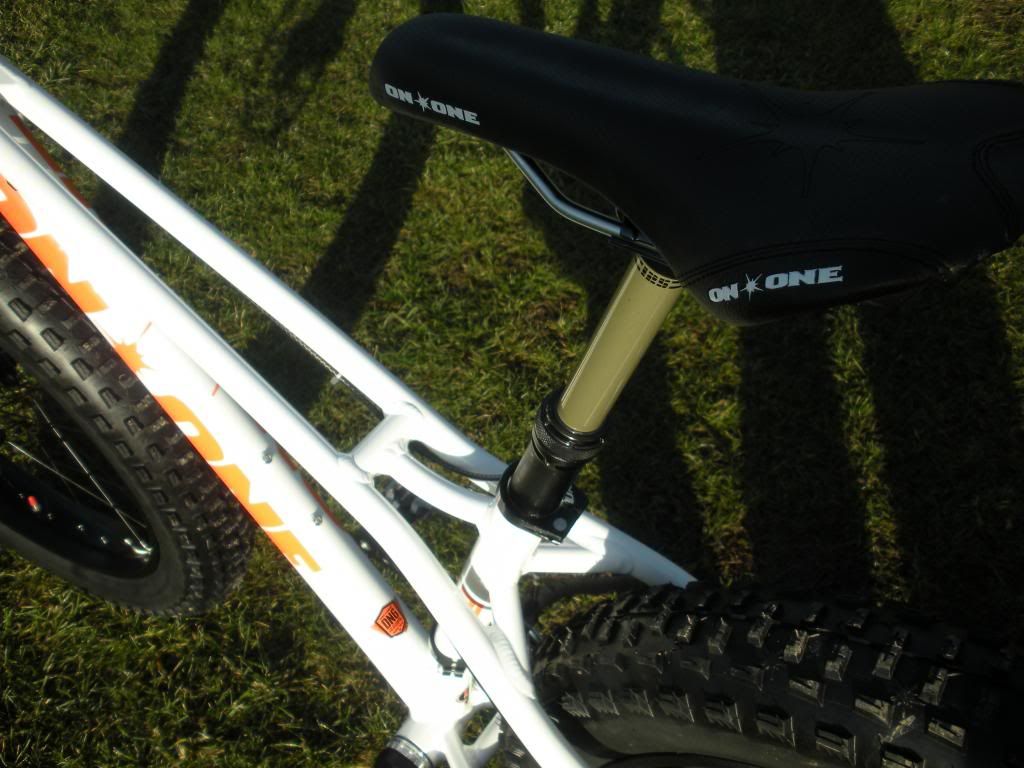
Big Nose saddle and KS Lev dropper seatpost
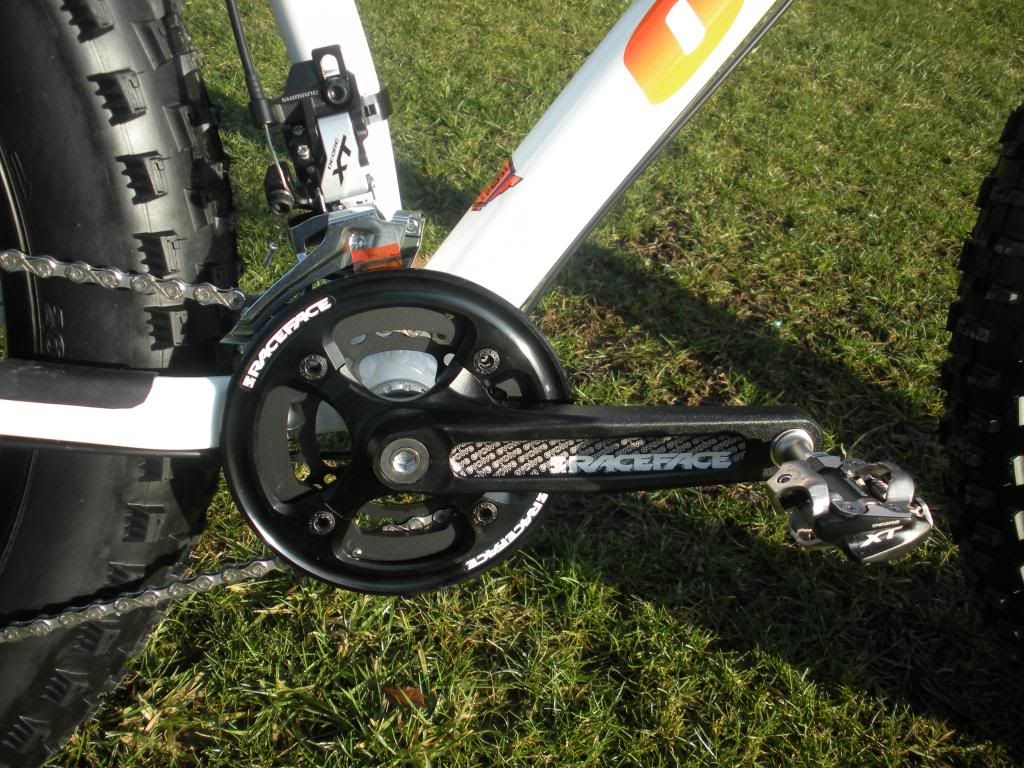
Race Face Evolve crankset, Shimano XT front der
 JoeGFree MemberPosted 11 years ago
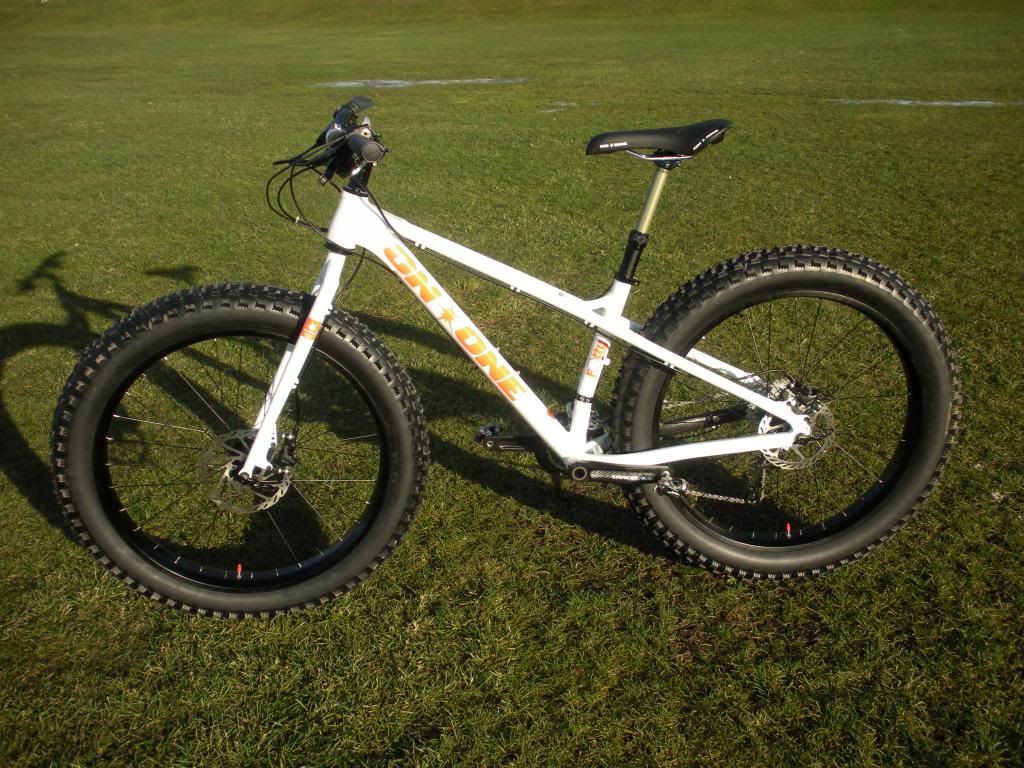
Front wheel and fork
Head on
Rear hub and brake caliper
Front brake caliper
 JoeGFree MemberPosted 11 years ago
The controls
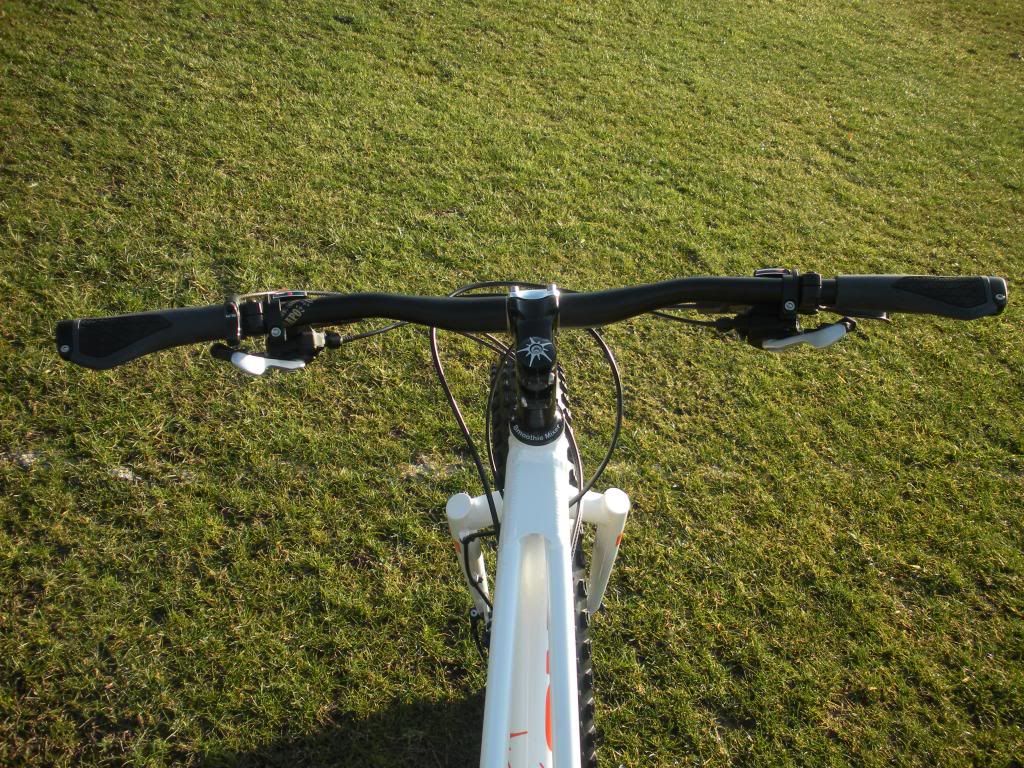
Nondrive side
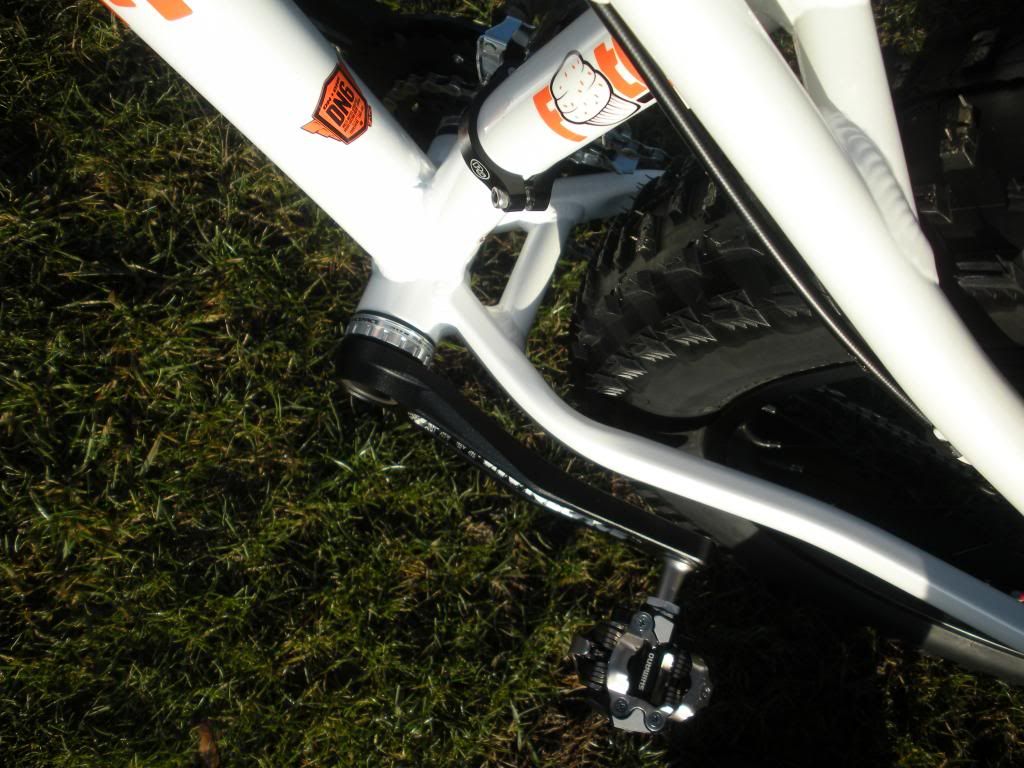
BB area showing tire chearance
Top tube(s)
The topic ‘On one fatty first impressions (anyone)’ is closed to new replies.