- This topic has 41 replies, 19 voices, and was last updated 11 years ago by footflaps.
-
Making workbenches
-
footflapsFull MemberPosted 11 years ago
I have some 18mm Ply sheets for the tops, but what about the frame – anyone got any suggestions for what size timbers to use and spans etc?
I was thinking cut each sheet to 2.4m x 0.8m, then six legs with a simple frame between the legs.
Nothing too heavy on top, just don’t want the Ply to sag / bounce about too much.
Actually, one of them will have a pillar drill & lathe (yet to be procured), so they will need a more beefy frame.
Thoughts?
tomhowardFull MemberPosted 11 years agoTo fit the theme of the shed?
Granite, for all of it. Hewn from one solid block.
HTH 😉
organic355Free MemberPosted 11 years agoI got a vice for Xmas, but nothing to put it on, please post pics of your build as would be interested to see what you come up with.
Can you engineer something that folds up for storage while your at it? 🙂
trail_ratFree MemberPosted 11 years agomount the ply on a frame made 2×2/2×4 , then mount your legs to that.
the ply wont be bouncy after that .footflapsFull MemberPosted 11 years agomount the ply on a frame made 2×2/2×4 , then mount your legs to that.
the ply wont be bouncy after that .Cheers. Would you add diagonals or just straight braces between the 6 legs?
maccruiskeenFull MemberPosted 11 years agoNothing too heavy on top, just don’t want the Ply to sag / bounce about too much.
make a sort of SIP – put your 18mm on top, a 3×2 frame (you could prob get away with 3×1), then put a skin of something on the bottom, 9mm perhaps. That means for the bench to sag the bottom sheet would have to stretch… which it can’t.
I make big workbenches this way for ‘flying factory’ work (where I put together a temporary crew and workshop in a hired hanger) for filmsets. With just the sip style panel and a leg on each corner and even 3m long benches don’t sag even when you stand on. If you were to hammer on them blacksmith-style you’d get a lot of bounce though.
footflapsFull MemberPosted 11 years agomake a sort of SIP – put your 18mm on top, a 3×2 frame (you could prob get away with 3×1), then put a skin of something on the bottom, 9mm perhaps. That means for the bench to sag the bottom sheet would have to stretch… which it can’t.
Interesting, hadn’t thought of that!
I’d be tempted to use two layers of ply.
Two layers of 18mm Ply? That’s quite thick!
trail_ratFree MemberPosted 11 years agoeither or really , long as its braced – ive done both in the past , cant say ive noticed much difference.
i was planning to build a new box section steel workbench frame over the holidays but ended up rewiring the house instead 🙁
the bench i inherited with the house is too low and falling apart.
nealgloverFree MemberPosted 11 years agomount the ply on a frame made 2×2/2×4 , then mount your legs to that.
the ply wont be bouncy after that .This is exactly what I did and it works a treat.
Used cheap CLS screwed to the underside of the ply (all edges and one across the middle) on a 8″ x 3″ ply sheet.
I used an 8″ batten fixed to the wall for the back edge, and 3×3 fence posts (x4) along the front edge as legs.
Great for storage underneath as there is no need for cross bracing on the legs as it fixed along the back edge so can’t topple.)Very sturdy and seen a lot of use over the last 7 years with no problems.
trail_ratFree MemberPosted 11 years agoinkeeping with the rest of the shed – i do suggest bib and braces – horizontal and diagonal bracing required – as well as fixing to a batten at the back and suspending it from the roof via cables.
then you can hide in your bunker under the bench in times of war
footflapsFull MemberPosted 11 years agoI’ve got some 5″ fence posts I dug up from the plot, before the Workshop was built, which I’ll cut up and use as legs. As for height, I was thinking kitchen worktop height, so I have the option of putting a Tumble Dryer / fridge under there at some point in the future.
bikebouyFree MemberPosted 11 years agoI have just bought 2 work benches from a school that has relocated, both are hybrid Woodwork/Metalwork benches that can be converted simply and easily. Came with all the vices (1 long flat woodwork, 1 upright woodwork and 1 metal work upright) there are draws attached to the metal framework.. very sturdy, very unused.
£50.00 each.
Bargain Shmargain. 😉
trail_ratFree MemberPosted 11 years agoits a slippy slope…. id make it just low enough that they wont fit….. before you know it mrs footflaps will be putting up floral curtains and such like in your WORKSHOP !
svFull MemberPosted 11 years ago3 lengths of 9×3 side by side works for me. Legs at either end and screwed to the wall, doesn’t sag!
maccruiskeenFull MemberPosted 11 years agothen you can hide in your bunker under the bench in times of war
 footflapsFull MemberPosted 11 years ago
its a slippy slope…. id make it just low enough that they wont fit….. before you know it mrs footflaps will be putting up floral curtains and such like in your WORKSHOP !
Luckily she is currently occupied planning the redecoration of the bike room in the house, which will shortly be emptied when everything gets moved into the workshop (as soon as I get the alarm up and running).
footflapsFull MemberPosted 11 years agothen you can hide in your bunker under the bench in times of war
That’s what the secret under ground network is for….
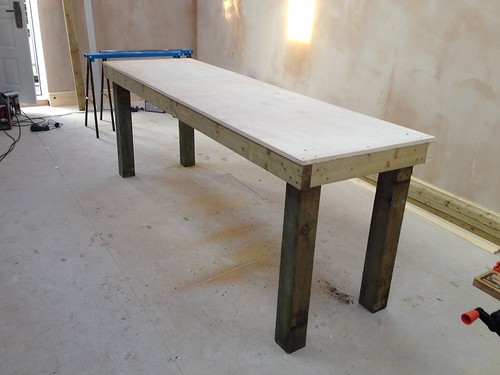
footflapsFull MemberPosted 11 years agoFinally got round to making Workbench Mark 1:
18mm Ply top and some 4×2 joists for the top:
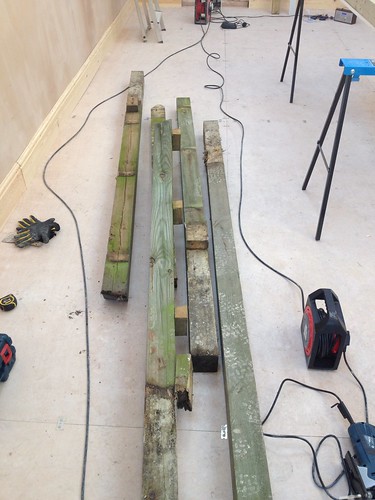
Workbench top by brf, on FlickrHad a load of old fence posts which I removed to make way for the workshop:
Old fence posts to use as legs for benches by brf, on FlickrDecided on 88cm legs, which makes the top 90cm off the floor.
Workbench with legs by brf, on FlickrAdded an edge to the top to stop screws etc rolling off the back / sides:
New workbench by brf, on FlickrWhole thing was strictly supervised by Jeff the cat:
Jeff supervising by brf, on Flickrglupton1976Free MemberPosted 11 years agoThat needs a strip of ply at the back and a strip of ply at the back on the workbench flat surface.
brFree MemberPosted 11 years agoNeeds additional braces under the ply.
Standard rule for any work bench, can you stand/jump on it – if not, it ain’t a workbench, it’s a table 🙂
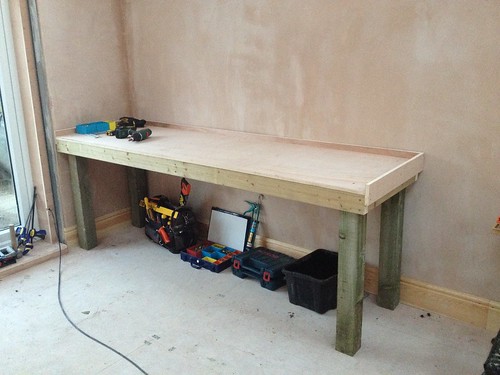
footflapsFull MemberPosted 11 years agoDoesn’t flex at all when you stand on it, it will be used as such for painting the ceiling. I’ll probably use another sheet to of ply to add a shelf underneath for filing storage boxes etc.
CountZeroFull MemberPosted 11 years agoIf you want a seriously solid work table in a shed, then the two we have at work are perfect; steel topped type composing tables, a bit like this one: http://www.briarpress.org/24657
The top is cast steel, which goes rusty in minutes if you spill liquid on it, and you need a pallet truck to move either one around, I reckon they weigh about ¼ ton each. Brilliant work tops, great for hammering the bejayzus out of anything!mcmoonterFree MemberPosted 11 years agoFootflaps, I’d brace the legs front to back and put a lower shelf in and nail it too, it will help it’s lateral strength no end. I’d make a L shaped brackets brackets and bolt it to the floor.
footflapsFull MemberPosted 11 years agoThe Ply shelf will double as a brace for the legs to keep them all from flexing. I was thinking I’d have 6 legs originally, but it seems OK, so far, with just the four. I’m going to make another one, so might make that a bit lower and beefier. Just need to buy some vices now….
brFree MemberPosted 11 years agoMy woodwork bench:
It started life as a battery table (1912 according to the pencil scribbles underneath) at our mill; I added new longer legs last year.
My cycle bench is half that size, with a 1/4″ steel top.
projectFree MemberPosted 11 years agoFootflaps, pop down to a B and Q and get a piece of hardboard cut, to size, secure it tio the workbench top with double sided tape, then clear varnish it, stops any oil sinking in and can easily be replaced.
also cross pieces on the legs, front to back, then another sheff accross them
footflapsFull MemberPosted 11 years agoGood tip Project, but I’ll probably just varnish the ply. If it get’s really bad, I can just replace the top or screw another thin sheet down over the top.
TreksterFull MemberPosted 11 years agoI would cover the rear with ply to stop the wall getting damaged and the sides to stop stuff falling out and to add strength to legs.
Wherever you mount the vice put another leg under it to stop bounce
Drawers are a handy thing rather than boxes for storage 💡
You could also cover the top with some sheet steel for a wipe clean surface 💡footflapsFull MemberPosted 11 years agoI would cover the rear with ply to stop the wall getting damaged and the sides to stop stuff falling out and to add strength to legs.
Yep I’ve now realised that, mainly to stop stuff falling off the back of the shelves (yet to be added).
I need to order a few sheets of 9mm ply to make the shelves / back and sides.
Wherever you mount the vice put another leg under it to stop bounce
I’ll probably mount the vice towards the edge on one side, but if it needs another leg, it’s a 5 min job to add one, I’ve got plenty of spare 4″ posts to cut up….
mcmoonterFree MemberPosted 11 years agoTop vice mounting tip.
When you fit it to the bench, ensure that the inner fixed jaw projects half an inch forward or so from the edge of the bench. This allows you to hold long pieces of work right down to the floor.
JoeGFree MemberPosted 11 years agoWhat fasteners did you use to put it together? Bolts or carriage bolts would be best, and they can be tightened more later. Lag screws are way better than decking screws because they are intended for shear loads, while deck screws are not. I’d also say that nails are better than deck screws, too. If you use deck screws and the workbench twists (even a tiny amount) the holes end up becoming elongated and it gets all wobbly.
I also agree that you should have more supports under the ply top. And I’d add a middle set of legs. Its hammering, twisting and such that it needs to be reinforced to deal with, not just static weight.
mugsys_m8Full MemberPosted 11 years agoFootflaps,
I built something similar. The worktop had internal braces, and was also completley filled with sand. The sand acted as damping; the design breif included the requirement that a mug of tea on the bench would not have its contents ripppled by heavy hammering on said workbench.
Worked a treat, but it did nearly kill me when I decided the legs were too long and flipped it on its side to trim them…… Sadly it remians in our now rented out property in Sheffield as I couldn’t convince my mates to lift it in the back of the truck when we moved to France!
footflapsFull MemberPosted 11 years agoWhat fasteners did you use to put it together?
It’s just screwed together right now – no glue. That way, if I change my mind, I can just unscrew it and tweak it.
I plan to have workbenches (of various sorts) all down one length of the workshop (8m), so plenty of room for some different design. I need to fit a sink and fridge into one of them as well.


The topic ‘Making workbenches’ is closed to new replies.