- This topic has 37 replies, 7 voices, and was last updated 11 years ago by spooky_b329.
-
DIY plumbing Q
-
cynic-alFree MemberPosted 11 years ago
I’ve asked before but I am still a bit stuck. I’m installing a thermostatic tap/shower bar on a solid wall with only 20mm plaster to raggle into (though I can cut into the brick below with the grinder
I think I can use the plate below (with some 15mm elbows feeding into it) installed flush with the plaster surface (i.e. right under the tiles)
http://www.toolstation.com/shop/Taps+Showers/Shower+Valves/Shower+Wall+Plate/d240/sd3000/p27249
Or…any better way?
StonerFree MemberPosted 11 years agoOverboard the wall with some hardibacker?
Surface mounted bar mixer and run some nice chromed pipes on the surface??mk1fanFree MemberPosted 11 years agoYou’ll either need to chase out the wall, build out the wall or surface mount.
If you chase out the wall you need to make sure you it’s thick enough to accomodate the channels.
cynic-alFree MemberPosted 11 years agoI’ve already bought the mixer, I’d rather keep it all behind the tiles, Shirley it can’t be that difficult?
I know I need to chase out the wall a bit, my Q is will the above solution work well?
The mixer was supplied with offset male-male 1/2-3/4 adaptors, which I was advised to use with a bolt-on 1/2 female right-angle “thing”, but I can’t see how I will have the accuracy fior the 150mm mounts.
StonerFree MemberPosted 11 years agoThe cranked adaptors are to give you adjustability.
Can you not fit an elbow joint directly to the mixer to get the pipes shallower?
cynic-alFree MemberPosted 11 years agoHow do you seal the cranked adaptors then stoner? PTFE tape? the only way I can see its to screw them all the way in, which of course has no adjustability.
I think your suggestion there is more or less what I am proposing in my OP? The mixer takes 3/4 male.
EDIT – that could work but how do I secure it? 32mm pipe WTF?
StonerFree MemberPosted 11 years ago
Sorry the one in the post above isnt right I think this one looks the right dimensions.
PTFE into the mixer body I should think. No need for PTFE on the other end if it’s a compression fit with a brass olive.
cynic-alFree MemberPosted 11 years agoTa…but I still ask…how is the whole assembly secured to the wall?
(mixer body has female 3/4 fitting btw)
StonerFree MemberPosted 11 years agoWHich mixer you got?
Im guessing you mount the mixer bar mounting wall plate to the surface of the wall using the three counter sunk screw holes. The 15mm copper chased into the wall comes up behind and compression elbow in the back.
the mixer bar itself has captive nuts that screw the mixer on to the wall plate tappings. Bit of PTFE wouldnt go a miss IMO.
EDIT, when you say mixer body has 3/4 female, are you sure it is OK to use with the mounting plate?
cynic-alFree MemberPosted 11 years agohttp://www.bathempire.com/round-thermostatic-bar-mixer-valve—shower-and-bath_p4030315.htm
OK I think we have communed there, don’t see why the mounting plate wouldn’t work.
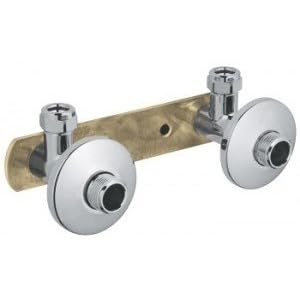
northernmattFull MemberPosted 11 years agoGet one of these. then all you have to do is run your pipes up inside the wall. The brass plate fixes to your tiles and is a compression fit onto your 15mm copper. You then cover the brass up with the chrome escutcheon and your bar screws straight onto the 3/4″ thread. Job done.
StonerFree MemberPosted 11 years agoright – so not a female connection as such, but captive nuts that scre on the male spigot of the backing plate.
bobs your uncle.
BearFree MemberPosted 11 years agoBest way is with a grohe bracket. Can’t really see what shower etc as only on my phone but if you can wait will look on my pc later and give you the grohe code. I always use them as they are fool proof. Do not use the s unions and tape horrible things that have a tendency to move in the wall when you tighten the shower. If you need tape use loctite thread seal. Brilliant stuff.
BigJohnFull MemberPosted 11 years agoYou can get a flush mounted shower plate with 150mm centres. You only need a 15mm elbow behind so very shallow chasing required.
I fitted one the other week and it looks pretty smart.
StonerFree MemberPosted 11 years agothe cranked adaptors are only used if you are not using the mounting plate, but instead connecting directly to pipe ends set in the wall.
cynic-alFree MemberPosted 11 years agoCheers Matt, that may be the neatest solution, these ones are cheaper too!
http://www.toolstation.com/shop/Taps+Showers/Shower+Valves/Shower+Fixing+Bracket/d240/sd3000/p68003
Would still love to know HTF the cranked adaptors are meant to work.
StonerFree MemberPosted 11 years agoif your copper pipe centres arent exactly 150mm you can use the cranking to take up the difference wider or narrower or recentre the outlets.
cynic-alFree MemberPosted 11 years agoBigjohn – ta, that’s the product I linked to in my OP 😀
Ta Bear but AFAIK grohe = £££ and I have a £20 solution now.
BigJohnFull MemberPosted 11 years agoOh, yes, didn’t spot that. But I prefer a 150 plate to 2 individual mounts.
Cranked adapters are for when you’ve got 2 pipes sticking out of the wall that are maybe 146 or 157 mm apart and are not quite level.
cynic-alFree MemberPosted 11 years agoAh…so the 1/2″ and of the cranked adaptor has to go into a captive nut & washer seal…rather than a female mount.
northernmattFull MemberPosted 11 years agoThe cranked adaptors are useful if replacing an existing shower or if your pipe work was a bit bodged as it gives you that bit of flexibility. The plate solution BJ mentions is good as well but they look a bit poo. Also if to manage to get to a Plumb Center they should be a few quid cheaper as the website only lists retail prices.
BearFree MemberPosted 11 years agoGrohe bracket is around the twenty mark too. Popular misconception I can get their stuff for less than that rubbish bristan.
cynic-alFree MemberPosted 11 years agoWell if it’s easy for you to link to it Bear, I’d be interested to see it.
EDIT if it’s liek this then it’s not going to suit:
Matt I’d presumed John’s/my original propsal fits UNDER the tiles, no?
northernmattFull MemberPosted 11 years agoThat plate is a surface mount thing, look at the threads to screw your shower to, can you imagine how much of that would be left showing if you tiled up to it?
If you can wait get the Grohe one. Grohe stuff is the dogs danglies. The only expensive stuff they make is the very flashy high end stuff, but then it’s high end so high price.
BigJohnFull MemberPosted 11 years agoThat last one you posted is like a Shower PL8 and goes behind the tiles.
The original is mounted on the front face of the tiles and if used with a thermostatic bar mixer looks very presentable. And I have high standards. Sorry if that sounds smug, but just to say it won’t look like shit.
BearFree MemberPosted 11 years agoCynic. That’s the thing but why won’t it work? You use those under the finished surface gives a secure mount
cynic-alFree MemberPosted 11 years agoIt would work but I then have to drill my bath accurately etc, I’ve already chased out the plaster for the pipes!
BearFree MemberPosted 11 years agoWhy do you need to drill bath. Thought this was a wall mounted shower?
spooky_b329Full MemberPosted 11 years agoI did this…the shower didn’t have a plate, it just accepted the 15mm pipe straight into its compression fittings.
I took a grinder to the bricks which made a huge mess. I then started by putting a 90 degree bend into the pipes but once I had cut the ends to length, they were too close to the bend so when I put them in the compression fittings the pipes were still slightly ovalised, so I wouldn’t have got a seal. So I did it again but with 90 degree soldered elbows.
I got the pipes as close to where I needed them as I could and cut the tiles to fit, then when I removed the tap I ended up cutting a car sponge into one long strip of foam, and spiralled it around each pipe as I needed some wiggle room due to the stupid design of the shower mixer. If it had been into a partition wall with access from the other side it would have been dead simple.
I then tiled over my sponged pipes, and once it had all gone off I was able to move the pipes about just enough to get all the connections done up. My tap body needed fixing to its wall bracket first which involved offering it up at an angle and then twisting, and then you had to fit an L shaped pipe to either side that connected the tap to the pipes. If the pipes were rigid in the wall there was no way to connect the L shaped connectors.
BearFree MemberPosted 11 years agoYou build the grohe bracket in the wall to the required depth pipes buried in wall too.
cynic-alFree MemberPosted 11 years agoBear I want to avoid having to dig too much into the brickwork – there’s only 20mm plaster.
mk1fanFree MemberPosted 11 years agoTo bury the pipes you’ll need 40-50mm deep channel. That’s either into the wall or building out the existing.
spooky_b329Full MemberPosted 11 years agoYeh you’ll have to go into the brick. Can’t see how you’d get a 15mm pipe into a 20mm channel and still have room to get an elbow on.
I was probably 25mm deep where I came up behind the bath, getting to 40mm deep behind the shower fitting. Still extremely fiddly though.
Why not dump the tap and just get a bath mounted one 🙂


The topic ‘DIY plumbing Q’ is closed to new replies.