- This topic has 713 replies, 3 voices, and was last updated 6 years ago by yourguitarhero.
-
Brewers of STW
-
singletrackmindFull MemberPosted 10 years ago
Liquor additions are not my strong point.
I know you need alot of calcium pretty much throughout the process to make everything work.
Water Hardness CACO3 , and PH and important . Also the quality of the water you are supplied with matters. yes , it may meet all EU requirements but that does not make it great for brewing.
The big brweries around Burton on Trent are there because the water is perfect for brewing with , needing little or no additions.We add acid to lower our start PH from 7.9 to nearer 6.0, then add Murphys DWB to the Grist which contains calcium chloride and gypsum and some magnesium iirc. 4lb to 20BBLs. for our water.
We also use different treatments for Milds and Stouts
CaptainFlashheartFree MemberPosted 10 years agoSince starting to brew again, I’ve wanted to make ‘farm beer’ of the type my grandfather used to serve up to his farmhands at harvest time. Light, thirst quenching stuff.
Just opened a bottle of a recent batch and I’ve cracked it!
Maris Otter and crushed crystal with Goldings. It’s lovely! Might make it a little bit hoppier next time, but otherwise it’s bang on! Happy, happy, happy.
troutFree MemberPosted 10 years agoPoundshop for this cleaner

£1 for 625 grams works just the same as the dearer stuff ace for soaking the fermenting vessels and removing the muck stuck to the sides .
allthepiesFree MemberPosted 10 years agoThe oxi is nice and cheap but make sure you rinse well when done, the poundshop stuff (as above) I’ve bought recently has a perfume additive. You don’t want any of that hanging around in a brew 🙂
davidrussellFree MemberPosted 10 years agohi all, long time off the thread and great to see its still going strong!
I’m still assembling kit to brew using the MB style – I have a stock pot and a very well fitted bag and have some copper to make a wort chiller, but after my last effort i’m scared to try it!
I did notice your comment though PF – where did you get the pot?
Bought a 20 litre pot so I can dispense with the dunk sparge and to allow me to brew 10-12 litre batches. First brew in the new pot, with no sparge, gave me 70% efficiency and much less faff/mess. No boil over with this pot either! It was only £20.
EDIT – i was also going to ask how your stove handles heatin a bigger volume of water, did it cope ok?
Cheers
David
peterfileFree MemberPosted 10 years agoI got this one david 19 litre for £21.99
My stove is utterly useless, however by using the same techniques as before (spreading across two elements and using a camp kettle to reduce the surface area of the liquid) it was absolutely fine.
I would definitely recommend a larger pot over the 11 litre MB one. You can get a full 10 litres into the FV without a dunk sparge, or if you use the same technique as the MB kit you could get about 16/17 litres!
for me, the benefits are less mess, no sparge and greater volume. There are no downsides as far as I can tell. The pot size only feels a little bit bigger than the 11 litre (I actually though i’d bought the wrong size until I measure the capacity!)
CaptainFlashheartFree MemberPosted 10 years agoMy stove is utterly useless
Try brewing on an Aga! Even worse!
davidrussellFree MemberPosted 10 years agoHey, thanks for the quick reply. That looks like the people i got the 11 litre pot from, I wonder if they’d accept returns after 3 months 🙂
By doing away with the dunk sparge are you doing away with sparging altogether then and just relying on the grain giving up its goodness in a slightly larger volume of water?
Cheers
davidrussellFree MemberPosted 10 years agoTry brewing on an Aga! Even worse!
i can imagine – my folks have one and it varies from screaming hot to almost out overnight (old school coke fuelled one)
I have actually been looking at 5 burner hobs with the wok burner element before i’ve even brewed a batch 🙂
peterfileFree MemberPosted 10 years agoTry brewing on an Aga! Even worse!
#firstworldproblemsflashy 🙂
By doing away with the dunk sparge are you doing away with sparging altogether then and just relying on the grain giving up its goodness in a slightly larger volume of water?
Yup. I got 70% (only a 2% drop) first attempt. Given that the cost of grain at our level is pretty cheap, I’m not even going to bother employing any techniques which might increase efficiency any higher, it’s just not worth the extra effort to save 20p on grain for me right now, got too many other areas I want to improve! 70% suits me fine for the moment.
The-ChairFree MemberPosted 10 years agoPeterfile I’m another after some of your sage advice 😀
I’m planning on graduating from kits to AG and already have an FV, so don’t fancy the Massive kit. Do you find your 19 litre pot large enough? And what bag do you use? I was thinking of this one:
Bag
Mostly though, I’m desperate to try that SNPA recipe, and wondered what quantities you used for your 19L pot, did you just scale them all linearly?
I’m also struggling to find Cara-Pils/Dextrine, what did you use? (same for the english carastan tbh)
Any advice would be massively appreciatedCaptainFlashheartFree MemberPosted 10 years agoBottlng tip for you, folks – if using the Lakeland bottle capper, Morland’s bottles work best.
Conveniently, they have also been a three for a fiver deal, including the rather lovely Old Crafty Hen.
john_drummerFree MemberPosted 10 years agoDon’t recommend clear bottles for beer unless you can store in a dark place. Beer bottles should be brown
zilog6128Full MemberPosted 10 years agoI have a similar bottle capper to the Lakeland one and it handles everything fine except the type used by Wychwood (which is a shame as I like their beer.)
+1 for brown bottles though. I guess they’re only used for marketing purpose (making light coloured beers more distinctive/appealing). I wouldn’t buy a beer in a clear bottle personally – clearly the shops don’t store them in a light-free environment.
Managed 2 brews and 1 bottling over Easter. The one I bottled (a porter) was the first brew I’d given “the works” in terms of liquor treatment and I have to say it lasted amazing out of the fermenter so I have really high hopes for that one!
troutFree MemberPosted 9 years agoInteresting article using an induction hob for the boil
induction hob brewingpomonaFree MemberPosted 9 years agojohn_drummer – Member
Don’t recommend clear bottles for beer unless you can store in a dark place. Beer bottles should be brownAlmost agree but not quite. I always use one clear bottle and one PET bottle per batch. The clear one so I can see how it’s looking and the PET so I can give it a squeeze and check for carbonation.
singletrackmindFull MemberPosted 9 years agoClear glass + sunlight can lead to sunstruck flavours which are not good. There is a hop called Tetnang which helps to delay the effect in beers and Lagers. It can make beers go ‘skunky’ and i will leave this to your imagination.
Clear is usefull though for clarity checks and PET bottles ace for a simple carbonation check . Buy a bottle of fizzy water , then compare your secondary fermentation to the volumes of dissolved CO2 by squeezing the bottles to see how much deflectin you have .
Personally for an ale I wouldnt want alot of CO2 in there , maybe 1 vol , but for a Lager of Blonde maybe 2 vols.Its very easy to rig a pressure guage up in the screw top of a PET to see exactly whats going on , useful if forcing secondary fermentation.
peterfileFree MemberPosted 9 years agoI’m planning on graduating from kits to AG and already have an FV, so don’t fancy the Massive kit. Do you find your 19 litre pot large enough? And what bag do you use? I was thinking of this one:
Bag
Mostly though, I’m desperate to try that SNPA recipe, and wondered what quantities you used for your 19L pot, did you just scale them all linearly?
I’m also struggling to find Cara-Pils/Dextrine, what did you use? (same for the english carastan tbh)
Any advice would be massively appreciatedSorry, missed this, just back from holiday.
The 19 litre pot i plenty large enough for me to fill my 10l fermenter to the top. In fact, if you did a dunk sparge, you could get about 17 litres into a fermenter!
I use 2 bags, for no reason other than I bought a Young’s mash bag and then realised it has a coarse mesh at the bottom, so also bought a large nylon straining bag with a really tight mesh. I stick the nylon bag inside the young’s one, since the Young’s seems to be really strong and I feel better squeezing it 🙂
As for the SNPA recipe, you can just adjust the grain weight simply, but I use beersmith for hop adjustments, since it seems to apply a bit of jiggery pokery to keep the bitterness and aroma the same as the original recipe. That said, the difference is small so it probably isn’t noticeable.
yourguitarheroFree MemberPosted 9 years agoSo… actually drank a Sierra Nevada for the first time in a couple of years. Think my clone is gonna be spot on!
Today: bottling day… next week – quaffing day!Have kept a second bottle aside for back to back tasting.
Had a bottle of Brewdog’s Jackhammer the other day along with Flying Dog Raging Bitch IPA. Think I might try something like that next.
JamzFree MemberPosted 9 years agoApologies for the random interruption, STW seems like as good a place as any to pose my question!
My knowledge of brewing is (regrettably) rather limited. However, I have an interest in fermentation and I have been wondering why it is that beer is predominantly made with hops as oppose to any other herb/plant. I think I’m right in saying that the role of the hops is to impart a bitterness that balances the sweetness of the malt. If this is the case, why are other bitter plants not more widely used?
davidrussellFree MemberPosted 9 years agoso, having never brewed with my 11 l Massive Brewery style stock pot I got on ebay, i’ve taken the plunge and got a 19l pot to remove the need to sparge 🙂
i have had a seamstress run me up a bag for the 11l pot which was a pretty neat fit, so i think i’ll just buy a bag as in the scheme of things its a lot less hassle. Anyone had any experience with this?
NZColFull MemberPosted 9 years agoDon’t think they are in production yet. A mate of mine, who owns a coffee roasting co, has one of those WilliamsWarn brewing machines. I wanted to hate it but with a bit of cunning you can make an epic beer in it but effectively making your Wort and then transferring it in for the rest of the process. Even the two can option with a bit of nifty dry hopping made something that people wouldn’t recognise as a Craft beer you would buy and drink through your designer moustache. Like all true fiddlers they have now got a bit of upgradeitis and are getting a 250litre brew centre built for them !
Garry_LagerFull MemberPosted 9 years agoJamz – Member
Apologies for the random interruption, STW seems like as good a place as any to pose my question!
My knowledge of brewing is (regrettably) rather limited. However, I have an interest in fermentation and I have been wondering why it is that beer is predominantly made with hops as oppose to any other herb/plant. I think I’m right in saying that the role of the hops is to impart a bitterness that balances the sweetness of the malt. If this is the case, why are other bitter plants not more widely used? Interesting question Jamz – I don’t know the answer. Let’s face it though, if there’s one thing on planet earth that ain’t broke, it’s beer 🙂
One possible reason is that hops impart a flavour and bitterness without tasting ‘herbal’, by and large. A herbal sort of beer, thinking about typical herbs that are used to flavour food, would not be very palatable IMO. It seems that hops are brilliantly compatible with the malt body of ale.
However, beer is older than God, so I am sure it has all been tried at some point in time, maybe with good results.mattrgeeFree MemberPosted 9 years agoI’ve just started a Festival Razorback IPA having had great success with the Suffolk Strong Ale and the Father Hooks bitter. With our house being very cold, even in summer, I’ve set up a water bath with an aquarium heater in the bottom to keep the FV warm. It’s working very well, a constant 22 degress.
peterfileFree MemberPosted 9 years agoAnyone had any experience with this?
David, I have that exact bag. The weave is perfect for BIAB and it’s plenty big enough (it fits my 19l pot well), but it doesn’t have a draw string or anything to attach it to the pot. I’ve been using it inside a mashing bag, but I’m sure you’d be fine with a few bulldog clips.
With our house being very cold, even in summer, I’ve set up a water bath with an aquarium heater in the bottom to keep the FV warm. It’s working very well, a constant 22 degress.
What yeast are you using and what is 22 degrees; the wort or the water bath?
22 is on the warm end of most ale yeasts and the first few days of fermentation throw off some surprising heat, so if you’re reading 22 degrees, the fermenting wort could easily be sitting at 25+.
I tend to keep fermentation in the lower range of the yeast initially, to keep those initial few days under control (where most off flavours seem to pop up), which is generally about 17-18 degrees for me. Then I let it creep up towards the upper range of the yeast as fermentation is completing, which seems to help clear up the beer.
I’ve had my best results fermenting in the lower range of the yeast, especially during the first few days…but as with everything brewing related, i’m sure there are some who swear by aiming for the upper end!
davidrussellFree MemberPosted 9 years agoThanks for the reply as alway PF.
i could be your copycat on this, with the exception that you have brewed loads of beers whilst i’ve brewed none! I have just spent months faffing around with kit. I’m going to have another go at the BYO wort chiller soon, but i’m not sure on the dims of the 19l pot (I copied you again and bought the same 19l pot off ebay :)) I assume it’s only a few mm’s taller+wider than the 11l pot as you said they looked really similar so if i work to that it shouldn’t be an issue. do you happen to know height of the 19l pot? If possible i’d like to have the tails of the wort chiller well clear of the side of the pan to avoid any leakage scenarios contaminating the wort. Thats assuming i ever actually brew a batch instead of constantly buying/making equipment and wasting money 🙂
peterfileFree MemberPosted 9 years agoFrom memory, it was 31cm diameter and 28cm height (excluding the lid).
I actually had to measure it and do a volume calculation because it didn’t seem big enough to hold almost double the amount of water!
I used some Rescue Tape on my wort chiller, which seems to have worked perfectly. The ends of the chiller are inside my pot now, but with the tape forming such a good seal, it’s not a problem.
I can’t believe you still haven’t brewed a batch! 🙂 Think I must be close to 20 now, even after a hiatus. Whenever there’s a spare 4 hours (usually about once every couple of weeks, I get up super early or do it later at night) I just get some strike water heated and go for it.
Just picked up a refractometer for about £20. I’ve always found the continual monitoring of gravity throughout the process to be a pain (especially during the boil, when you have to cool down each sample). This should let me get pretty accurate readings almost instantly. Another bit of fine tuning!
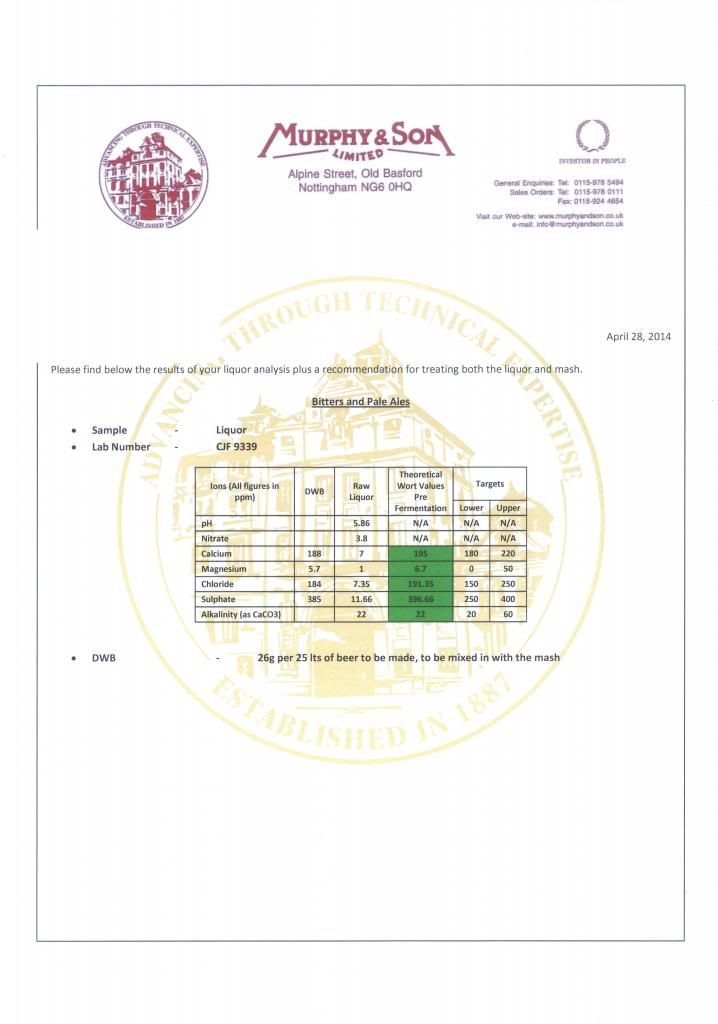
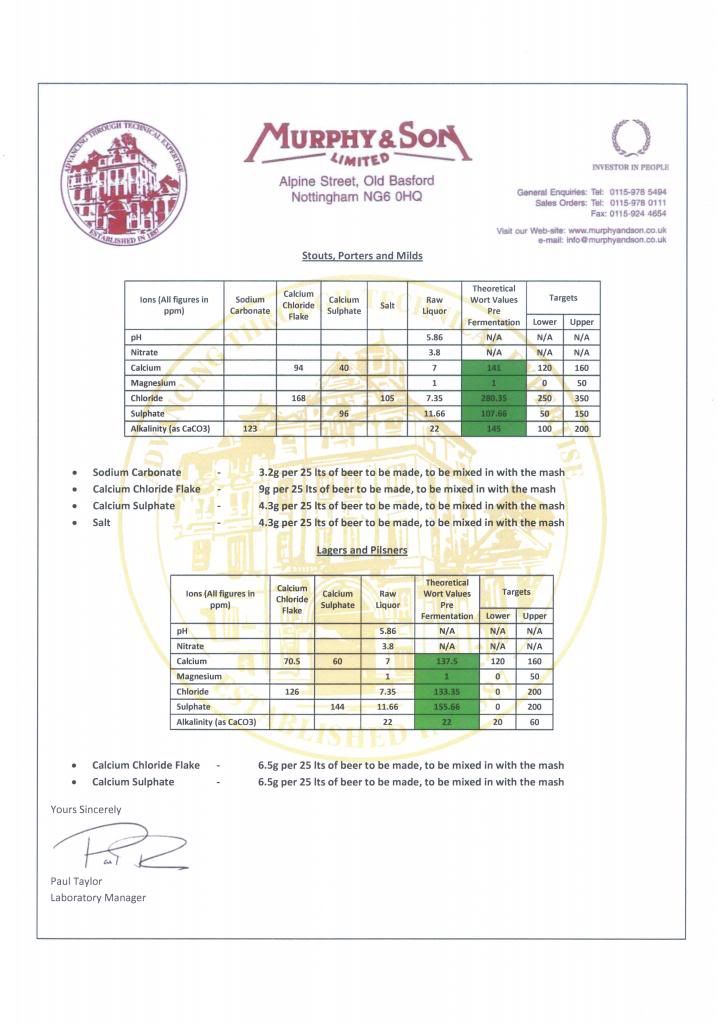
Hey PF how did you get on with your waterprofiling?
ah yes! I forgot to mention those results had come back!
I got a very helpful sheet detailing my water profile, plus the recommended additions for each particular beer style.
I ended up buying the relevant additions from Murphy…which came to a grand total of about £4 🙂 Good for around 20+ batches.
Will be giving it a whirl as soon as they arrive.
ClobberFree MemberPosted 9 years agoThanks for that PF, looking forward to a report to let us know if the additions improve your brew!
davidrussellFree MemberPosted 9 years agoI can’t believe you still haven’t brewed a batch!
yeah thats classic me – research it to death, buy stuff and want everything perfect before starting it, then make an @rse of it anyway. research more, buy more stuff, still make an @rse of it 2nd time 🙂
Once the pot arrives i’ll get the chiller made and just buy the rest of the bits / ingredients and give it a go. found a nice smash recipe on beersmith so i’ll get the bits and get it done.
Half the battle is finding / making time, i just need to go for it!
peterfileFree MemberPosted 9 years agoHonestly, you’re better off just getting started with whatever you have already, since you’ll undoubtedly want to change things once you get a feel for it anyway! I’ve gradually changed/tweaked most things as I’ve gone along, so very very glad that I didn’t spend loads on kit at the outset.
The first few brews are quite time consuming, however once you’ve got the hang of it you’ll find that even though it takes 4.5 hours from start to finish, you’re free to go do something else for a couple of those hours. It’s quite good to do it along side cleaning the house etc. Hugely satisfying when you’re finished up at 11.30am on a Saturday/Sunday morning having just stuck a load of wort into the fermenter and have a clean and tidy house!
john_drummerFree MemberPosted 9 years agoI usually do the supermarket run while my mash is on.
and you don’t need a chiller. in countries where water is at a premium, many home brewers use the no-chill method. OK you can’t put the yeast on it straight away but that doesn’t seem to be a huge problem
davidrussellFree MemberPosted 9 years agoHey guys, more good advice as always, especially thanks to PF and J_D
To be fair i have a lot of kit from my kit brewing time, so I don’t actually need a lot more stuff to move to the BIAB method, although I completely take your point about working with what you have. I have come to loathe starting a task if i don’t feel I have the right kit, as I’ve made too many screw ups in the past by trying to improvise – my previous attempt at a wort chiller and a very expensive attempt to drift bearings out of a Chris King hub spring to mind 🙁 I’m not quite an ATGNI type, but not far off. I guess i just don’t want to be lacking something vital on the day that causes a screw up because that really winds me up if time and effort and money goes to waste. I’m sure there are many on here who sympathise 🙂
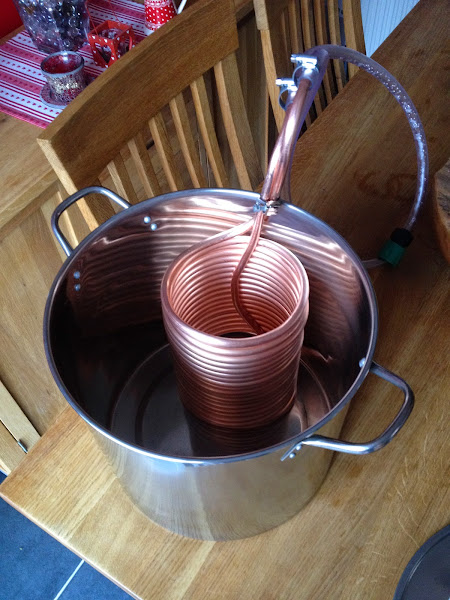
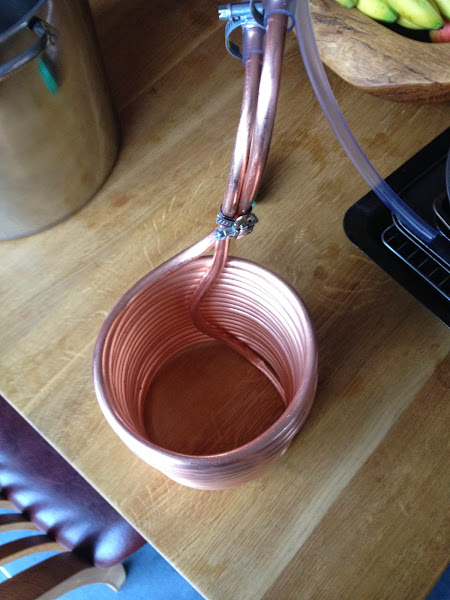
I’ve got my 19l pot now and i managed to put together a wort chiller today (I had already bought the copper and fittings for it) so the only things i need now are a mashing bag and some ingredients! The brewuk guys sell both so I’m going to put an order in this week and break my duck!In terms of the wort chiller I’d say a DIY effort is fine if a: you are an accomplished metalworker, as copper is a bit temperamental to work, or b: you aren’t looking for a perfect example (it’s really hard to get copper looking like a factory finish)
My chiller is functional and looks ok, but I almost crimped the pipe twice because of the way it bent. I was using a pipe bender but a small lapse in concentration and its easy to crimp the pipe, then there is a few sweaty moment as you try to recover it. I’m reasonably happy with it though and it fits the pot quite well. A few pics below for you to laugh at 🙂john_drummerFree MemberPosted 9 years agoThat looks great 🙂 just remember to test it for leaks before you actually need it


The topic ‘Brewers of STW’ is closed to new replies.