- This topic has 713 replies, 3 voices, and was last updated 6 years ago by yourguitarhero.
-
Brewers of STW
-
Garry_LagerFull MemberPosted 10 years ago
donks – Member
can anyone post a link to that micro kettle kit that was posted up on here just before christmas? it was 99 quid or something like….otherwise whats the basic kit required to progress from two can kits as im doing now to all grain…I obviously have a fermentation bin and pressurisation barrel and hydrometer ect. That video John posted upthread is a guy brewing-in-a-bag. You basically just need a vessel big enough to boil enough wort for your needs, and a bag to hold the grain. A pillow case shape basically – stitch together a big sheet of viole from a fabric shop, cost a couple of quid.
A typical 25L fermentation is going to need ca. 34L of water to start with, so that’s a big old pot sitting on the stove. If you’ve got one of these already, plus a decent hob, then great. It’s easier to use a dedicated boiler, though, with an electric element – like a giant tea urn. This will run you best part of £100.CaptainFlashheartFree MemberPosted 10 years ago
It’s quite hard to keep the temperature right on an Aga, by the way! 🙂
donksFree MemberPosted 10 years agoCheers Clobber.
Might have to purchase one of these just to ease me into the process. Have read some of the older posts on this system and so far i gather my ceramic hob may be a bit crap, so as an alternative i have a 2 ring camping stove in the garage which may be better plus the steam and smell would be confined to there leaving my kitchen and wife well out of it. Will this be ok..this should be fine?
ClobberFree MemberPosted 10 years agoHmmm… can’t vouch for the power of your camping stove boiling 10litres… try it first, it might be fine…
I have a gas wok hob on my cooker and it powers it beautifully… And I love the smell of boiling wort in the kitchen… Missus, kids and dog not so keen…
I think the massive set-up is a great way to start, you will want to upgrade eventually but it answers a lot of questions.
CaptainFlashheartFree MemberPosted 10 years agoI think the massive set-up is a great way to start, you will want to upgrade eventually but it answers a lot of questions.
Agreed in full.
One thing I would suggest is to buy a second/third FV bucket. That way, you can spread out the fermentation to bottling times nicely, and build up a decent stock of stuff conditioning in the bottle, as well as having a failover if a brew goes wrong!
zilog6128Full MemberPosted 10 years agoFinally got round to doing my first brew with the Massive kit on Saturday. IMO it’s great value as it includes almost everything you need, even a (very well made) immersion chiller. The only other thing you need to buy is steriliser, but there are loads of places to get that so it isn’t a problem.
It went well (I think!), got the first bubbles of fermentation after about 18-ish hours so hopefully on the way to some nice beer! It really is so straight forward, I think you’ll wonder why you ever bothered with a basic kit (I jumped straight in with this!)
The limited size (going to get 15-16 pints out of it I think) might be an issue for some but it’s perfect for me. I don’t actually drink that much but I’m looking forward to doing lots of experimenting with different recipes (which is where the AG method really shines).
peterfileFree MemberPosted 10 years agoAgreed in full.
+1
I’ve already started swapping things out and planning some gear that I can scale up recipes on.
The best thing about the Massive Brewery kit, if like me you were a complete novice, is that you can’t make any equipment buying errors. You get (almost) everything you need to make beer and it all works well together.
After a few brews you start getting a feeling for what’s happening, why it’s happening and how you can change/tweak that process, along with what might make it easier.
I reckon my 10 litre kit will always be used though, since it’s great being able to play around with a new recipe and getting it right before committing to a big batch. Also, I prefer variety – there’s no point in my knocking out 40+ bottles of an IPA at a time, because I just won’t get through them all at their best, especially since I’m likely to have other beers knocking around.
I’ve currently got two IPAs, two double IPAs, RIS, Black IPA, oatmeal stout and a porter on the go! You couldn’t have that much variety when you’re producing large batches.
Based on a quick count, I think i’ve brewed about 20 batches on the kit now. If I was brewing large batches I would only have about a fifth of the brewing experience I have already.
going to get 15-16 pints out of it I think
I get between 12 and 14 bottles on average. I tend to fill the kettle as full as it will go without guaranteed boil over, but rarely get more than 12-14 bottles. About 8.5 litres normally ends up in the fermenter, then I lose about 1-2 litres to trub, dry hopping and shrinkage.
zilog6128Full MemberPosted 10 years agoI get between 12 and 14 bottles on average. I tend to fill the kettle as full as it will go without guaranteed boil over, but rarely get more than 12-14 bottles. About 8.5 litres normally ends up in the fermenter, then I lose about 1-2 litres to trub, dry hopping and shrinkage.
right, didn’t consider the trub! Got 8.8L (I think) in the FV. Didn’t consider dry hopping, although looking at the brewing forums online almost everyone seems to do it so will probably have a go next time!
Will definitely get another couple of FVs, can see easily see myself having 2-3 on the go at a time!
peterfileFree MemberPosted 10 years agoI picked up a few Youngs 10l fermenting buckets from my LHBS for about £5 each. I always keep the Massive Brewery fermenting bucket empty and use that is a bottling bucket, so I just sipon the beer into that once it’s ready to be bottled.
I bought a bottling wand which goes over the little tap, which has made bottling MUCH easier. Little Bottler. I also add my sugar + water mix to the bottling bucket before I siphon in the beer – this has given me easy and consistent carbonation across at the bottles.
peterfileFree MemberPosted 10 years agodavid, the black IPA is a fairly new style. It’s hoppy like an IPA but carries the lovely malt profile of a dark beer. It’s not my favourite style to be honest, but is good fun to brew and gives a really interesting mix of flavour.
The recipe I used was:
4 lbs 12.4 oz Pale Malt (2 Row) US
7.0 oz Carafa III
5.0 oz Munich Malt – 10L
4.7 oz Caramel/Crystal Malt – 40L
0.4 oz Northern Brewer [8.5%] –
0.2 oz Centennial [10.0%] – Boil 60 min
0.4 oz Centennial [10.0%] – Boil 30 min
0.4 oz Northern Brewer [8.5%] – Boil 5 min
0.8 oz Centennial [10.0%] – Boil 0 min
0 pkgs California Ale (White Labs #WLP001)
0.8 oz Centennial [10.0%] – Dry Hop 7 dayszilog6128Full MemberPosted 10 years agoI picked up a few Youngs 10l fermenting buckets from my LHBS for about £5 each. I always keep the Massive Brewery fermenting bucket empty and use that is a bottling bucket, so I just sipon the beer into that once it’s ready to be bottled.
I bought a bottling wand which goes over the little tap, which has made bottling MUCH easier. Little Bottler. I also add my sugar + water mix to the bottling bucket before I siphon in the beer – this has given me easy and consistent carbonation across at the bottles.Thanks that’s a great idea re: the bucket – especially as mine as a very slight leak (like a few drops per day). What do you use for the siphon?
Was wondering about something like the Little Bottler so will order that up if it’s recommended! Was also going to get some Star San for the bottling as have read a lot of good things about it online, unless anyone has any horror stories?
Have tried a couple of Black IPAs as we’re lucky enough to have a very well stocked boutique-beer stall at the local farmers’ market. Definitely a cool idea but not for me though really!
CaptainFlashheartFree MemberPosted 10 years agoStar San for the bottling as have read a lot of good things about it online, unless anyone has any horror stories?
I’m currently using this stuff;
Pretty cheap, easy to use and to date haven’t had any issues with taste/tang/horridness from it!Then again, for bottling, I’m lucky to have two Belfast sinks in the kitchen, so can have one with the bottles submerged/soaking and then rinse them off in the other, over which I have the tap for bottling.
Haven’t had too much issue with bubbling/air when bottling, but trying to roll it down the inside of the bottle helps. That little bottler thing looks tidy, though!
Garry_LagerFull MemberPosted 10 years agoA no-rinse sanitiser is a good idea IME – makes things easier. Star san works great once you get over the sight of all the foam it leaves behind. Yeast love that stuff though.
Iodophor was another popular one before star-san was introduced.Used VWP loads and it is fine – you do need to be careful that it all dissolves, though. It can be quite resistant to dissolution in cold water so not something to rush.
davidrussellFree MemberPosted 10 years agoI’ve got the youngs 23l autosyphon and the little bottler – fantastic pieces of kit that save lots of time too.
+1 for Starsan – DFTF (Dont Fear The Foam!)
PF – that black IPA does sound intriguing!
peterfileFree MemberPosted 10 years agoWas wondering about something like the Little Bottler so will order that up if it’s recommended! Was also going to get some Star San for the bottling as have read a lot of good things about it online, unless anyone has any horror stories?
I love Star San. I have a spray bottle filled with it and everything that touches the wort post boil gets a blast.
For bottles, I clean with PBW first, then sanitise with Star San. To sanitise I mix up star san in about 2 litres cold water, then fill up 3 bottles to the brim. Leave for a minute or two, then pour the contents into the next three bottles and so on.
There is a little bit of foam left in the bottle, but as they say, don’t fear the foam! Using the Little Bottler wand means that the foam is pushed out of the bottle as you fill it. If you try to fill from the top of the bottle after using star san, you’ll just end up with a huge bubbly mess (speaking from experience here!)
so can have one with the bottles submerged/soaking and then rinse them off in the other
As i understand it flashy, it’s not a good idea to rinse sanitised bottles with tap water, since it’s not sterile (which is why a no rinse sanitiser like star san is preferable).
john_drummerFree MemberPosted 10 years agoI used to use VWP. Last summer I lost 5 or 6 21litre batches to phenols – a germolene like taste – due to insufficient rinsing and/or contamination in my fermenting bins. Threw out 5 FVs and the VWP, not lost a batch since. I now use chlorine-free cleaner. Starsan is supposed to be very good.
I can now smell phenol in beer from the other side of a room. Hateful stuff.
CaptainFlashheartFree MemberPosted 10 years agoWell, to date, I’ve been OK with rinsing with tap water. Will have to have a look at/try Starsan at some point, as removing the rinsing would be a more hassle free process!
davidrussellFree MemberPosted 10 years agoanother bit of kit which is really good is the Fastrack system. Its not perfect for 500ml bottles, but i find them really handy for bottling day.
zilog6128Full MemberPosted 10 years agoI’ve got the youngs 23l autosyphon and the little bottler – fantastic pieces of kit that save lots of time too.
Is 23L the max it will do? Assume it will be fine for my 10L FV, considering the options seem to be either 23L or 4.5L?
another bit of kit which is really good is the Fastrack system. Its not perfect for 500ml bottles, but i find them really handy for bottling day.
Something like that would be pretty handy. Is that better than a bottle tree?
davidrussellFree MemberPosted 10 years agoHi zilog,
the 23l syphon is designated like that because of the length of it i.e. its long enough to get to the bottom of a standard FV. the 4.5l syphone is much smaller and used for demijohns I think. For your needs a 23l syphon would be needed. Som might say they are overkill but its just one less thing to worry about on bottling day.
As for the fastrack i think its really handy, although i haven’t used a bottling tree. As i say you can’t get 20 x 500ml bottles in one rack because of the diameter of them, so you have to stagger them across the holes, but i have got enough bottles (c.40) on 3 racks without too many issues. if you have the space these are really stable and easy to use i.e. rinse / sanitise your bottles, rack them here to dry off, get the rest of your bottling gear ready and then pluck them from here when you are ready to bottle. The bottling tree wins if you are really tight for space, but i dont know how stable they are.
Cheers
singletrackmindFull MemberPosted 10 years ago@ DavidRussel
Would you be interested in a Stainless Steel wound 10mm pipe to cool your wort? They are approx 12ft long once unwound and are from the insides of box chillers tht pubs use to flash cool Lager, Cider and Guiness.
roughly 12″ x 14″ and fit inside a Burco or bucket FV easily.
Black IPA’s .- See if you can source some Carafa S 3 for Wvyerman of Germnay . Its a de- husked roasted barley with approx 1300′ of colour . More importantly it leave a smooth taste as the astringent burnt skin of the kernal has been removed.
Red IPA’s are worth looking at if you can find some CaraRed from Wvyermans as well.
zilog6128Full MemberPosted 10 years agoThanks david, that’s good info. I’m going on holiday soon (leaving a friend in charge of the fermentation!) but will get some bits ordered ready to do the bottling when I get back. Looking forward to doing the next brew(s) already!!
Do any iPad wielding brewers have app recommendations? Reading online the big hitters seem to be iBrewmaster 2, Beer Smith and Beer Alchemy Touch 2. There are plenty of reviews of each but can’t seem to find much comparing them directly, probably as they’re quite expensive as apps go so I guess most people have only bought one.
donksFree MemberPosted 10 years agoHow do the brews stack up cost wise for 10ltrs for say a reasonable pale ale? I’m all up for some real brewing but looking at the kit, ingredients and process I wonder if it works out cheaper than buying 10 or so bottles. I realise that you can tailor the beer to your liking and it gives a good sense of achievement so just cost comparison really. And how vital is the cooling, as running water through the coil for half hour seems quite a waste….even considering all the rain recently. Just wondering really?
peterfileFree MemberPosted 10 years agoIt costs me about 50p to £1.50 per bottle to make (excluding the bottles themselves, that’s just ingredients).
It’s a hard calculation to give accurately for smaller batches, since sometimes you’ll have to buy all the ingredients, which might include a few 500g bags of speciality malts which you’re only using 100g of…but then other times you’ll be making recipes from the stuff you have in your cupboard already.
Cooling is pretty important, although some don’t bother and seem to get away with it. Your wort is vulnerable to infection as it cools, so the quicker the better. It’s not a huge amount of water to be honest, since you don’t need the tap on full. I’d be surprised if I use half a bath worth of water when cooling.
rendoFree MemberPosted 10 years agoI bought the Massive brewery kit as a complete beginner. i’ve now just completed 5 brews, but i’ve been upgrading the kit also.
the 10litres pot is a bit small (but i will continue to use it now that i want to experiment a bit). I ended up buying a bigger pot from themaltmiller. i’ve made a nice mash-tun from a cheap cooler from tesco.
^in terms of cost, its been a bit of an expensive hobby due to the upgrades, but i recently spent £40 on grain & ingredients, and i expect easily to get about 240lites of beer frmm this grain.
I’ve done a few IPA’s, 2 batches of hoegaarden (brilliant cause it only takes a week from brew to drinking) have a nice porter in bottles and i’ve created a hoppy porter in FV atm.
really enjoying it, it is hard work, i probably spend 5hrs on a brew on one day
zilog6128Full MemberPosted 10 years agoAnd how vital is the cooling, as running water through the coil for half hour seems quite a waste….even considering all the rain recently. Just wondering really?
If you look at the Australian brewing forums they seem to have perfected the “no chill” method due to the scarcity of water so it’s perfectly possible. No reason why you couldn’t use collected rainwater either; the water from the chiller doesn’t contact the beer.
I think if all I were interested in was saving money then the Massive kit would probably be too small, you’d get a lot more pints out of a bigger setup for a similar level of effort plus the cost-per-pint would be reduced.
2 batches of hoegaarden (brilliant cause it only takes a week from brew to drinking)
Would be very interested in the recipe for this if you have a link or fancy sharing please!
troutFree MemberPosted 10 years agosome figures from a recent SMASH ( Single malt and single hop ) 23 ltrs
or about 40 pints5 kilos of Marris Otter malt if bought from a homebrew shop would have been £1.60 per KG = £8
100 grams of East kent golding hops £3.00
Nottingham yeast £2.50
total £13.50
or £0.33 per pintBut if you can get a few mates interested and do group buys this is what it cost me
5 kilos MO @ £0.72 per kg = £3.60
100 gms EKG hops @ £1 = £1
Nottingham yeast = £2.5
total = £7.10
or .18p per pintplus energy costs I use Propane for the boil and reckon on about £2 per brew
if on a water meter then get a 12v solar pump and use water from a rainwater butt and recirculate it through the chiller .
though you do get about 25 litrs of hot water which I use for the washing up after so using the heat 2 times.
bob_summersFull MemberPosted 10 years agoAny ideas for lifting a full FV out of a chest freezer? Or should I build a cupboard like Trout’s?
davidrussellFree MemberPosted 10 years agoBob, a full FV is a tricky thing to manouvere at the best of times, getting mine into the brew fridge was a chore and thats not much lifting. Getting it into / out of a chest freezer would be an undertaking. How about 🙂
Just thinking though if the freezer hardware gubbins isn’t running through the front wall you could very neatly cut a portion of the freezer out and put hinges on it to make it walk in? You wouldn’t lose much efficiency in the insulation and it would be a lot easier to get in and out. This is all based on you never actually needing the freezer again though 🙂
Would you be interested in a Stainless Steel wound 10mm pipe to cool your wort? They are approx 12ft long once unwound and are from the insides of box chillers tht pubs use to flash cool Lager, Cider and Guiness.
Singletrackmind is it 12″ diameter on the coil? My pot is 26cm diameter (10″) in old money so it sounds a bit too big i’m afraid. Would have been ideal too probably. i’m going to build something 6-7 inches in diameter and will post up pics of either the completed chiller or the carnage i cause during hulk rage when i screw it up again… Thanks very much for the offer though Singletrackmind.
mugsys_m8Full MemberPosted 10 years agohmmm I’ve been doing some research and starting to understand a little bit. As a complete novice with little idea and no kit would it be best to buy one of the kits using an extract as a starting point?
bob_summersFull MemberPosted 10 years agoI’d thought about chopping a door out of the front (and the engine hoist :-)) but I wonder if it would be easier to build an insulated front-loading cupboard? Problem is, I want to both heat it (using a greenhouse heater or a paint can lightbulb jobbie) and be able to do a clearing chill before racking to bottle/keg. I doubt the cooling gubbins from a freezer could be easily transferred to a cupboard?
The short term solution is a chest freezer and two pair of hands come racking time 😀
bob_summersFull MemberPosted 10 years agomugsy, it’s really no harder to do an all grain ‘brew in the bag’ than to brew from a kit. There’s a bit more cleaning up to do, and a bit more smell in the kitchen, but it’s mainly just waiting the extra 90m or so while you mash the grain.
Check out the vids posted by JohnDrummer and consider doing a smaller volume (10l, or a bit less than half a ‘traditional’ 5 gallon brew).
edit: the videos on page 1 of the thread
jamieaFree MemberPosted 10 years agodavid, the black IPA is a fairly new style. It’s hoppy like an IPA but carries the lovely malt profile of a dark beer. It’s not my favourite style to be honest, but is good fun to brew and gives a really interesting mix of flavour.
As I understand it, a Black IPA is made by cold seeping the dark grains then adding the dark liquor to the boil. This is done so just the colour is extracted and not the roasty-ness of the dark malt. I’ve not brewed one and have only had a pint of commercial one- that was horrible- halve IPA, half porter- not in a good way!
Cheers,
Jamiezilog6128Full MemberPosted 10 years agohmmm I’ve been doing some research and starting to understand a little bit. As a complete novice with little idea and no kit would it be best to buy one of the kits using an extract as a starting point?
Exactly the position I was in. I bought one of the BIAB Massive kits mentioned earlier. It’s really not difficult, I don’t see why anyone would need to do one of the “simplified” kits to be honest.
peterfileFree MemberPosted 10 years agoAs I understand it, a Black IPA is made by cold seeping the dark grains then adding the dark liquor to the boil. This is done so just the colour is extracted and not the roasty-ness of the dark malt.
Where did you read that? As far as I understand the style, the dark malt aroma and flavour is supposed to come across?
Carafa Special III seems to be the key. All of the commercial offerings I’ve tried have had that roastyness.
Although, I suppose it’s hardly a developed/established style, so I doubt there’s much agreement between brewers! Mine turned out pretty well I think.
rendoFree MemberPosted 10 years agohere is the recipe i used for a hoegaargen clone. the thread is unfortunate at 21 pages, but find the time its an interesting read.
http://www.jimsbeerkit.co.uk/forum/viewtopic.php?f=5&t=38303
jamieaFree MemberPosted 10 years agoAs i understand it flashy, it’s not a good idea to rinse sanitised bottles with tap water, since it’s not sterile (which is why a no rinse sanitiser like star san is preferable).
I’ve never knowingly had a problem rinsing with tap water, I’ve chucked one beer away in 50 odd batches- but I believe that was down being a bit lazy with cleaning the FV.
I been using Videne (local chemist ordered it in for me) at a rate of 1.25ml per litre in a spray bottle as a no-rinse sanitiser. I avoid using VWP on stainless so the Videne gets used in the Corny kegs and bottles. Much cheaper than Star Stan- I think I paid £4 and still have half a bottle left after 4 years!
Cheers,
JamiebokononFree MemberPosted 10 years agoAny ideas for lifting a full FV out of a chest freezer? Or should I build a cupboard like Trout’s?
I use a cheap old fridge (£10 off ebay) to regulate temperature – the controls for the fridge and a heat mat are on a fish tank heat controller, they switch on and off to maintain whatever temp I set, very useful.
It’s a +1 on the starsan front here was well – really worth making the switch, once you get over the initial price it’s actually pretty cheap as well because it lasts so long.
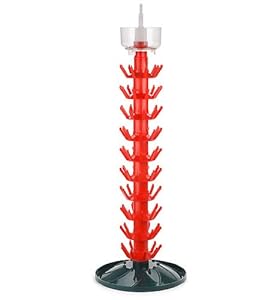
I’d also add get a bottling tree if you are going to bottle in any quantity (10gal brew lengths and above) saves me no end of time, and the foam from the starsan stays in the rinser.
jamieaFree MemberPosted 10 years agoWhere did you read that? As far as I understand the style, the dark malt aroma and flavour is supposed to come across?
I remember reading it on an American HB forum when I first heard about the style, like you say it’s so new there’s probably no consensus as to what is Actually a black IPA / Cascadian Dark. I know from trying that one beer that if I were to brew one I’d try cold stepping 😉
Edit- here it is:Some brewers prefer to cold steep the dark grains to achieve a very dark beer without the tannin contribution of adding the grains to the mash.
Cheers,
Jamie


The topic ‘Brewers of STW’ is closed to new replies.