- This topic has 166 replies, 46 voices, and was last updated 6 years ago by trail_rat.
-
Another camper thread. – not my usual ambitious projects.
-
trail_ratFree MemberPosted 7 years ago
Well glad i followed spookys advice and got ontop of all the brakes sharpish
Stripped them down last Thursday and cleaned all sliders before applying ceramic lube liberally (fyi don’t use copper slip on sliders kids- when it heats up it dries out and goes sticky can cause more issues) and cleaned/lubed/wound back all pistons to ensure they were free and working.
All 4 brembos units working at 100%
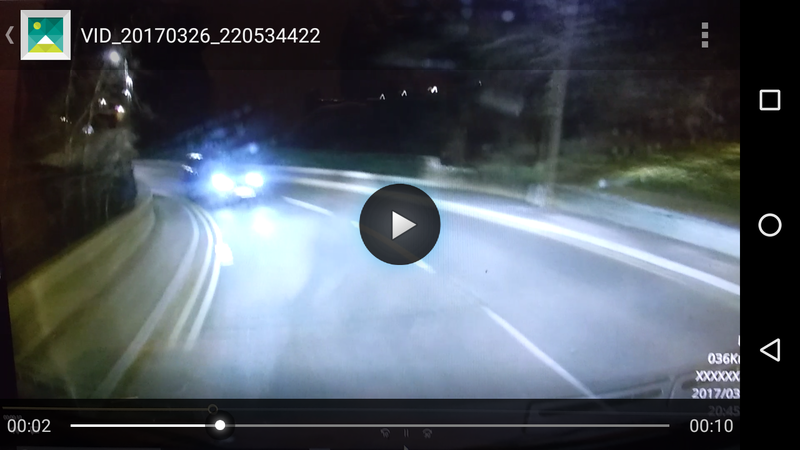
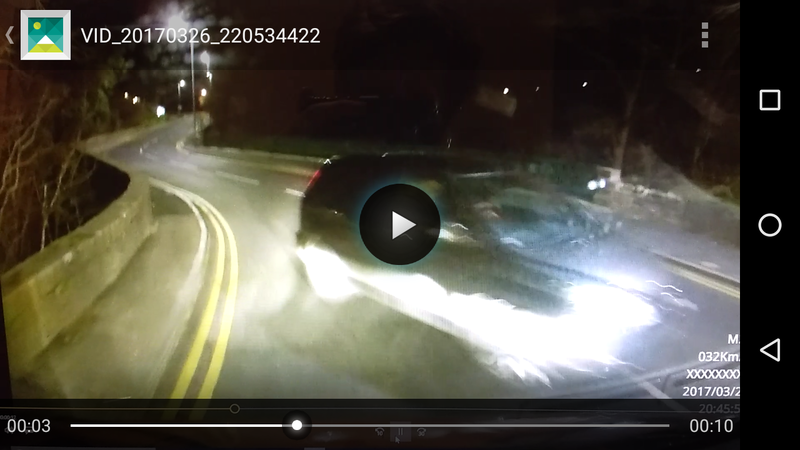
Then driving home from a long weekend i was about 2 mins from my house just coming out the village and was met by this nugget on a blind corner (no doubt driving god’s on here can see through walls though)

Raging. He didn’t even seem to have drifted-ive seen folk cut the corner occasionally but this guy was fully tracking the corner on my side ffs.i was stopped by the second screenshot….He didn’t stop he swearved i thought that was van dead as he didn’t seem to even be trying to stop.
andy8442Free MemberPosted 7 years agoAre you passing the footage on to the plod? It’s the only way nobs like that will learn.
trail_ratFree MemberPosted 7 years agoPhone 101 but due to my own lights reflecting off the nuggits plates i don have a plate.
They said they would put it in the system and bare it in mind if there were other similar complaints against similar cars in the area.
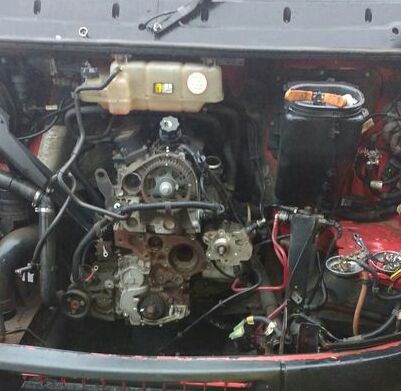
trail_ratFree MemberPosted 7 years agoWell as far as i see the vans never had a belt pump thermostat or fan belt change since new. All stamped up 2005.
So it now has shiny new belt, tensioners , rollers , waterpump , thermostat and fan belt.
Felt like i was taking bits off the van for ever just to find the timing chest !
At its most disassembled !
DickBartonFull MemberPosted 7 years agoIs there a Big End in that photo??? No idea what it is, but it is a cool name for something in an engine.
squirrelkingFree MemberPosted 7 years agoIs there a Big End in that photo?
Bloody hope not.
Video footage is impressive, little disappointed there was no audio, I might have learned some new words…
metalheartFree MemberPosted 7 years agoRaging. He didn’t even seem to have drifted-ive seen folk cut the corner occasionally but this guy was fully tracking the corner on my side ffs.
Guess he thought the roadworks were still in place (assuming that’s the bridge like). I find it’s usually worse on the opposite direction. That looked chuffing scary!
Yeah, you really need to take that line in a 30 zone…
trail_ratFree MemberPosted 7 years agoSpooky i sent it to save on Facebook
No big ends dickbarton.
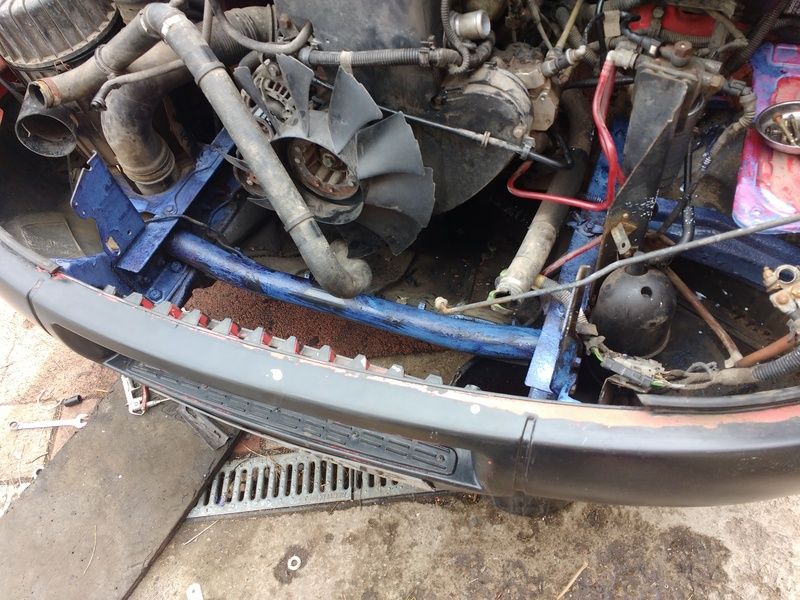
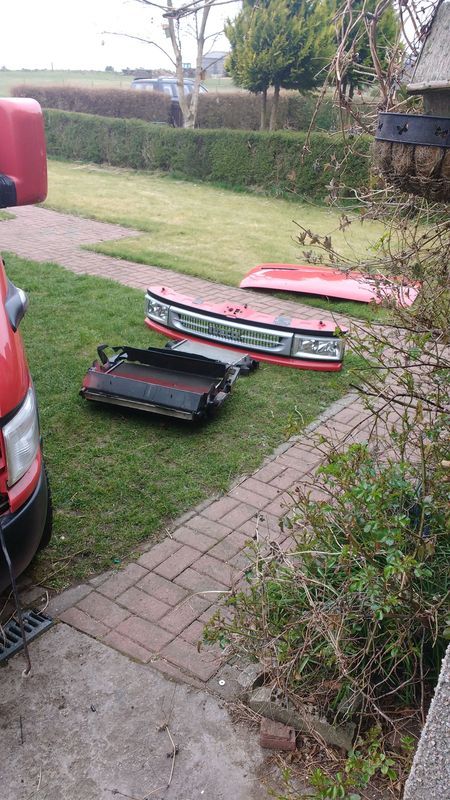
It’s just the clean end of the block . No ancillaries or waterpump or belts etc – nor intercooler , rad , front clip or bonnet…….
trail_ratFree MemberPosted 7 years agoah ha .
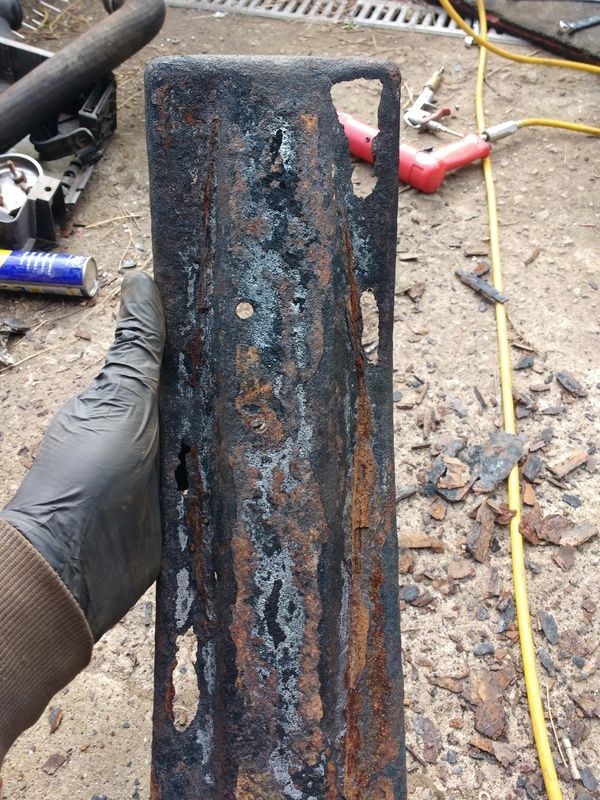
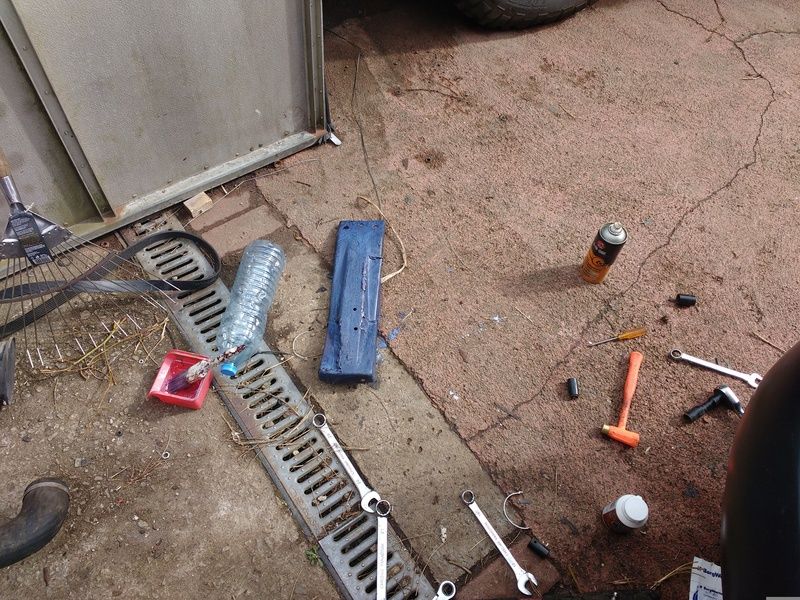
Found the rusty bits.
The offside bumper support bracket when lightly tapped with my rubber mallet appeared to be mostly made of rust and fresh air….. photos later.
yay . Break out the plasma cutter and welder – brackets now rebuilt and solid again. if it shall rust again i well make some new ones out of box binky style.
because of this and some repairs to the rad brackets + waiting on paint to dry still not restarrted the van after timing belt 🙁
trail_ratFree MemberPosted 7 years agoIt’s not a trail rat project unless i get to wield a welder in a haphazard manor.
Loving the plasma cutter(just a cheeky) . Makes life so much nicer than trying to hack rot out with the grinder. Just run the plasma up the edge of a ruler- really nice straight edge to run a burr over and perfect to weld to.
All because someone didnt bother to replace the arch liner….
Post plasma – 3d cad patch design weld and kurusted. Was actually a complex multi piece patch due to the contours and limited shaping facilities at mine. – having checked out the prices of replacements on line I’ll be making some box section units to replace these if they ever need doing again.
Also wire wheeled and kurusted the chassis legs – not because they were bad but because old flakey paints worse than a rusty surface as it traps water and dirt against it causing localised heavy corrosion.
So it got wire wheeled , kurusted then undersealed.
I also did the edges of the battery tray and the cab mount sections – although these got wire wheeled – kurusted – primered and are ready for some fresh red when i get back
One of the new neighbours who wasn’t here for landy gate seemed to be having a minor coronary at this stage and was down asking me about what i was up to……
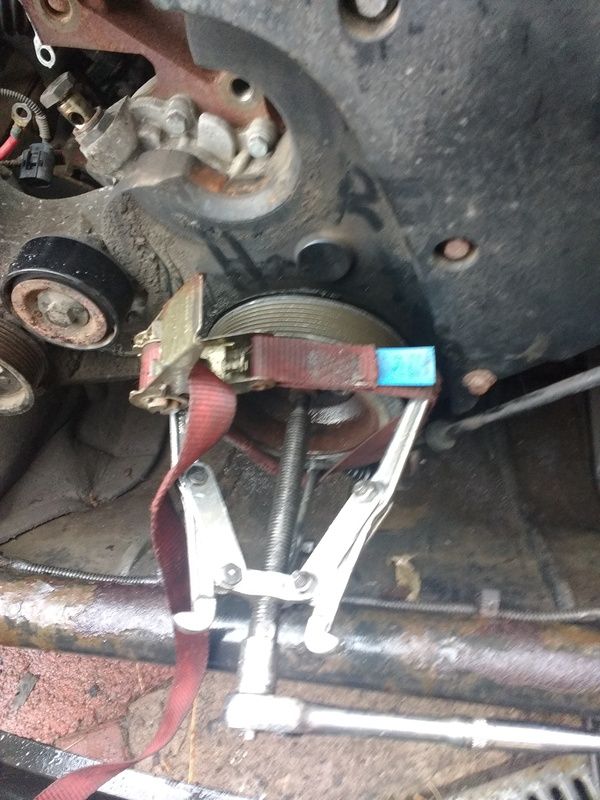
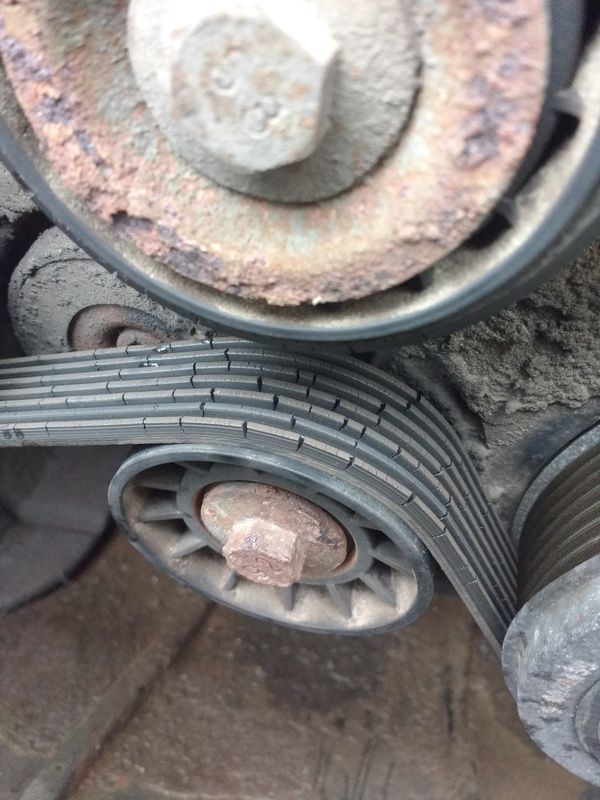
When yer crank pulleys stuck and you have not got a ribbed pulley pullers – ooh err matron.
Check the nick of that aux belt.
spooky_b329Full MemberPosted 7 years agoFinally got my wiring sorted out as per discussion on previous page. It got little more involved…
1) When I pressed the over-ride switch (far right) to turn on the radio without the key in, the power feeding back down the switched positive resulted in the dash becoming live and the fuel pump priming 😯 So had to add a diode which is essentially a ‘one way valve’ for electricity.
2) Realised I would lose the auto-dimming screen when the lights are on, (quite useful with a large screen as it also switches to a dark theme) this didn’t need another relay, just a positive feed to another switch (2nd from right, not yet labelled) which then supplies 12v to the illumination wire.
3) Had to add a second relay to keep the 12v ‘reverse gear’ signal separate from the leisure system (radio flips to a rear camera in reverse)
There are a few other bits in there, a 3rd relay for a rear flood lamp, permanent supply for a dashcam, and supply for a wireless camera transceiver that takes a video feed from our horse trailer.
anagallis_arvensisFull MemberPosted 7 years agoTrailrat could we have less pics of rusty bits of van and more of your mrs please?
DickBartonFull MemberPosted 7 years agoHow much are people paying for leisure batteries?
Depends where they are bought from – Ann Summers sells them at a premium (but they tend to arrive with an interesting holder’ for them to live in).
trail_ratFree MemberPosted 7 years agoWell the tone lowered quickly in here ……
Anyway vans been parked up for 3 weeks I’m at work. To be continued when i get back.
I figured another solution to my radio issue spooky….I have an FM/dab stereo that lived in the garage that runs off 5v 2.1a so i just made a usb cable for that and it runs off a usb port i fitted in the back. Seemed a simpler solution.
I will be following suit with the rear flood lights when i get home….Found out when i arrived home late on a Sunday night the reversing cam is useless in the dark.
trail_ratFree MemberPosted 7 years agowell in preparations for me getting home ive bitten the(rather expensive)bullet of sorting out its hotrod like stance and lack of a suitable spare rear wheel for the (it has odd axles)
So i could have cheaped out and just bought a single 6 bolt wheel and thrown it in the back to give me 2 spare wheels
How ever the different sized wheels bothers me ,it just looks shit as well as all the weight being forward so its crashy as **** at pot holes despite the cab mounts looking good and most of all it really needs new front tires shortly as they are nearing end of life.
SO 3 wheels with good tires were procured off ebay along with 2 steering knuckles with disks and hubs to allow me to run 16″ wheels all round. I may need new calipers also but ill cross that bridge when i get there as they are easy to get At the very least ill have a spare wheel to chuck in the back , I cant say ive not been nervous about the last few trips with only 2 cans of tire weld to sort out a rear puncture should it occur….
So far im resisting the urge to fit 20″ bling bling alloys and a bonnet bra…..
trail_ratFree MemberPosted 6 years ago
these arrived this morning , went for rigid panels as my roof isnt flat and i dont want to bond them direct to roof.
2 x 100watt – to be wired in series , the controller hasnt arrived yet , went with a MPPT unit which will step down from 24v to 12v
not got the mounts yet either just went with regular Z mounts which ill rivinut through the roof to secure – i have an HD rivinut tool so im bloody well gonna use it for something – it hasnt been used since the land rover build.
i also took a road trip yesterday to dunfermilne and collected this

its a rather old fiamma F45 , ive half cleaned it and half left it dirty for now i was just seeing what it looked like under the scum that had built up. The guy i bought it off was breaking his old camper after the engine dropped a valve so picked this up for 80 quid and a mint condition seitz window for 150 which ill mount in the drivers side opposite the sliding door window.
For the fiamma ill need to get creative as its a f45 its meant to be mounted on the side – and although fiamma make roof mount brackets for it they are A very expensive and B desigend to fit on a flat roof …. i dont have a flat roof 🙁

those are the brackets that came with – again rivinuts are going to be order of the day and im thinking i could knock up a couple of angled washers like those in an avid CPS mount to get the plate vertical against the side of the van – then tie that back to another couple of riv nuts using the upper bolts + a bracket coming off at 45 degrees with a 90 degree twist in so it would bolt flat to roof.I also have the fridge vents needed to put the fridge onto gas – the lower ones not an issue , the upper one with the exhaust for the exhaust to exit in the vent the vent will have to span over a panel joint – im not overly keen to do this but i cant see any other option – if i lift it above the panel join ill be across the door runner – if i lift it above the door runner im in an area where i have no depth behind the panel to run the exhaust. – answers on a postcard please.
trail_ratFree MemberPosted 6 years ago
The 80called. They want their awning back. Tomorrow’s job – find some 2.5mm ally sheet to make the braces for the brackets

The middles my reversing camera and left and right are my reversing floodlights. They are 18watt led units off eBay .got a 50 odd watt version of the same on the lndy it’s been there for ages and still works as well as being insanely bright for its size.
trail_ratFree MemberPosted 6 years agoToday we mostly installed solar panels
2 * 100 watt wired in series with an mppt controller
Keeps the fridge happy !
Had to get creative and bend the glandbox to fit roof profile

Was very grey today and still we produced power looking forward to seeing it in sunny times
Once that was buttoned up I moved onto the awning .
This awning was bought from a vehicle which has flat sides so was just bolted on side.
I can’t do this
Neither can I use any of the predetermined brackets from fiammas range as my roofs not flat. I can use their multi fit but at 32 quid each and i need 3 it got pricy fast.
I came up with this.
Going to add some spine gussets on the bends as under load I can see the bends wanting to straighten out.. will do that after I get all the bends final though . Take it all off and tidy up corners on the grinder prime it and paint it
twangFree MemberPosted 6 years agoLove the wavy gland box 🙂
Do the panel brackets need bolting from inside? I probably should be fitting solar but I’ve got a finished ceiling..trail_ratFree MemberPosted 6 years agoWell I planned to riv nut them but brackets came with self drilling screws with sealing washers.
I applied brackets to a bed of sikaflex 512 and screwed through that.
Was good enough for my skylights so I’m sure it’ll be grand for the solar panels. Wasn’t wanting to stick them down direct im a believer in airflow and cooling effecting effiency and also they are finite they don’t last for ever and I don’t fancy trying to remove a panel without removing the paint….I know technically they should last life of vehicle but bathtub model applies….even more so with stuff from China.
Run cables now if you can ….that was my biggest bug bear. Ended up using a length of copper brake pipe as my cable fishing kit wasn’t rigid enough to get through the holes/gromets in the side bars o the van.
trail_ratFree MemberPosted 6 years agoNae hanging about
My 80 quid fiamma is now mounted . The shock absorber system needed an adjustment and the front panel could do with a wee tweek but at a 720 quid saving I’ll live with it.
Was a bloody tough lift getting that up there on my own. 4m long and 30kg it was more than a little unwieldy but it’s up there now.
Fiamma wanted the guts of 100 quid for brackets to fit the awning to my van so I nipped down to Bnq and bought some 2mm galv perforated strap and did some CAD templating before bending some up in metal.
Used 5 riv nuts on each of the three brackets. I’m sure the awning will be in bits on the floor before the brackets shift.
That’s it about half out all working well 🙂
trail_ratFree MemberPosted 6 years agoWell it’s been an eventful week.
After 1200 miles since myfull service through diligence of checking the oil regularly I noticed the oil level was climbing
Investigations started.
Things that can cause oil level to rise are piston rings being banjoed-/cylinder bores being banjoed- , injector being banjoed- ,oil cooler being banjoed- or the fuel pump diaphragm.
So starting with what I know.
There was a strong diesel smell on start up
So I opted to check the injectors with my leak off test kit. On doing that it revealed injector 3 had excessive leak off.
So I stripped down the injectors 1 at a time and stuck the nozzles and ball valves into the ultrasonic cleaner.
Then I rebuilt them .
Injector 3 still off the scale. Stripped it back down and found out that under the microscope the ball seat was fine by the ball had erroded badly.
In with a new injector at a cost of 140 quid plus vat and the van starts nicely plus doesn’t smell of diesel on start up + the leak off test is a uniform 25ml after 3mins of idle which is within Bosch specification.
Will need to drop the oil and replace it as running a crankshaft in a diesel oil I mix is a terrible idea . the monitor the level going forward before looking at other potential issues.
vdubber67Free MemberPosted 6 years agoJust found this thread. Loving your work and your level of tenacity / ingenuity! 🙂
trail_ratFree MemberPosted 6 years agoHa cheers vdubber.
It’s more a commitment to the fact I really want a camper to explore the country and I really like learning about mechanical things.
As a teen I had a great boss who taught me that being a mechanic is not about being able to fix xyz . It’s about identifying what it’s supposed to do, why it’s not doing that , what needs to do to make it do that.
It’s an education thats stood me better than my degree even I believe.
squirrelkingFree MemberPosted 6 years agoPirsig. Thought you would have got that one straight away.
trail_ratFree MemberPosted 6 years agoAh killer had you said robert I’d have got it.
Love that book. Infact it’s going in my bag for a re-re-re read on tomorrow night’s flight. Need inspiration and confidence to apply for new jobs/new careers…..got good hands and brain but shit paperwork and shit at selling my self .
trail_ratFree MemberPosted 6 years agoand we have a fresh ticket for another year 😀 it failed initially on handbrake being siezed – which i knew but i wanted to see if it had any big surprises before i spent 300 quid on new calipers.
It didnt – so 2 new genuine calipers for the rear , 2 refurbed calipers , 4 new disks , 8 new pads , 2 used steering knuckles and 3 used wheels. We have new calipers all round , 4 matching size wheels all with 6bolt hubs so i now only need to carry a single spare wheel.
Sailed through its retest and jeeze does it not drive better – no longer crashes into bumps due to the angle and all the weight being on the front end.
my tame mechanic said get under it with a wirebrush and some paint and thats got a good number of years left in it yet before it may need welding but id do well to look at new springs to improve the ride as current ones are quite saggy so thatll be after our october trip ill get it cleaned up and painted – probably with bed liner(upol raptor) for the body and the plastics on the body work and use their Wheel arch refinement on the arches, under the plastic and the chassis. and then next year sometime ill look at new springs as looking at about 400 quid for them.
Its had a good few trips out after we got back from canada and its running well , engines back on full gas and its returning better MPG with the new/cleaned injectors. I do how ever need to put an extension on the tail piece of the exhaust – due to the gas drop vents i when i drive with the window open the exhaust vents into the area under the van and the vacuum in the van draws the fumes into the van through the drop vents – so ill extend the exhaust to outside the body line of the van – hard to believe the so called professional builder let this happen in the first place ! – but i guess paying attention to all the little details costs money.
Ive cut in the vents for the fridge so it now runs on gas and has exhaust and cooling vents in all the right places – another thing that im dissapointed a professional never sorted
at the request of mrs Tr ive bought a hozelock spray shower as she was a bit worried we would start to smell on long trips – apparently sponge baths are not allowable in this day and age as personal hygiene. I also picked up a cheap(reduced) table and chairs from halfords for under the awning
We are off on the road again for the october holidays when i get home for its first extended trip weather permitting to where ever the sun is 😀
trail_ratFree MemberPosted 6 years agoYe ah haven’t got any photos atm and still need to find a decent hosts. Any thoughts on a host
sobrietyFree MemberPosted 6 years agoI’ve started using postimage.org
Looks pretty good so far, and is as easy to use as photobucket was
mark90Free MemberPosted 6 years agoit failed initially on handbrake being siezed
I don’t want to say I told you so, but….. page 1 😉
my tame mechanic said get under it with a wirebrush and some paint
That seems familiar too.
Despite all the troubles I do miss my Iveco, well the travels and adventures it took us on 🙂


The topic ‘Another camper thread. – not my usual ambitious projects.’ is closed to new replies.